Transforming a cluttered garage into an efficient, functional storage hub requires a clear understanding of spatial layout, weight distribution, and modular organization systems. Garages often become neglected drop zones for household overflow, sporting goods, lawn equipment, and seasonal decorations, which quickly eliminates usable floor space for vehicle parking. Implementing targeted garage organization systems solves this challenge by shifting items off the ground and onto structured vertical wall assemblies and overhead ceiling planes. This comprehensive guide outlines ten practical garage storage and organizing concepts designed to maximize floor space, streamline access, and maintain long-term order. Readers will learn the essential mechanics of installing heavy-duty wall tracks, building sliding ceiling tote racks, assembling mobile workbench stations, and creating dedicated tool zones. Applying these structural organizing methods creates a safer workspace, protects household gear from moisture or accidental damage, and saves valuable time during daily routines. By combining modular shelving, transparent sorting bins, and custom tool holders, homeowners can establish an orderly environment tailored to their household needs.
Why This Idea Is Trending or Useful
Garage organization has emerged as a major focus across modern Pinterest inspiration boards because it transforms underutilized utility areas into clean, high-performing home extensions. Contemporary homeowners increasingly prioritize multi-functional spaces that support vehicle parking, home gym workouts, craft activities, and automotive maintenance simultaneously. This systematic storage approach provides immense practical value by turning chaotic piles of tools and boxes into accessible, categorized inventory. Building customized shelving and wall racks serves as an accessible, beginner friendly framework that delivers immediate visual and functional improvements. The minimalist style inherent to modern garage designs emphasizes clean cabinet lines, uniform storage containers, and open floor space that is simple to sweep and maintain. Furthermore, DIY garage shelving projects offer high utility without requiring expensive contractor renovations, making them budget-friendly upgrades for any property. Integrating vertical tracks and ceiling platforms maximizes storage efficiency, providing actionable inspiration for establishing an organized, reliable workshop and utility system for the entire household.
Materials and Preparation
Executing an effective garage organization overhaul requires heavy-duty structural hardware, durable containers, and reliable carpentry tools to ensure safety and stability. Essential materials include standard two-by-four dimensional lumber, three-quarter-inch exterior-grade plywood, metal track slatwall panels, heavy-duty metal shelf brackets, plastic interlocking storage totes, steel lag screws, and masonry wall anchors. Key tools include an electric drill driver, a circular saw or miter saw, a precision laser level, a digital stud finder, a heavy-duty tape measure, and personal protective equipment. Preparation begins with a complete purge of the existing space, emptying the garage to sort items into keep, donate, recycle, and discard piles. Group the items you plan to keep into functional categories such as garden maintenance, automotive care, seasonal holiday decor, and sports equipment. Planning considerations require measuring the perimeter walls, ceiling joist spacing, and overhead door clearance to prevent new installations from blocking overhead garage tracks or vehicle pathways. Marking stud locations accurately with chalk lines ensures that all load-bearing brackets anchor securely into solid framing.
Main Ideas Section
Idea 1: Overhead Ceiling Sliding Tote Storage Tracks
Step-by-Step Guide
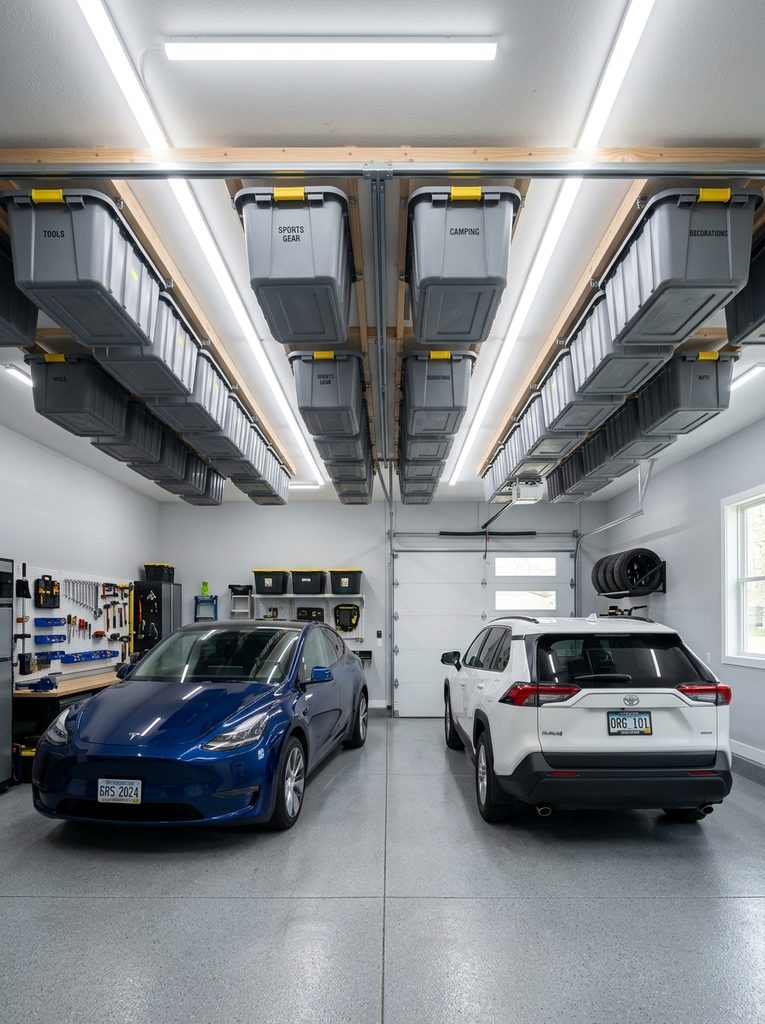
Overhead ceiling sliding tote storage tracks utilize unused vertical space above garage doors and ceiling joists to store lightweight, seasonal items out of the way. This system relies on horizontal wooden or aluminum inverted T-runners mounted directly into structural ceiling joists to create secure hanging channels. Heavy-duty plastic storage totes with reinforced perimeter lips slide directly between the runners, suspended safely above vehicle roofs and walking paths. By moving holiday decorations, camping supplies, and winter sports equipment to the ceiling, the main floor remains completely open for daily parking. This setup prevents boxes from absorbing ground moisture while keeping seasonal inventory organized and visible along ceiling pathways.
To construct this overhead rack system, locate and mark the centerlines of your ceiling joists using a stud finder and chalk line. Cut two-by-four lumber to the length of your storage run, and fasten two-inch plywood strips along the base of each board to form an inverted T-shaped runner flange. Align the first runner perpendicular to the ceiling joists and secure it using four-inch structural lag screws driven directly into the joist centers. Measure the width of your storage tote lid lip, position the second runner parallel to the first with a half-inch clearance gap, and anchor it firmly. Slide your plastic bins into the channels to test for smooth movement without binding. Label the bottom of each container with large waterproof lettering for easy identification from the garage floor.
Idea 2: Wall-Mounted French Cleat Tool Wall System
Execution Process
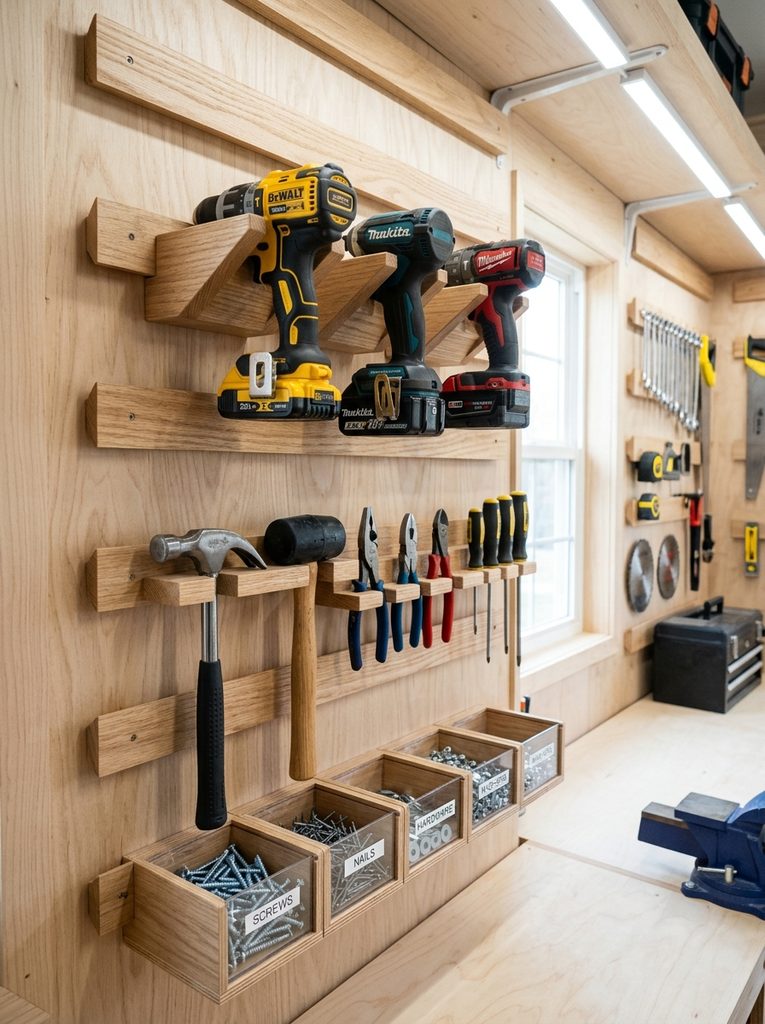
The wall-mounted French cleat tool wall system offers a fully modular, adjustable hanging surface for hand tools, power equipment, and hardware containers. A French cleat consists of horizontal wooden rails cut at a forty-five-degree bevel that interlock securely with matching beveled clips attached to tool holders, bins, and custom shelves. This design eliminates permanent mounting positions, allowing users to rearrange tool holders instantly as their equipment collection expands or workflow changes. The clean horizontal lines of the wood cleats create an attractive, workshop-grade aesthetic across drywall or exposed wall studs. This organization method keeps cutting tools, drills, and clamps off workbenches, preventing clutter and increasing productivity during household repair projects.
Begin by ripping several eight-foot lengths of three-quarter-inch plywood into four-inch-wide strips using a table saw, tilting the blade to a forty-five-degree angle to create the interlocking beveled edge. Mount the wall cleats horizontally across the garage wall with the beveled point facing upward and inward toward the wall surface. Secure each cleat into wall studs using three-inch wood screws, spacing the horizontal rails six to eight inches apart with a level. Next, construct custom tool holders, drill charging stations, and tape dispenser racks, attaching a reverse forty-five-degree cleat to the back of each accessory. Hang the tool holders by sliding their cleats over the wall-mounted rails, testing each station with your tools to confirm balance and weight capacity.
Idea 3: Mobile Heavy-Duty Plywood Workbench with Built-In Tool Shelves
How to Create
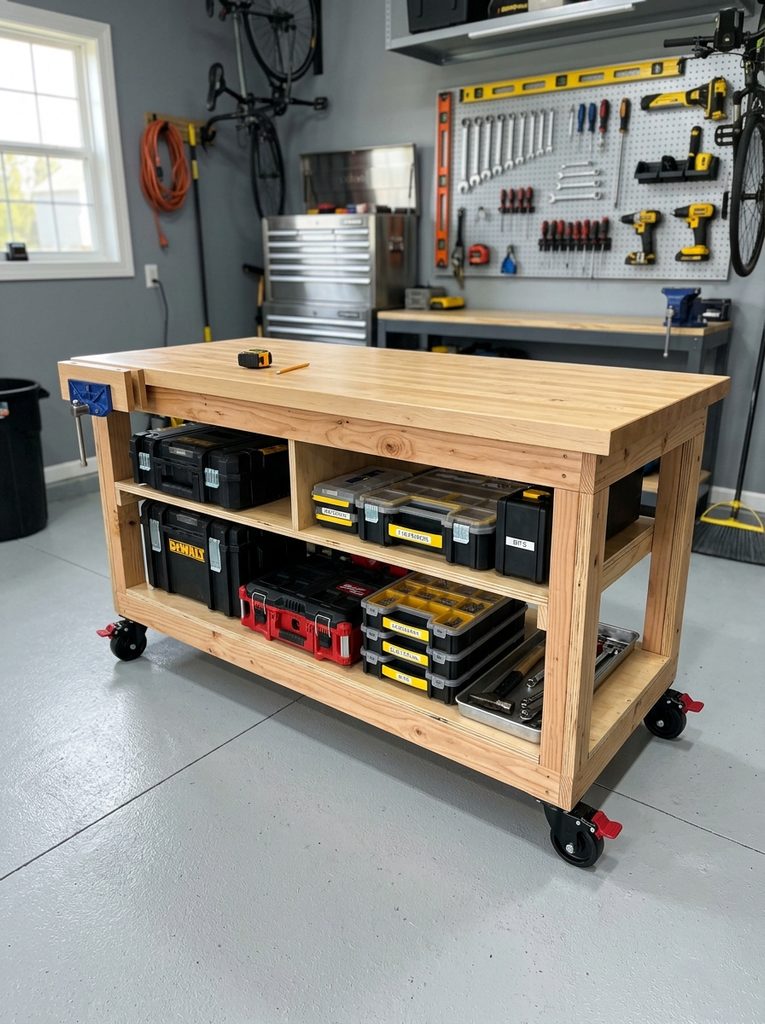
A mobile heavy-duty plywood workbench with integrated lower shelving combines an expansive project work surface with structured storage on smooth-rolling casters. Building the workbench on lockable industrial wheels allows the entire workstation to be rolled into the driveway for messy woodworking or pushed against the wall to make room for vehicles. The lower base features deep, open shelving built to hold heavy tool cases, circular saws, and parts bins, utilizing the structural footprint beneath the worktable efficiently. The solid plywood tabletop provides a flat surface for assembly, clamping, and mechanical repairs, making it an essential centerpiece for an active home garage workshop.
Start by cutting two-by-four dimensional lumber to build two identical rectangular frames measuring six feet in length and two feet in width, securing the joints with pocket hole screws. Connect the top and bottom frames using four vertical corner posts cut to thirty-four inches, creating a sturdy structural box. Fasten three-quarter-inch sanded plywood to the top frame to create the primary work surface, and add a second plywood panel across the lower frame to form the bottom storage deck. Mount four four-inch polyurethane swivel casters with dual locking brakes to the four bottom corners using heavy-duty lag bolts. Sand all edges smooth, seal the plywood surfaces with polyurethane to resist oil stains, and stock the lower shelf with your most frequently used equipment.
Idea 4: Slatwall Panel Grid with Specialty Hanging Baskets and Hooks
Setup Method
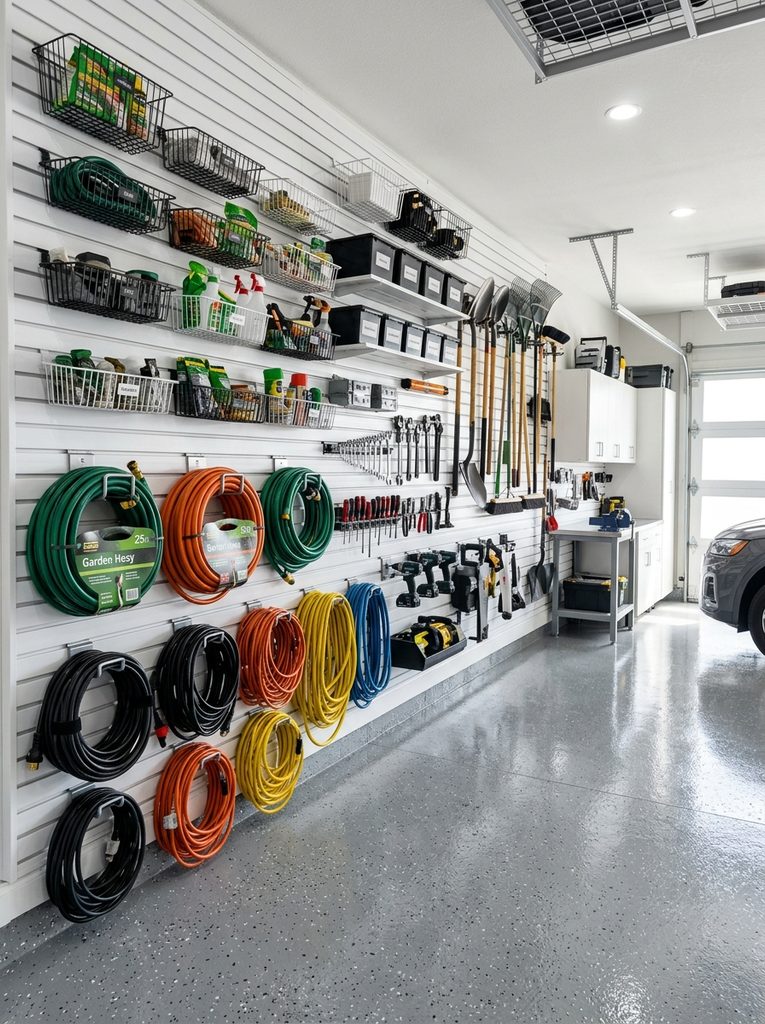
The slatwall panel grid system provides a sleek, commercial-grade wall storage surface that covers large expanses of drywall or concrete block. Heavy-duty PVC or cellular aluminum slatwall panels feature continuous horizontal grooves that accept a wide variety of snap-in metal hooks, wire baskets, and specialty tool holders. Unlike standard pegboard, durable slatwall panels can support substantial weight, making them suitable for hanging heavy ladders, extension cords, garden hoses, and automotive detailing chemicals. The solid interlocking panels also protect garage walls from dirt, scuffs, and chemical splashes while presenting a modern, uniform finish that brightens the entire workspace.
To install this system, mark the wall studs across the intended installation area using a stud finder and pencil. Mount a horizontal starter trim strip along the bottom of the wall, using a four-foot level to ensure proper alignment. Slide the first slatwall panel into the bottom channel, driving corrosion-resistant drywall screws through the panel’s installation lip directly into every wall stud. Interlock subsequent panels vertically, concealing the screw heads within the panel joints until the entire wall section is covered. Install finished edge trim pieces along the outer borders for a clean look. Snap specialty J-hooks, wide utility brackets, and wire baskets into the horizontal channels, arranging your yard tools, hoses, and cords by frequency of use.
Idea 5: Vertical Long-Handled Garden Tool Carousel Rack
Step-by-Step Guide
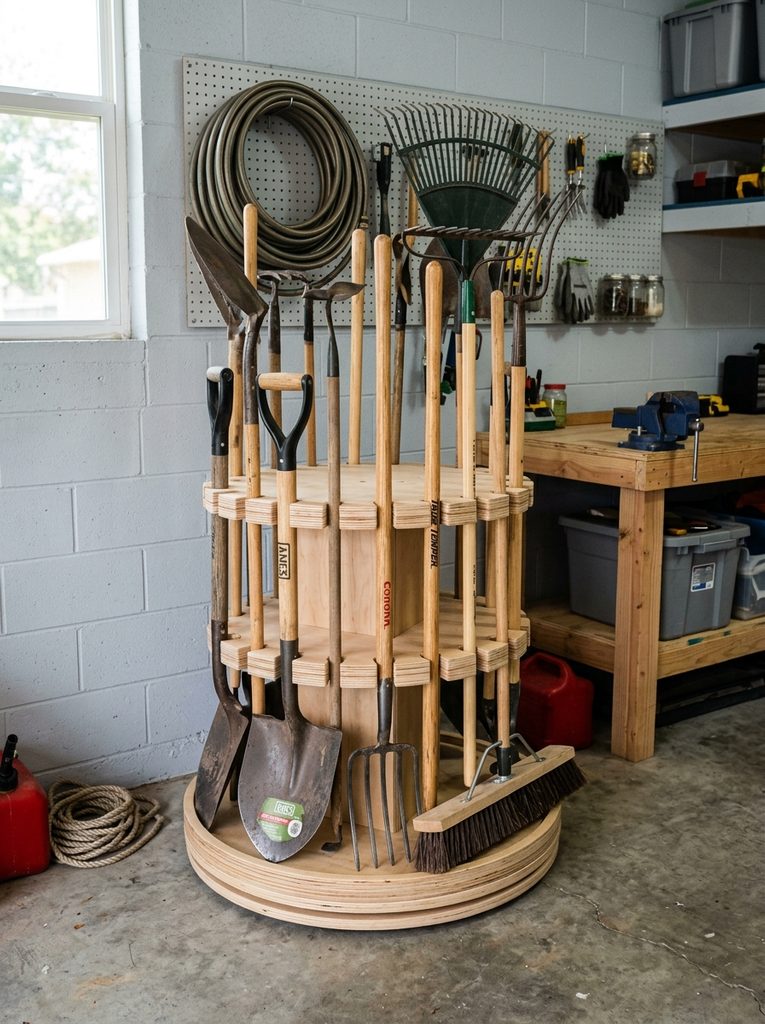
The vertical long-handled garden tool carousel rack organizes rakes, shovels, brooms, and hoes into a compact footprint without tangled handles. Storing long tools loosely in wall corners often leads to tip-overs that scratch vehicles or block pathways. This compact storage rack uses staggered, slotted plywood rings to hold tool heads securely while keeping handles oriented vertically in a small corner zone. By arranging tools in an accessible, upright orientation, you can identify and remove a specific rake or spade quickly without disturbing adjacent equipment. This space-saving setup keeps heavy steel blades safely off the floor and prevents moisture buildup around wooden handles.
Begin by cutting two identical twenty-four-inch diameter circles from three-quarter-inch plywood using a jigsaw. On the top circular plate, use a two-inch hole saw to drill eight to ten evenly spaced holes around the outer perimeter, cutting a narrow slot from each hole to the edge to create drop-in tool slots. Connect the top plate to the solid bottom base plate using a central two-by-four vertical post cut to thirty-six inches, reinforced with metal corner brackets. Mount a twelve-inch heavy-duty lazy Susan bearing beneath the bottom base plate, attaching it to a square plywood base anchored to the floor or a low corner platform. Place your shovels, brooms, and rakes into the perimeter slots, rotating the carousel to access any tool effortlessly.
Idea 6: Wall-Recessed Stud Bay Shelving for Small Parts and Hardware
How to Make
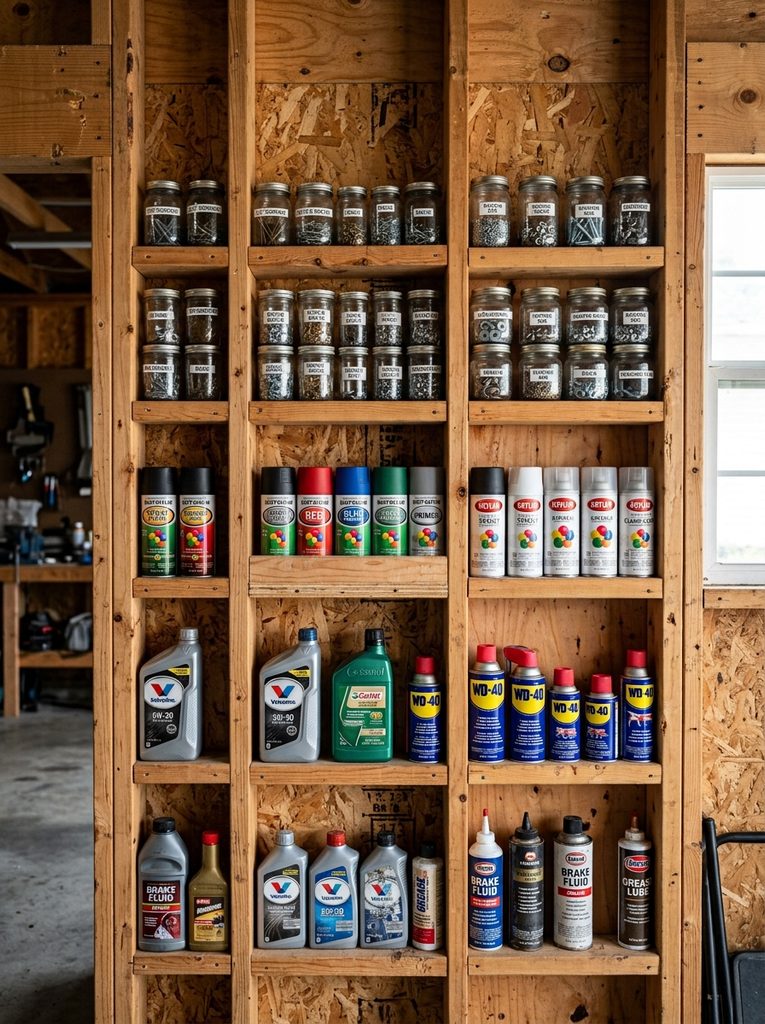
Wall-recessed stud bay shelving takes advantage of the empty space inside unfinished, exposed stud walls to store small items without taking up floor space. The hollow cavities between standard two-by-four wall framing offer three and a half inches of functional depth, which is ideal for organizing spray paint cans, oil bottles, hardware jars, and fastener boxes. Installing horizontal shelf dividers directly between the vertical studs turns unused wall framing into shallow, organized display shelving. This approach keeps smaller utility supplies visible, preventing them from getting lost behind larger items on deep storage shelves.
To build recessed shelving, locate an open, non-insulated wall section between two structural studs spaced sixteen inches apart. Cut lengths of one-by-four pine lumber to fourteen and a half inches to fit cleanly between the studs. Position the first shelf at your desired height, checking it with a level, and secure it through the sides of the studs using two-inch wood screws driven at an angle or through pocket holes. Space additional shelf boards six to ten inches apart vertically up the entire stud bay. Nail a thin one-inch retaining strip of wood or install a bungee cord across the front of each shelf to prevent paint cans and hardware bottles from tipping off during door operations. Label each shelf zone for fasteners, lubricants, and adhesives.
Idea 7: Fold-Down Wall-Mounted Miter Saw Station
Execution Process
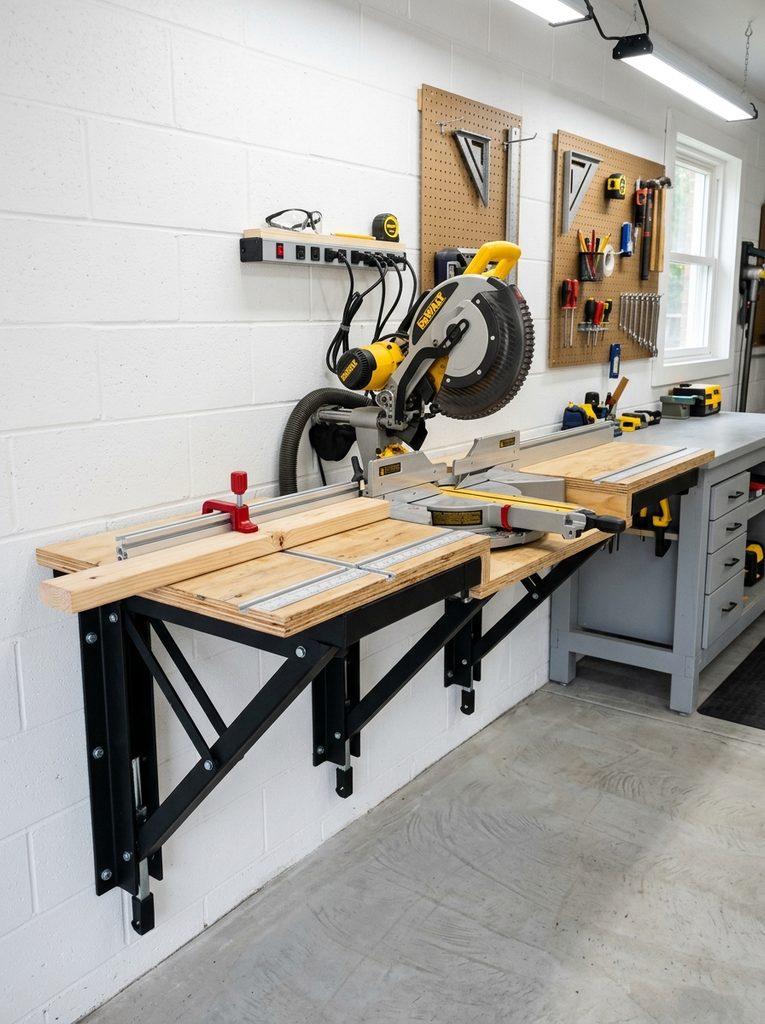
The fold-down wall-mounted miter saw station provides a sturdy, dedicated cutting platform that folds flat against the wall when not in use. Stationary power tool benches often consume valuable floor area in small garages, restricting vehicle parking and foot traffic. This space-saving design uses heavy-duty folding locking shelf brackets to support a solid wood workbench that lowers smoothly against the wall studs. The tabletop incorporates recessed mounting tracks to secure the miter saw safely during use, paired with folding side support wings for long lumber cuts. This setup gives you a stable cutting station that sets up in seconds and stows away easily after your projects.
Begin by locating three adjacent wall studs and marking a level horizontal line at your preferred work height, typically thirty-six inches from the floor. Anchor three heavy-duty, twenty-four-inch folding steel brackets into the centers of the studs using three-inch structural lag bolts. Cut a top work surface from three-quarter-inch birch plywood measuring twenty-six inches deep and sixty inches wide, sanding the edges to prevent splinters. Secure the underside of the plywood tabletop to the horizontal arms of the folding brackets using short wood screws. Mount two sliding T-tracks along the top to lock the saw base down during operation. Test the folding mechanism to ensure the table raises, locks into place firmly, and releases down smoothly without binding against the wall.
Idea 8: Heavy-Duty Lumber and Pipe Storage Cantilever Rack
Setup Method
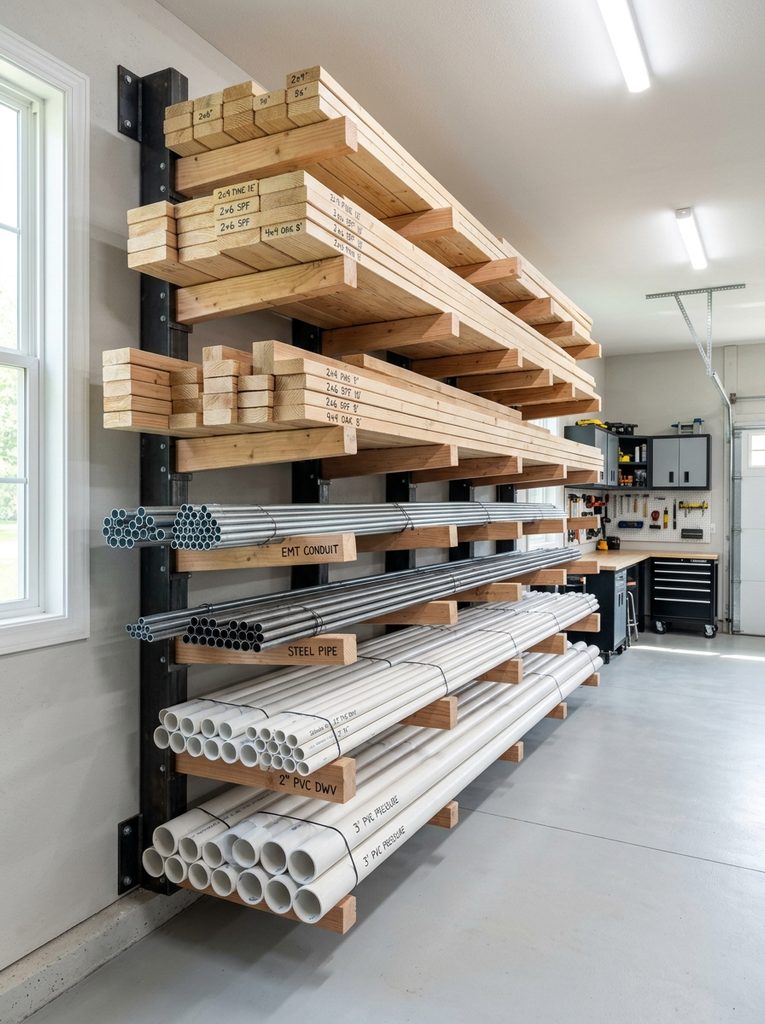
A heavy-duty cantilever rack organizes long dimensional lumber, metal conduit, PVC pipes, and trim boards horizontally along upper wall areas. Storing lumber flat on the floor exposes raw wood to moisture and creates tripping hazards, while leaning boards vertically against walls can cause warping and bowing over time. Cantilever racks feature vertical steel or wood uprights supporting angled support arms that hold heavy materials safely above walking zones. Storing long materials horizontally on multi-tiered arms preserves board straightness and lets you quickly sort lumber by species, thickness, and length.
To construct a wooden cantilever rack, cut three two-by-four uprights to six feet in length and attach thirty-degree angled support arm blocks every twelve inches along each board using wood glue and three-inch screws. Attach twenty-inch-long two-by-four support arms to these angled blocks, angling them upward slightly to prevent round pipes and boards from rolling off the ends. Secure the three vertical uprights into load-bearing wall studs using heavy-duty lag screws, spacing them four feet apart to support long boards evenly without sagging. Sand the arm tips smooth and apply load warning labels to establish clear weight limits for each shelf tier. Sort your lumber stock onto the arms, placing the heaviest hardwood and framing lumber on the lower tiers.
Idea 9: Sports Gear and Ball Storage Cage with Bungee Cord Retainers
How to Create
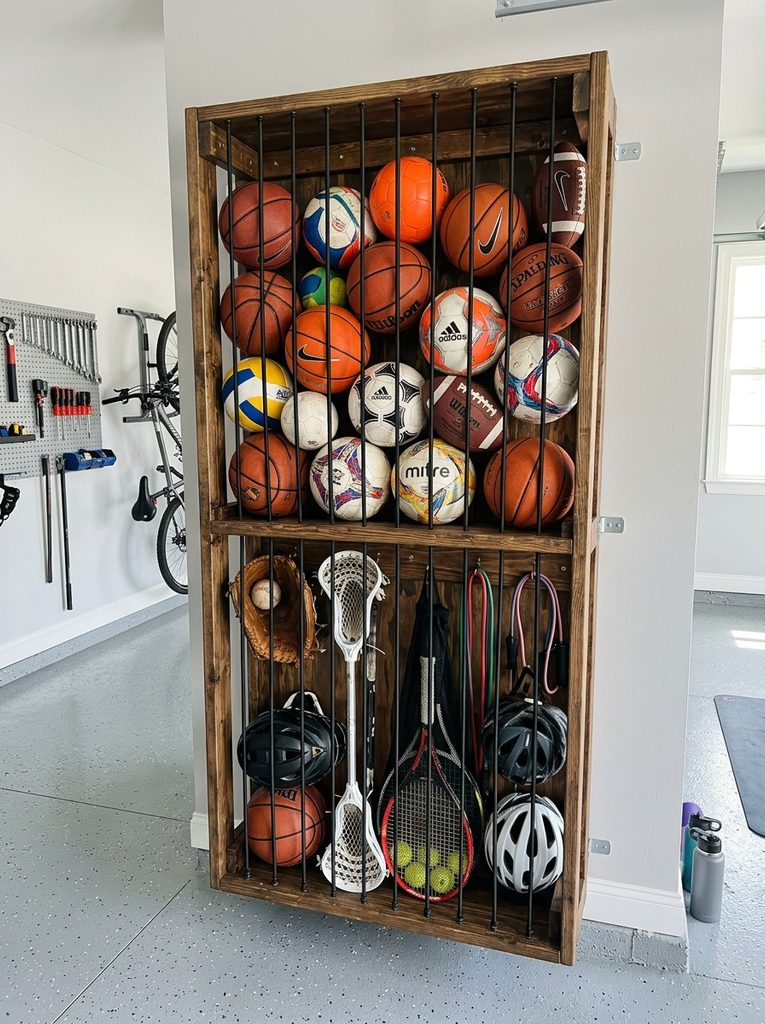
The sports gear and ball storage cage organizes athletic equipment, basketballs, helmets, and soccer balls in a compact, easy-access vertical container. Loose sports balls take up excessive floor space and roll around the garage, creating safety hazards around vehicles. This wall-mounted storage bin features open slatted wooden sides and a front face made of flexible, vertical elastic bungee cords. The flexible front cords allow children and adults to pull balls out from the middle or bottom of the stack without unpacking the entire bin from the top. Storing sports gear vertically keeps athletic equipment contained in one organized zone while maintaining clear walkways.
Begin by building a tall rectangular box frame from one-by-two pine lumber, sizing it twelve inches deep, twenty-four inches wide, and forty-eight inches tall. Attach a solid plywood base to the bottom of the frame to support equipment weight, and add two horizontal back braces to attach the unit to the wall. Drill quarter-inch holes spaced three inches apart along the top and bottom front frame rails. Thread heavy-duty marine-grade elastic shock cords vertically through the holes, knotting the ends securely to create a flexible front retaining grid. Mount the completed cage to garage wall studs using three-inch wood screws driven through the rear braces. Fill the cage with sports balls and athletic equipment, testing the bungee cords to ensure items can be removed easily.
Idea 10: Overhead Kayak and Bike Pulley Lift Hoist
Step-by-Step Guide
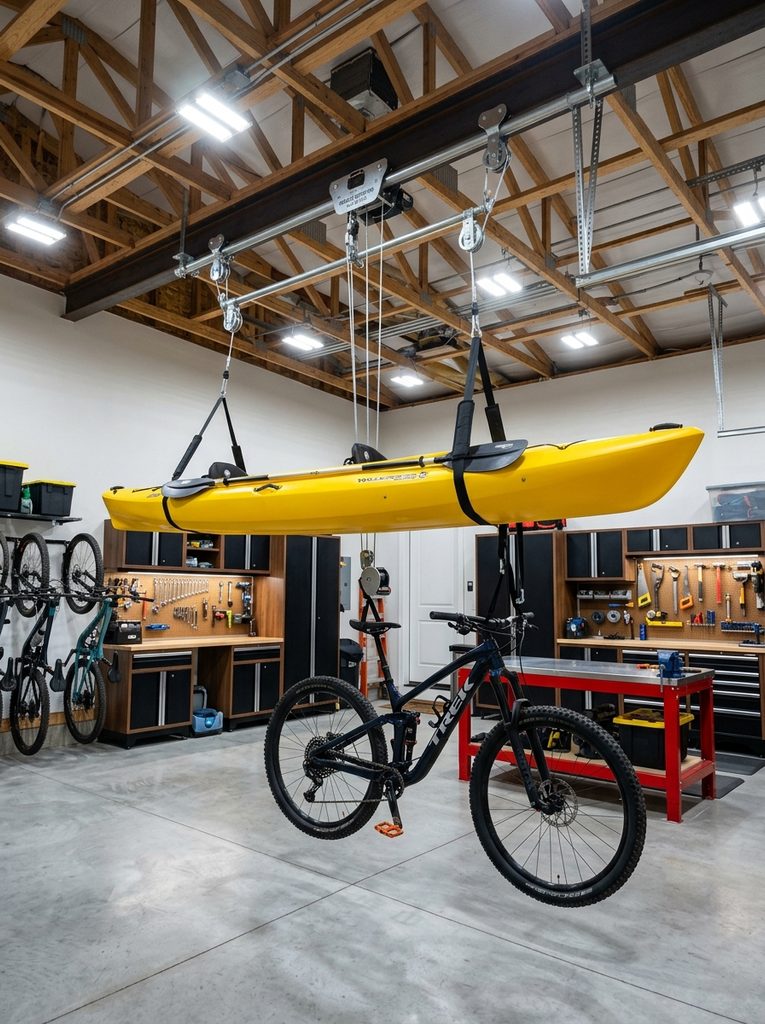
The overhead kayak and bike pulley lift hoist uses mechanical advantage to lift heavy, bulky recreational equipment safely up to the garage ceiling. Kayaks, bicycles, cargo carriers, and ladders take up valuable floor and wall space when stored at ground level. A dual-pulley hoist system with an integrated auto-locking rope brake lets one person lift fifty to one hundred pounds of gear to the ceiling smoothly. The gear remains suspended safely above walking areas, fully utilizing the vertical volume of high garage ceilings while keeping expensive recreational equipment safe from floor spills and bumps.
Start by locating the ceiling joists above an open floor area that offers sufficient clearance from overhead garage doors and lighting fixtures. Mount two heavy-duty steel pulley brackets into the center of the ceiling joists using lag screws, spacing them to match the balance points of your kayak or bicycle frame. Thread the heavy-duty hoist rope through the pulley wheels and the integrated safety brake mechanism, attaching nylon web support straps to the lower hanging hooks. Wrap the straps securely around the front and rear of your kayak hull or bicycle seat and handlebars. Pull the hoist rope to lift the gear smoothly to the ceiling, testing the rope brake to ensure it locks firmly in place. Secure the rope tail to a wall-mounted cleat for extra safety.
Common Beginner Mistakes and How to Avoid Them
A frequent mistake in DIY garage organization is anchoring heavy storage shelves into drywall alone using plastic hollow-wall anchors instead of structural wall studs. Drywall lacks the tensile strength to support loaded tool racks or heavy storage bins, which can lead to sudden structural failures and damage to parked vehicles. To prevent this, always locate the center of solid wood wall studs with a reliable stud finder and drive heavy-duty lag screws directly into the framing. Another common error is buying storage bins in varied shapes, sizes, and colors without an organized system. Mismatched containers do not stack efficiently, wasting shelf space and making seasonal items difficult to identify. Standardize your storage by purchasing uniform, clear, interlocking plastic storage totes that stack securely and show contents at a glance. Additionally, builders often forget to account for the travel path of overhead garage doors when planning ceiling storage. Always measure the full door travel height with the garage door open before mounting overhead racks to ensure safe operating clearance.
Practical Tips for Better Results
Achieving long-term organization in a busy garage depends on using clear labeling, durable containers, and regular maintenance routines. Apply large, waterproof labels to the front and bottom faces of all storage totes so you can identify contents quickly from the garage floor. Use color-coded bin lids—such as red for holiday decorations, green for garden supplies, and blue for camping gear—to make finding items even faster. Keep an updated digital inventory spreadsheet or QR code on your storage bins to track seasonal tools and household items without opening every container. Place heavy items like automotive jacks, bulk paint cans, and power tools on lower shelves between waist and knee height to avoid muscle strain during lifting. Finally, establish a simple seasonal clean-up routine: spend fifteen minutes every three months sweeping the floor, returning tools to their designated wall cleats, and wiping down work surfaces to keep your storage systems working smoothly all year long.
Styling, Presentation, or Organization Ideas
Organizing your garage into dedicated functional zones creates an orderly, efficient layout that feels like a natural extension of your home. Group your garage storage into distinct zones: garden care near the side entryway, automotive maintenance along the side wall, sports gear near the main entrance, and seasonal storage in overhead ceiling channels. Paint your perimeter walls with light grey or white semi-gloss exterior paint; this reflects overhead lighting, brightens the workspace, and resists scuffs and moisture stains. Apply a two-part epoxy or polyaspartic coating to the concrete floor to create a durable, non-porous surface that resists oil drips, wipes clean easily, and looks like a professional showroom floor. Install daylight-balanced LED shop lights across the ceiling to eliminate dark corners and illuminate your work surfaces. Coordinating your storage accessories—such as matching black metal brackets, light wood shelving, and uniform grey storage totes—creates a clean, intentional look across the entire space.
Budget or Time Planning
Executing a complete garage organization project does not require an expensive, all-at-once overhaul; it is most manageable when broken into affordable, phased DIY stages. Begin by completing a thorough cleanout and purge over a single weekend, which costs nothing and immediately frees up floor space while helping you identify your true storage needs. Allocate your DIY budget toward high-impact, versatile basics—such as quality two-by-four lumber, three-quarter-inch plywood sheets, and matching plastic storage totes—which deliver great storage capacity for a fraction of the cost of custom steel cabinetry. Plan your build schedule across three consecutive weekends: construct wall-mounted French cleats and lumber racks on weekend one, install ceiling sliding tracks and overhead hoists on weekend two, and build mobile workbenches and tool racks on weekend three. Staging your project this way keeps costs manageable, prevents physical fatigue, and allows you to refine your layout as you build.
Creative Expansion and Advanced Inspiration
Once your primary storage systems and workbenches are installed, you can explore advanced customizations to expand your workshop’s functionality. Consider adding a dust collection system by installing two-inch PVC pipe along your French cleat walls, connecting tools directly to a central shop vacuum with automated blast gates. You can also build an enclosed battery charging cabinet equipped with an internal surge-protected power strip, organizing power tool batteries in one fire-safe, ventilated location. For hobbyists, build fold-out outfeed support tables for table saws or attach magnetic tool bars beneath wall shelves to hold steel hardware, drill bits, and driver accessories. Adding vertical slide-out pegboard drawers inside narrow wall cabinets provides double-sided tool storage within a compact footprint. These custom additions let you tailor your garage over time, turning a basic utility room into an organized, efficient, and versatile workshop.
Leave a Reply