Mason jar centerpieces represent a foundational element of contemporary tabletop styling, combining functional glassware with accessible floral design. Across interior design channels and visual discovery platforms, standard canning jars serve as versatile vessels for dining tables, wedding receptions, and seasonal displays. Readers of this comprehensive guide will learn how to design, construct, and style ten distinct centerpiece concepts using varied glass profiles, structural supports, and surface finishing techniques. The tutorial details essential craft methods, covering surface paint adhesion, wire suspension mechanics, interior water preservation, and balanced botanical scaling. Mastering these practical techniques allows makers to build stable decorative displays that elevate common glassware into refined focal points for residential and event settings. Beyond aesthetic enhancement, creating homemade centerpieces offers an efficient way to repurpose household canning jars while tailoring colors and textures to specific room themes. The compact scale and modular nature of mason jars make these projects approachable for novice decorators seeking professional-grade results without substantial workshop equipment. Through structured fabrication steps, this article provides practical guidance to construct durable, balanced glass centerpieces suited for everyday living and special occasions.
Why This Idea Is Trending or Useful
Mason jar decorations maintain consistent popularity across modern visual platforms because they effectively merge utilitarian function with adaptable aesthetics. As modern design movements embrace warm textures and natural elements, the transparent, clean geometry of molded glass jars complements contemporary minimalist style interiors without cluttering visual space. From a practical perspective, canning jars provide watertight structural stability, standard mouth diameters, and uniform dimensions, making them dependable foundations for floral stems and illumination sources. Sourcing these vessels supports budget ideas, as standard utility jars remain widely available and cost a fraction of specialty floral glassware. The DIY appeal is particularly high because jars can be painted, wrapped, submerged, or suspended, allowing decorators to manifest diverse creative ideas with minimal supplies. Beginners benefit from this craft because glass surfaces provide forgiving work areas that can be easily cleaned, repainted, or adjusted if initial attempts require refinement. The balance of low financial investment, accessible supplies, and immediate visual payoff ensures these trending ideas remain central to handmade home decor planning.
Materials and Preparation
Executing clean, structurally sound mason jar centerpieces requires gathering quality materials designed for glass adhesion, water containment, and mechanical stability. Standard glassware choices include half-pint, pint, and quart-sized glass jars in regular and wide-mouth configurations, chosen based on the height requirements of the target table. Essential surface preparation materials comprise ninety-one percent isopropyl alcohol, lint-free microfiber towels, multi-surface chalk finish paint, matte acrylic sealers, and low-tack painter tape. Floristry tools and mechanical fasteners include floral shears, clear waterproof floristry tape, dry floral foam blocks, nineteen-gauge craft wire, natural jute twine, and low-temperature hot glue applicators. Preparation begins with a systematic inspection of the glass jars to ensure rims and bases are free from micro-fractures or manufacturer defects. Wash each jar with warm, soapy water to remove surface oils, let the glass air-dry fully, and wipe the exterior with isopropyl alcohol to ensure smooth paint application. Verify table dimensions in advance, planning for at least fifteen inches of clearance around the centerpiece perimeter to maintain functional dining space.
1. Chalk-Painted Pastel Farmhouse Jar Trio
Step-by-Step Guide
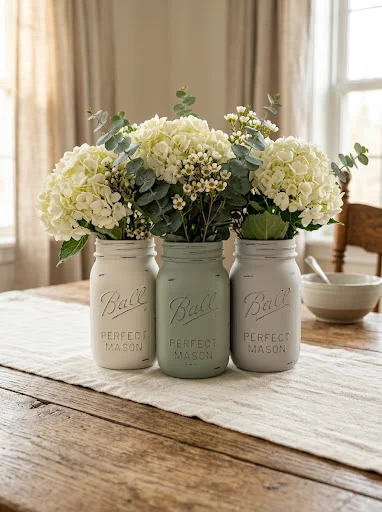
The chalk-painted pastel jar trio relies on a matte, opaque exterior finish that converts standard molded glassware into ceramic-like floral vessels. The design concept pairs three wide-mouth pint jars coated in soft off-white, muted sage, and pale dove gray, producing a balanced neutral palette suitable for everyday dining tables. The chalk paint dries to an ultra-flat, non-reflective sheen that highlights raised glass manufacturer lettering, adding subtle textural relief to the containers. By applying a light distressing technique to the raised lettering, threaded rims, and basal edges, the glassware acquires an authentic weathered appearance that balances modern rustic design. Grouping three uniform jars together creates a classic triangular footprint that distributes visual weight evenly without obstructing conversations across dining tables. This project serves as an ideal baseline exercise for crafters learning basic paint adhesion on non-porous glass surfaces.
Begin by wiping the exterior of three clean pint-sized mason jars with isopropyl alcohol, allowing the glass to dry completely before applying any pigment. Using a flat synthetic bristle brush, apply a smooth, even base coat of multi-surface chalk paint across the entire exterior wall, working downward from just below the threaded rim to the bottom edge. Allow the primary coat to dry for two hours before applying a second opaque layer to eliminate brush streaks and glass transparency. Once fully dry, take a fine two-hundred-twenty-grit sanding sponge and gently abrade the raised glass typography, corner contours, and upper threading to expose tiny hints of bare glass. Wipe away fine paint residue with a damp cloth, apply a coat of clear matte aerosol wax or sealer, and let cure for twenty-four hours. Fill each painted jar with two inches of fresh water, insert five trimmed stems of white hydrangeas and eucalyptus, and set the trio atop a linen table runner.
2. Twine-Wrapped Hanging Wire Jar Lanterns
How to Make
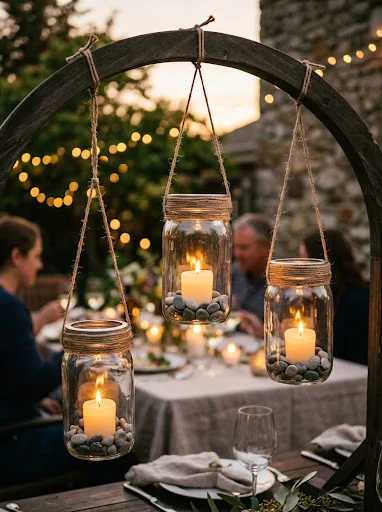
The twine-wrapped hanging wire lantern concept transforms functional tabletop glassware into elevated luminous focal points using mechanical wire harnesses and natural fiber wraps. The design utilizes quart-sized regular-mouth jars, suspending them from a sturdy timber or iron tabletop arch to introduce vertical architectural lines to the center of the table. Natural jute twine is wrapped tightly around the recessed neck of each jar, concealing galvanized steel wire collars while introducing rich organic texture. Within each suspended vessel, clean river pebbles stabilize an unscented wax or LED votive candle, providing sheltered illumination that flickers safely above dining plates. The combination of industrial craft wire, fibrous unbleached jute, and clear molded glass produces an eye-catching interplay of textures that suits rustic outdoor dinners, covered patio tables, and festive banquet settings. The vertical suspension elevates light sources, leaving the flat surface beneath available for tableware and serving platters.
To construct the wire harness, cut an eighteen-inch length of sixteen-gauge galvanized craft wire, wrapping it tightly around the recessed glass neck directly below the threaded rim. Twist the wire ends together using needle-nose pliers to form a snug collar, creating two opposing eyelet loops on opposite sides of the neck before snipping off the excess wire. Cut a secondary fourteen-inch wire segment to serve as the handle, threading each end through an eyelet loop and bending the wire back upward into a secure safety hook. Wrap six-ply natural jute twine continuously around the wire collar, securing the starting and ending tails with small drops of clear industrial adhesive to conceal the metal mechanics. Pour one inch of washed gray river stones into the bottom of the jar, pressing an LED votive candle into the stones to keep it level. Hang the finished lanterns from a tabletop wooden arbor, spacing each vessel eight inches apart.
3. Submerged Botanical and Floating Candle Vessel
Execution Process
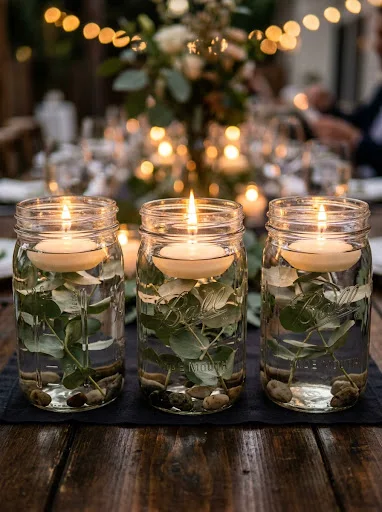
The submerged botanical centerpiece relies on optical refraction to magnify lush green leaves through water, capped with a luminous floating candle flame. The design concept utilizes wide-mouth quart jars filled with crystal-clear water, fully submerging dense botanical cuttings like silver dollar eucalyptus, rosemary branches, or faux white orchids beneath the surface. Because the plant elements remain entirely underwater, the glass jar functions as a visual prism, making the foliage appear larger and more vibrant under room lighting. A paraffin or soy floating disc candle rests on the water surface, held in place by the narrow neck of the jar to prevent wax drift. This arrangement provides clean, modern lines with zero exposed stems, offering a contemporary presentation that fits modern minimalist dining rooms, wedding tables, and evening dinner parties. The self-contained water reservoir ensures greenery remains fresh without requiring delicate floral foam or complex daily maintenance.
Begin by selecting three clear, unblemished wide-mouth quart mason jars, washing the glass thoroughly with a vinegar-based glass cleaner to eliminate water spots and cloudiness. Cut sturdy stems of fresh silver dollar eucalyptus, boxwood, or artificial cymbidium orchids to a height two inches shorter than the jar mouth, removing lower leaves that could tear. To keep the stems from floating to the surface, attach a clean, clear glass floral marble or stainless steel fishing weight to the bottom of each stem using clear monofilament wire. Lower the weighted botanical cutting upright into the center of the dry jar, ensuring it stands straight against the bottom base. Slowly pour distilled room-temperature water down the inside wall of the jar until the liquid reaches one inch below the rim, avoiding direct turbulence that dislodges the base weight. Gently place an ivory floating disc candle onto the water surface, lighting the cotton wick right before guests arrive.
4. Burlap and Lace Banded Rustic Trio
Setup Method
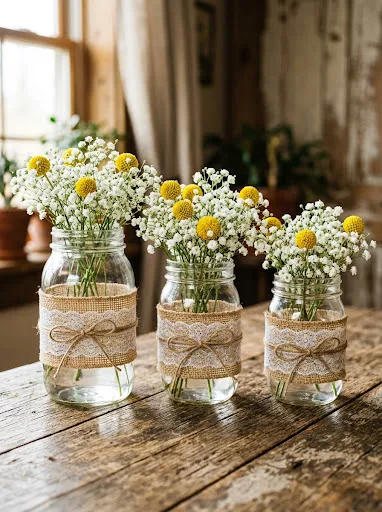
The burlap and lace banded centerpiece uses layered textiles applied directly to clear glass jars to build rich tactile depth without using paint. The core design concept pairs natural open-weave jute burlap with delicate white cotton crochet lace, wrapping the midsection of three graduated jars measuring half-pint, pint, and quart heights. The natural golden-brown burlap provides an earthy, rustic base that softens reflections on the glass, while the patterned lace overlay introduces vintage refinement. By leaving the upper and lower quadrants of the jars uncovered, the clear glass maintains a light, transparent presence that keeps the table feeling open. This modular trio accommodates fresh garden wildflowers or dried wheat bouquets, making it an adaptable arrangement for harvest celebrations, casual weekend breakfasts, and country barn events. The textile bands are easily detached or customized, giving makers a reusable vessel collection that transitions smoothly between different seasons and event palettes.
Select three clean mason jars of differing heights, wiping the exterior surfaces dry with a microfiber cloth. Using a rotary cutter and ruler, cut three strips of natural jute burlap measuring three inches in width and long enough to wrap around each jar circumference with a half-inch overlap. Cut matching lengths of one-and-a-half-inch wide white cotton lace ribbon, centering the lace over the burlap strips and adhering them together with thin beads of fabric glue. Apply a thin line of low-temperature hot glue vertically along the back seam of a jar, pressing the edge of the layered textile strip into the adhesive. Wrap the band snugly around the glass perimeter, pulling the fabric taut before securing the overlapping terminal end with a final line of adhesive. Wrap four rounds of polished cotton string around the center of the lace band, tying the ends into a simple shoestring bow in front. Fill the vessels with fresh baby’s breath and yellow craspedia blooms.
5. Antiqued Mercury Glass Mirrored Cluster
Step-by-Step Guide
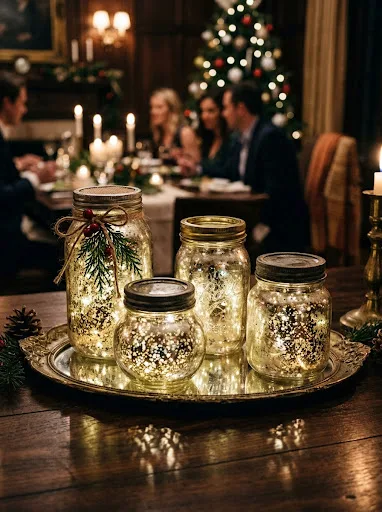
The antiqued mercury glass cluster uses mirrored paint techniques and mild acid washes to replicate the look of nineteenth-century silvered art glass. The design concept relies on creating a semi-reflective, speckled interior coating that gives ordinary canning jars the metallic appearance of aged mercury glass. When illuminated by internal tea lights, the light shines through tiny breaks in the silver finish, casting dynamic, scattered patterns across nearby table linens and dinnerware. Grouping four or five jars of varied sizes creates a striking focal point, with reflective surfaces that bounce candlelight around dark dining rooms and reception halls. The contrast between bright mirrored silver and dark, tarnished patina spots delivers a high-end look suitable for winter holidays, formal anniversaries, and upscale evening receptions. This process introduces decorators to faux-finishing methods, demonstrating how liquid surface mists can transform clear glass into an antique metallic accent.
Working in a well-ventilated space, place clean regular-mouth mason jars upside down on protective newspaper. Mix equal parts white distilled vinegar and tap water inside a fine-mist spray bottle, setting the nozzle to release a micro-droplet mist pattern. Mist the interior glass walls lightly with the vinegar solution, immediately following with a thin coat of mirror-effect aerosol paint sprayed directly into the jar cavity over the water droplets. Allow the paint to interact with the acidic moisture beads for one minute, then gently blot the interior walls with a crumpled paper towel to lift paint away where the droplets formed, leaving irregular, authentic patina spots. Repeat this misting and painting cycle two additional times until you achieve the desired balance of silver coverage and translucent spots. Once the interior is completely dry, seal the inner finish with a light mist of matte clear lacquer, insert a warm-white battery LED candle, and arrange the cluster on a mirrored tray.
6. Geometric Hexagon Wooden Box with Inset Jars
How to Create
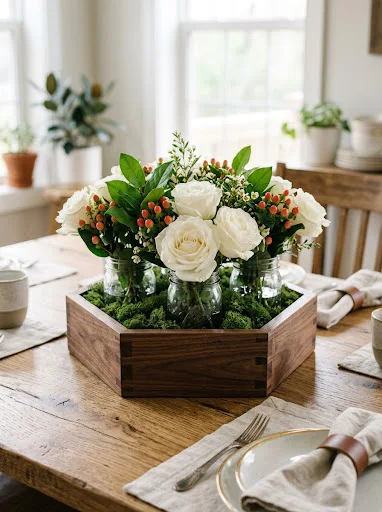
The geometric wooden box centerpiece uses angular carpentry profiles to house five standard canning jars within a modern wood container. Moving away from standard rectangular planter boxes, this concept utilizes an open hexagonal pine or birch frame that holds jars in an organized cluster. The straight wooden outer frame grounds the arrangement, while the vertical glass jars inside provide practical water reservoirs for individual floral cuttings. Staining the outer wooden frame in a rich espresso or warm walnut finish creates a sharp contrast against clear glass jars and light-colored dining tables. This structured design brings clean order to everyday tables, organizing scattered vessels into a cohesive, movable centerpiece that slides easily out of the way for family-style meals. It bridges rustic farmhouse elements with modern geometric forms, making it an exceptional fit for contemporary homes that appreciate clean woodworking lines alongside traditional glassware accents.
Begin by cutting six equal segments of one-by-four pine lumber to eight-inch lengths, beveling both ends of each board at thirty-degree angles using a compound miter saw to form a hexagon. Sand all cut surfaces with one-hundred-fifty-grit sandpaper, apply wood glue to each beveled corner joint, and assemble the perimeter using an adjustable nylon strap clamp to hold the joints tight. Reinforce every corner seam with two one-inch pin nails driven from the outside face, letting the glue cure for four hours before wiping on a dark walnut oil stain. Cut a base panel from quarter-inch birch plywood to fit the bottom of the hexagon, securing it to the frame with brad nails and adhering felt pads underneath. Place five pint-sized mason jars inside the wooden frame, packing the surrounding open voids with preserved green reindeer moss to conceal the internal base. Fill the jars with water and cut white garden roses, hypericum berries, and salal leaves to complete the display.
7. Frosted Sea Glass Luminary Arrangement
How to Make
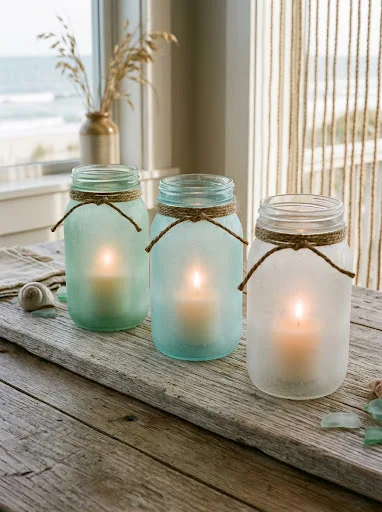
The frosted sea glass luminary arrangement captures the soft, weathered appearance of ocean-tumbled glass using translucent matte coatings and coastal color palettes. The design concept pairs three wide-mouth jars finished in soft seafoam green, pale aqua, and frosty white, recreating the sun-bleached look of collected shoreline glass. The smooth matte exterior diffuses bright candle flames, casting a soft, glare-free ambient glow across dining spaces. Because the coating remains slightly translucent, the flickering light highlights the contours of the glass, creating a serene, relaxed atmosphere suitable for warm-weather outdoor dining, coastal cottages, and calm living rooms. By combining soft frosted finishes with clean glass textures, this design delivers an understated look that introduces gentle pastel colors without overwhelming neutral dining spaces. This straightforward spray-frosting method offers an accessible project for beginners seeking clean, even finishes without the brush marks common to hand-applied liquid paints.
Wipe down three wide-mouth quart jars with acetone to remove grease, letting the glass dry completely before applying finishes. Mask the top half-inch of the threaded glass rim with low-tack painter tape to keep the rim clear and crisp. In an outdoor workspace, hold a can of specialized glass-frosting aerosol spray twelve inches from the jars, applying two light, continuous coats across the glass using smooth horizontal strokes. Allow the frosted layer to dry for thirty minutes before applying a very sheer mist of seafoam green or pale aqua transparent glass tint spray over the frosted base. After the paint cures for two hours, carefully peel away the painter tape to reveal the clean glass rim above the frosted body. Wrap three rounds of natural braided hemp cord around each jar neck, securing the ends with a small drop of craft glue. Place a two-inch white beeswax votive candle inside each frosted container, setting the trio on a weathered drift-oak runner.
8. Preserved Moss and Terrarium Ecosystem Jar
Execution Process
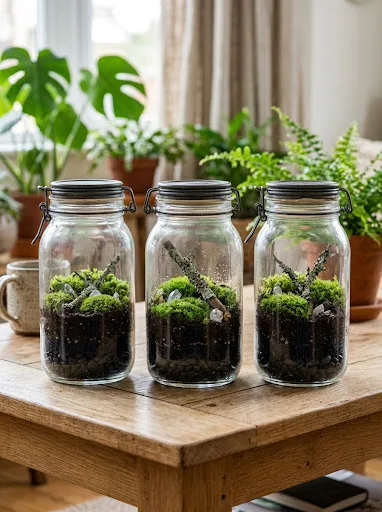
The preserved moss terrarium centerpiece builds a miniature indoor garden inside wide-mouth glass jars, creating a self-contained display that requires zero routine watering. The design concept features half-gallon or wide-mouth quart jars layered with natural soil elements, washed river stones, preserved cushion moss, and dried botanical botanicals. Because the internal materials are preserved rather than living, the terrarium maintains its vibrant green appearance indefinitely without developing mold, internal condensation, or plant overgrowth. The transparent glass container protects delicate moss textures from dust, providing a neat, mess-free botanical accent for dining rooms and coffee tables. This self-contained presentation brings the tranquil beauty of forest greenery indoors, making it an exceptional year-round centerpiece for apartments, offices, and low-light dining spaces where cut flowers wilt within days. The layered construction showcases natural geological strata through the glass walls, adding rich textural interest from soil to moss surface.
Gather three clean wide-mouth quart jars, ensuring the inner glass walls are completely dry and free from dust particles. Begin layering the foundation by pouring one inch of washed black volcanic gravel into the bottom of each jar to establish a clean drainage strata line. Add a half-inch layer of crushed horticultural charcoal over the stones, followed by one-and-a-half inches of sterilized dark potting soil, using a small wooden spoon to compress each layer flat against the glass. Carefully lower varied clusters of preserved emerald cushion moss, sheet moss, and lichen-covered bark twigs into the jar using long tweezers, arranging the components to create a rolling, miniature landscape. Tuck small decorative items—such as polished tiger-eye stones, dried seed pods, or miniature quartz crystals—into the moss crevices to complete the terrarium scene. Wipe the inner glass above the soil line with a dry cotton swab, close the jar with an antiqued zinc lid, and display the set along the center table axis.
9. Monochromatic White Floral and Ribbon Vignette
Setup Method
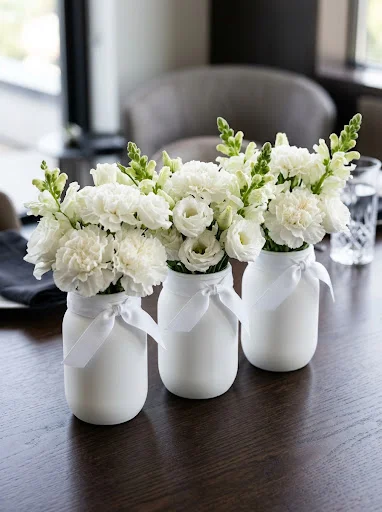
The monochromatic white floral vignette focuses on classic elegance, pairing clean white chalk-painted jars with pristine white blooms and delicate satin accents. The design concept uses three identical regular-mouth pint jars coated in a smooth, non-distressed ivory chalk finish, creating an architectural ceramic effect across the tabletop. Instead of rustic distressing, this concept emphasizes smooth, perfect surfaces accented with tailored white grosgrain or satin ribbons tied around the threaded rims. Filling each vessel with lush, all-white florals—such as carnations, ranunculus, and baby’s breath—produces a dense, textured floral cloud that stands out against dark dining tables. This clean monochromatic look fits modern white weddings, formal holiday brunches, and transitional dining rooms where bold colors might clash with surrounding decor. The calm, clean presentation showcases the sculptural form of the flowers, proving that single-color palettes can deliver rich visual impact through varied petal shapes and fabric textures.
Select three matching pint-sized regular-mouth canning jars, cleaning the exterior surfaces with rubbing alcohol to ensure a clean foundation. Using an ultra-dense foam roller or synthetic flat brush, apply three thin coats of pure white chalk paint across the jars, allowing forty minutes of drying time between layers to achieve an opaque, streak-free surface. Avoid sanding or distressing the paint once dry; instead, apply an ultra-matte spray finish to protect the paint while maintaining its velvety, non-reflective surface. Cut three eighteen-inch lengths of one-inch-wide white grosgrain ribbon, wrapping a length around the threaded collar of each jar and tying it into a tailored square knot with ends trimmed at clean forty-five-degree angles. Fill each jar with floral preservative water, cut white carnations, white snapdragons, and white lisianthus stems to varied heights, and insert them tightly into the jars to form a rounded floral dome. Arrange the finished jars in an even, straight line down the center of the table.
10. Antiqued Tin-Lid Floating Candle Bowl
Step-by-Step Guide
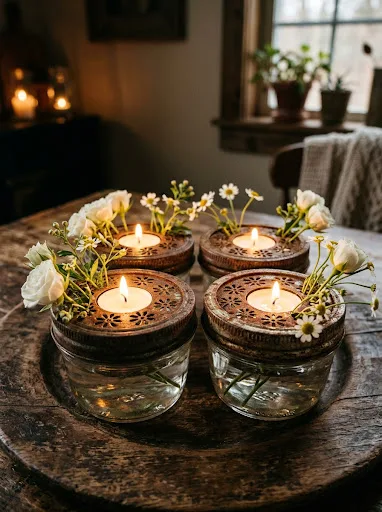
The antiqued tin-lid floating candle bowl pairs wide half-pint canning jars with rusted metal floral frogs or cut tin lid collars to produce a low-profile centerpiece. The design concept uses shallow squat jars rather than tall bottles, keeping the visual height under five inches to ensure unobstructed eye contact across dinner tables. An antiqued daisy-cut tin metal lid rests over the jar mouth, acting as a decorative metal grill that holds floral stems upright while leaving space for a central tea light. The patina on the metal lid introduces industrial, historic character that contrasts with the clean water and delicate flower petals inside the glass base. This low-profile design is practical for busy family dinner tables, holiday feasts, and lively celebrations where tall arrangements risk being tipped over by passing serving dishes. The wide, low base provides physical stability, making it an exceptionally safe option when incorporating open candle flames into tabletop settings.
Acquire four wide-mouth half-pint canning jars alongside matching reproduction daisy-cut cutout metal lid inserts, washing the glassware until completely clear. To age new shiny tin lids, soak them in a shallow tray filled with white vinegar and salt for three hours, drying them outdoors to encourage a weathered, antique patina across the metal surface. Fill each glass jar three-quarters full with fresh water, adding two drops of liquid floral preservative to keep the arrangement clear. Secure the treated metal cutout lid over the jar mouth using the screw-on metal band, tightening the collar securely onto the glass threads. Trim short stems of spray roses, chamomile daisies, and fresh mint sprigs, sliding them through the outer cutout openings of the metal lid so the flower heads rest close to the metal surface. Place a standard floating candle or waterproof tea light into the open center cutout of the lid, grouping the four finished bowls closely together on the table.
Common Beginner Mistakes and How to Avoid Them
A frequent mistake beginners make when creating mason jar centerpieces is applying heavy coats of paint directly onto uncleaned glass, which causes the paint to peel or chip under slight friction. Glass surfaces collect oils during manufacturing and packing that prevent paint pigments from bonding securely. Avoid this issue by thoroughly wiping down the glass with ninety-one percent isopropyl alcohol and applying paint in thin, multiple layers rather than one heavy, wet application. Another common design error is arranging floral stems too tall for the jar, creating top-heavy arrangements that tip over easily during lively dinners. Keep total arrangement heights within one-and-a-half times the height of the container, anchoring lightweight jars with internal glass marbles or river stones when displaying tall, woody branches. Additionally, crafters often forget to protect their wooden tables from water rings and scratches caused by rough glass bases. Prevent surface damage by applying adhesive felt furniture dots to the underside of every jar, or display your arrangements on protective table runners, wooden chargers, or ceramic trays to catch condensation and protect furniture finishes.
Practical Tips for Better Results
Achieving a clean, professional finish on handmade mason jar centerpieces requires careful attention to glass preparation, paint drying times, and mechanical balance. Always select multi-surface acrylic or chalk paints formulated specifically to bond with non-porous glass surfaces, as standard interior wall latex paints easily peel away under humid conditions. When creating distressed vintage finishes, use a fine two-hundred-twenty-grit sanding sponge with a light touch, focusing wear on natural friction points like raised lettering, rims, and base corners rather than flat surfaces. If your centerpiece uses fresh-cut flowers, build a structural support grid across the jar mouth using clear waterproof floral tape spaced in a half-inch crosshatch pattern; this keeps stems upright and organized without crowding. To prevent mold and cloudy water in submerged arrangements, always use distilled water mixed with two drops of household bleach, which keeps the liquid crystal clear for days. Finally, maintain visual harmony by sticking to a disciplined palette of three complementary materials—such as clear glass, matte white paint, and natural fiber twine—ensuring your handmade centerpieces look intentional, balanced, and beautifully styled.
Styling, Presentation, or Organization Ideas
Styling mason jar centerpieces effectively involves balancing the vessels with surrounding table linens, dinnerware, and ambient room lighting to build a complete tablescape. Begin by laying down a foundational textile—such as a frayed unbleached linen runner, woven jute mat, or ticking stripe fabric—to define the central display area and ground the glassware. On long rectangular dining tables, space individual jars evenly along the center runner axis, interspersing them with loose botanical garlands like silver dollar eucalyptus or olive branches to connect the vessels into a unified display. For round or square dining tables, cluster jars in odd-numbered groups—such as three or five—placing the tallest jar in the center to create a dynamic triangular pyramid effect. Extend the theme beyond the dining room by adapting matching painted jars for storage organization in other areas: line up matching jars on bathroom vanities to hold cotton swabs and brushes, or style them on home office desks to organize pens and scissors.
Budget or Time Planning
Handcrafting mason jar centerpieces is an economical project that yields professional-looking decor at a fraction of boutique retail prices. Sourcing standard canning jars in multi-packs of twelve from grocery stores drops the base container cost to just a couple of dollars per vessel, compared to specialty floral vases that often cost significantly more. A complete three-jar centerpiece project typically requires between two and three hours of active crafting time, making it an easy weekend endeavor to complete around daily schedules. Plan your preparation workflow efficiently: clean all glassware and apply initial paint coats on Friday evening, complete secondary coats and distressing on Saturday morning, and reserve Saturday afternoon for final sealing, water filling, and floral assembly. Purchasing craft notions—such as jute twine, floral wire, and tea lights—in bulk quantities significantly lowers the cost per piece, making these centerpieces an affordable way to decorate large wedding receptions, holiday family dinners, and seasonal gatherings on a modest budget.
Creative Expansion and Advanced Inspiration
Once you master basic painting, wrapping, and arranging techniques, you can expand these core methods into advanced, personalized centerpiece installations. Experiment with advanced surface finishes by applying metallic gold leaf foil to jar interiors, creating glowing gilded reflections that elevate evening dining setups. You can also explore functional illuminated centerpieces by drilling small holes through wooden bases to wire low-voltage micro-LED warm-white fairy lights directly up into inverted frosted jars, building charming ambient table lamps. For formal weddings and milestones, customize jars by applying custom die-cut vinyl stencils of monograms, family crests, or meaningful dates before painting, peeling the vinyl away to create clear glass typography windows. These glassware techniques adapt easily across different living spaces: scale down the jar sizes to create cohesive windowsill herb planters, bathroom vanity organizers, or fireplace mantel candle displays, keeping a consistent, handcrafted rustic aesthetic throughout your entire home.