Seasonal centerpieces serve as the visual anchor of interior gathering spaces, establishing mood, celebrating natural cycles, and elevating everyday dining experiences. Designing custom focal arrangements allows homeowners and event hosts to craft purposeful tablescapes that reflect seasonal foliage, natural light shifts, and ambient textures. Readers will discover ten versatile design concepts spanning spring awakenings, sun-drenched summer gatherings, rustic autumn harvests, and frosted winter festivities. Each featured concept provides structured construction methods, botanical selection guidelines, vessel sourcing recommendations, and preservation techniques suitable for both beginners and experienced decorators. Creating personal table displays offers an accessible entry point into botanical design without requiring commercial floristry tools or costly imported blooms. Handcrafted centerpieces provide an economical avenue to refresh living spaces, transforming foraged greenery, garden cuttings, architectural branches, and reusable foundational vessels into striking arrangements. Beyond visual impact, purposeful table decoration fosters hospitality, transforming ordinary family dinners, holiday parties, and weekend brunches into memorable sensory occasions. By following this structured guide, decorators will master floral mechanics, balance, spatial proportions, and moisture management to produce enduring, professional-grade displays across all four seasons.
Why This Idea Is Trending or Useful
The widespread popularity of seasonal tabletop styling across visual curation channels stems from a desire for intentional living, sustainable home decor, and organic aesthetics. Modern interior design increasingly favors seasonal rotation over static decoration, allowing interior spaces to evolve alongside the natural world outside. Crafting seasonal centerpieces delivers immense practical value by encouraging the use of locally foraged foliage, backyard trimmings, and compostable elements, significantly reducing plastic waste. For design enthusiasts, low-profile centerpieces resolve a common entertaining dilemma by introducing color and dimension without blocking conversation across dining tables. The creative appeal lies in tactile material manipulation—arranging architectural branches, layering textural mosses, and pairing rough stone with delicate petals. Furthermore, seasonal DIY styling remains remarkably accessible to novices because nature provides built-in color harmonies that guarantee visual cohesion. Novices can assemble professional-looking arrangements within an hour using standard kitchen glassware, basic wire, and seasonal elements. Whether designing an everyday breakfast table vignette or an elaborate holiday tablescape, seasonal centerpieces offer an adaptable, budget-conscious creative project.
Materials and Preparation
Assembling durable, well-proportioned seasonal table centerpieces requires systematic preparation, proper mechanical support, and intentional container selection. Begin by gathering foundational mechanics, including floral frogs, uncoated wire netting, waterproof floral tape, sharp pruning shears, and clean vessels of varying heights. Selecting water-tight containers made of stoneware, iron, turned wood, or recycled glass establishes the structural foundation and dictates the overall arrangement scale. Before arranging live materials, prepare fresh botanicals through proper conditioning: cut woody stems at sharp angles, strip submerged foliage to prevent bacterial growth, and hydrate flowers in cool water for three hours. Planning considerations require measuring your table surface to maintain proper spatial clearance, ensuring the finished display leaves adequate space for dinnerware, serving platters, and drinkware. For dry autumn or winter displays, prepare stable non-flammable risers, natural floral foam alternatives, and battery-operated pillar candles to guarantee evening illumination without fire hazards. Organizing pruning snips, stem tape, and clean water pitchers within an uncluttered workspace streamlines assembly and prevents accidental table spills.
1. Idea 1: Spring Bulb and Moss Terracotta Trough
Step-by-Step Guide
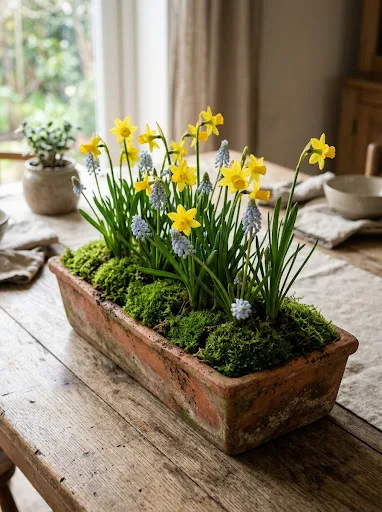
The spring bulb and moss terracotta trough captures the vitality of early spring by combining living sprouted bulbs with earthy woodland textures. This living display features potted miniature daffodils, fragrant hyacinths, and delicate grape hyacinths nestled tightly within an aged, weathered clay vessel. By preserving the root systems intact, the centerpiece evolves naturally across several weeks, allowing dinner guests to observe the buds unfurling in real time. The terracotta clay provides an organic terra-cotta warmth that grounds the bright lemon yellows, soft sky blues, and vivid greens of emergent spring growth. Thick sheets of fresh forest moss cloak the interior potting soil, retaining soil moisture while providing a cohesive, finished carpet across the base. The horizontal trough silhouette keeps the total display height well below eye level, ensuring natural conversation flows smoothly across the dining table. This living arrangement offers an enduring botanical display that can later be transplanted directly into outdoor garden beds once the season concludes.
Begin by lining a rectangular terracotta trough with heavy-duty plastic sheeting to protect wooden tabletops from ambient water seepage. Carefully unpot sprouted spring bulbs, gently massaging dense root masses to separate individual plants without snapping fragile feeder tendrils. Layer three centimeters of damp potting soil across the bottom of the container before positioning the largest hyacinth bulbs along the central spine. Fill intermediate gaps with smaller muscari and dwarf daffodils, angling the stems outward slightly to generate an organic, wind-swept garden growth pattern. Pack moist soil firmly around all exposed root balls, leaving the bulb shoulders exposed by one centimeter to prevent stem moisture rot. Collect damp sheets of living cushion moss, pressing them securely into all remaining surface gaps to create a seamless green topography. Mist the moss layer every morning with a fine water spray, placing the completed trough in bright, indirect sunlight to encourage steady, balanced floral blooming.
2. Idea 2: Summer Citrus and Olive Branch Garland
How to Create
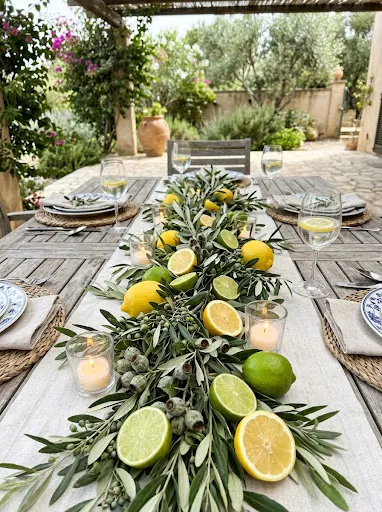
The summer citrus and olive branch garland brings breezy Mediterranean elegance to warm-weather tables through fragrant greenery and bright fruit accents. This linear arrangement utilizes intertwined silvery olive foliage and seeded eucalyptus branches, punctuated by fresh lemons, juicy limes, and small clementines. The vibrant yellow and green citrus fruits provide radiant color pops that echo bright summer sunlight, while dense olive leaves introduce tactile matte sophistication. Because this low-lying garland rests directly upon the table surface, it acts as an expansive runner that frames outdoor dining tables effortlessly. The aromatic natural oils from the crushed olive foliage and citrus rinds release subtle summer fragrances without overwhelming the aromas of served meals. This styling approach requires no water reservoirs during evening events, making it an exceptional centerpiece for breezy patio dinners, garden parties, and outdoor celebrations. Its relaxed horizontal sprawl delivers visual opulence through organic simplicity.
Construct this runner by laying a clean, unrolled base of heavy linen or raw parchment paper down the center of your table. Lay three long olive branches end-to-end, overlapping their cut woody ends by fifteen centimeters, and secure the junctions using discreet dark green floral wire. Weave secondary sprigs of seeded eucalyptus, rosemary, and bay leaf into the central framework, establishing a full, feather-soft greenery base twenty centimeters wide. Cut several whole lemons and limes into halves and thick wheels, patting the exposed fruit surfaces dry with paper towels to prevent table drips. Position whole, unblemished citrus fruits throughout the leafy foundation, wedging them firmly between overlapping stems to anchor the foliage down against ambient breezes. Place the cut citrus halves face up at alternating angles along the perimeter, allowing the glistening segments to catch ambient outdoor light. Finish the garland by tucking slender glass votives holding white tea lights into small foliage pockets, ensuring open flames clear all dried leaves safely.
3. Idea 4: Wild Meadow Foraged Flora Cluster
Execution Process
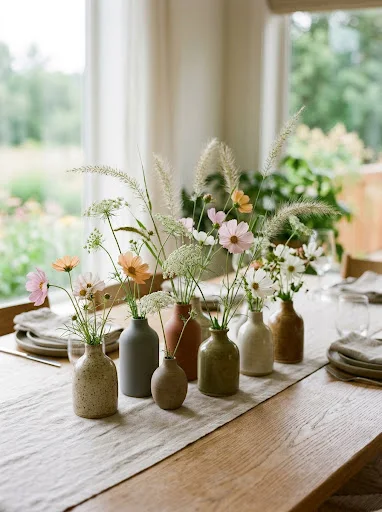
The wild meadow foraged flora cluster celebrates peak midsummer by gathering uncultivated field grasses, dynamic wildflowers, and delicate garden cuttings into a cohesive display. This styling method relies on clustering several small, mismatched ceramic bud vases along a central axis rather than concentrating blooms within one large vessel. Soft cosmos, airy Queen Anne’s lace, golden black-eyed Susans, and wispy fountain grasses create an effortless, meadow-inspired aesthetic that feels foraged and artistic. Distributing botanicals across multiple small vessels introduces rhythmic negative space, allowing individual flower stems to arch, twist, and display their natural architectural silhouettes. The pale, varied ceramic glazes complement the untamed colors of the blossoms without competing for visual dominance. This modular format provides maximum flexibility for dining hosts, allowing individual floral bud vases to be redistributed around platters as dinner courses are served.
Collect seven to nine small ceramic vessels ranging between eight and fifteen centimeters in height, opting for matte stone finishes and earthy glazes. Fill each vessel three-quarters full with fresh, room-temperature water mixed with a standard floral preservative to prolong the delicate field blooms. Trim gathered wildflower stems with sharp bypass shears at steep forty-five-degree angles, stripping any lower foliage that would sit beneath the water line. Group stems by species, placing two or three tall architectural grasses in the taller center vessels to establish an airy upper canopy. Intersperse the medium vases with fluttering cosmos and wild daisies, cutting stems at varying heights to mimic natural field stratification. Position low, spreading blooms like clover and wild buttercups in the smallest outer vessels to blend the display downward toward the tablecloth. Stagger the completed vessels in an organic, meandering formation down the table center, leaving two to three inches between pots for dynamic light and shadow play.
4. Idea 4: Autumn Harvest White Gourd Pedestal
Setup Method
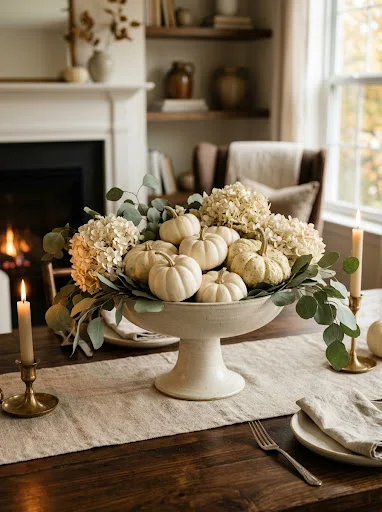
The autumn harvest white gourd pedestal presents a refined, contemporary perspective on traditional fall harvest decor through a serene, monochromatic palette. This design balances ghostly white baby boo pumpkins, pale turban gourds, and creamy acorn squashes across an elevated footed stoneware compote bowl. Layering muted botanical accents—such as dried ivory hydrangeas, pale bleached wheat stalks, and dusty silver dollar eucalyptus—softens the dense ceramic textures of the gourds. The elevated pedestal bowl lifts the autumn display above the tabletop, creating visual breathing room that accommodates dense place settings and family-style serving dishes below. By abandoning predictable bright orange tones in favor of soft chalky whites, warm tans, and muted sage greens, the arrangement integrates into modern interiors seamlessly. This durable centerpiece endures throughout the autumn season without wilting, making it a reliable staple from early September through Thanksgiving celebrations.
Begin by anchoring a heavy, low-profile stoneware compote dish in the center of your dining table, lining the bowl with a silicone mat to prevent shifting. Place the largest white heirloom gourd directly in the center of the dish, tilting its stem upward to establish a focal anchor point. Surround the central gourd with three smaller miniature white pumpkins and textured gourds, wedging them snugly together around the pedestal rim. Insert short sprigs of preserved silver dollar eucalyptus into the small perimeter gaps between gourds, allowing the silvery leaves to cascade downward over the rim. Weave dry, fluffy heads of bleached hydrangea into remaining openings, hiding the inner mechanics while framing the firm rind surfaces with soft floral clouds. Tuck small bundles of dried wheat stalks underneath the pumpkins, letting their textured bearded heads extend outward horizontally. Periodically wipe the gourd rinds with a dry microfiber cloth to keep the chalky white surfaces pristine and free from dust throughout the festive season.
5. Idea 5: Rustic Foraged Branch and Amber Glass Run
Step-by-Step Guide
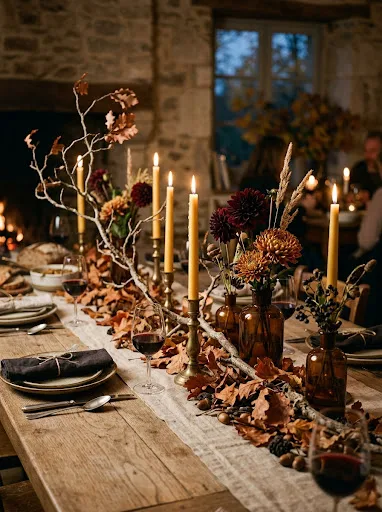
The rustic foraged branch and amber glass run captures the rich warmth of late autumn through architectural woodland branches and glowing vintage glassware. This dramatic concept utilizes tall, twisting oak branches holding dry russet leaves, paired with small amber apothecary bottles holding deep burgundy flora. The warm amber glass filters afternoon daylight and evening candlelight, casting golden honey tones across the table linen that immediately evoke autumn comfort. Tall, sculptural branches draw the eye upward toward dining room light fixtures, introducing vertical grandeur without cluttering valuable table space below. Rich floral elements like deep chocolate cosmos, rust-colored chrysanthemums, and hypericum berries nestle within the amber vessels, providing localized bursts of saturated jewel tones. This arrangement suits Thanksgiving tables, seasonal dinner parties, and rustic sideboard buffets where organic drama and warm mood lighting are desired.
Source four to six vintage-inspired amber glass bottles and narrow-necked flasks of varied heights, washing them thoroughly to maximize glass clarity. Fill each amber vessel with fresh water and arrange them in an alternating zigzag pattern down the center of a neutral linen runner. Forage three sculptural, bare or partially leafed hardwood branches measuring approximately sixty centimeters in length, ensuring they are free of loose dirt and brittle twigs. Rest the heavy branch bases flat along the central spine of the table runner, weaving the branches through the neck areas of the amber bottles. Trim your fresh burgundy chrysanthemums and dark dahlias so their heads hover just above the lips of the amber bottles, anchoring the look with color. Intersperse small clusters of dried acorn sprigs and pinecones directly onto the runner beneath the branches to ground the overall display. Insert tall, slender beeswax taper candles in brass holders between the glass vessels to illuminate the amber tones warmly during evening meals.
6. Idea 6: Minimalist Frosted Evergreen and Stoneware Bowl
How to Make
The minimalist frosted evergreen and stoneware bowl offers a restrained, contemporary interpretation of classic winter holiday arrangements through clean textures and cool woodland greens. This centerpiece features a wide, shallow handmade stoneware bowl filled with dense cuttings of blue spruce, noble fir, and fragrant cedar foliage. A dusting of fine powdered marble or dry floral chalk coats the evergreen needles, mimicking fresh mountain frost without the artificial appearance of synthetic flocking. The deep emerald and icy blue evergreen needles create an organic, lush bed that contrasts handsomely with the rough, unglazed exterior of artisan ceramic stoneware. Tucking real sugar pine cones and dried white tallow berries into the foliage adds structural variety while maintaining a serene winter color story. This arrangement releases crisp pine aromas throughout the room, creating an atmospheric holiday presence that lasts for several weeks with minimal misting.
Select a wide, shallow ceramic bowl with an unglazed stone exterior and a minimum diameter of twenty-five centimeters. Secure a heavy metal pin floral frog in the bottom center of the dry bowl using waterproof floristry clay, pressing down with firm pressure. Pour three centimeters of clean water into the bowl, ensuring the metal pins are submerged while leaving ample rim clearance. Trim fresh cuttings of noble fir, white pine, and incense cedar into fifteen-centimeter sprigs, removing needles from the bottom two centimeters of every stem. Impale the woody stem ends firmly onto the metal pins of the floral frog, working in radiating concentric circles from the rim toward the center. Build a mounded, domed canopy of mixed evergreens, alternating needles and scale-like cedar sprigs to generate deep textural contrast. Tuck three medium pinecones and clusters of white tallow berries into the upper foliage using short wooden floral picks. Lightly mist the finished arrangement with water and dust with dry ground chalk to complete the frosted winter look.
7. Idea 7: Winter Birch Pillar and Floating Cranberry Tray
Execution Process
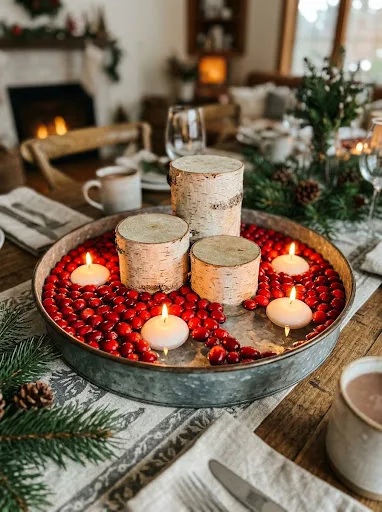
The winter birch pillar and floating cranberry tray pairs rustic white woodland bark with reflective water elements and vibrant holiday jewel tones. This sensory centerpiece utilizes a shallow zinc or galvanized metal serving tray holding thick, natural white birch log rounds and floating pillar candles. The crisp crimson hues of fresh floating cranberries and floating camellia foliage provide radiant contrast against the chalky white papery textures of birch bark. As evening arrives, glowing candlelight reflects across the water surface, creating flickering ambient lighting that transforms the dining space into a cozy winter sanctuary. The combination of buoyant fruit, industrial zinc metal, and natural woodland timber delivers balanced texture that complements casual family gatherings and festive holiday feasts alike. The water reservoir serves a dual purpose by keeping the fresh greenery hydrated while completely neutralizing the fire risk of burning table candles.
Obtain a round galvanized zinc metal tray with a five-centimeter lip, ensuring the internal seams are completely watertight before placing it on your table. Cut three solid white birch tree limbs into varying heights of ten, fifteen, and twenty centimeters, using a miter saw to guarantee flat, level base cuts. Seal the cut bottom end of each birch log with clear paraffin wax to prevent water absorption and position them cluster-style within the tray. Place heavy, wide glass cylinder vases holding white floating candles directly between the birch logs to establish stable, wind-protected flame sources. Fill the surrounding tray cavity with two centimeters of fresh water, taking care not to float the heavy timber logs off the tray floor. Scatter two cups of firm, fresh raw cranberries across the water surface, letting them form a buoyant crimson carpet around the birch bases. Tuck short sprigs of boxwood and rosemary between the floating berries to add fresh herbal scent and rich green accents.
8. Idea 8: Monochromatic Dried Botanical Shadow Cloche

Setup Method
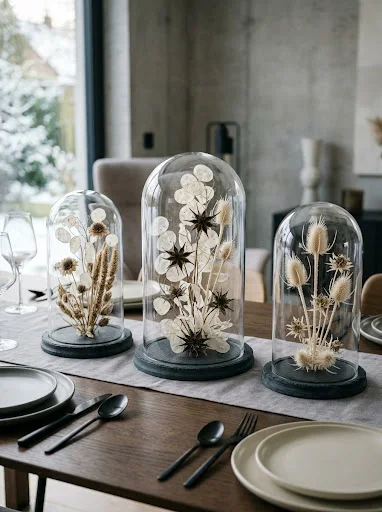
The monochromatic dried botanical shadow cloche introduces an architectural, museum-quality design element to seasonal dining tables through preserved flora displayed under glass. This sophisticated concept features a trio of clear glass bell cloches encasing sculpted arrangements of dried winter botanicals, seed heads, and textured grasses. The protective glass domes create an intimate focal boundary, drawing the viewer’s attention to the intricate, sculptural details of poppy seed pods, honesty pods, and bleached thistle. Executed entirely in tones of parchment, wheat, bone, and soft charcoal, this dry arrangement fits modern architectural dining spaces that favor sculptural form over floral mass. The enclosed glass design protects delicate dried botanicals from accidental handling, food splatters, and air currents from dining room heating vents. Furthermore, this everlasting centerpiece requires no ongoing water maintenance, serving as a permanent seasonal installation that can be moved from table to sideboard effortlessly.
Gather three clear glass display cloches with matching turned wooden or raw slate bases in varied heights of twenty, twenty-five, and thirty centimeters. Cut small blocks of dense dry floral foam, adhering them securely to the centers of the display bases using hot craft glue or floral putty. Select architectural dried botanicals, including translucent silver honesty seed pods, star-shaped scabiosa pods, dried wild oat stems, and sculptural globe thistles. Trim botanical stems with precision wire cutters, inserting the tallest elements into the center of the foam block to establish vertical height within the glass boundary. Layer smaller dried pods, fluffy cotton puffs, and dried flax seeds around the base, ensuring no green floral foam remains visible from any angle. Carefully test-fit the glass cloches over the finished dry botanical sculptures, checking that no fragile dried stems press against or bend along the glass interior walls. Lower the glass domes permanently onto their bases, wiping the exterior glass with vinegar and a lint-free cloth to remove all fingerprints.
9. Idea 9: Woodland Moss and Foraged Bark Table Trough
Step-by-Step Guide
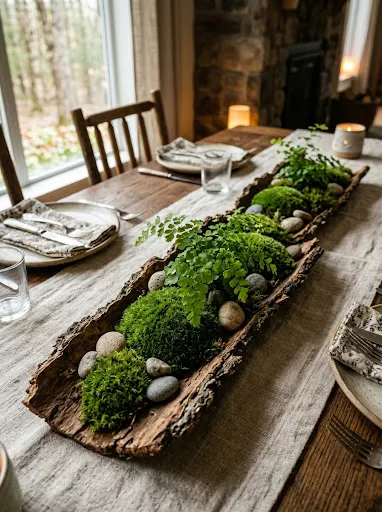
The woodland moss and foraged bark table trough captures the serene, grounding atmosphere of a quiet forest floor through living woodland elements and earthy textures. This low-profile runner features large slabs of natural fallen tree bark that cradle dense cushions of living moss, smooth river stones, and tiny wood ferns. Its deep earthy browns, rich olive greens, and cool slate greys introduce tactile outdoor textures into minimalist or rustic dining rooms. The low horizontal profile keeps the arrangement nestled comfortably beneath sightlines, functioning as an expansive garden bed down the table length. Using natural fallen bark as the primary container eliminates formal commercial vessels, delivering an organic silhouette with rough, weathered edges. This botanical tablescape fits cozy autumn dinners, weekend breakfasts, and rustic cabin dining, bringing the restorative calm of the forest directly to the table.
Source several long, curled slabs of clean, fallen pine or hardwood bark, gently brushing away loose exterior dirt with a soft-bristled brush. Lay the bark slabs end-to-end down the center of the table, overlapping the broken edges to form a continuous, undulating thirty-centimeter trough. Line the interior curved channel of the bark slabs with a thin sheet of heavy plastic film to prevent soil moisture from touching the table linen. Distribute several miniature potted fern varieties, such as maidenhair or button ferns, along the trough length, packing moist potting soil firmly around their root systems. Cover all exposed soil, plastic edges, and root balls with thick mats of fresh pillow moss, sheet moss, and lichen-encrusted twigs gathered from clean forest paths. Intersperse small clusters of polished grey river stones and smooth hazelnuts along the mossy ridges to create naturalistic landscape contours. Lightly mist the living moss and fern fronds with distilled water every other day to maintain their deep green vitality throughout your seasonal celebrations.
10. Idea 10: Frosted Brass Compote with Winter White Florals
How to Make
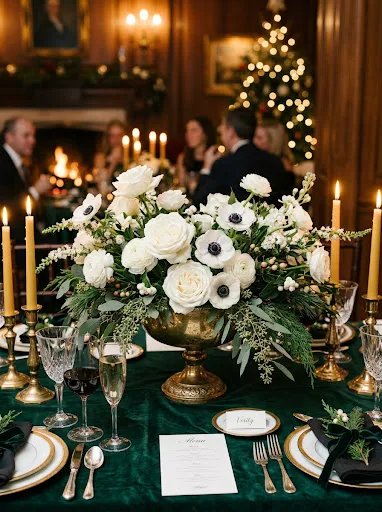
The frosted brass compote with winter white florals combines vintage metallic warmth with crisp, elegant winter blossoms to create a luxurious celebratory centerpiece. An elevated vintage spun-brass compote bowl hosts a sweeping arrangement of snowy garden roses, ruffled white ranunculus, and delicate winter anemones with dark midnight centers. The reflective golden surface of the brass warms the cool white petals and silvery dusty miller foliage, generating balanced visual warmth for formal winter dinner parties. Cascading sprigs of variegated ivy and seeded eucalyptus spill over the metal lip, softening the vessel’s metallic rim and creating fluid, asymmetric movement. The footed compote structure elevates the focal mass of the arrangement, leaving ample open surface area on the table below for stemware, condiments, and celebratory courses. This formal centerpiece suits New Year’s Eve celebrations, winter weddings, and holiday dinner parties where refined sophistication is paramount.
Secure an aged brass compote bowl, inspecting the interior for watertight integrity or inserting a fitted plastic floral liner bowl. Place a block of soaked floral foam trimmed to fit the bowl interior, securing it across the top rim with a crisscross grid of green waterproof floral tape. Begin by creating a greenery framework, inserting stems of silver dollar eucalyptus, olive foliage, and plumosa fern around the rim to establish a spreading horizontal shape. Angle lower foliage downward so the tips brush the tabletop, disguising the mechanical tape and creating graceful visual lines. Insert the primary focal flowers—large white garden roses and ruffled ranunculus—deeply into the center of the foam, cutting stems at varied lengths to prevent a flat, packed look. Weave delicate white winter anemones and sweet peas through the upper canopy, allowing their curving stems to dance naturally above the primary rose layer. Check the water level within the brass container daily, topping it off with cold water to keep the delicate winter blooms fully hydrated.
Common Beginner Mistakes and How to Avoid Them
Beginner table stylists frequently encounter structural and aesthetic missteps that detract from the visual success and functional utility of their centerpieces. A common error involves building arrangements too tall, creating an awkward visual barrier that obstructs cross-table eye contact and hinders conversation during dinner. Prevent this by testing your arrangement’s height from a seated position; the widest mass of foliage should remain below eye level, roughly thirty-five centimeters above the tabletop. Another frequent misstep is ignoring stem conditioning, which causes fresh garden cuttings and delicate blooms to wilt prematurely within hours of assembly. Always trim botanical stems at an angle under cool running water, strip away submerged foliage to prevent bacterial slime, and let stems drink for several hours prior to arranging. Beginners also often use inappropriate containers that leak moisture, resulting in water rings and permanent heat damage on fine wooden dining tables. Protect your furniture by utilizing waterproof floral trays, heavy plastic barriers, or silicone coasters underneath every vessel, checking for moisture buildup daily. Additionally, neglecting visual balance by clustering all large flowers on one side causes the display to look lopsided; rotate your centerpiece continuously while building it to ensure balanced beauty from every dining chair.
Practical Tips for Better Results
Elevating your DIY seasonal centerpieces from amateur arrangements to professional-grade installations requires thoughtful mechanical discipline, tool selection, and finishing touches. Use floral frogs or chicken wire rather than standard floral foam whenever possible; wire frameworks allow natural stem movement while ensuring effortless daily water replenishment. When foraging outdoor branches and foliage, choose materials with varying growth habits—mix upright stems, spreading fan foliage, and delicate cascading vines to produce rich textural layers. If incorporating candles, select dripless, unscented paraffin or natural beeswax varieties; scented candles clash with the culinary aromas of served meals and can overwhelm dining guests. Keep your workspace clean by stripping unnecessary foliage and thorns before bringing materials to the main table, preventing stray leaf debris from contaminating clean linens. For arrangements featuring fresh fruit, wipe rinds with a drop of food-grade mineral oil to impart a subtle, camera-ready sheen that catches ambient evening light. Extend the lifespan of cut floral centerpieces by moving them into a cool basement, pantry, or refrigerator overnight, away from direct sunlight and heat registers. These professional finishing touches ensure your creative table centerpieces maintain structural freshness, balanced proportions, and visual vitality throughout your seasonal gatherings.
Styling, Presentation, or Organization Ideas
Displaying seasonal centerpieces effectively relies on holistic table composition, balancing the central arrangement with surrounding dinnerware, linens, and ambient lighting. Pair rustic earthenware centerpieces with raw, textured linen runners in neutral oatmeal or slate tones, letting natural wrinkles enhance the relaxed, organic mood. For formal gatherings featuring brass or fine glass vessels, select pressed cotton tablecloths and coordinated cloth napkins folded neatly beneath flatware to establish a refined foundation. Maintain spatial harmony by selecting centerpiece proportions that match your table shape; long banquet tables benefit from meandering garlands or multi-vessel runs, while round tables require compact, circular focal bowls. Introduce layered ambient lighting around your botanical focal point using small glass votives, slender taper candles, or delicate battery-operated fairy lights woven through foliage beds. Coordinate place settings subtly with the centerpiece by placing a single olive sprig, mini white gourd, or dried botanical pod across each dinner napkin. Keep sideboards and buffet credenzas visually connected by echoing elements from the main table, such as placing a matching branch in an oversized jug nearby. This cohesive approach unifies dining spaces, turning an isolated floral arrangement into an immersive, professionally curated tablescape.
Budget or Time Planning
Designing impactful seasonal centerpieces does not require extravagant expenditures on imported flowers or specialized floristry supplies. Prioritize budget efficiency by establishing a seasonal foraging routine, gathering evergreen boughs, wild grasses, architectural branches, and pinecones from your local environment at zero material cost. Invest in two or three versatile, high-quality foundational vessels—such as a weathered terracotta trough, a stoneware compote, and a low brass bowl—that can be repurposed across all four seasons. Sourcing inexpensive supermarket floral bundles and combining them with backyard greenery dramatically reduces costs while maintaining substantial volume and botanical variety. From a time-management perspective, allocate forty-five minutes to source and condition botanicals on the morning of an event, reserving thirty minutes for final table assembly before guests arrive. Dry arrangements, including gourd pedestals, botanical cloches, and dried pod collections, can be assembled weeks in advance, eliminating entertaining day stress completely. When purchasing living potted bulbs or miniature ferns, select varieties that can be transplanted into outdoor home garden beds after the event, maximizing your financial investment. Planning your centerpiece around durable, long-lasting elements ensures you achieve maximum decorative impact with modest financial expenditure and efficient time investment.
Creative Expansion and Advanced Inspiration
Once you master fundamental seasonal centerpieces, you can explore innovative material pairings, kinetic design elements, and multi-dimensional installations. Experiment with suspending lightweight foraged branches or delicate dried floral clouds from dining room ceiling beams or chandelier bases directly above your tabletop arrangement. This vertical expansion introduces floating sculptural drama that draws the eye upward, framing the seated dining space into an intimate room within a room. You can also explore living hydro-botanical arrangements, submerging weighted branches and smooth river stones completely under water in tall glass cylinders topped with floating flame wicks. Explore subtle mixed-media textures by weaving woven raw jute cords, polished copper pipes, or hand-torn silk ribbons through your foliage runners for an unexpected contemporary twist. Advanced floral stylists can also experiment with botanical dyeing techniques, tinting dried hydrangeas and bunny tails with natural onion skin or avocado pit dyes to create custom seasonal color palettes. Incorporating fragrant edible herbs—such as flowering basil, blooming chives, and variegated sage—into floral arrangements bridges the gap between garden decor and table dining. Pushing the boundaries of scale, texture, and living elements ensures your DIY seasonal centerpieces remain an inspiring canvas for creative artistic expression.