Designing an intentional reception tablescape establishes the visual tone for a wedding celebration, and centerpiece decor serves as the primary focal anchor for dining guests. This comprehensive guide details ten distinct wedding reception centerpiece decor concepts, providing structured, practical methodologies to transform event tables into cohesive visual statements. Readers will learn the precise mechanical steps required to stabilize floral foundations, balance physical proportions against table dimensions, coordinate secondary lighting accents, and maintain clear sightlines across dinner service. Centerpiece design directly influences venue atmosphere, transitioning empty banquet halls, open pavilions, and garden courtyards into immersive, welcoming reception spaces. Beyond ornamental value, an effective centerpiece organizes table real estate, ensuring that shared dining elements, glassware, and printed stationery sit harmoniously without causing clutter. By exploring varied design directions ranging from clean architectural arrangements to lush botanical cascades, couples and event stylists can customize layouts to reflect specific seasonal palettes and architectural environments. Mastering these step-by-step assembly techniques allows planners and decorators to approach reception design with technical confidence, achieving professional, durable finishes that withstand hours of celebration while elevating the guest dining experience.
Why This Idea Is Trending or Useful
Reception centerpiece design maintains a commanding presence across modern wedding inspiration boards because seated dining represents the longest shared experience of any reception schedule. Contemporary couples increasingly approach table styling as a curated art form, moving away from mass-produced, uniform floral mounds in favor of dimensional installations that feature organic textures, architectural vessels, and purposeful negative space. From a functional perspective, a thoughtfully engineered centerpiece balances aesthetic appeal with dining ergonomics, allowing smooth family-style meal distribution and uninterrupted face-to-face conversation. The creative appeal of DIY wedding centerpieces has grown rapidly, as sourcing independent glassware, architectural stands, and botanical components allows planners to personalize decorative details while managing floral budgets effectively. Because foundational table mechanics follow repeatable structural principles, beginners can assemble sophisticated arrangements without extensive floristry training. This blend of practical utility, accessible fabrication methods, and modern aesthetic versatility ensures that centerpiece styling remains a central creative focus for contemporary wedding planning.
Materials and Preparation
Assembling durable, professional wedding centerpieces requires disciplined preparation, dependable mechanics, and systematic workspace organization prior to event installation. Begin by acquiring structural vessels and foundations, such as heavy ceramic bowls, footed brass urns, glass hurricane cylinders, or metal risers suited to your table geometry. Essential floral tools include sharp bypass pruners, heavy wire cutters, floral pin frogs, waterproof anchor tape, dry and wet floral foam blocks, and clean buckets for stem hydration. Thorough preparation starts forty-eight hours before assembly with careful botanical conditioning: cut flower stems at sharp forty-five-degree angles under cool running water, strip lower foliage that would sit beneath waterlines, and allow blooms to hydrate fully in preservative-treated water. Measure venue banquet tables in advance to determine centerpiece height thresholds, ensuring arrangements remain below fifteen inches or rise above twenty-four inches to preserve guest sightlines. Pre-cleaning glass vessels with isopropyl alcohol and testing battery-operated or dripless wax candles prevents day-of delays, ensuring an efficient assembly process that delivers stable, long-lasting table arrangements.
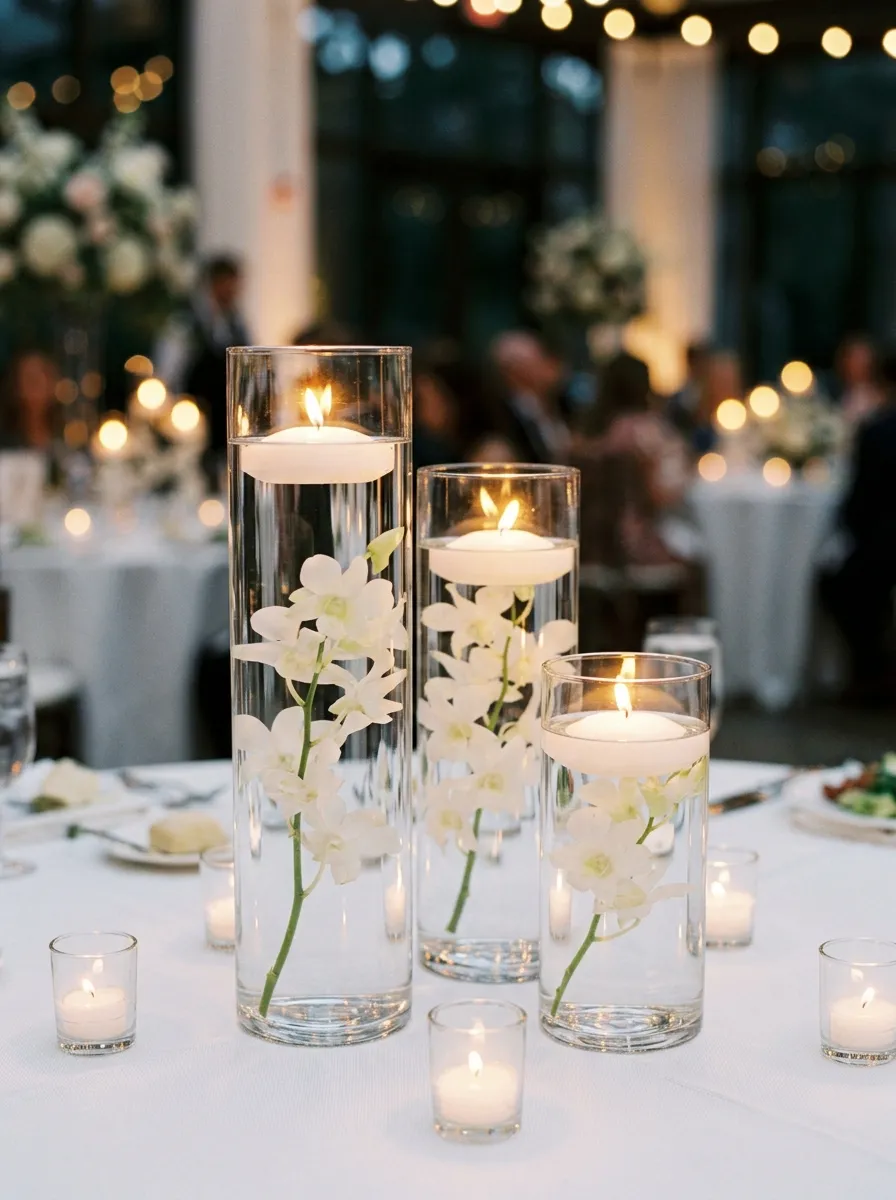
1. Tiered Glass Cylinder Trio with Submerged Blooms and Floating Candles
Step-by-Step Guide
The tiered glass cylinder centerpiece uses translucent water refraction and clean vertical geometry to form an understated, luminous focal point. This concept groups three smooth borosilicate glass cylinder vases measuring six, nine, and twelve inches in height, clustered closely together at the center of the table. Submerging single botanical stems, such as white dendrobium orchids, calla lilies, or long-stemmed tulips, creates an aquatic visual display that magnifies petal textures beneath the water surface. Capping each cylinder with a white wax floating candle introduces dynamic reflection, casting warm light downward through the glass columns across table linens and flatware. The contained vertical profile leaves surrounding table space open for banquet service, wine coolers, and personal dining essentials. This clean, modern design adapts effortlessly to contemporary ballrooms, industrial art galleries, and minimalist evening celebrations where controlled, elegant lighting takes precedence.
To assemble this centerpiece, begin by thoroughly cleaning each glass cylinder inside and out using a microfiber cloth and glass cleaner to eliminate streaks, dust, and fingerprints. Anchor a lead weight or heavy glass floral marble to the base of your chosen botanical stem using clear florist wire to prevent the flower from floating upward. Lower the weighted stem carefully into the dry vase, positioning the flower head upright against the glass wall. Slowly pour distilled room-temperature water down the inside edge of the cylinder, filling the vessel until the waterline rests two inches below the top rim; using distilled water prevents cloudiness and micro-bubble accumulation on the petals. Gently set a three-inch circular floating candle onto the water surface, ensuring the wick stays dry. Group the three filled cylinders in a tight triangular cluster at the table center, and surround the glass bases with three low glass votive cups to create a multi-level field of candlelight.
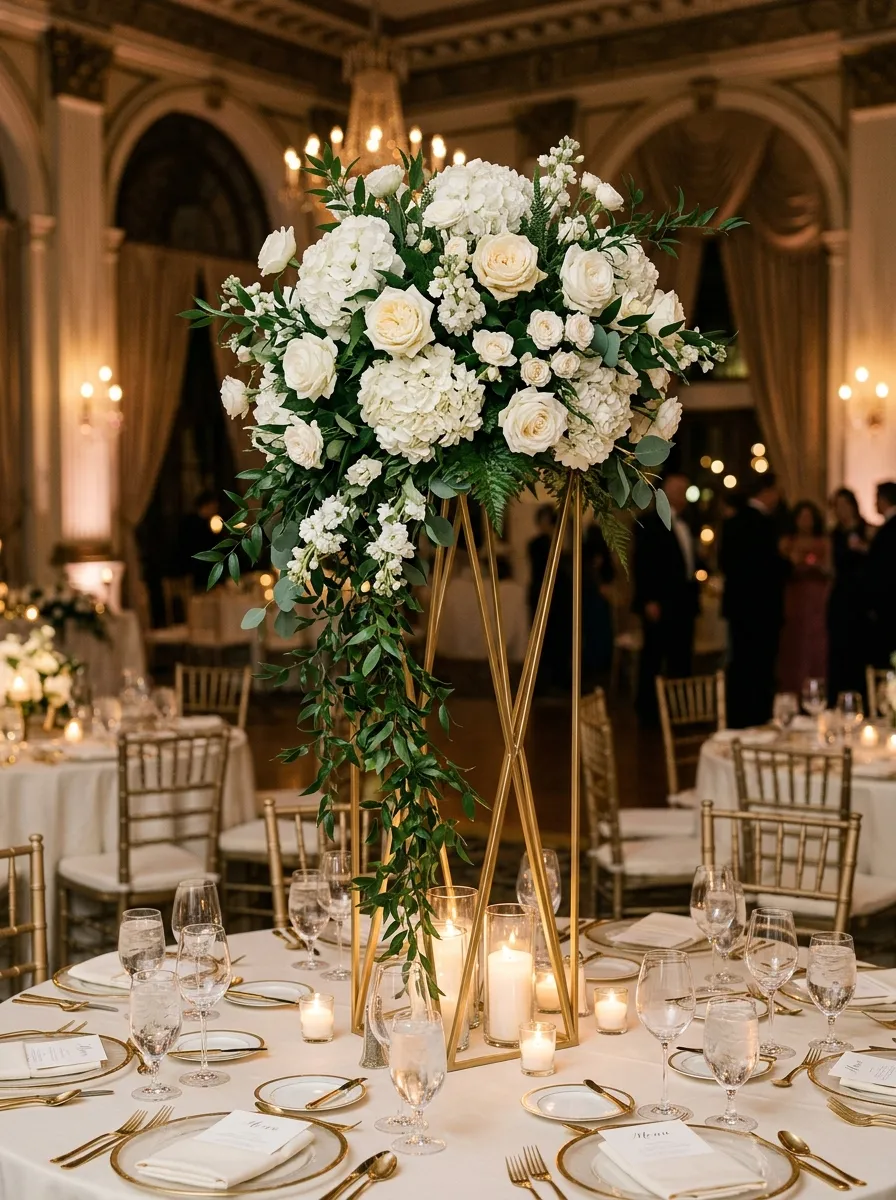
2. Low Terracotta Compote with Seasonal Garden Blooms
How to Make
The low terracotta compote arrangement brings earthy Mediterranean warmth and relaxed fine-art floristry to reception banquet tables. This design relies on a shallow, footed earthenware dish that lifts seasonal garden flowers slightly above the tabletop while keeping the overall arrangement below guest eye level. The porous, warm texture of unglazed clay provides an organic counterpoint to delicate garden roses, ranunculus, trailing jasmine vines, and sweet peas. Rather than packing flowers into a stiff, dome-like mass, this concept embraces an asymmetrical garden style, letting soft stems spill naturally over the container edges while focal blooms face upward toward the viewer. The wide, low footprint provides exceptional physical stability, eliminating tipping hazards on lively dining tables. Its warm clay tones complement raw linen table runners, woven textures, and outdoor vineyard, orchard, or historic courtyard settings.
Start by securing a heavy metal floral pin frog to the bottom center of a six-inch-wide terracotta compote bowl using a firm disc of waterproof floral putty. Fill the bowl with cool, flower-food-treated water up to one-half inch below the rim, and wrap the container edge with clear floral tape in an open grid for extra structural support. Cut five stems of textured base greenery, such as olive branches or seeded eucalyptus, trimming the woody ends at a sharp angle and pressing them firmly onto the outer pins of the frog to establish a horizontal, spilling base. Insert three large focal garden roses into the central pins at varied heights between six and ten inches, angling them slightly outward. Fill the internal gaps with delicate ranunculus and flowering branches, ensuring stems curve in different directions to produce an organic garden shape. Step back to verify that the arrangement remains under fourteen inches tall, then wipe the outer clay bowl dry before placing it on the table linen.
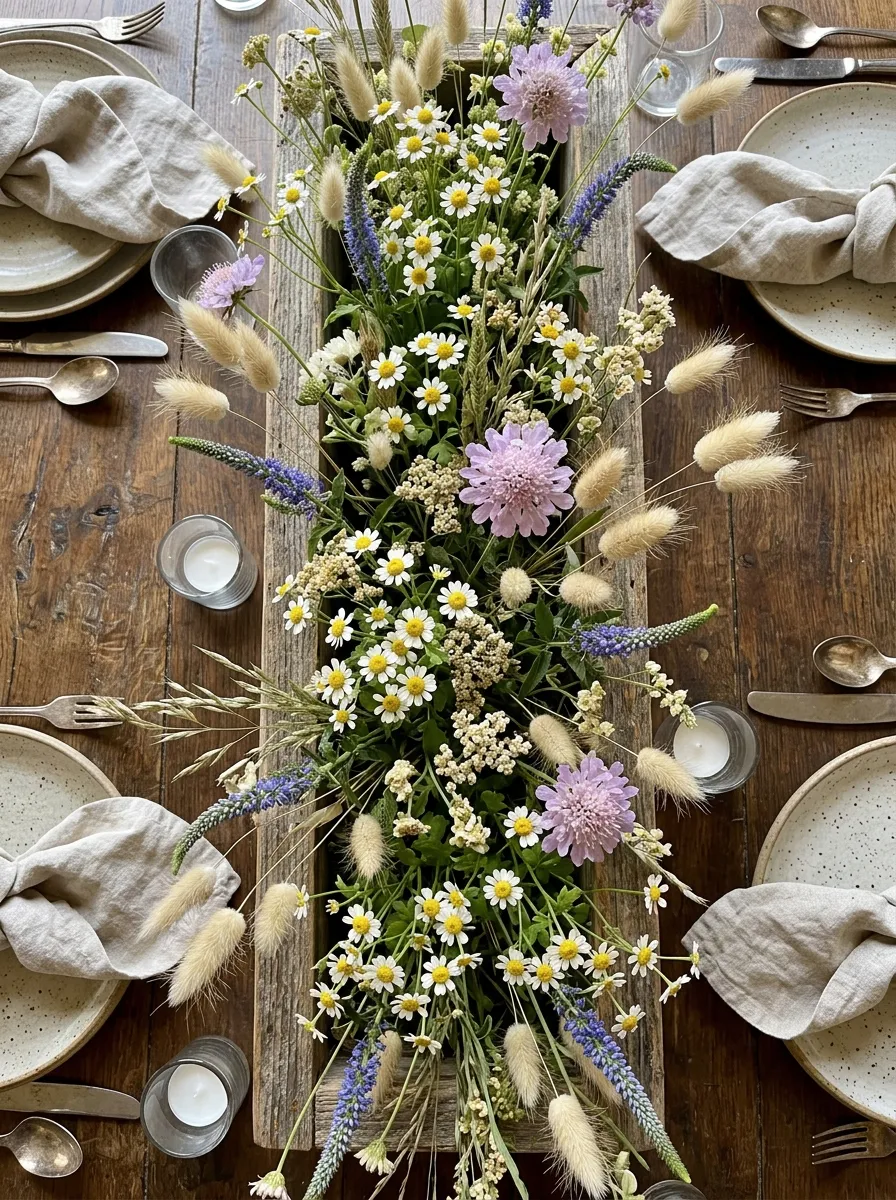
3. Elevated Geometric Metal Riser with Cascading Greenery
Execution Process
The elevated geometric metal riser solves the structural problem of filling high-ceilinged reception spaces without blocking cross-table conversation. This design places a voluminous floral and foliage display atop a slender, four-legged matte gold or black iron stand measuring twenty-eight to thirty-two inches tall. By lifting the decorative weight well above seated eye level, the metal pedestal leaves the immediate tabletop clear for place settings, printed menus, and low table lighting. The upper botanical canopy features long, arching stems of Italian ruscus, weeping eucalyptus, and white delphiniums that drape downward toward the table, creating a soft arbor-like canopy over diners. The open framework of the pedestal legs maintains sightlines across the room, preserving a light, spacious feeling within grand ballrooms, historic tented lawns, and vaulted barn venues.
Begin by fastening a heavy-duty plastic floral designer tray to the top flat plate of your metal pedestal stand using two wide strips of waterproof anchor tape crossed in an X shape. Fit a pre-soaked block of structural floral foam into the tray, securing it with a layer of coated poultry wire folded over the foam and taped to the tray handles for added stem security. Insert long branches of Italian ruscus horizontally into the perimeter of the foam, letting the foliage trail eighteen inches downward around the open frame. Insert tall focal branches vertically into the center of the top foam block, establishing an overall height of sixteen inches above the tray. Layer dense garden roses, hydrangeas, and lisianthus into the front and sides of the foam, angling stems downward to completely conceal the plastic dish and foam mechanics from seated guests. Ensure the overall centerpiece remains balanced, checking that no single side carries excess weight that could tilt the pedestal.
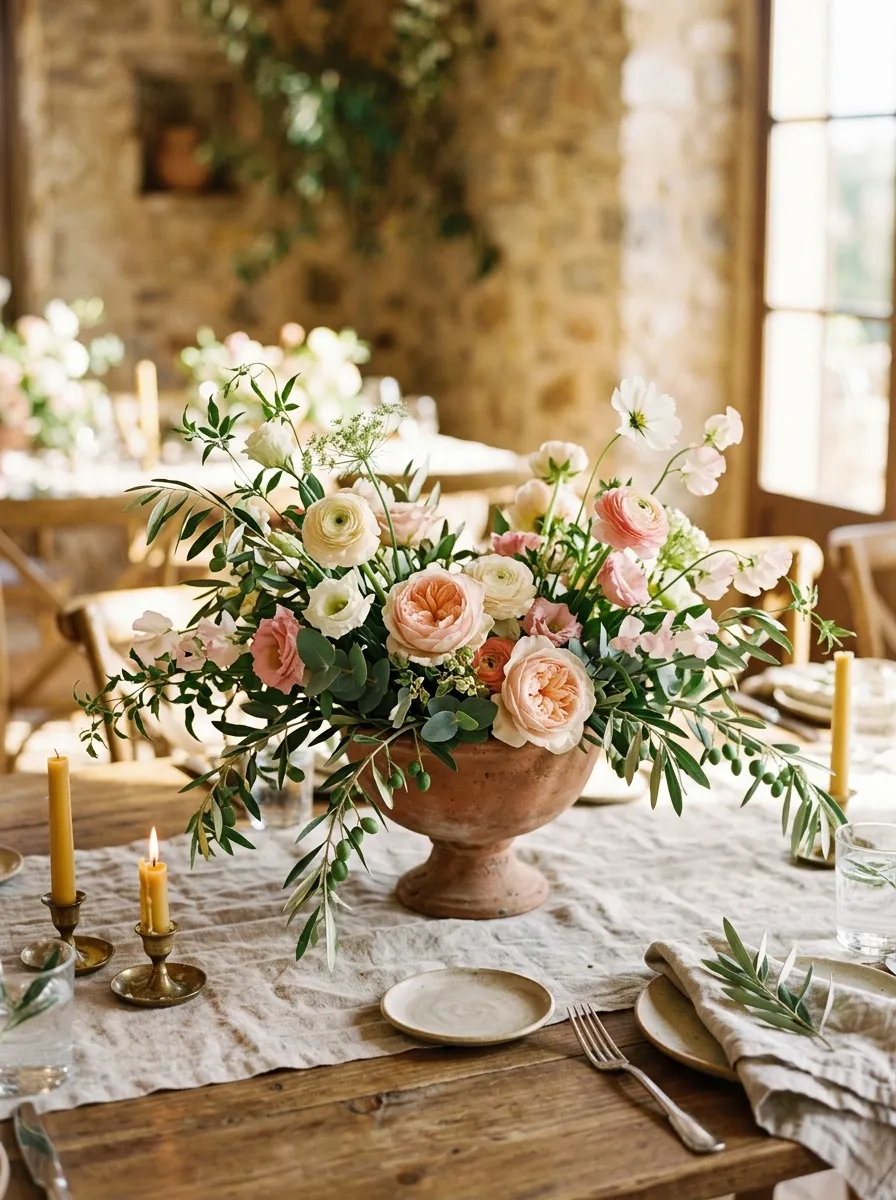
4. Reclaimed Wood Planter Box with Textured Meadow Florals
Setup Method
The reclaimed wood planter box centerpiece introduces rustic warmth, clean linear lines, and meadow-inspired textures to long banquet and estate tables. This design utilizes a narrow, rectangular wooden trough measuring twenty-four to thirty-six inches long, four inches wide, and three inches deep, constructed from weathered cedar, walnut, or pine. The elongated box sits flat along the central axis of the table, organizing a diverse assortment of field-grown botanicals such as chamomile, veronica, scabiosa, delphinium, and ornamental grasses. The continuous horizontal shape ties long tables together into a unified display, avoiding the visual gaps created by isolated round arrangements. The natural wood grain pairs effortlessly with exposed wooden farm tables, neutral linen runners, and casual family-style dining service, bringing relaxed garden charm to rustic barns, open meadows, and mountain lodges.
Prepare the wooden trough by lining the entire internal cavity with heavy-gauge transparent plastic sheeting, stapling the edges inside the rim to protect the exterior wood from moisture. Cut pre-soaked bricks of wet floral foam to fit the trough snugly, slicing the top surface so the foam rises one-half inch above the container rim to permit horizontal stem insertions. Secure the foam with two bands of green floral tape wrapped around the narrow width of the box. Begin inserting structural foliage, such as salal leaves and boxwood clippings, along the outer edge of the foam to establish an even green collar that conceals the plastic lining. Insert varied meadow blooms into the top surface at alternating heights between six and twelve inches, distributing colors and textures evenly along the trough to avoid heavy focal clusters. Finish by tucking small stems of dried bunny tails and delicate grasses into the gaps, creating an airy, textured field arrangement that flows cleanly down the length of the table.
5. Smoked Glass Demi-John Vessels with Dried Meadow Plumes
How to Create
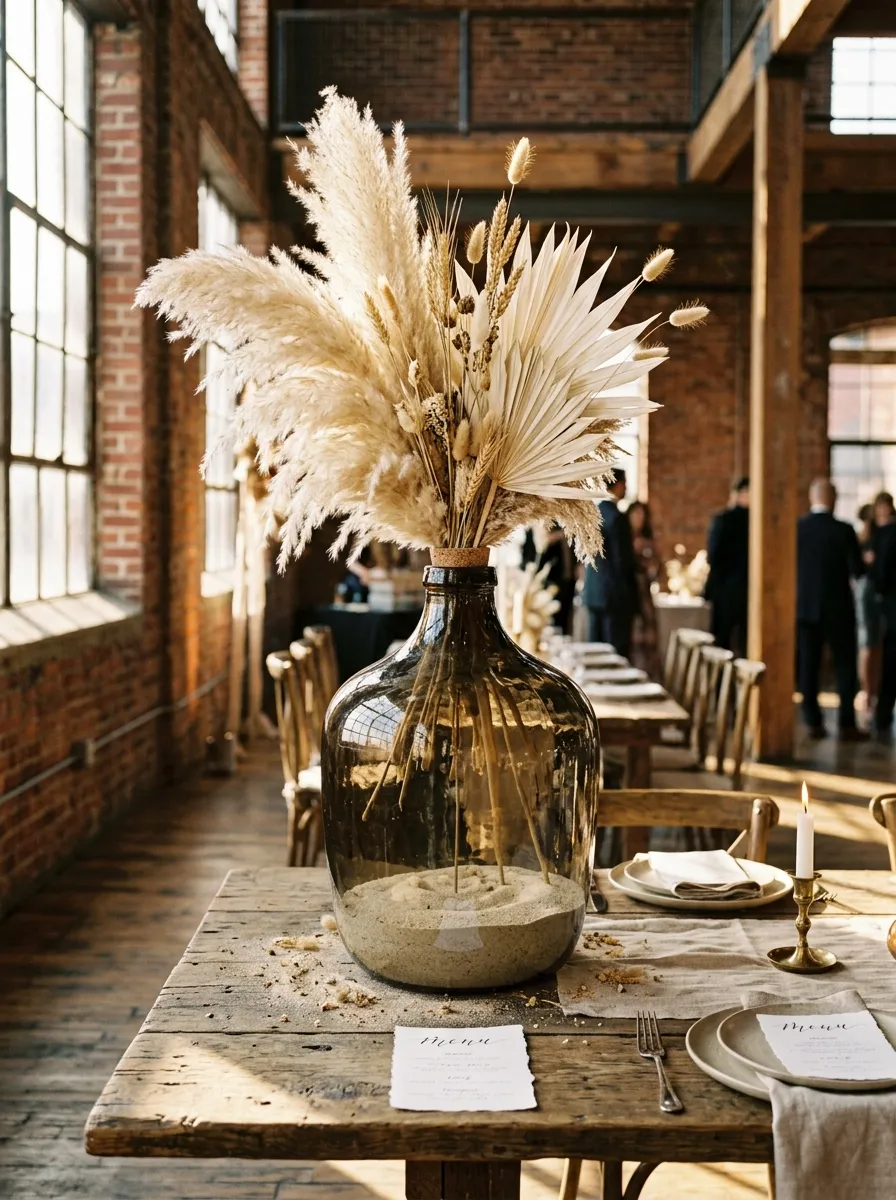
The smoked glass demi-john centerpiece combines vintage utilitarian glasswork with preserved, neutral botanicals to craft an architectural, low-maintenance statement. This concept uses oversized vintage glass carboys or narrow-necked demi-john bottles finished in translucent charcoal, olive green, or warm amber tones. The colored glass provides visual anchor weight while partially obscuring the cut stems inside, turning functional stem mechanics into an intentional decorative feature. By filling the vessels with fluffy dried pampas plumes, bleached palm spears, bunny tails, and dried flax pods, this centerpiece eliminates the need for water reservoirs and floral foam entirely. The soft, billowy texture of dried grasses contrasts against the hard, reflective glass surface, making it an ideal choice for autumn weddings, desert gatherings, and modern industrial warehouse receptions where durable, waterless decor is preferred.
Select a heavy smoked glass carboy with a stable, wide bottom base measuring at least ten inches across to provide sufficient ballast against accidental bumps. Funnel one cup of clean, fine horticultural sand or washed decorative pebbles into the bottom of the dry glass vessel to lower its center of gravity and add stability against drafts. Select three to five tall, full pampas grass stems, measuring their length so the bottom of the feathery plume begins precisely at the mouth of the bottle. Trim the bare woody stems at an angle using bypass pruners, sliding them carefully through the bottle neck so the stems cross inside the base and spread outward naturally above. Layer in two dried bleached sun palm fans and a cluster of dried wheat stems to add varied structural shapes among the feathery plumes. Spray the finished arrangement with a light coat of aerosol hairspray to control shedding, and place the finished demi-john atop an exposed wooden tabletop.
6. Vintage Brass Candlesticks and Asymmetrical Taper Pathway
Step-by-Step Guide
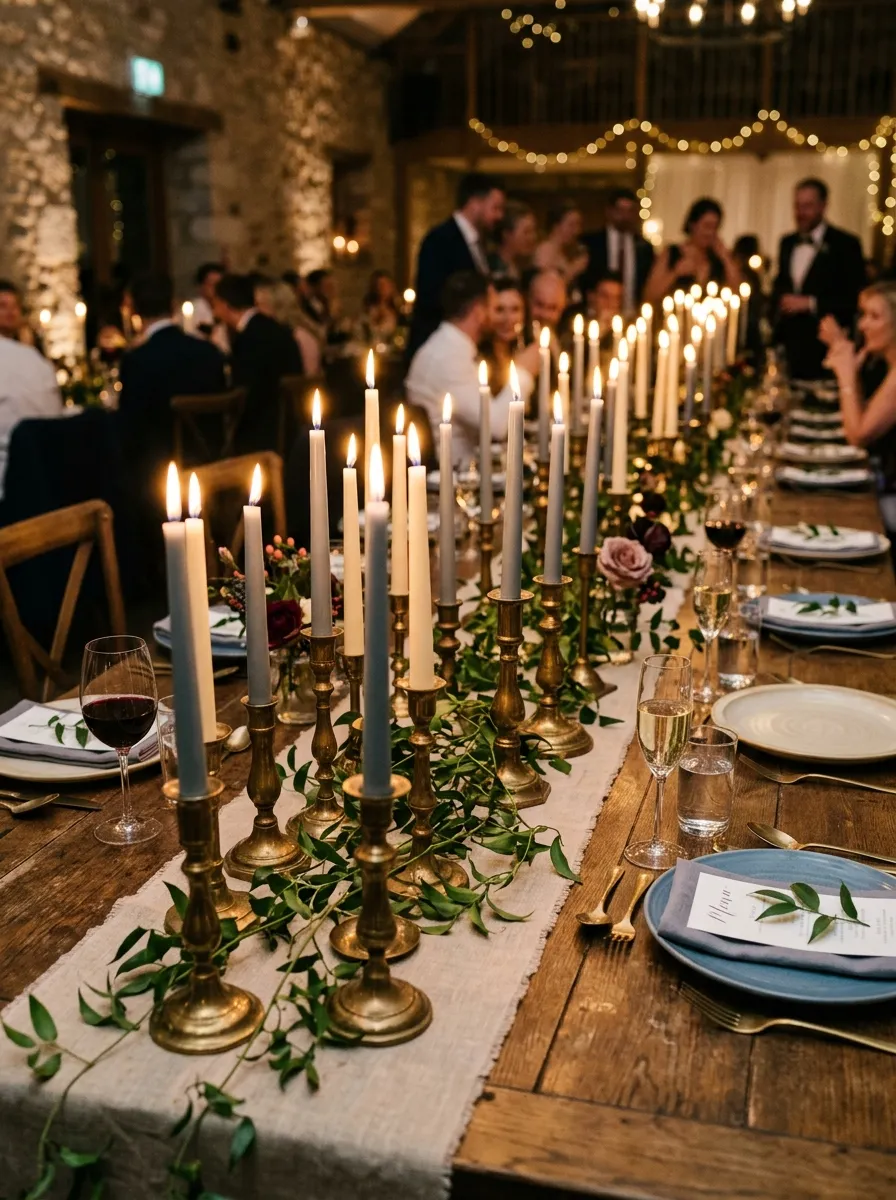
The vintage brass candlestick pathway trades traditional floral-heavy arrangements for a luminous, multi-tiered installation of warm living light and understated foliage. This design arranges an eclectic collection of authentic brass candlesticks, varying from four to twelve inches in height, along the center axis of long dining tables. Smooth, dripless taper candles in ivory, dusty slate, or warm beeswax tones rise from the polished metal bases, casting a flickering, intimate glow across glassware and place settings. Slender, creeping vines of fresh smilax or Italian ruscus are woven organically between the brass bases, softening the hard metal edges without adding bulky floral volume. This low-profile setting keeps table sightlines open, creating an inviting, romantic atmosphere well-suited for historic stone estates, wine cellars, and evening courtyard dinner services.
Begin by arranging a washed, raw-edged neutral linen table runner down the center of an eight-foot banquet table, allowing the fabric to fall into gentle ripples. Select twelve vintage brass candlesticks of varying heights, cleaning off old wax and polishing the metal surfaces with a soft microfiber cloth. Space the candlesticks down the runner in an organic, meandering zigzag pattern, avoiding rigid lines and keeping each candlestick at least four inches away from guest flatware and paper menus. Press high-grade, dripless taper candles firmly into the candlestick cups, using melted wax drops or floral adhesive putty in the base to ensure every candle stands vertically plumb. Weave two continuous strands of fresh smilax or trailing ivy along the table runner, threading the vines between the brass bases while keeping leaves at least two inches away from the active wicks. Place clear glass chimney hurricane tubes over every candle if local venue regulations require enclosed flames.
7. Architectural Stone Pedestal with Sculptural Foliage
Execution Process
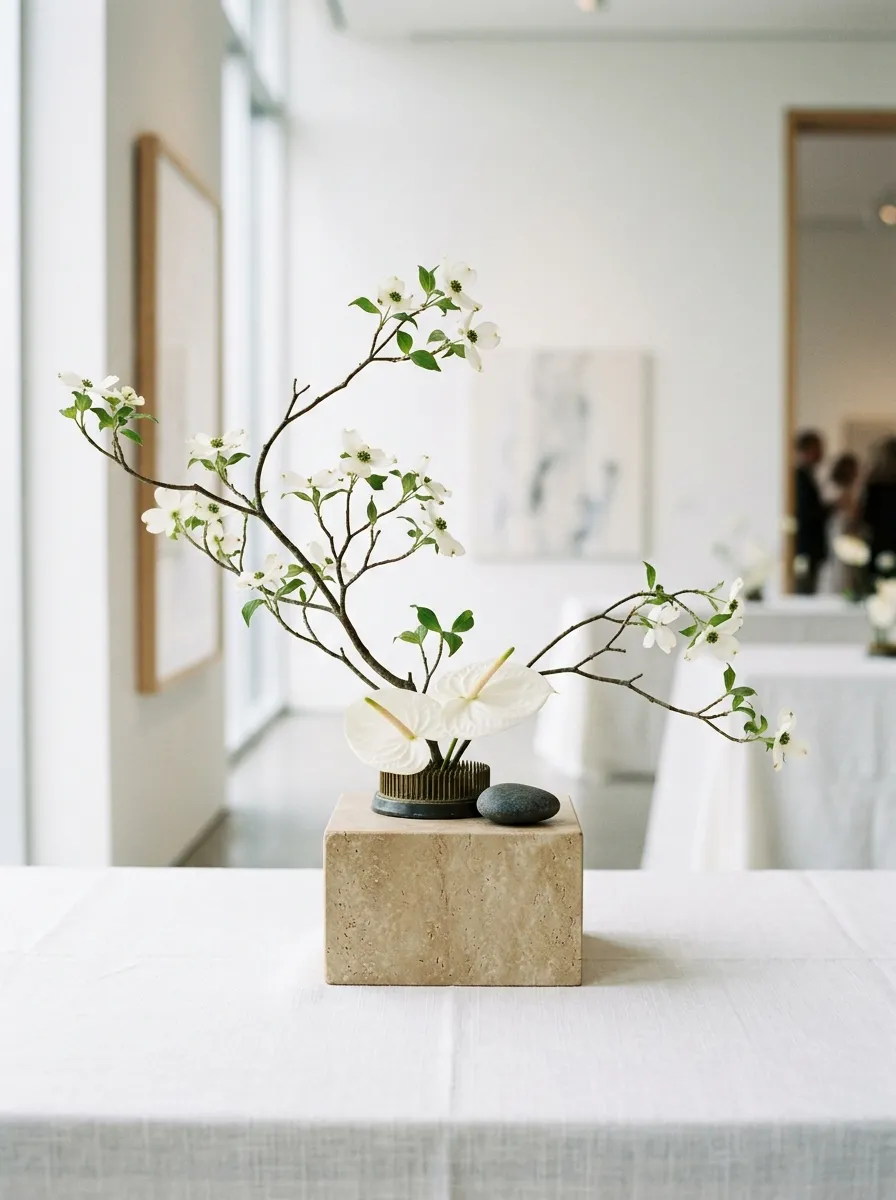
The architectural stone pedestal centerpiece utilizes minimalist principles and raw mineral textures to present a modern, gallery-inspired tablescape. This concept centers on a low, heavy plinth crafted from honed travertine, raw slate, or cast concrete, elevating foliage above the table surface with clean geometric authority. Rather than using dense, colorful flower clusters, this design prioritizes negative space, form, and line, featuring a small selection of striking botanical elements such as monstera leaves, anthuriums, or flowering dogwood branches. The cool, matte stone surface contrasts cleanly against glossy living foliage, turning individual plant stems into sculptural elements. This styling fits naturally into contemporary art centers, minimalist industrial venues, and modern architectural spaces where clean forms and thoughtful restraint take precedence over traditional abundance.
Start by placing a solid, honed travertine stone block measuring eight by eight inches at the center of the reception table, ensuring felt protective pads cover the bottom to prevent table scratching. Secure a heavy brass floral kenzan, or pin frog, directly onto the center of the stone surface using clear mounting putty, pressing down with a firm twisting motion to establish an airtight seal. Pour a shallow pool of water into the stone dish or kenzan reservoir to sustain the stems throughout the event. Cut a single branch of blooming quince, dogwood, or sculpted monstera foliage at a sharp forty-five-degree angle, making the branch approximately twice the width of the stone plinth. Press the base of the branch firmly into the brass pins at an intentional, off-center diagonal angle to establish a striking, sculptural line. Insert two contemporary white or blush anthurium stems directly beside the branch base, and complete the setting with a single smooth river stone placed over the brass pins to mask the mechanics.
8. Clustered Ceramic Bud Vases on Mirrored Trays
Setup Method
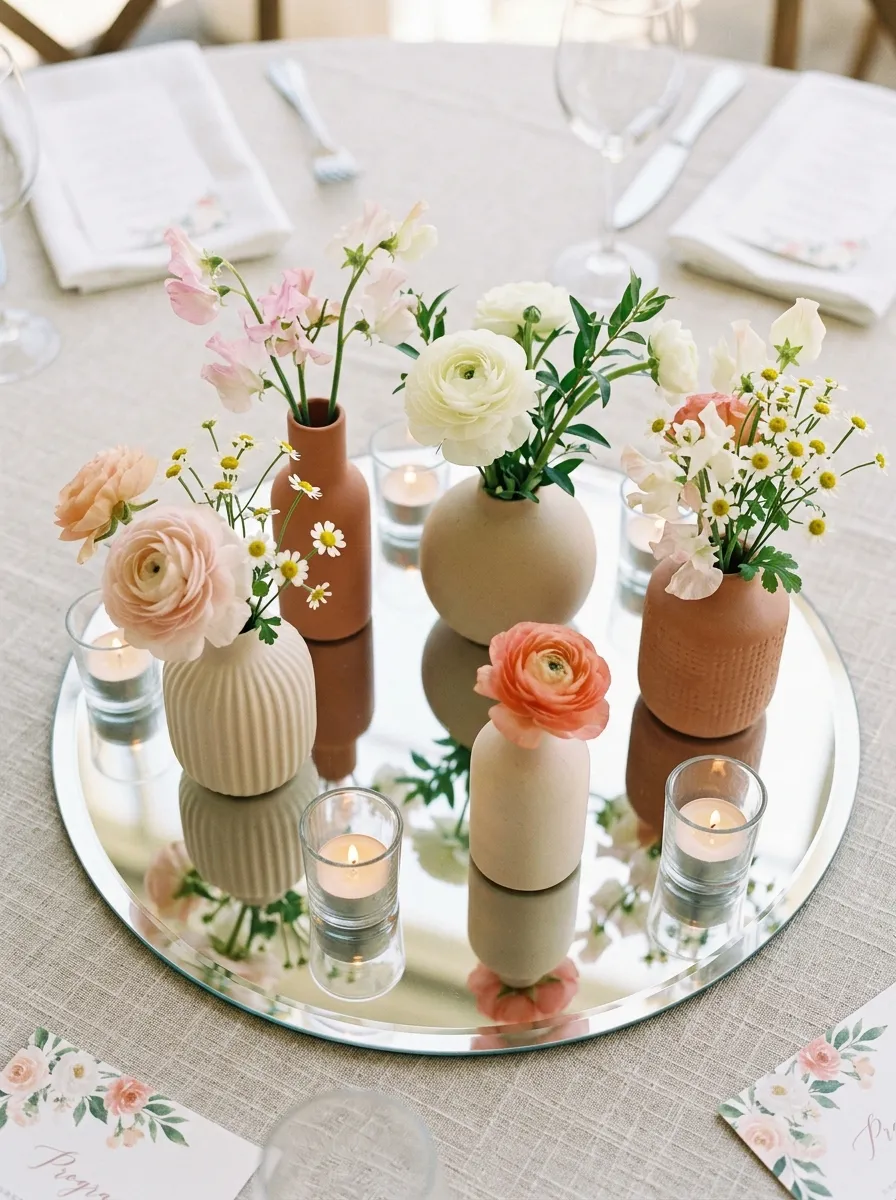
The clustered ceramic bud vase centerpiece provides a flexible, budget-conscious design that breaks floral masses into small, delicate arrangements. This concept arranges five to seven petite matte ceramic bud vases in complementary earth tones—such as cream, warm taupe, and terracotta—atop a clean circular mirror or flat slate tray. Each vessel houses one to three stems of delicate garden blooms and foliage, such as ranunculus, hellebores, feverfew, and sweet peas. The reflective surface of the mirrored tray catches ambient light and bounces the soft ceramic textures upward, while the varied heights of the bud vases create dynamic visual rhythm across the table. This modular approach is practical for round dining tables, providing a complete 360-degree viewing experience without obstructing cross-table views, while allowing simple assembly and quick venue cleanup.
Place a twelve-inch circular, beveled-edge glass mirror flat in the center of the dining table, polishing the surface with a lint-free glass cloth to remove dust and fingerprints. Select five matte ceramic bud vases in assorted geometric shapes, ranging from three to six inches tall, and fill each container two-thirds full with fresh, preservative-treated water. Trim individual flower stems to staggered lengths, cutting them so bloom heads hover between one and four inches above each vase mouth. Place an open garden rose into the tallest central vessel, two delicate ranunculus stems into the medium-sized vases, and airy sprigs of feverfew or sweet peas into the smallest outer containers. Arrange the filled vases on the mirrored tray in an offset, asymmetrical cluster, ensuring the container walls sit closely without touching or clinking together. Complete the setting by resting three small glass tealight cups along the outer edge of the mirror to illuminate the arrangement from below.
9. Suspended Open-Wire Floral Chandelier Canopy
How to Make
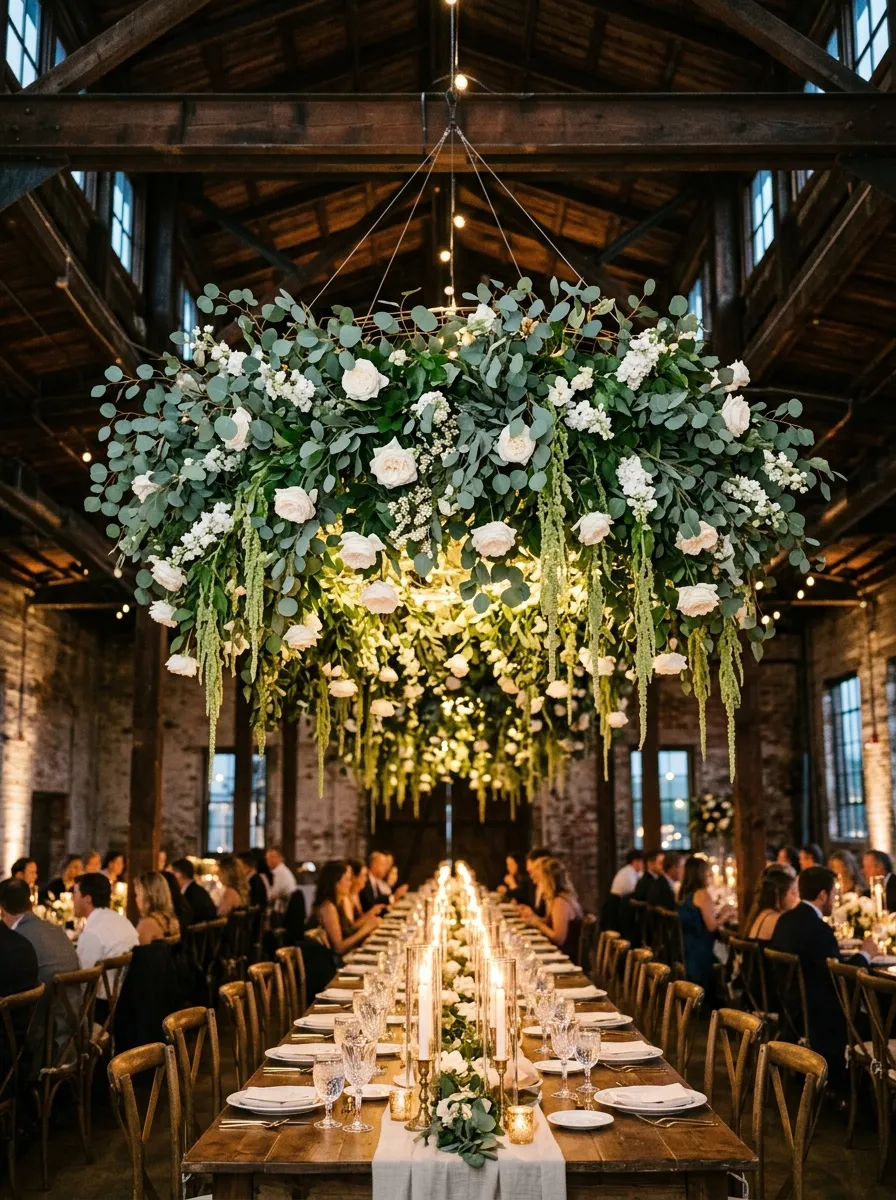
The suspended floral chandelier canopy shifts centerpiece decor overhead, freeing the dining table entirely while creating a high-impact architectural installation. This concept suspends a horizontal frame of structural chicken wire or light powder-coated iron mesh from venue ceiling beams, positioning the botanical cloud four to five feet above the banquet table. The suspended frame is packed with airy foliage, hanging amaranthus, and open garden blooms that drape downward toward diners, creating an immersive dining arbor. Because the decorative mass floats overhead, the entire tabletop remains open for low candlelight, shared feast platters, and comfortable dining place settings. This installation visually lowers cavernous ceilings, creating an intimate, magical dining atmosphere within large industrial warehouses, vaulted barns, and open-air tent structures.
Construct the foundation by rolling out a four-foot section of two-inch galvanized chicken wire, shaping it into a three-dimensional, hollow oval basket and crimping cut wire ends together with pliers. Secure four points of load-tested steel aircraft cable or heavy-duty monofilament line to the structural corners of the wire frame, suspending the empty armature at a comfortable working height on ladders or rigging points. Weave long branches of hardy salal, bay laurel, and weeping eucalyptus through the wire mesh from the outside inward, letting the leafy ends drape naturally downward to conceal the wire structure from below. Insert water tubes containing fresh focal flowers, such as open garden roses and hanging amaranthus, pushing the tubes securely through the wire layers so the blossoms face downward toward seated guests. Fill any thin gaps with airy sprigs of baby’s breath or plumosa fern, and verify that the installation hangs securely and level before table linens are positioned beneath it.
10. Pressed Botanical Glass Frames with Potted Living Ferns
Step-by-Step Guide
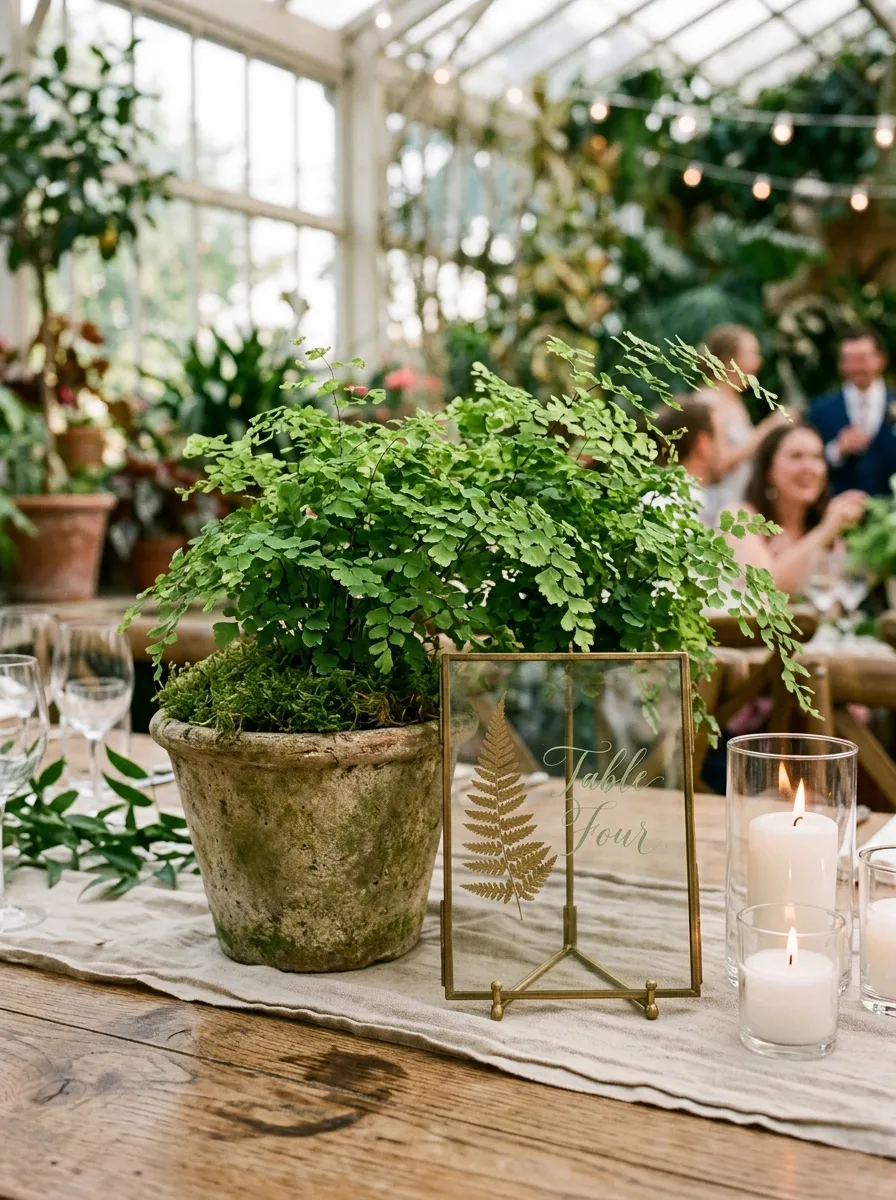
The pressed botanical glass and living fern centerpiece pairs preserved botanical specimens with living potted plants, creating a sustainable, eco-conscious tablescape. This design centers on small potted maidenhair, asparagus, or button ferns housed in clean ceramic or weathered stone pots, flanked by double-glass floating frames displaying pressed botanical leaves and calligraphed table numbers. The soft, feathery texture of the living ferns introduces vibrant green life to the table, while the glass frames add clean geometric lines and personal stationery integration. Because living ferns remain intact in their soil pots, this centerpiece avoids floral foam waste and wilting risks, providing healthy house plants that can be repurposed or gifted to guests after the reception. The natural, understated aesthetic complements botanical garden conservatories, historic libraries, and modern green-house celebrations.
Begin by selecting a healthy, five-inch potted maidenhair or Boston fern, slipping the plastic grower container inside an unglazed stone, concrete, or aged terracotta decorative pot that coordinates with your table palette. Top the exposed potting soil with a neat layer of preserved green sheet moss to conceal the dirt, misting the moss lightly with water to keep it fresh and clean. Take a seven-by-five-inch vertical double-glass brass frame, carefully placing a pressed fern frond or botanical leaf alongside a calligraphed deckle-edge paper table number between the two glass panes. Close the metal frame latch securely, ensuring the specimens remain centered without slipping downward. Position the potted fern slightly off-center on a natural wooden banquet table or linen runner, placing the brass botanical frame directly adjacent at a slight viewing angle. Complete the arrangement by setting three clear glass votive candles in a shallow arc around the pot base, casting soft light through the fern fronds and glass frame.
Common Beginner Mistakes and How to Avoid Them
Beginner planners and DIY couples frequently encounter mechanical and logistical challenges when assembling reception centerpieces, with improper proportion choices serving as the most common issue. Designing centerpieces that stand between fifteen and twenty-four inches tall creates an awkward physical barrier directly at seated eye level, frustrating guests by blocking conversation across the table. Prevent this by strictly keeping low arrangements under fifteen inches, or utilizing slender, elevated risers that hold the floral canopy above twenty-four inches, maintaining open sightlines across the dining space. Another common error is neglecting stem hydration and temperature management during storage, causing delicate blooms like hydrangeas and garden roses to wilt before the reception starts. Address this by keeping all finished arrangements in a cool, dark staging room away from direct window sunlight and exterior draft doors, ensuring water vessels are filled to the brim. Finally, placing unprotected open-flame candles directly next to dry foliage creates a serious fire hazard; always encase taper candles in glass chimney hurricane sleeves and ensure that all open flames sit at least three inches below cylinder rims.
Practical Tips for Better Results
Achieving polished, professional centerpieces depends on disciplined floristry mechanics, consistent preparation habits, and careful vessel selection. When assembling water-based arrangements, strip all leaves and secondary foliage from the lower third of flower stems before insertion; submerged leaves decompose quickly, breeding bacteria that clouds the water and drastically shortens bloom life. Use sharp bypass pruners rather than standard household scissors, as crushing shears damage the delicate vascular pathways within stems, preventing efficient water uptake. If your reception takes place outdoors in warm weather, choose heat-resilient botanical varieties such as garden roses, chrysanthemums, proteas, and hardy foliage like olive and ruscus rather than fragile field flowers. When styling arrangements across multiple tables, create one complete master centerpiece first to serve as an exact visual standard for stem counts, heights, and silhouette balance across the entire venue. Finally, always wipe down the exteriors of ceramic bowls, metal risers, and glass cylinders with a dry microfiber cloth after final placement, removing water droplets and fingerprints to ensure a clean, camera-ready finish.
Styling, Presentation, or Organization Ideas
Organizing the visual flow of a reception space requires balancing table centerpiece designs with the broader architectural features of your venue. In rooms with soaring, vaulted ceilings or exposed industrial rafters, alternate between tall elevated risers and low compote arrangements across different tables to create a dynamic, rhythmic visual landscape that draws the eye upward. Coordinate your centerpiece palettes directly with your paper goods: use matching typographic styles, paper textures, and ribbon accents across menu cards, place settings, and table numbers to maintain visual harmony. For round banquet tables, ensure arrangements feature balanced 360-degree symmetry so every seated guest enjoys a refined view of the flowers. When working with long rectangular tables, run continuous foliage pathways or staggered bud vase runners down the central axis to connect individual place settings into a unified display. Provide designated clearance around centerpieces for table numbers and wine bottles, preventing service items from crowding out your floral designs when dinner service begins.
Budget or Time Planning
Curating elegant reception centerpieces does not require an exorbitant budget; rather, it thrives on strategic material selection and disciplined schedule management. Prioritize spending on high-impact focal flowers like garden roses or dahlias, supplementing their volume with textured, cost-effective greenery such as salal, leatherleaf, or Italian ruscus, which fills space naturally at a fraction of the cost per stem. When preparing DIY floral centerpieces, plan your assembly schedule forty-eight to twenty-four hours before the event, allowing blooms time to open naturally after processing without risking premature wilting. To optimize time on the wedding day, assemble all dry mechanical components—including taped compote bowls, anchored pin frogs, and pre-cut foam blocks—several weeks in advance. On installation day, establish a step-by-step assembly line: assign one person to trim stems to predetermined lengths, a second to insert foundational greenery collars, and a final designer to place primary focal blooms. This streamlined workflow reduces setup time significantly, eliminates last-minute stress, and ensures that every table receives a balanced, professionally finished centerpiece.
Creative Expansion and Advanced Inspiration
Once you master foundational centerpiece assembly techniques, explore advanced creative concepts that introduce unexpected textures and artistic elements into your reception tables. Consider incorporating seasonal fresh produce into botanical displays, weaving ripe whole pomegranates, green figs, clusters of grapes, or vibrant citrus branches through low floral runners to add rich color and organic abundance. Experiment with custom vessel finishes by coating basic terracotta pots or ceramic bowls with textured lime-wash paint, micro-cement, or stone spray to give affordable containers an aged, architectural quality. You can also explore multi-sensory centerpiece additions, incorporating fragrant living herbs like rosemary, lavender, and silver thyme into arrangements to release subtle, natural aromas throughout dinner service. Extending your centerpiece styling principles beyond dining tables allows you to design coordinated arrangements for the welcome entrance, guestbook station, and cocktail high-tops, creating a unified, immersive atmosphere throughout the entire venue. Document your favorite botanical varieties, vessel combinations, and stem recipes in a dedicated design notebook to guide future creative projects and celebrations.