Non-floral centerpieces have emerged as a dominant design trend across contemporary wedding and interior styling boards, offering an enduring alternative to traditional cut blossoms. This comprehensive tutorial explores how to create captivating tablescapes using architectural objects, textured vessels, ambient lighting, sculptural fruit, and organic natural elements without a single fresh flower stem. Standard floral arrangements carry significant logistical hurdles, including high procurement costs, refrigeration requirements, and the risk of wilting under warm venue lighting. Transitioning to non-floral designs solves these challenges while providing sculptural presence, layered textures, and complete peace of mind during pre-event assembly. Throughout this guide, you will learn the mechanics of balancing varied heights, working with reflective surfaces, incorporating safe illumination sources, and organizing cohesive decorative tablescapes. These creative ideas demonstrate how everyday materials and vintage accents can be repurposed into refined tablescapes that elevate weddings, anniversary dinners, seasonal banquets, and everyday home dining. Whether designing for a modern minimalist reception or an earthy rustic dinner, this step-by-step exploration provides actionable techniques to construct durable, budget-conscious centerpiece displays that command attention and spark memorable conversation.
Why This Idea Is Trending or Useful
The international popularity of non-floral centerpieces across digital design inspiration feeds stems directly from their practical sustainability, extended longevity, and striking aesthetic versatility. Contemporary interior design and event styling increasingly favor architectural silhouettes, warm textural layers, and sustainable materials over single-use, perishable botanicals. Traditional floral arrangements generate substantial organic waste and lose their structural vibrancy within hours of exposure to dry indoor air or direct sunlight. Non-floral installations eliminate these liabilities entirely, allowing hosts to assemble displays days or weeks in advance without refrigeration or last-minute hydration panic. From a budgetary perspective, items like glassware, metal lanterns, wooden bowls, and sculptural candles can be repurposed into everyday home decor or resold after the event to recover expenses. Furthermore, non-floral centerpieces accommodate sensory-sensitive guests by removing heavy pollen and overpowering floral fragrances from the dining table. For beginners undertaking a DIY creative project, working with static objects provides total control over proportions, stability, and sightlines, ensuring a cohesive and sophisticated aesthetic that remains pristine throughout the entire celebration.
Materials and Preparation
Constructing balanced non-floral centerpieces requires purposeful curation of structural containers, textured filler elements, lighting hardware, and thoughtful spatial planning before beginning assembly. Essential core supplies include clear glass hurricane cylinders in graduated heights, pillar and floating candles, metal lanterns, raw timber dough bowls, battery-operated micro fairy lights, and decorative bases such as mirrored plates or stone slabs. Accent textures can range from polished river stones and preserved forest moss to vintage linen-bound books, brass taper holders, and architectural fruit specimens. Preparation begins by thoroughly washing and drying all glassware with a microfiber cloth and glass cleaner to remove fingerprints, dust, and water spots that show under table lighting. Planning considerations also require checking venue policies regarding open flames, measuring banquet table widths to ensure adequate space for place settings, and verifying guest sightlines from seated positions. Gathering your styling components onto a clean staging table and testing different groupings in sets of three or five allows you to evaluate visual balance before transporting materials to the event space.
Idea 1: Architectural Floating Candle Cylinder Cluster
Step-by-Step Guide
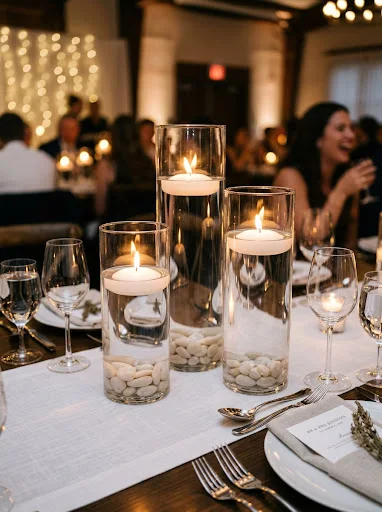
The architectural floating candle cylinder cluster utilizes transparent glass vessels in staggered heights filled with distilled water and topped with smooth disc candles to create a luminous, reflective focal point. This design relies on vertical variation and clean geometry, using clusters of three cylinders measuring eight, ten, and twelve inches to draw the eye upward without blocking cross-table conversation. The water acts as a natural prism, magnifying the dancing flame and casting gentle ripples of light across table linens. This minimalist style works across black-tie ballroom celebrations, modern industrial lofts, and chic outdoor gatherings. Using clear water and uncolored wax keeps the display modern and clean, while the submerged glass lines add structural depth. Because floating candles burn evenly without dripping wax down the outside of the glass, the installation remains tidy and pristine from the opening toast through late-night dancing.
To construct this centerpiece, arrange three graduated glass cylinder vases in an offset triangular cluster at the center of the table. Place an optional layer of smooth white river stones or clear glass gems in the bottom two inches of each vase to provide visual grounding and conceal the table surface beneath. Carefully pour room-temperature distilled water into each cylinder, stopping approximately two inches below the top rim to prevent overflow when inserting the candles. Tap the glass gently to dislodge any air bubbles clinging to the interior walls, ensuring a crystal-clear appearance. Blot the bottom of your white floating candles dry with a clean paper towel before gently setting one candle onto the water surface of each vase, keeping the wick dry. Use a long-reach kitchen lighter to ignite the wicks just before guests enter the reception hall, creating an instant warm ambiance that reflects softly across nearby glassware and polished flatware.
Idea 2: Geometric Terrarium with Preserved Moss and Crystals
Execution Process
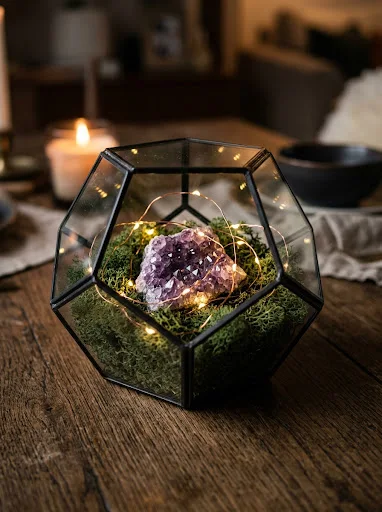
The geometric terrarium centerpiece combines faceted metal-framed glass containers with earthy organic textures, creating an intriguing conversation piece that bridges natural and modern elements. This design features multi-sided glass lanterns framed in matte black or brass, filled with vibrant green preserved moss, rough geode bookends, and raw quartz points. The sharp lines of the geometric frame contrast with the soft, organic textures of reindeer moss and rough crystals, providing rich visual interest without perishable flowers. Preserved moss requires zero water or maintenance, making it an ideal medium for low-stress assembly weeks before your event. This concept suits contemporary greenhouse weddings, modern botanical spaces, and bohemian banquets where guests appreciate tactile, artisanal design. The contained terrarium framework also prevents debris from scattering across table linens, ensuring a clean dining surface.
Begin by selecting an eight-inch faceted geometric glass terrarium featuring an open side panel and a stable, flat base plate. Line the interior bottom with a dense, two-inch bed of preserved green reindeer and sheet moss, pressing the moss into the corners using your fingertips to form a continuous cushion. Carefully position a large raw amethyst cluster, smoky quartz point, or metallic pyrite specimen near the center of the moss bed, angling the crystal faces toward the open viewing side. Tuck small fragments of dried lichen bark and polished river pebbles around the base of the crystal to anchor it securely within the greenery. Weave a strand of battery-operated warm-white copper fairy lights throughout the moss, hiding the compact battery pack beneath the foliage at the rear of the terrarium. Turn on the lights to illuminate the crystal facets from within, casting intricate geometric shadows across the table.
Idea 3: Tiered Vintage Book Stack with Brass Candlesticks

How to Make
The tiered vintage book stack centerpiece evokes the timeless atmosphere of an antique library, using aged, cloth-bound hardcovers and heavy brass candleholders to create scholarly warmth. This concept stacks three or four vintage novels bound in coordinated tones of linen, navy, and gold-embossed leather to form a tiered pedestal for ambient lighting. The tactile quality of aged paper, deckled edges, and weathered fabric spines introduces rich character and historic charm to rustic and literary-inspired events. Flanking the paper stack with slender solid-brass candlestick holders fitted with taper candles of varied heights creates an asymmetrical silhouette that feels naturally collected over time. This approach offers an exceptional beginner friendly project that turns thrifted, inexpensive literary finds into sophisticated table decor suited for intimate celebrations and historic venues.
Start by sourcing three or four vintage hardcover books with worn cloth or embossed covers in harmonious earthy tones, removing modern paper dust jackets to reveal the historic textiles beneath. Stack the books in the center of the table, turning each volume at a slight thirty-degree angle relative to the one below to create an asymmetrical, sculptural pedestal. Tie a length of natural velvet ribbon or frayed silk chiffon around the entire stack, finishing with a loose knot on the front spine. Arrange two or three solid brass candlestick holders of varying heights around the base of the stack, ensuring each holder stands stable on the tabletop. Insert dripless wax taper candles in soft ivory, olive, or beeswax into the brass cups, pressing them firmly to ensure vertical alignment. Tuck dried cinnamon sticks, loose star anise, or sprigs of preserved eucalyptus around the book corners to add subtle texture without cluttering the display.
Idea 4: Weathered Dough Bowl with Handcrafted Ceramic Spheres
Setup Method
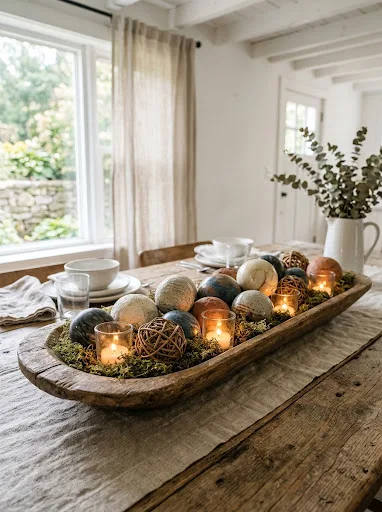
The weathered dough bowl centerpiece grounds long banquet tables with rustic character, using a hand-carved wooden trencher filled with tactile ceramic and stone spheres. Traditional dough bowls feature elongated, shallow oval contours that spread horizontal volume across wide tables without encroaching on guest sightlines. Filling the hollow wooden vessel with a collection of handcrafted pottery orbs, tumbled marble balls, and textured rattan spheres introduces varied materials that complement organic modern interiors. The contrast between rough reclaimed pine and smooth ceramic surfaces produces an artisanal aesthetic that fits farmhouse weddings, vineyard dinners, and Mediterranean gatherings. Because this design has a low profile, it provides a functional centerpiece that encourages open conversation while serving as a sturdy anchor for surrounding accent pieces.
Select a long, shallow hand-carved wooden dough bowl measuring approximately twenty-four to thirty inches in length, ensuring the bottom rests flat without rocking. Clean the interior wood with a dry lint-free cloth, applying a light coat of mineral oil or beeswax polish to enrich the natural grain and rustic tool marks. Distribute a base layer of dried Spanish moss or shredded natural excelsior across the interior floor to protect the wood and cushion the heavier display spheres. Arrange an assortment of seven to nine mixed spheres—combining matte speckled ceramic orbs, smooth tumbled soapstone balls, and woven rope orbs—within the bowl, nestling them securely into the moss bedding. Intersperse three small glass votive cups holding unscented wax tealights between the spheres, ensuring candle flames remain clear of dry materials. Place the finished bowl along the centerline of the table runner, adjusting the decorative orbs so they sit balanced and secure.
Idea 5: Sculptural Seasonal Fruit and Pedestal Still Life
How to Create
The sculptural seasonal fruit and pedestal still life draws inspiration from classical Dutch Renaissance paintings, arranging textured whole fruits on footed compote bowls for an organic tablescape. This design uses the natural shapes and colors of whole pomegranates, black mission figs, bosc pears, and cluster grapes to produce rich visual texture without cut flowers. The fruit’s deep jewel tones—such as plum, russet, burgundy, and gold—introduce warmth that complements linen runners, ceramic dishware, and ambient candlelight. Arranging the fruit on a footed ceramic or aged brass pedestal elevates the display, creating vertical interest while keeping the fruit clean and contained. This approach offers a budget ideas solution, as the centerpiece materials can be eaten or composted following the event, eliminating the waste associated with synthetic decorations.
Begin with a wide, shallow footed pedestal bowl made from matte ceramic, dark stoneware, or brushed aged brass, centering it on a linen runner. Place a compact core support, such as a small bowl inverted inside the pedestal, to elevate the upper layer of fruit and build height. Arrange larger, firm fruits—such as deep red pomegranates, russet bosc pears, and small persimmons—around the base of the pedestal, angling their stems upward and outward for natural balance. Drape small clusters of red seedless grapes, dark mission figs, and whole walnuts across the top and down the side of the bowl, allowing trailing grape tendrils to spill over the edge toward the table. Position two slender taper candles in low brass holders on either side of the pedestal to frame the fruit with warm candlelight. Check the arrangement from all angles to ensure an organic, bountiful shape that feels both casual and deliberate.
Idea 6: Atmospheric Hurricane Lantern and Candle Trio
Step-by-Step Guide
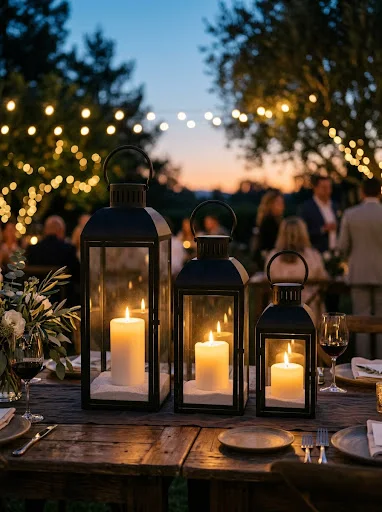
The atmospheric hurricane lantern and candle trio provides a dependable centerpiece solution that delivers substantial visual weight and protected candle illumination. This design uses three square or hexagonal metal lanterns with glass side panes, styled in graduated heights of twelve, sixteen, and twenty inches. The sturdy metal framework—available in matte black, weathered zinc, or brushed brass—suits both indoor reception spaces and breezy outdoor garden celebrations. Glass panes shield the interior pillar candles from cross-drafts, preventing uneven burns, excessive smoking, and blown-out flames throughout long gatherings. The clean, straight lines of modern lanterns complement industrial brick venues, lakeside pavilions, and coastal settings, providing a structured framework that looks intentional during daylight and casts a warm, inviting glow after sunset.
Position three matching metal lanterns of varying heights in an overlapping cluster at the center of the table, turning them slightly so each glass face catches the light. Open the glass access doors and place a layer of clean pea gravel, tumbled beach glass, or fine white sand an inch deep across each interior floor to create a stable base for the candles. Center a high-quality unscented wax pillar candle into the gravel in each lantern, selecting heights that leave at least four inches of clearance between the top of the candle and the lantern roof. Securely latch each glass door to protect the flames from indoor air currents or evening outdoor breezes. Place a few loose decorative elements around the exterior bases, such as smooth river rocks or twisted olive wood twigs, to soften the metal angles. Light the pillar candles using a long fireplace lighter before guest arrival to establish an inviting atmosphere across the dining room.
Idea 7: Sculptured Driftwood and Micro Fairy Light Runner
Setup Method
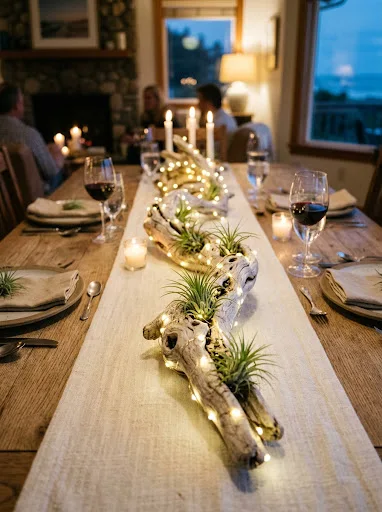
The sculptured driftwood and micro fairy light runner replaces compact circular centerpieces with a flowing horizontal installation that spans the entire length of rectangular banquet tables. This design uses naturally weathered coastal driftwood or sandblasted grapewood branches, showcasing gnarled grain, bleached textures, and organic twists. Weaving thin copper-wire fairy lights through the wood crevice lines transforms the timber into a glowing sculpture that illuminates the table with starry light. This low-profile arrangement keeps sightlines completely open, making it popular for beachside receptions, rustic barn celebrations, and desert-inspired gatherings. The natural curves of the wood provide built-in footholds for small accent details, allowing hosts to weave in tiny succulents, air plants, or seed pods for added visual depth.
Select two or three complementary pieces of dry, sandblasted driftwood or grapewood measuring between eighteen and twenty-four inches, ensuring they sit stable without rocking. Lay the wood pieces along the center axis of the table, overlapping the ends slightly to create the illusion of a single continuous branch meandering down the table runner. Take a thirty-foot strand of battery-operated warm-white micro fairy lights on flexible copper wire, wrapping the wire through the twists and branches of the wood. Hide the small battery pack inside a hollow underneath the thickest section of the branch, securing it with a small strip of gaffer tape. Tuck small, hearty air plants into the natural crevices of the timber, nestling their roots directly into the wood without adhesives. Scatter a few frosted glass votives along the edges of the branch to supplement the fairy lights with natural flickering candlelight.
Idea 8: Vintage Amber Glass Bottle and Colored Taper Collection
How to Make
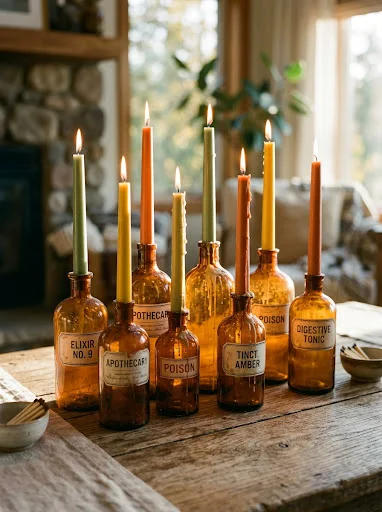
The vintage amber glass bottle and colored taper collection pairs warm-toned apothecary bottles with slender wax tapers, creating a relaxed, eclectic tablescape full of vintage character. This design gathers five to seven vintage amber or smoke-tinted medicine bottles in varied shapes and heights, turning the glass vessels directly into candlestick holders. The rich amber glass warms incoming daylight, while the burning tapers cast a honey-toned glow across the table at night. Choosing modern colored tapers—such as terracotta, sage green, mustard, or slate blue—injects contemporary personality into vintage glass aesthetics. This approach is budget-friendly and easy to source from flea markets and thrift shops, providing an accessible project for couples and event hosts who want to curate a warm, personalized atmosphere.
Collect five to seven vintage amber glass bottles ranging from four to ten inches in height, ensuring the bottle mouths have an inner diameter of approximately three-quarters of an inch. Wash the bottles thoroughly and soak off any old paper labels, using a scrub brush to clean out internal dust before drying the glass completely. Place the bottles in an organic, meandering cluster along the center of the table, grouping taller bottles in the middle and smaller vials near the outer perimeter. Take colored taper candles and carefully shave down the bottom half-inch of wax with a paring knife if the stems are too thick for the bottle necks. Insert each candle firmly into a bottle neck, twisting gently to ensure a secure fit that prevents tilting. Light the candles thirty minutes before the event begins, allowing a small amount of wax to drip down the glass shoulders to enhance the vintage character of the display.
Idea 9: Modern Cast Concrete Pedestal and Abstract Blocks
Execution Process
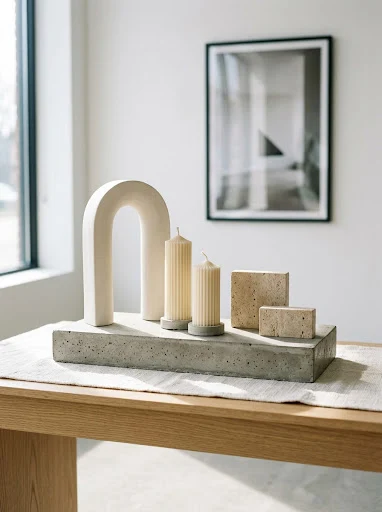
The modern cast concrete pedestal and abstract blocks centerpiece brings clean architectural lines and tactile industrial textures to contemporary dining settings. This concept uses poured-concrete display risers, geometric plaster arches, and smooth stone blocks to create a dynamic, multi-level platform for table styling. The cool, matte finish of raw concrete contrasts with modern glassware, polished flatware, and fine linen napkins, making it an ideal choice for urban lofts and minimalist gallery receptions. The sturdy, flat surface of the concrete base provides a stable anchor for sculptural wax candles and minimalist ceramic shapes. This design embraces modern design principles, focusing on shape, form, and texture rather than elaborate decorative fillers, resulting in an uncluttered table that feels refined and intentional.
Begin by casting or sourcing a low rectangular concrete plinth measuring roughly twelve by six inches, ensuring the bottom surface is fitted with protective felt pads to prevent scratching table surfaces. Position the concrete block at the center of the table, setting a smooth plaster arch or geometric travertine tile upright against one corner of the base to create vertical height. Place a pair of modern sculptural ribbed pillar candles or ribbed wax arches directly on the concrete plinth, anchoring them with small dots of mounting putty to prevent shifting. Arrange two small concrete or ceramic tea light holders on the opposite side of the plinth to create asymmetrical balance across the display. Scatter a few rough marble chips or pieces of crushed aggregate around the base of the plinth to transition the concrete smoothly onto the linen runner. Light the sculptural candles prior to the event, allowing the architectural forms to cast dramatic geometric shadows across the table.
Idea 10: Mirrored Pedestal Tray with Reflected Glass Votives

Step-by-Step Guide
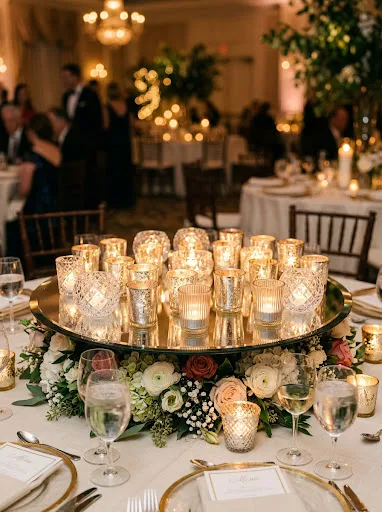
The mirrored pedestal tray with reflected glass votives creates an expansive, luminous centerpiece by bouncing candlelight across a polished reflective glass surface. This design utilizes a beveled mirror tray or round mirror plate as a decorative base, topped with a dense grouping of cut-crystal, ribbed glass, and mercury-glass votives. When lit, the cluster of small flames is doubled in the mirror reflection, producing a dazzling pool of light that brightens the entire reception room without blocking guest sightlines. The low profile of the display keeps sightlines open across the table, making it especially effective for high-energy banquets, holiday parties, and glamorous wedding receptions. Combining clear, silvered, and frosted glass votives adds subtle visual variation, ensuring the arrangement feels layered and textured rather than flat.
Select a twelve-to-fourteen-inch round or octagonal beveled-edge mirror plate with protective non-scratch backing pads, centering it cleanly on the dining table. Polish the mirror surface thoroughly using isopropyl alcohol and a microfiber cloth to eliminate all dust, smudges, and stray fingerprints before placing any decor. Gather fifteen to eighteen small glass votive holders featuring a mix of mercury glass, ribbed cut crystal, and frosted finishes, grouping them tightly across the mirror face. Insert long-burning, unscented wax tea lights or battery-operated LED votives into each glass holder, ensuring wicks are centered and trimmed to a quarter-inch. Scatter a few faceted crystal beads or clear acrylic drops between the votive holders to catch extra light along the mirror surface. Light all the tea lights fifteen minutes before guests are seated, transforming the mirror into a radiant pool of flickering light that illuminates the surrounding place settings.
Common Beginner Mistakes and How to Avoid Them
A frequent challenge beginners face when creating non-floral centerpieces is misjudging height and proportion, often building arrangements that sit right at eye level and obstruct conversations across the table. When guests cannot see over or through a centerpiece, they find themselves leaning uncomfortably to talk, which disrupts the natural flow of the dining experience. Avoid this issue by adhering to the rule of sightlines: keep low designs under twelve inches tall, and ensure any elevated elements, such as slender candlestick tapers or lanterns, rise cleanly above twenty-four inches. Another common error is failing to secure candle flames properly, which creates fire hazards when guests reach across tables for bread baskets or wine glasses. Always protect open flames using tall glass hurricane shields, use deep containers for floating candles, or choose high-quality battery-operated wax candles for worry-free illumination. Beginners also tend to overfill their displays with too many competing colors, resulting in a cluttered tablescape that lacks cohesion. Establish a focused palette of two or three complementary materials—such as brass, glass, and dark timber—to ensure your design looks deliberate and elegant. Finally, always clean glassware thoroughly before setup, as bright candlelight will highlight dust, fingerprints, and smudges on reflective surfaces.
Practical Tips for Better Results
To achieve clean, professional-quality results with non-floral centerpieces, mastering lighting techniques, textural layering, and secure assembly methods makes all the difference. When styling with taper or pillar candles, select hundred-percent dripless, unscented paraffin or refined beeswax formulations; scented candles interfere with the aroma of food and can overwhelm guests in enclosed dining spaces. If using battery-operated LED candles, choose warm-white flicker options with real wax exterior shells to achieve the authentic look of natural candlelight without fire hazards. When working with loose materials like river stones, moss, or sand, place them inside glass containers or onto rimmed trays rather than spreading them directly on linens; this keeps the dining area tidy and prevents debris from getting into plates. Use clear museum wax or removable adhesive dots beneath lightweight glass holders, slender candlesticks, and metal lanterns; this anchors the pieces firmly to tables or trays, preventing accidental tipping during active dinner services. Finally, evaluate your centerpiece from a seated guest perspective during your trial run, ensuring the display looks balanced, stable, and visually pleasing from every angle around the table.
Styling, Presentation, or Organization Ideas
Styling your non-floral centerpieces with coordinated linens, dinnerware, and ambient table elements creates a cohesive, welcoming atmosphere throughout the dining room. Pair low-profile designs, like wooden dough bowls or concrete plinths, with continuous gauze, crushed linen, or velvet table runners that run down the length of long rectangular tables; this unifies the individual centerpieces and frames the place settings. When decorating round banquet tables, use circular mirror plates or round timber chargers as anchors to ground the centerpiece and define the center of the table. Complement the metallic finishes in your centerpieces with matching charger plates, flatware, and napkin rings—such as pairing warm brass candlestick holders with gold-rimmed glassware and brushed brass utensils. Incorporate small clusters of ribbed glass votives around the base of main lanterns or stone pedestals, spreading candlelight across the table to create an intimate, layered glow. For large events with dozens of tables, pack centerpiece components into labeled plastic storage bins sorted by table number, which keeps parts organized and allows setup teams to assemble tables quickly and efficiently on event day.
Budget or Time Planning
Creating non-floral centerpieces is an affordable, time-efficient approach that can save hundreds of dollars compared to traditional fresh floral arrangements. Because non-perishable materials like glass cylinders, brass candlesticks, river rocks, and metal lanterns do not degrade, you can source components gradually over several months from thrift stores, estate sales, and online bulk suppliers without the price markups of full-service event florists. Grouping purchases allows you to negotiate bulk pricing on candles and glassware, significantly lowering your per-table costs. In terms of time management, non-floral designs eliminate the stress of day-of assembly; you can clean glassware, prepare book stacks, fill terrariums, and prep candle holders weeks before the event. Transport finished elements safely using divided cardboard wine boxes or bubble wrap pouches to prevent chips and breakage during transit. On the day of the event, the setup team simply unboxes the pre-assembled components, positions them on the tables, and lights the wicks, completing room styling in under an hour and leaving plenty of time to focus on other event details.
Creative Expansion and Advanced Inspiration
Once you feel comfortable with foundational non-floral styling techniques, you can explore creative variations to tailor these ideas to unique themes, seasons, and architectural environments. For autumn and winter celebrations, weave natural seasonal elements into your displays, such as dried seed pods, whole pinecones, cinnamon sticks, and dark velvet ribbons that bring rich textural warmth to candlelit tables. You can also experiment with dynamic liquid displays, adding subtle food-grade botanical extracts, floating cranberries, or submerged waterproof micro lights to tall water cylinders for a glowing water column effect. For modern industrial spaces, introduce structural metal pipes, blackened iron fittings, or stacked ceramic building tiles as risers, creating minimalist geometric centerpieces that complement raw brick and concrete walls. If decorating large venues with high ceilings, consider combining low-profile table runners with tall, suspended hanging branch installations or overhead fairy-light canopies, drawing the eye upward and creating an immersive dining experience. Developing your own signature styling formulas—whether based on vintage collections, natural materials, or minimalist geometry—gives you the confidence to design memorable, flower-free tablescapes that showcase your personal design vision.