Tabletop styling defines the visual atmosphere of any gathering, yet curating memorable dining displays does not require lavish spending or extravagant floral orders. This comprehensive tutorial details ten original DIY budget centerpiece ideas engineered to elevate everyday dining rooms, intimate dinner parties, and festive celebrations without excessive expense. Throughout this practical guide, readers will learn how to balance proportions, repurpose standard household glassware, forage seasonal organic foliage, and construct professional-grade arrangements using accessible materials. Developing resourceful styling capabilities offers genuine long-term value for every home decorator and event host. Instead of relying on single-use commercial plastic decor that quickly loses aesthetic appeal, upcycling affordable foundational vessels—such as clean glass bottles, terracotta saucers, floating candle cylinders, and natural timber cuts—fosters sustainable, eco-conscious entertaining habits. Each curated concept balances structured step by step mechanics with realistic, beginner friendly assembly techniques that deliver high-end visual impact. By mastering scale, spatial distribution, reflective lighting elements, and clean botanical layering, anyone can transform ordinary tabletops into inviting, photogenic spaces that impress guests while keeping project costs strictly aligned with practical household budgets.
Why This Idea Is Trending or Useful
Budget-conscious centerpiece styling continues to dominate modern Pinterest ideas because it bridges timeless aesthetic charm with practical financial sensibility. Contemporary interior design movements consistently prioritize authentic, textured materials over mass-produced plastic ornaments. Creating your own tabletop arrangements brings immense practical value by allowing complete control over color palettes, dimensions, and botanical freshness. From a DIY perspective, these projects offer high satisfaction through creative transformation: standard kitchen jars, dried backyard foliage, and modest hardware store supplies become polished, cohesive focal points. Furthermore, the accessibility for beginners is exceptional, as none of the outlined designs require advanced woodcraft tools, expensive floristry equipment, or formal artistic training. Simple methods such as grouping odd-numbered vessels, alternating stem heights, and utilizing warm ambient illumination consistently yield stunning results across any table surface. These budget ideas adapt seamlessly to diverse domestic aesthetics, complementing minimalist modern apartments, warm rustic farmhouses, and relaxed outdoor garden gatherings. Ultimately, crafting your own centerpieces saves substantial funds for food, hospitality, and entertainment while establishing a refined, welcoming environment.
Materials and Preparation
Achieving durable, visually pleasing centerpieces on a modest budget requires intentional material sourcing and structured workspace preparation before assembling decor components. The primary supplies featured across these projects include recycled clear glass jars, standard glass cylinder vases, natural jute twine, raw wooden rounds, unscented white pillar and taper candles, and florist wire. For botanical elements, focus on hardy greenery like seeded eucalyptus, salal leaves, baby’s breath, and foraged branches from non-toxic local shrubs. Essential tools include sharp bypass floral shears, a hot glue gun with glue sticks, masking tape, and clean microfiber cloths. Workspace preparation begins with thorough cleaning. Wash all glass containers in hot, soapy water to remove dust and label adhesive, drying them completely with lint-free towels to guarantee streak-free shine. If integrating fresh botanicals, cut stems at an acute angle and allow them to hydrate in cool water for two hours prior to final arrangement. Clear a flat, spacious tabletop to lay out your elements, grouping similar components together to streamline the creative project from start to finish.
1. Upcycled Twine-Wrapped Glass Bottle Trio with Meadow Florals
Step-by-Step Guide
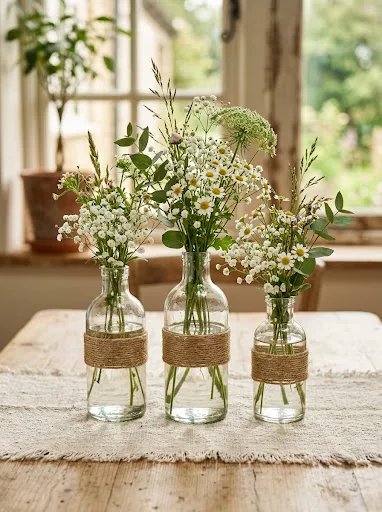
The upcycled twine-wrapped glass bottle trio pairs rustic farmhouse texture with delicate field florals, transforming everyday beverage containers into an elegant, unified focal point. This design utilizes three recycled glass bottles of varying heights, linked visually through horizontal bands of natural jute twine wrapped snugly around their lower midsections. The matte, tactile twine grounds the reflective surface of the clear glass, creating a pleasing organic contrast. By using varied bottle heights, the arrangement introduces rhythmic vertical movement without obstructing cross-table sightlines. Filled with inexpensive meadow stems such as white baby’s breath, wild daisies, and slender sprigs of green foliage, this centerpiece delivers an airy, casual aesthetic that feels freshly harvested and naturally balanced for rustic dining settings or casual brunch tables.
To assemble this trio, thoroughly clean three empty glass bottles of differing heights, removing all label adhesive using warm water and baking soda. Apply a small bead of hot glue at the base of the first bottle, anchor the end of your natural jute twine, and wrap the cord tightly upward in smooth, continuous rows until covering approximately three inches of the bottle body, securing the top edge with another discreet drop of glue. Repeat this process on the remaining two bottles, adjusting the wrapped height proportionally to their respective sizes. Group the finished bottles tightly in the center of your table upon a simple fabric runner, placing the tallest bottle in the center flanked by the shorter two. Fill each bottle two-thirds full with fresh water, then insert three to four trimmed stems of baby’s breath and fresh greenery into each neck, staggering stem heights so the blossoms form a soft, cascading canopy above the glass rims.
2. Floating Candle Cylinders with Submerged Faux Greenery
How to Create
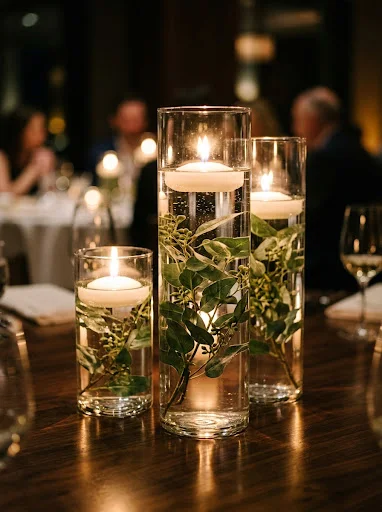
The floating candle cylinder concept captures modern minimalist style through clean transparency, reflective water surfaces, and soft evening luminescence. This installation features three identical or graduated clear glass cylinder vases filled with crystal-clear water and submerged botanical branches, topped with smooth white disc candles. The water magnifies the submerged green leaves, creating an optical illusion of lush volume while concealing mechanical stem bases beneath the water line. Because the open flame sits recessed safely within the top two inches of the glass cylinder, this design provides wind-resistant ambient lighting that is suitable for indoor dining rooms and outdoor patio tables alike. The monochrome pairing of rich green foliage, transparent glass, and warm flickering flame yields an upscale, hotel-lobby look with minimal material investment.
Begin by selecting three inexpensive glass cylinder vases from a local discount store, choosing heights such as six, eight, and ten inches to establish visual balance. Thoroughly polish the interior and exterior of each vase using white vinegar and a microfiber cloth to eliminate water spots and fingerprints. Take three sturdy sprigs of artificial or hardy fresh greenery, such as faux eucalyptus, faux ficus, or fresh rosemary branches, trimming them so the top leaves sit three inches below the vase rims. Secure the bottom base of each stem inside the vase using clear floral tape or a small clean river stone to prevent the foliage from floating upward. Carefully pour room-temperature distilled water into the cylinders, filling them until the water level rests roughly one and a half inches below the rim. Gently place a round white floating candle onto the water surface of each vase, taking care to keep the cotton wick dry before lighting.
3. Natural Wood Slice Tier with Clustered Mason Jar Votives
Setup Method
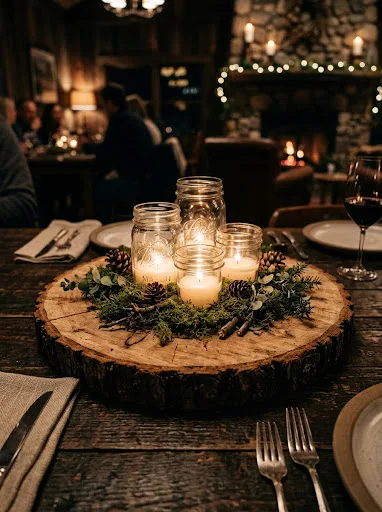
The natural wood slice tier centerpiece brings earthy woodland warmth into home decor by using organic timber grain as an elevated structural stage. This concept centers on a kiln-dried, raw-edge wood slab that acts as an earthy pedestal, visually anchoring small decorative elements that might otherwise look scattered across an expansive tabletop. Resting upon the rustic bark-edged slice is a tight cluster of small glass mason jars or recycled yogurt pots, filled with unscented tea lights and nestled into a bed of dried moss and miniature pinecones. The elevated platform gives the arrangement presence, while the rough bark perimeter contrasts against the smooth, flickering glass votives. This setup is particularly effective for autumn harvest gatherings, cozy winter dinners, and rustic wedding receptions seeking effortless charm.
To execute this design, source a flat, round wood slice measuring ten to twelve inches in diameter, ensuring the surface is dry and free of loose dirt or splinters. Center the wooden round upon your dining table, laying it directly over bare wood or atop an unironed natural linen table runner. Arrange three or four clean, small glass jelly jars or baby food jars on top of the wooden disc, positioning them in an asymmetrical cluster slightly off-center to maintain visual interest. Place a single white wax or battery-operated LED tea light candle inside the base of each glass jar. Fill the negative spaces between the jars on the surface of the wood slice with preserved green sheet moss, tucking in a few dried acorns or small pinecones to completely disguise any glass seams. Light the candles to cast warm, flickering patterns across the bark edges and table linen.
4. Fresh Citrus and Eucalyptus Table Garland
How to Make
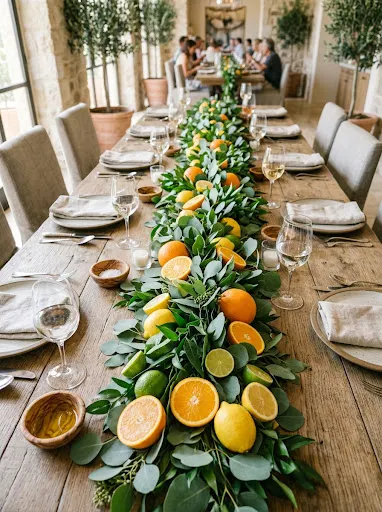
The fresh citrus and eucalyptus garland relies on vibrant fruit colors and fragrant botanical textures to establish a lively, continuous runner down the center of long banquet or dining tables. Rather than using expensive floral foam structures, this design builds an organic, freeform garland directly on the table surface using layered branches of silver dollar eucalyptus interspersed with whole, vibrant citrus fruits like oranges, lemons, and limes. The deep, matte grey-green tone of the eucalyptus leaves contrasts against the glossy, saturated rinds of the fresh citrus, producing a Mediterranean-inspired tablescape that feels bountiful and modern. The natural scent of crushed citrus and fresh eucalyptus leaves gently perfumes the dining space, enhancing the sensory experience for seated guests throughout the meal.
To construct this long-table runner, acquire several long, fresh branches of silver dollar or seeded eucalyptus, gently shaking them to remove loose leaves. Lay down an initial branch in the center of the table, then lay subsequent branches extending outward toward both ends, overlapping the stem ends beneath the broad leaves of adjacent branches to create an unbroken leafy spine. Once the green foundation reaches twelve inches from each table end, weave in shorter sprigs of Italian ruscus or olive branches to add fullness and conceal exposed woody stems. Take six to eight firm, clean citrus fruits, including small navel oranges, bright yellow lemons, and key limes, slicing two fruits in half crosswise to expose their geometric inner wheels. Nest the whole and halved fruits directly among the eucalyptus leaves in small, organic clusters of two and three, ensuring cut fruit faces rest on small pieces of parchment paper to protect table linens.
5. Architectural Terracotta Saucer Succulent Garden
Step-by-Step Guide
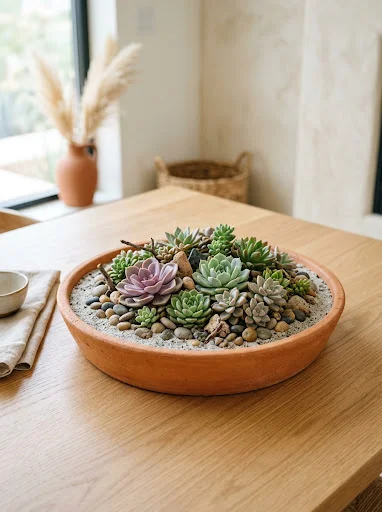
The architectural terracotta saucer garden presents a modern desert-inspired centerpiece that transitions seamlessly from festive table styling into long-term indoor home decor. This arrangement utilizes an inexpensive, wide-brimmed terracotta plant saucer filled with fine decorative sand, smooth river pebbles, and an assortment of low-maintenance succulent rosettes. The warm, porous orange-clay hue of the terracotta provides an earthy, grounded base that complements both light wooden dining tables and dark stone countertops. The geometric, fleshy leaves of various succulents—ranging from pale jade greens to soft dusty purples—introduce sculptural form without vertical bulk, ensuring guests retain unobstructed sightlines across the dining area. Because succulents require minimal moisture, this budget project remains pristine for weeks with only light, periodic misting.
Begin by selecting an eight-to-ten-inch unglazed terracotta plant saucer, wiping away surface dust with a dry cloth. Seal the interior drainage hole, if present, with a small patch of waterproof tape to prevent debris or sand from leaking onto your furniture. Fill the bottom half of the saucer with a shallow layer of potting soil formulated for cacti, spreading it evenly across the basin. Remove three to five small nursery-grown succulents from their plastic starter pots, gently loosening root balls with your fingers, and arrange them closely in the center of the saucer, positioning the largest rosette slightly off-center as the focal anchor. Pour fine white or grey horticultural sand around the root systems until the soil is completely concealed beneath an even half-inch layer. Complete the surface styling by nestling three or four smooth, dark river pebbles around the base of the plants, creating a serene, polished miniature desert landscape.
6. Monochromatic Baby’s Breath Clouds in Recycled Tin Cans
How to Create
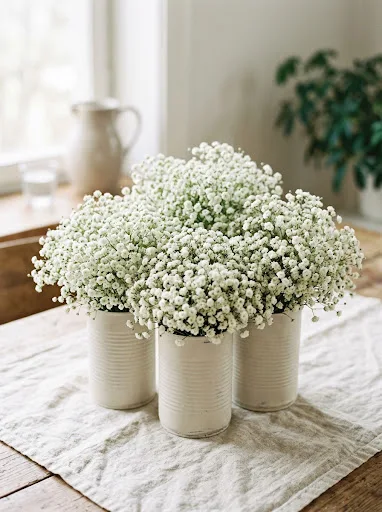
The monochromatic baby’s breath cloud arrangement elevates modest recycled kitchen cans into chic, textured pedestals carrying voluminous white floral spheres. This concept relies on the high-volume visual impact of dense gypsophila, commonly known as baby’s breath, massed tightly together to create the appearance of soft, pillowy clouds. Using repurposed aluminum soup or vegetable cans finished with matte chalk paint transforms humble utilitarian items into sculptural, contemporary vases. The crisp, clean white blossoms contrast against muted vessel tones like slate grey, soft terracotta, or antique white. Because baby’s breath is among the most affordable cut flowers available and dries naturally without wilting, this centerpiece offers exceptional longevity, maintaining its ethereal beauty long after your dinner party concludes.
To create these floral vessels, thoroughly clean three empty aluminum soup cans, ensuring the inner rim is smooth and safe to handle. Apply two light, even coats of matte spray paint or mineral chalk paint in an antique linen or soft charcoal shade to the can exteriors, letting them dry completely for two hours. Cut three blocks of green floral foam to fit snugly inside the cans, soak the foam in water until saturated, and press the blocks into the cans so they sit flush with the top metal rim. Trim individual branches of fresh baby’s breath to approximately four inches in length, stripping leaves from the lower stems. Insert stems deeply and closely into the foam block from all angles, working in concentric rings from the outer rim inward until the foam is completely hidden beneath a dense, rounded sphere of blooms. Cluster the three finished cloud cans together in the center of your table for a unified, modern aesthetic.
7. Elevated Floating Leaf and Pillar Candle Bowl
Execution Process
The elevated floating leaf and pillar candle bowl creates an impressive, spa-like centerpiece by combining a wide-mouth clear glass serving bowl with natural greenery and floating light. This design uses a shallow, broad glass fruit bowl or low trifle dish, placing a single substantial, pillar candle safely in the center surrounded by a shallow moat of water. Large, hardy green leaves—such as monstera, broad hosta, or folded palm fronds—submerge within the water ring, framing the candle with rich emerald tones. The expansive water surface reflects candlelight across the dining room ceiling and walls, creating a serene, luminous ambiance. This centerpiece is especially practical for round dining tables, as its circular symmetry provides a balanced view from every seat without crowding individual place settings.
To assemble this water feature, place a clean, wide-mouth clear glass bowl measuring roughly ten to twelve inches in diameter in the center of your dining space. Take a tall, wide white pillar candle that rises at least three inches higher than the bowl rim, securing its base firmly to the center floor of the glass bowl using three waterproof floral adhesive dots or a generous dab of floral putty. Submerge two or three large, clean garden leaves—such as broad hosta leaves or clipped palm fronds—into the basin around the candle, curling the leaves gently around the glass curves to form a natural green collar. Carefully pour cold distilled water into the bowl around the candle until the waterline sits halfway up the vessel walls, taking precautions to keep the candle wick and top wax completely dry. Light the central pillar wick just before guests sit down to create a dramatic, glowing water garden.
8. Staggered Taper Candles on Thrifted Brass Holders with Ivy Vines
How to Make
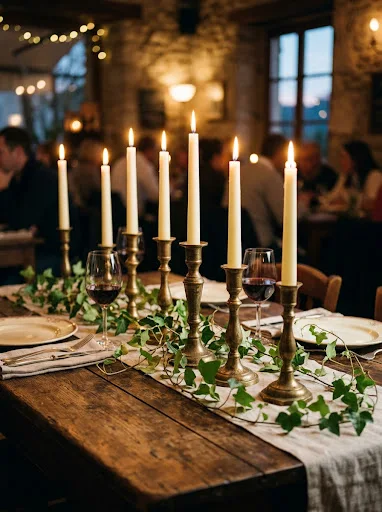
The staggered taper candle centerpiece channels timeless European bistro romance by pairing mismatched metallic holders with natural trailing ivy vines. This design gathers an eclectic collection of five to seven thrifted brass candlesticks, each displaying unique heights, base shapes, and aged surface patinas. Slender ivory or beeswax taper candles rise vertically from the brass stands, creating dynamic lines that draw the eye upward without blocking dinner conversation. Weaving long, pliable stems of fresh or preserved English ivy around the metal bases connects the individual candlesticks into a cohesive, flowing visual installation. The warm, reflective glow of the polished brass catches flickering candle flames, casting romantic shadows across table linens and adding classic vintage character to holiday feasts and anniversary dinners.
Begin by sourcing five to seven vintage brass candlesticks from thrift shops, estate sales, or secondhand markets, choosing varied heights ranging from four to eleven inches. Wipe the metal surfaces with a dry cloth to remove dust while preserving the authentic aged patina that gives them character. Arrange the candlesticks along the central axis of your table in an alternating, zigzag pattern, spacing them approximately four to six inches apart to ensure heat from the flames does not overlap. Insert dripless ivory or pure beeswax taper candles firmly into each holder cup, securing loose bases by wrapping a small strip of aluminum foil or adhesive candle wax around the base of each candle. Finish by winding fresh, flexible strands of English ivy or trailing smilax vines around and between the brass bases, keeping leaves at least four inches away from candle flames to maintain complete fire safety.
9. Paper Book Page Cones with Dried Botanical Sprigs

Step-by-Step Guide
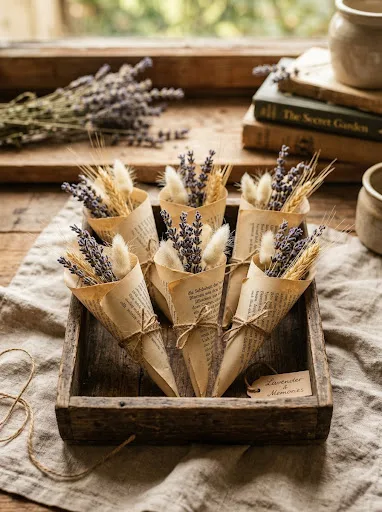
The paper book page cone centerpiece introduces literary charm and delicate papercraft art to seasonal tablescapes through simple, eco-friendly folding techniques. This concept repurposes yellowed, vintage book pages from damaged books or discarded sheet music, forming them into small, tailored decorative cones that rest inside rustic glass jars or across individual table runners. Each paper cone holds a light, feathery arrangement of dried florals and textured seed heads, including dried lavender sprigs, lagurus bunny tails, and golden wheat stalks. The aged typography and soft parchment color introduce neutral textural patterns that complement cream tablecloths and natural wood surfaces. This entirely waterless centerpiece is an ideal, stress-free option for seasonal autumn dinners, book club gatherings, and quiet holiday tables because it can be crafted weeks in advance without risking floral decay.
To create the paper cone elements, carefully remove several pages from a discarded vintage paperback book, trimming rough binding edges with scissors to form neat rectangular sheets. Take the bottom corner of a page, roll it inward toward the opposite upper corner to form a tapered funnel, and secure the overlapping paper seam along the back with double-sided tape or a dot of clear craft glue. Repeat this process to create six to eight uniform paper cones. Cut small bouquets of dried florals—such as three stems of dried purple lavender, two stalks of wheat, and three fluffy white bunny tails—trimming stems to five inches in length. Slide each miniature dried bouquet into a paper cone, letting flower heads flare gracefully above the open rim. Arrange the filled paper cones horizontally within a shallow wooden tray or tuck them directly into the center of folded cloth napkins at each place setting.
10. Reclaimed Garden Pot Trio with Potted Fragrant Herbs
Execution Process
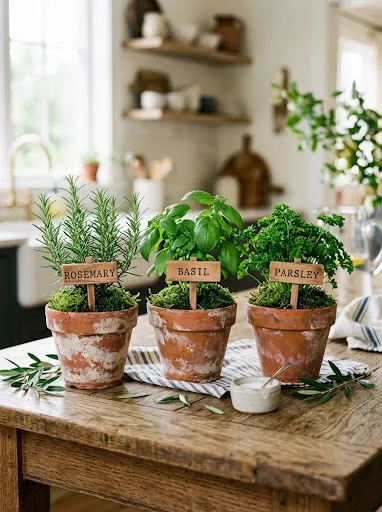
The reclaimed garden pot centerpiece integrates living culinary botanicals into formal table settings, offering a vibrant, farm-to-table presentation with delightful aromatic qualities. This arrangement groups three modest aged clay or concrete herb pots along the table center, each holding a different fresh culinary herb such as rosemary, garden sage, and sweet basil. The velvety green leaves, woody stems, and fragrant oils release pleasant, appetizing aromas throughout the meal, enhancing the dining ambiance naturally. Finished with stamped wooden craft stakes or simple chalkboard labels identifying each herb, this living centerpiece serves a dual function: it decorates the dinner table during the event and later supplies fresh culinary seasonings for family cooking. Its clean, functional simplicity aligns perfectly with modern kitchen dining, outdoor patio suppers, and casual weekend dinner parties.
Begin by gathering three small aged terracotta or ceramic plant pots, measuring approximately four inches in diameter, ensuring each container is clean and fitted with an internal plastic saucer or liner to prevent moisture leakage. Plant one small, healthy herb plant—such as compact rosemary, curly parsley, or sweet bush basil—into each pot using rich organic potting soil, pressing the soil gently around the roots. Top the exposed soil around the plants with a tidy half-inch layer of small, smooth pea gravel or damp forest moss to maintain moisture and create a neat, professional appearance. Place the three potted herbs in a straight row down the center of the table, spacing them evenly apart. Interweave loose strands of natural jute twine or fresh olive leaves between the pots to link the containers into a continuous display, inserting a small wooden plant label into each pot to complete the charming kitchen-garden aesthetic.
Common Beginner Mistakes and How to Avoid Them
Novice crafters frequently encounter common layout and structural errors when assembling budget centerpieces that can detract from their finished presentation. The most widespread mistake is disregarding the functional sightline of seated guests. Creating tall, dense arrangements that exceed twelve inches in height across the table center forms a physical barrier that prevents guests from making eye contact and conversing naturally. Always sit in a dining chair while styling to verify that floral heads and bulky containers remain either below chin level or feature slender, transparent supports that preserve open views. Another frequent issue is overfilling vases, which creates a cluttered, unorganized look that overwhelms the table. When using budget florals like baby’s breath or garden clippings, avoid cramming stems into a single vessel; instead, distribute stems across multiple smaller containers to establish an airy, intentional composition. Finally, decorators often forget to protect wooden table surfaces from moisture damage. Cold water sweating from glass jars or terracotta saucers can warp fine wood and leave permanent water rings. Always place protective felt pads, water-tight plastic liners, or solid runners underneath vessels to safeguard furniture surfaces during dinner parties.
Practical Tips for Better Results
Achieving professional, magazine-quality centerpiece styling on a modest budget depends on mastering subtle floristry mechanics and spatial balance. One of the most effective techniques for keeping floral stems exactly where you want them inside wide-mouth jars is building an invisible grid across the container opening using narrow strips of clear floral tape. Inserting stems into the individual square openings of the grid provides structural support, preventing flowers from falling clumsily against the outer edges and creating a balanced, professional dome. When selecting candles, always invest in genuine dripless wax varieties or modern realistic LED flickering pillars. Dripping wax from cheap taper candles ruins table linens and creates stubborn messes on vintage brass or timber pedestals. Additionally, utilize the florist’s rule of odd numbers when arranging containers: grouping vessels in clusters of three, five, or seven creates natural visual movement and prevents the display from feeling rigid or excessively formal. Finally, maximize natural fullness by mixing foraged backyard greenery with inexpensive store-bought blooms, using sturdy outdoor foliage to build a generous structural framework before tucking in delicate, colorful focal flowers.
Styling, Presentation, or Organization Ideas
Integrating DIY budget centerpieces into an overall dining room layout requires careful coordination with surrounding textiles, dinnerware, and ambient room lighting. Establish an intentional decorative foundation by laying down an inexpensive washed-linen or unbleached cotton table runner to define the centerpiece footprint down the table axis. This runner serves as an anchor, unifying multiple small bottles or votives into a single, cohesive visual arrangement. When setting place settings, echo materials from the center of the table; for instance, tie fabric napkins with the same jute twine wrapped around your glass bottles, or place a single sprig of eucalyptus across each dinner plate. Balance room lighting by dimming overhead chandeliers and allowing the low-level glow of your centerpiece tapers, votives, and tea lights to supply intimate, flattering illumination. If styling a long rectangular banquet table, avoid concentrating all decor in the middle; stretch the arrangement horizontally by scattering loose foliage leaves, small river pebbles, or individual glass votives outward toward the ends of the table runner, creating a seamless, engaging tablescape from end to end.
Budget or Time Planning
Crafting an entire collection of high-impact centerpieces can be accomplished within strict financial limits by practicing disciplined sourcing habits and strategic project planning. Instead of purchasing brand-new vases from specialty decor boutiques, frequent local charity thrift stores, dollar stores, and community yard sales, where clear glass cylinders, brass candlesticks, and ceramic pots are routinely sold for nominal change. Save and wash pasta jars, beverage bottles, and tin cans from your household kitchen over several weeks leading up to your event, eliminating vessel costs entirely. From a time management perspective, organize your centerpiece construction into distinct phases scheduled over two days. Dedicate the first afternoon to non-perishable tasks: wash glassware, wrap twine accents, paint cans, and assemble candle pedestals. Reserve the morning of your dinner party exclusively for cutting fresh stems, filling water reservoirs, and positioning delicate greenery. Setting aside ninety minutes on the day of the event ensures your flowers remain crisp, candles remain dust-free, and you avoid stressful last-minute rushing before welcoming arriving guests into your beautifully styled dining space.
Creative Expansion and Advanced Inspiration
Once you feel comfortable with the foundational budget techniques detailed in this guide, you can explore creative design expansions that elevate simple arrangements into show-stopping installations. Consider introducing battery-operated micro-LED fairy light strands into your arrangements, weaving the thin, flexible copper wire inside submerged-leaf cylinders or through the hollows of thick greenery garlands to produce an enchanting, firefly-like radiance. You can also explore multi-sensory centerpiece additions by incorporating fragrant dried botanicals, such as tying real cinnamon sticks around pillar candles with raffia cord or nestling dried star anise pods and whole cloves directly among fresh greenery runners. For special seasonal celebrations, adapt the core glass bottle trio concept by applying modern faux-ceramic texturing techniques: coat recycled glass bottles with a mixture of acrylic paint and baking powder to create matte, stoneware-like vessels that look like expensive artisan pottery. Continuing to experiment with textural contrast, unexpected upcycled vessels, and layered ambient lighting allows you to evolve simple budget elements into distinctive, memorable tabletop art that showcases your personal design aesthetic.