Low floral arrangements and tabletop decorations continue to be one of the most practical and aesthetically pleasing styling choices across contemporary event planning and interior design. Creating a welcoming dining environment requires keeping sightlines open, allowing guests to converse comfortably without peering around towering botanical structures. This detailed guide covers ten complete DIY low centerpiece ideas that elevate everyday dining tables, formal banquet settings, wedding receptions, and seasonal family gatherings. Readers will learn the essential principles of structural flower arranging, sustainable mechanics, vessel selection, and balanced composition. Handcrafted centerpieces provide complete creative control over color palettes, textures, and dimensional presence, allowing makers to tailor every design to their specific interior styling preferences. By working with accessible foundational supplies, natural materials, and reusable vessels, crafters of all skill levels can produce high-impact, professional-quality tablescapes on a modest budget. The following sections outline step-by-step methodologies, workshop preparation protocols, and practical assembly routines that eliminate common mistakes. Adopting these low-profile concepts guarantees comfortable dining logistics, balanced spatial distribution, and refined visual appeal across residential spaces, banquet halls, and outdoor entertaining areas.
Why This Idea Is Trending or Useful
Low centerpieces have surged in popularity across modern visual inspiration boards because they successfully combine functional tabletop utility with organic, effortless luxury. High floral installations often obstruct natural conversation, complicate platter placement, and pose tipping hazards during lively dinner service. In contrast, low-profile designs keep all focal elements beneath eye level, typically fourteen inches or shorter, supporting natural guest interaction and seamless food presentation. From a design standpoint, low arrangements align with modern organic, minimalist, and Scandinavian interior styling trends, celebrating asymmetrical foliage, earthy textures, and intentional negative space. For DIY enthusiasts, low centerpieces present a remarkably accessible entry point into floral art. Compact vessels require far fewer stems than tall pedestal urns, resulting in significant cost savings without sacrificing visual fullness. Beginners can achieve balanced proportions quickly because low centerpieces feature a stable, grounded center of gravity that minimizes structural failure during movement. Furthermore, these designs adapt effortlessly across varied occasions, transitioning from casual brunch tablescapes to formal wedding banquets simply by swapping flower varieties or vessel finishes.
Materials and Preparation
Building long-lasting, visually balanced low centerpieces requires methodical preparation, clean workshop habits, and appropriate florist tools. Core floral supplies include fresh focal blooms, textural filler flowers, trailing vines, and structural greenery. Non-perishable hardware essentials comprise low ceramic bowls, wooden dough bowls, metal compotes, floristry shears, sharp floral knives, waterproof stem tape, chicken wire netting, and heavy brass floral frogs. Clean, sanitized water buckets and specialized flower food packets are vital for preparing fresh botanicals prior to assembly. Begin the preparation process twenty-four hours before arranging by cutting stem ends at a sharp forty-five-degree angle under cool water. Strip away all foliage that falls below the intended water level of your vessel to prevent rapid bacterial growth and unpleasant odors. Allow conditioned stems to drink deeply in a shaded, temperature-controlled environment. Additionally, measure your dining table dimensions, factoring in place settings, shared serving boards, and candle placements to ensure finished vessels fit comfortably without crowding dining essentials.
Idea 1: Low Terracotta Bowl with Meadow-Style Wildflowers
How to Create
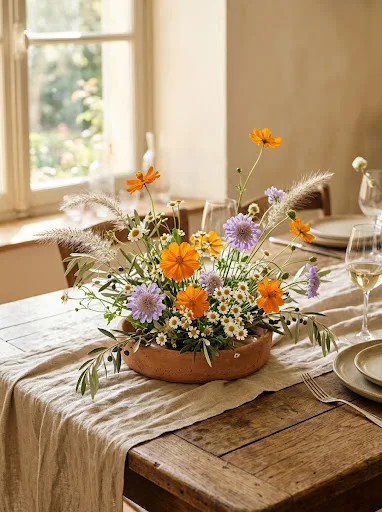
The low terracotta bowl meadow centerpiece brings the relaxed charm of an untamed garden path to the dining table through loose, airy botanical placement. This design uses a shallow, unglazed clay dish that grounds the tablescape in warm, earthy tones, balancing natural floral colors. The floral arrangement avoids rigid geometric domes in favor of an organic meadow silhouette, featuring stems cut to differing heights that mimic natural outdoor growth. Dainty blooms like chamomile, cosmos, feverfew, and blue cornflowers sway gently above a base layer of delicate grasses and silvery olive foliage. The warmth of the terracotta contrasts with cool pastels and verdant greens, making it a great focal point for summer patio luncheons, rustic bridal showers, or relaxed autumn dinners. Keeping the exterior profile loose and natural ensures the centerpiece integrates seamlessly into casual, sunlit interior settings.
To construct this meadow-style centerpiece, line an eight-inch shallow terracotta bowl with a waterproof plastic dish liner to prevent moisture seepage onto furniture. Place a heavy brass pin frog into the center of the liner, anchoring it securely to the base using floral adhesive clay. Fill the dish two-thirds full with fresh water mixed with flower preservative. Begin by pressing sturdy stems of fountain grass, slender olive branches, and maidenhair fern into the outer pins of the frog, angling them outward to create a wide, grounded perimeter. Insert primary stems of orange cosmos and lavender scabiosa into the central pins, varying their vertical lengths between six and ten inches to establish an airy, staggered canopy. Fill the intermediate gaps by inserting delicate sprigs of white chamomile and buttercup blooms, allowing the smaller blossoms to lean forward over the terracotta lip. Verify the arrangement appears balanced from every seated angle, adding water daily with a narrow-spout watering can.
Idea 2: Vintage Ceramic Compote with Lush Garden Roses
Step-by-Step Guide
The vintage ceramic compote centerpiece pairs traditional romantic blooms with a slightly raised footed vessel to create an elegant, classic tablescape. A footed compote lifts the floral canopy two to three inches above the tabletop, creating visual lightness while remaining well below guest sightlines. Velvety garden roses in cream, dusty rose, and antique mauve act as dense visual anchors, surrounded by ruffled lisianthus, sweet peas, and trailing jasmine vines. The foliage drapes softly over the curved rim of the ceramic dish, obscuring the hard rim and giving the entire arrangement a lush, overflowing look. This design channels timeless Dutch still-life paintings, delivering an upscale aesthetic suitable for formal anniversary dinners, black-tie weddings, and milestone celebrations. The compact footprint preserves ample surface area for wine carafes and bread baskets.
Begin by cutting a small section of flexible green floral chicken wire, folding it into a loose three-dimensional pillow that fits snugly inside your ceramic compote. Secure the wire mesh to the vessel by running a cross of clear waterproof floral tape over the top rim. Pour cool, nutrient-rich water into the compote until it reaches one inch below the upper edge. Insert sturdy stems of salal leaves and seeded eucalyptus around the perimeter, threading them through the wire openings so they rest flat against the vessel lip. Strip the lower thorns from four large garden roses and insert them centrally into the wire at gentle forty-five-degree angles, creating a low, balanced triangle of focal blooms. Intersperse trailing jasmine vines, delicate blush sweet peas, and stems of white lisianthus into the secondary wire voids, ensuring stems remain securely hydrated beneath the water level. Mist the completed rose petals lightly and display.
Idea 3: Rustic Carved Dough Bowl Succulent and Moss Garden
Execution Process
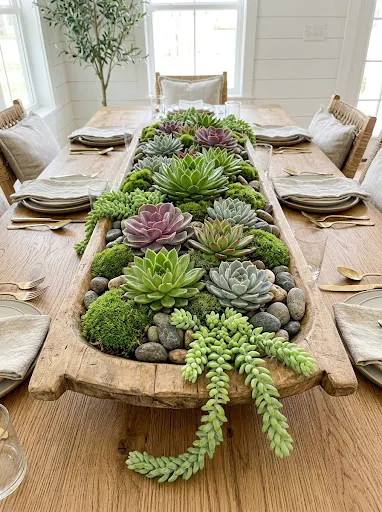
The rustic carved dough bowl succulent garden offers an enduring, low-maintenance centerpiece that stays fresh for months with minimal care. A long, narrow wooden dough bowl serves as the vessel, its hand-hewn imperfections adding warmth to modern farmhouse or transitional dining rooms. Inside the elongated wooden channel, assorted living succulents in jade green, dusty lavender, and blue-gray nestle together among preserved forest moss and river pebbles. The low, horizontal orientation is ideal for long rectangular banquet tables, filling the center without creating tall visual barriers. Because succulents require minimal moisture, this centerpiece eliminates the stress of daily wilting, making it a practical option for holiday tablescapes, corporate boardrooms, and ongoing everyday home decoration.
Prepare an oblong wooden dough bowl measuring roughly twenty to twenty-four inches long by lining the interior hollow with heavy-gauge transparent plastic sheeting, trimming the excess plastic flush with the wooden rim. Lay down an inch-deep drainage foundation consisting of small horticultural lava rock or clean pea gravel, followed by a light dusting of activated charcoal. Add a two-inch layer of well-draining cactus potting soil over the gravel base. Remove six to eight assorted succulents—such as rosette echeverias, trailing burro’s tail, and upright haworthias—from their nursery pots, gently shaking loose soil from their root balls. Plant the largest echeverias along the center line of the bowl, surrounding their bases with spreading varieties and trailing succulents that drape over the wooden edges. Tuck tufts of preserved green mood moss and smooth gray river stones over the exposed soil surface, pressing down lightly to secure all plants in place.
Idea 4: Floating Citrus and White Blossom Glass Pedestal Dish
Setup Method
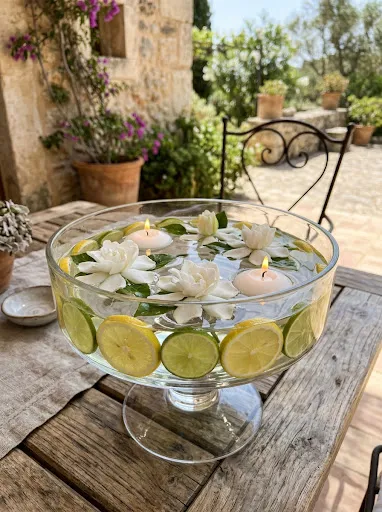
Combining sliced citrus fruits with floating white blooms in a low glass pedestal bowl creates a vibrant, multi-sensory centerpiece with built-in seasonal freshness. The transparent glass exposes submerged layers of vibrant fruit, while the open water surface supports fragrant white petals and soft floating candlelight. Thin cross-sections of yellow lemons, vibrant limes, or blood oranges cling naturally to the interior glass walls, creating a luminous mosaic beneath the water level. Floating blossoms such as gardenias, open white camellias, or floating spray rose heads rest gracefully on the water surface alongside tiny floating disc candles. This centerpiece is especially suited for warm-weather garden gatherings, coastal wedding receptions, and Mediterranean-themed dinners, filling the room with a light natural citrus scent without relying on overpowering synthetic sprays.
Select a wide, shallow clear glass pedestal bowl measuring ten to twelve inches in diameter and four to five inches in depth. Wash the interior and exterior surfaces with warm soapy water and wipe dry with a microfiber cloth to prevent water spots. Slice two firm lemons and three fresh limes into uniform three-millimeter-thick circular rounds using a sharp mandoline or chef’s knife. Press the damp citrus slices flat against the inside perimeter of the glass bowl, using natural surface tension to keep them adhered along the perimeter wall. Fill the bowl slowly with distilled room-temperature water, directing the stream toward the center to avoid dislodging the fruit slices. Trim the green calyxes of fresh white gardenias or spray roses completely flat, floating them on the water surface alongside two unscented white floating wax wicks. Light the candles just before guests arrive to create an ambient, glowing tabletop display.
Idea 5: Minimalist Matte Ceramic Ikebana Dish with Kenzan
How to Make
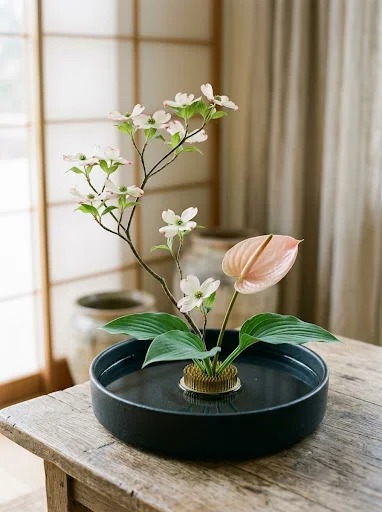
The minimalist matte ceramic Ikebana centerpiece uses traditional Japanese design principles, celebrating negative space, sculptural line, and deliberate restraint. Rather than packing a vessel full of dense foliage, this concept uses only three to five carefully chosen botanical stems, letting their natural angles shine. A low, wide dish with a matte black, charcoal, or chalk-white glaze serves as an understated base. A heavy brass pin frog, or kenzan, holds architectural branches and sculptural flowers at expressive angles. Minimalist arrangements draw attention to the individual shape of each leaf, bud, and branch, making them well-suited for modern, Scandinavian, and contemporary Japandi-inspired interiors. The low-profile silhouette feels calm, intentional, and artistic, serving as an engaging focal point for quiet dinner gatherings and minimalist table settings.
Begin by selecting an eight-inch round, shallow matte ceramic dish with an upturned rim no deeper than two inches. Place a heavy circular brass kenzan directly in the center or slightly off-center to establish an asymmetrical foundation, securing its rubber base to the dish. Pour clean, cool water into the dish until the metal pins of the frog are completely submerged by half an inch. Select an expressive branch of quince, cherry blossom, or flowering dogwood, cutting its base squarely and pressing it vertically onto the rear pins of the kenzan to represent the primary structural line. Cut a sculptural stem of Japanese anthurium or open peony two-thirds shorter than the branch, pressing it into the central pins at a forward-leaning forty-five-degree angle. Add two broad hosta or aspidistra leaves trimmed low to ground the base and conceal the metal pins from direct view. Maintain clean water conditions daily to preserve the stark beauty of the arrangement.
Idea 6: Potted Herb and Linen-Wrapped Stone Vessel Runner
How to Create
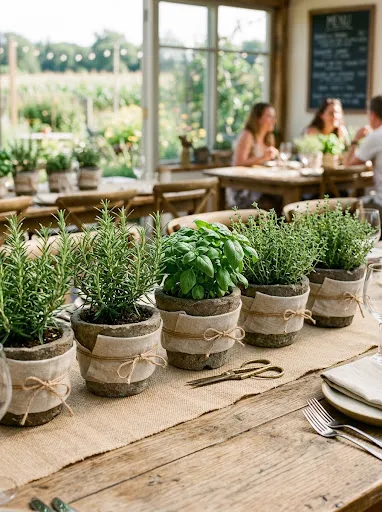
The potted herb and linen-wrapped vessel centerpiece combines culinary function with understated rustic charm down the center of a dining table. This concept uses a collection of live potted aromatic herbs—such as rosemary, sweet basil, French thyme, and curly parsley—housed inside small stone pots or wrapped in neutral linen fabric. Grouped closely along an untreated linen or burlap table runner, the clustered herb pots create a continuous green path that provides visual depth and natural fragrance. Guests can interact with the centerpiece directly, snipping fresh sprigs with small shears to garnish their dining plates throughout the meal. This approach works well for casual family-style Italian meals, vineyard wedding receptions, and outdoor farm-to-table gatherings, creating an interactive dining experience that transitions easily into ongoing kitchen garden use after the event.
Source five to seven small four-inch terracotta or faux-stone seedling pots, filling each with a healthy, potted culinary herb. Cut squares of unbleached natural linen fabric measuring twelve by twelve inches, centering each pot onto a fabric square and folding the corners up around the exterior container walls. Fasten the gathered linen around the pot neck using raw jute twine tied into a simple square knot, trimming excess string neatly. Arrange the wrapped pots down the center line of your dining table, staggering the heights by alternating between flat surfaces and low wooden coaster blocks. Intertwine loose sprigs of cut bay laurel and dried olive leaves between the wrapped vessels to disguise empty spaces between the pots. Place small brass herb snips alongside the arrangement, inviting guests to harvest fresh garnishes as the dinner progresses.
Idea 7: Sculptural Driftwood Branch with Epiphytes and Pillar Candles
Step-by-Step Guide
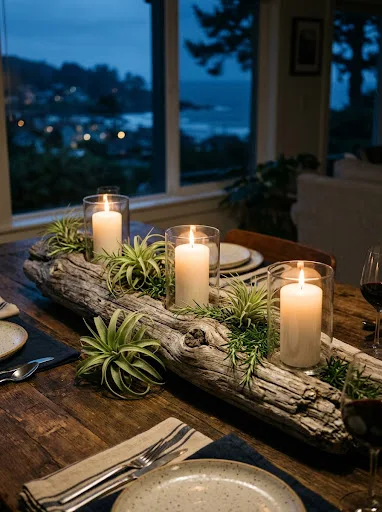
The sculptural driftwood branch centerpiece merges weathered beach timber with living air plants and warm candlelight, producing an earthy, coastal focal point. A sprawling piece of tumbled driftwood with interesting curves and natural hollows acts as the horizontal anchor for the dining table. The pale gray and honey tones of the wood contrast with vibrant green tillandsias and the clean wax of low pillar candles. The branch naturally keeps the arrangement close to the tabletop, creating a fluid, winding path down long banquet tables without requiring water vessels. This organic composition suits coastal celebrations, desert-themed weddings, and transitional modern homes, offering a durable centerpiece that can be set up days in advance without fear of petal drop or water damage.
Select a clean, sturdy piece of sand-blasted driftwood measuring between twenty-four and thirty-six inches in length, ensuring it rests flat on a table without rocking. Wipe away loose bark or dust with a dry brush. Place three low, broad glass hurricane candle sleeves or small metal candle plates along the natural dips of the branch to catch wax drips safely. Position three differing heights of unscented ivory or beeswax pillar candles inside the glass holders, keeping wick heights below ten inches. Tuck assorted tillandsia air plants into the natural crevices, cracks, and bifurcations of the driftwood branch, using small drops of plant-safe floral glue if a branch pocket needs extra stability. Weave small sprigs of fresh rosemary or dried eucalyptus leaves through the remaining gaps to soften hard edges, creating an organic tablescape ready for evening dining.
Idea 8: Carved Pumpkin and Gourd Autumn Floral Vessel
Execution Process
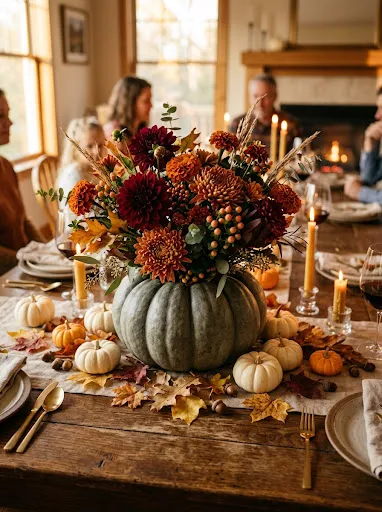
The carved pumpkin floral vessel turns seasonal autumn squash into natural, organic containers for rich fall arrangements. A medium, flat-bottomed heirloom pumpkin—such as a Cinderella squash or slate-gray Jarrahdale—is hollowed out to hold floral foam and seasonal autumn blooms. The ribbed exterior of the squash brings rich texture to harvest dinners, Thanksgiving banquets, and fall wedding receptions. Inside, deep burgundy dahlias, burnt orange marigolds, golden sunflowers, and rust-toned hypericum berries spill over the top rim. Using real pumpkins grounds the centerpiece in seasonal charm, allowing makers to tie their tabletop florals directly to the changing autumn landscape. The wide base of the pumpkin provides steady support on busy dining tables.
Begin by selecting a medium, flat heirloom pumpkin in white, slate green, or muted peach, checking that its base sits level on a flat surface. Using a serrated kitchen knife, carve a circular opening around the top stem, removing the lid and scraping out seeds and pulp with an ice cream scoop. Cut a standard plastic food storage container to fit inside the pumpkin hollow, placing it inside to act as a waterproof barrier that protects the pumpkin walls. Insert a saturated brick of green floral foam trimmed flush with the container rim, securing it with waterproof tape. Insert broad salal leaves and autumn oak foliage around the rim to conceal the cut edge of the pumpkin. Add focal blooms of copper chrysanthemums, burgundy dahlias, and orange spray roses, pushing stems deeply into the wet foam. Finish by adding sprigs of hypericum berries and bronze wheat stalks, misting daily to keep the display fresh.
Idea 9: Mirrored Tray with Mercury Glass Votives and Hydrangea Cushions
Setup Method
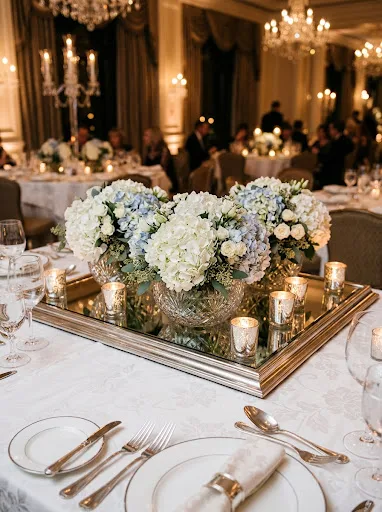
The mirrored tray centerpiece pairs reflective glass surfaces with fluffy hydrangea cushions and mercury glass votive cups to maximize candlelight throughout the dining space. A low, rectangular or octagonal silver-edged mirrored tray sits flat on the table, bouncing candlelight upward onto dinnerware. Two to three wide, low glass compote bowls sit atop the mirror, each packed with a single broad head of ivory or pale blue hydrangea trimmed close to the rim. Surrounding the flower bowls are assorted mercury glass votive cups holding tea lights that sparkle against the mirrored surface. This glamorous design works well for formal indoor receptions, winter weddings, and holiday galas, delivering rich visual sparkle with a very simple floral mechanic. The low profile keeps the table open, airy, and conversation-friendly.
Start with a clean, smudge-free silver-framed mirrored tray measuring twenty-four inches long, positioning it directly along the center line of the dining table. Take three low, wide-mouthed clear glass tumblers or dessert bowls, filling each two-thirds full with fresh water. Cut the thick woody stems of fresh hydrangeas very short using a craft knife, making a vertical split up the center of the stem base to promote maximum water intake. Rest one large hydrangea head inside each glass bowl so the petals form a plush, domed cushion that covers the glass rim. Set the three floral bowls evenly along the mirrored tray. Fill the surrounding spaces on the tray with eight to ten assorted mercury glass votive cups containing unscented tea lights. Light the candles just before guests enter the room, allowing the twinkling reflections on the mirror to illuminate the white flower petals.
Idea 10: Bundled Birch Log and Evergreen Winter Floral Trough

How to Make
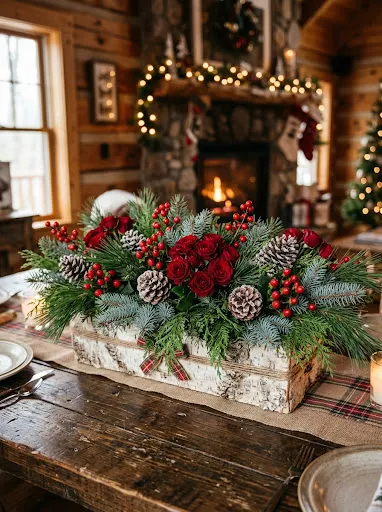
The bundled birch log trough centerpiece combines winter greenery, rustic white birch bark, and seasonal red botanicals to create a festive holiday tablescape. The container is constructed from lightweight wooden troughs wrapped in natural white birch bark or hollowed birch logs, bringing woodland texture to the table. Inside, fragrant sprigs of blue spruce, noble fir, and cedar form an evergreen bed that supports deep red spray roses, hypericum berries, and frosted pinecones. The contrast between snowy birch bark, deep evergreen branches, and scarlet flowers feels cheerful and sophisticated without leaning into gaudy commercial themes. This long, low arrangement coordinates with holiday dinners, ski-lodge winter weddings, and cozy fireplace settings, infusing the dining space with fresh forest scents throughout the winter season.
Build this winter arrangement by placing a pre-soaked, fitted floral foam block inside a narrow birch-bark-covered rectangular wooden box or trough. Wrap the outer edges of the foam block in green floristry foil to retain moisture and prevent leaks onto the wood. Insert flat sprays of fresh cedar and noble fir branches along the base, allowing the evergreen needles to drape out and soften the wooden box edges. Insert shorter sprigs of blue spruce and seeded eucalyptus into the top of the foam, building a low green foundation four to six inches tall. Insert twelve to fourteen short-stemmed deep red spray roses and clusters of red hypericum berries into the evergreen gaps, angling stems to distribute the red tones evenly. Wire small natural pinecones onto wooden florist picks, inserting them into the green bed alongside small clusters of white snowberries. Spray the needles with cool water daily to keep the winter display fragrant and fresh.
Common Beginner Mistakes and How to Avoid Them
Beginners creating DIY low centerpieces often encounter common pitfalls that compromise the structural balance, longevity, and practical utility of their arrangements. A frequent error is misjudging the final height, letting foliage creep above fourteen inches, which obstructs eye contact across the dining table. Prevent this by checking stem lengths from a seated perspective throughout the arranging process. Another common mistake is neglecting proper flower hydration, which causes blooms to droop prematurely during the event. Always condition stems in fresh water with flower preservatives for twenty-four hours before arranging, and never push floral foam down into water buckets, as this traps dry air pockets inside the foam. Beginners also tend to crowd too many competing focal blooms into small vessels, producing a muddled look that lacks visual breathing room. Give larger flowers room to breathe by framing them with plenty of secondary foliage and filler sprigs. Lastly, failing to protect tabletops from moisture seepage can ruin fine wood dining surfaces; always line porous vessels like terracotta, wood, and metal with clear plastic liners or waterproof trays before adding water-soaked mechanics.
Practical Tips for Better Results
Achieving professional florist-grade results with low centerpieces requires attention to preparation, structural mechanics, and proper floral care. When working with floral foam, allow the bricks to sink naturally in a clean bucket of water mixed with flower food, ensuring complete saturation. For eco-conscious arranging that avoids floral foam entirely, use reusable brass kenzans or balls of chicken wire, which provide support without single-use plastics. Keep your floristry shears sharp, cutting stems at a steep angle under running water to maximize water absorption and prevent stem ends from resting flat against the container bottom. When building round centerpieces, place your vessel on a rotating turntable while working; spinning the arrangement frequently lets you spot bare patches and maintain a balanced dome from every angle. Add small droplets of clear water to flower petals with a fine misting bottle just before dinner begins, giving the blossoms a fresh, dewy finish. Finally, keep completed centerpieces in a cool, dark room away from heat vents, direct sun, and ripening fruit bowls until it is time to set the table.
Styling, Presentation, or Organization Ideas
Presenting low centerpieces effectively involves styling the entire tablescape so the florals, dinnerware, and linens work together as a unified design. Lay a textured runner made of natural linen, soft cheesecloth, or rich velvet down the center of the table, creating a soft landing area that visually frames your vessels. Coordinate your centerpiece container finish with your flatware and dining accents; for example, pair antique brass compotes with gold cutlery, or match matte ceramic dishes with modern matte black dinner plates. Frame the central floral arrangement with scattered clusters of votive candles, tea lights, or low glass hurricane lamps, staggering heights to create a warm, layered glow across the table. For long rectangular banquet tables, link multiple low centerpieces together by trailing loose vines of Italian ruscus, eucalyptus, or smilax directly along the table runner between the vessels. Always leave at least six inches of clear space between your floral vessels and place settings, ensuring guests have plenty of room for bread plates, stemware, and easy dining movement.
Budget or Time Planning
Handcrafting low table centerpieces allows hosts and planners to achieve high-end visual results while keeping floral costs well within a realistic budget. Maximize your floral funds by following the florist sixty-twenty-twenty proportion rule: allocate sixty percent of your stem count to affordable, voluminous greenery and filler flowers, twenty percent to secondary textural blooms, and twenty percent to high-impact focal flowers like dahlias or garden roses. Purchase bulk seasonal blooms from local flower farms or wholesale distributors, selecting flowers that peak naturally during your event month to keep stem prices down. Organize your build schedule across a two-day workflow: clean, strip, and hydrate all fresh cut flowers two days before the gathering, and assemble your vessels and mechanics during that same afternoon. Build the floral arrangements thirty-six hours before the event, storing finished displays in a cool, shaded room or basement. Reserve the morning of the event for transporting vessels to the venue, topping off water levels, lighting candles, and placing final table touches. This step-by-step timeline prevents rushed assembly and keeps your flowers fresh and vibrant.
Creative Expansion and Advanced Inspiration
Once you have mastered the foundational mechanics of low floral centerpieces, several creative expansions can help you develop more adventurous, high-concept tablescapes. Experiment with monochromatic color stories, using flowers, foliage, and vessels in varied tones of a single color family—such as an all-white composition pairing ivory hydrangeas, white sweet peas, and pale spray roses in a matte white ceramic dish. You can also incorporate edible botanical elements directly into your arrangements, using split fresh figs, small artichokes, dark plums, or clusters of grapes skewered on florist picks to add rich, Old World Dutch still-life drama. Another modern idea is building broken centerpieces, where small floral clusters of differing heights sit in individual bud vases clustered down the table center, creating an open, flexible meadow look that can be rearranged quickly around food platters. You can also add subtle scented foliage like flowering mint, lemon verbena, or lavender into the greenery mix, treating dining guests to gentle natural aromas that complement the meal. These advanced design variations highlight the versatility of low centerpieces, offering endless ways to customize any celebration.