Barn wedding receptions continue to captivate couples seeking a harmonious balance between rustic architecture and refined celebratory design. When curating Pinterest ideas for event styling, rustic venues present a spacious canvas defined by exposed wooden beams, high ceilings, and weathered wood textures. This comprehensive guide outlines practical styling strategies that transform agricultural spaces into welcoming, visually coordinated banquet environments. Readers will discover actionable methods for handling vertical venue dimensions, curating cohesive table settings, designing functional lighting plans, and framing structural entryways. Each installation concept is explained with direct construction techniques and material specifications to streamline preparation. Understanding spatial proportions, color temperatures, and textile weights ensures that rustic venue layouts remain comfortable, well-lit, and photogenic throughout both afternoon and evening hours. From overhead greenery canopies to textured wooden display tables, the step by step recommendations provide clear technical blueprints for designing a memorable, personalized aesthetic. By mastering these foundational decor principles, hosts can confidently implement professional-grade styling concepts that elevate the inherent charm of wooden banquet architecture without incurring excessive production costs.
Why This Idea Is Trending or Useful
The enduring popularity of barn wedding decor across modern design platforms reflects a broader cultural appreciation for authentic architectural character, tactile materials, and versatile event layouts. Unlike traditional banquet halls that feature rigid carpet patterns and commercial wall treatments, timber barns provide a neutral, organic backdrop adaptable to diverse themes ranging from modern minimalist style to rich vintage arrangements. This architectural versatility provides exceptional DIY appeal, giving hosts the freedom to introduce customized, handmade components that reflect their personal tastes. From a practical perspective, high open-rafter ceilings simplify the hanging of overhead canopies, lightweight drapery, and fairy light networks without requiring freestanding scaffolding. The generous floor plans comfortably accommodate flexible floor designs, such as extended harvest tables, dedicated beverage stations, and open-format lounge seating. For beginners embarking on wedding planning, rustic styling allows for soft natural imperfections; asymmetrical greenery, textured stone, and unvarnished timber look intentional rather than unpolished. This intersection of creative project freedom, spatial flexibility, and reliable budget ideas ensures that rustic reception styling remains an evergreen source of bridal inspiration.
Materials and Preparation
Achieving an elevated reception environment requires thorough logistical planning and careful material selection before setup begins. Core structural materials include semi-sheer chiffon or voile drapery yardage, commercial-grade outdoor Edison bulb strands, warm micro-fairy lights, clear floral monofilament wire, and high-tensile zip ties rated for overhead weight. Table decor collections require unbleached cheesecloth runners, natural taper candles with protective glass hurricane chimneys, assorted vintage brass vessels, and hearty fresh greenery stems like silver dollar eucalyptus, Italian ruscus, and salal foliage. Tools must include heavy-duty metal snips, extension ladders, ratcheting cable ties, manual staple guns, multi-outlet extension cords, and a laser measuring device to confirm ceiling heights and beam spans accurately. Initial preparation involves inspecting beam anchor points, testing venue electrical circuits to prevent breaker trips, and mapping fire-safety boundaries for open-flame centerpieces. Creating a scaled floor diagram guarantees correct furniture spacing, keeping primary pathways clear for guest flow and dinner service. Presorting decor pieces into labeled storage totes by reception zones streamlines on-site setup, keeping your decorating team focused, efficient, and well-organized on event day.
1. Suspended Rafter Greenery Chandelier Installation
How to Create
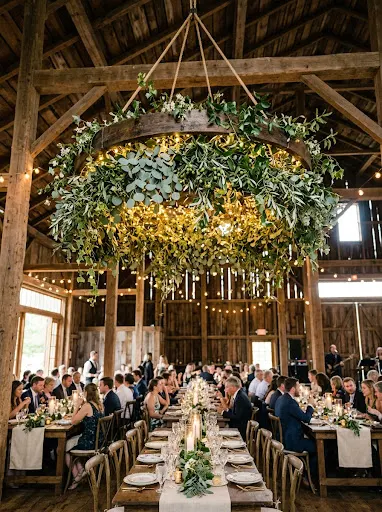
A suspended rafter greenery chandelier serves as an architectural anchor that visually lowers towering ceilings, bringing intimate scale and lush botanical texture into the dining area. High timber roofs often draw attention upward into empty shadowed peaks, which can make table seating feel disconnected from the overall venue space. Constructing suspended circular or horizontal floral rings directly over the bridal table or central dance floor bridges this vertical gap, establishing a lush focal point that integrates seamlessly with overhead wooden crossbeams. The construction pairs sturdy metal or wooden frames with dense, mixed eucalyptus, olive branches, and trailing ivy vines that spill organically toward the floor. Incorporating subtle warm-illumination elements, such as hidden micro-wire lights or suspended glass orb globes with LED flame capsules, infuses the foliage canopy with a gentle ambient glow. This suspended feature frames wide-angle photographs naturally, concealing structural rafters while framing the primary gathering zone in balanced botanical greens.
Execution requires two lightweight wooden hula hoops or welded four-foot wire wreath rings treated with matte dark-walnut spray paint to match the venue woodwork. Secure three equal lengths of clear 50-pound floral monofilament wire to the frame perimeter at equidistant intervals, joining them above at a central galvanized steel carabiner clip to maintain level horizontal suspension. Using green floral tape and thin binding wire, attach dense bundles of salal leaves and flat eucalyptus branches flat against the circular rim, working in a continuous directional sequence to establish a full leaf foundation. Layer longer, flexible stems of Italian ruscus and trailing smilax along the lower edge, letting them drape naturally fifteen to twenty-four inches below the ring frame. Weave a battery-powered micro-fairy light strand through the internal foliage, securing the battery pack securely out of sight with zip ties. With two workers on stable ladders, lift the assembled installation to the designated ceiling rafter, hook the central carabiner into a load-tested beam clamp, and confirm the ring hangs level above the tables.
2. Illuminated Edison Bulb and Sheer Fabric Canopy
Setup Method
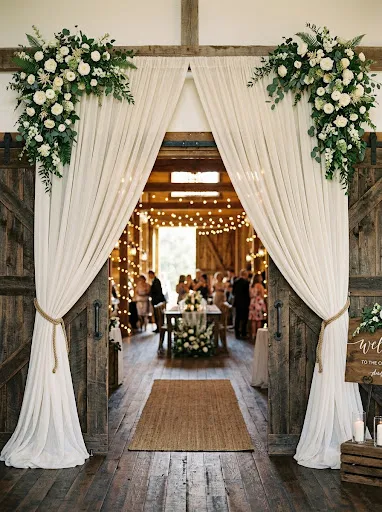
An illuminated canopy combining warm-glow Edison filament bulbs with sweeping runs of lightweight sheer fabric softens the rugged timber surfaces of a classic barn interior. Open rafters can look dark and stark once night falls; introducing horizontal drapery swags reflects ambient light back downward onto the dining tables. Crisp ivory or soft champagne voile runs gracefully along structural support beams, creating gentle curved waves that soften the building’s industrial farm architecture. Interspersing exposed vintage-style pendant cords among the fabric swags provides a dynamic canopy of warm illumination at varying heights. This lighting approach eliminates the harsh glare of modern high-wattage floodlights, casting a flattering golden tone across guest faces, table linens, and surrounding wood surfaces. The finished overhead installation creates a cohesive ceiling landscape that balances the rustic qualities of antique timber with the refined elegance of formal evening receptions.
Begin by measuring the clear distance between the venue’s central transverse beams to determine the necessary yardage of 118-inch wide sheer polyester voile, adding twenty percent extra fabric length to account for natural gravitational swagging. Mount screw-in eye bolts or heavy-duty beam clamps into the overhead timber supports along both wall lines, spacing them six feet apart to create balanced anchor points. Thread high-tensile steel aircraft cable through the support hooks, tensioning the line taut with turnbuckle hardware to support the textile and lighting weight without sagging. Drape the fabric lengths over the cables, securing the fabric folds around the perimeter cables with hidden, heavy-duty safety pins or transparent zip ties. Next, suspend commercial-grade E26 drop-socket stringer cords along the rafter spans, staggering the individual pendant drops between twelve and thirty inches in depth. Screw in warm 2200K amber LED Edison bulbs, and route power cables safely along hidden structural rafters down to dedicated wall outlets.
3. Floor-to-Ceiling Barn Door Draped Entrance
Execution Process
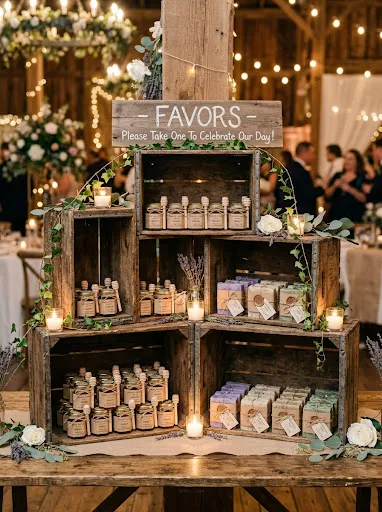
The primary sliding barn entrance sets the visual tone for the entire event, serving as guests’ introductory transition point from natural outdoor countryside into the styled reception space. Large sliding exterior doors provide significant architectural scale, but their broad, dark openings can feel cavernous or uninviting without soft framing accents. Dressing this threshold with dramatic floor-to-ceiling drapery softens the entryway, creating a refined portal that frames the illuminated reception inside. The textile treatment is anchored with asymmetrical botanical sprays positioned at the upper corner junctions, drawing the eye upward while connecting the venue exterior to the interior floral arrangements. In addition to defining the arrival experience, a properly draped entryway functions as an elegant portrait backdrop for incoming guests, establishing immediate visual continuity with the wedding’s central decor theme.
To build this entrance, mount a heavy-duty, tensioned steel wire or extendable pipe-and-drape track system directly across the upper interior header of the sliding doorway, ensuring it is positioned to clear the door glide hardware. Hang four extra-long, semi-sheer linen or heavy gauze panels, ensuring the fabric hem pools elegantly three to five inches onto the floor to prevent outdoor drafts from blowing the curtains around. Gather the central panels toward each door jamb using wide leather tiebacks, thick jute rope, or matching fabric sashes fastened to concealed wall eyelets. Construct two asymmetrical floral sprays on curved foam floral cages, saturating the foam blocks with water before inserting sturdy leatherleaf ferns, eucalyptus branches, and hearty cream garden roses. Attach the larger floral spray to the upper left corner of the wooden door frame with removable wood screws, and mount a smaller complementary spray five feet above the ground on the opposite post, completing a balanced, framed entryway.
4. Vintage Wood Barrel Cocktail and Beverage Station
How to Make
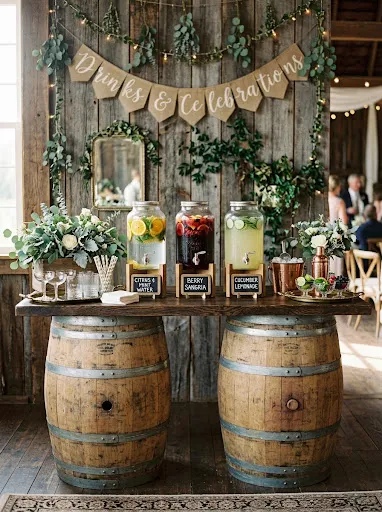
A beverage station made from authentic oak whiskey or wine barrels provides practical service utility while showcasing classic rustic materials. Traditional banquet folding tables with commercial poly-linen skirting often look out of place against weathered timber walls; repurposed barrel stations integrate naturally with the building’s architectural finish. Two solid hardwood barrels serve as sculptural pedestal legs that support an expansive, unvarnished wooden plank tabletop, creating an open-access beverage display for drink service. This design offers generous serving room for beverage dispensers, glassware clusters, and personalized signage, ensuring guests move easily through the drink line. Dressing the wood top with fresh floral groupings, seasonal fruit accents, and vintage metal trays transforms a functional bar into a charming decorative hub that complements the room’s overarching rustic aesthetic.
Procure two authentic, cleaned 55-gallon oak barrels of equal height, along with a solid pine or reclaimed oak tabletop measuring eight feet long by twenty-four inches wide. Sand the wooden board with 120-grit sandpaper to eliminate splinters, then seal the wood surface with a clear matte water-based polyurethane coat to protect it against drink spills. Position the barrels five feet apart on a level section of flooring, verifying that both tops are aligned before lowering the heavy wood plank across them. Secure the tabletop to the barrels using four removable underside L-brackets and short wood screws to prevent accidental shifting during use. Arrange three clear glass beverage dispensers along the center line, styling the spaces between them with vintage silver trays for drinkware, low compote arrangements filled with fresh greenery, and a framed script menu card. Hide empty beverage supply crates cleanly behind the wide barrel bases to keep the surrounding floor area neat and organized.
5. Extended Harvest Table Centerpiece with Mixed Vessels
Step-by-Step Guide
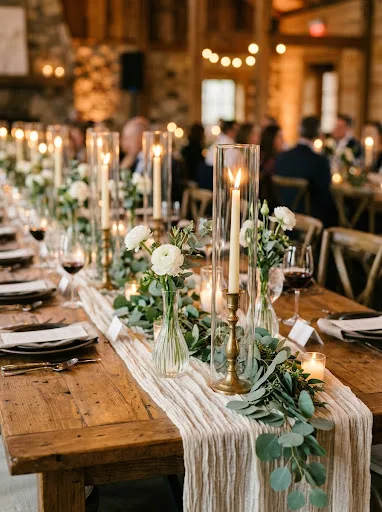
Extended wooden harvest tables present a striking design opportunity, replacing isolated round tables with long, unified banquets reminiscent of historic family gatherings. Maximizing these long timber surfaces requires a low-profile centerpiece that encourages cross-table conversation without blocking sightlines across the room. A continuous runner design featuring unbleached textiles, winding greenery vines, and varied vintage vessels provides rich tactile interest along the table’s entire length. In place of uniform, tall floral centerpieces, this concept uses mixed glass, ceramic, and aged brass vessels of varying heights to achieve an organic, gathered-over-time feel. This rhythmic variation in height, texture, and reflection brings visual energy to the long wooden tables, creating an intimate, candlelit dining atmosphere that feels curated rather than commercially mass-produced.
Lay a continuous runner of light-toned cheesecloth down the center of an eight-foot wooden harvest table, gathering the fabric gently by hand to create organic, wrinkled folds that cascade eight inches off each table end. Weave alternating branches of silver dollar eucalyptus, gunnii foliage, and seeded eucalyptus down the fabric spine, overlapping stem ends to create a seamless, cohesive greenery garland. Distribute five aged brass candlestick holders in varied heights from six to twelve inches along the table runner, fitting each with non-drip beeswax taper candles in neutral ivory or soft taupe. Intersperse small, fluted clear-glass bud vases between the candle bases, inserting two to three floral stems into each vase, such as white ranunculus, lisianthus, and delicate sprigs of feverfew. Enclose every open flame within a tall, open-ended cylindrical glass hurricane shade, ensuring the glass extends at least two inches above the candle wicks to meet venue fire codes while maintaining steady, flicker-free illumination.
6. Tiered Timber Crate Wedding Favor Display
Setup Method
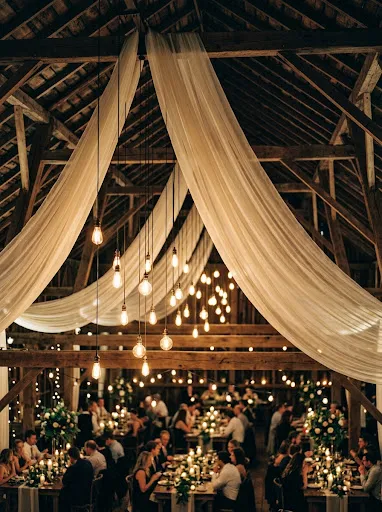
A dedicated tiered crate display organizes guest favors, wedding programs, or artisanal gifts into a clear, visually appealing focal station. Freestanding folding tables often look flat and uninspired; stacking authentic wooden crates vertically creates a modular display with varied heights that draws the eye naturally. This three-dimensional arrangement provides clear compartmentalized cubbies for organizing individual favor bags, keeping items neat, accessible, and easy for guests to browse throughout the evening. Styling the wooden shelves with trailing greenery tendrils, handwritten calligraphed signs, and warm micro-lights turns practical guest gifting into an interactive decorative feature. Placing this multi-level installation near the primary exit ensures guests notice it on their way out, providing a warm, visually cohesive conclusion to the reception experience.
Gather six to eight sanded pine or reclaimed fruit crates of uniform depth but varying lengths, wiping down the wood to remove any loose debris or dust. Arrange the heaviest three crates horizontally side-by-side on top of a low vintage credenza or sturdy table base to establish a stable, balanced foundation. Stack the remaining crates on top, alternating between vertical and horizontal orientations to create a series of staggered cubbies and tiered display shelves. Anchor overlapping crate junctions together from the inside using small two-inch wood clamps or removable bolts to ensure the tower remains secure if bumped by passing guests. Arrange guest favors—such as personalized honey jars, seed packets, or artisan soap bars—in orderly rows inside each crate compartment, maintaining neat spacing between groupings. Fill open corner gaps with trailing sprigs of preserved ivy, small potted succulents, and battery-powered tea lights tucked inside mini frosted glass votives, finishing with a framed informational calligraphed sign placed on the highest crate.
7. Reclaimed Window Frame Seating Chart Arrangement
Execution Process
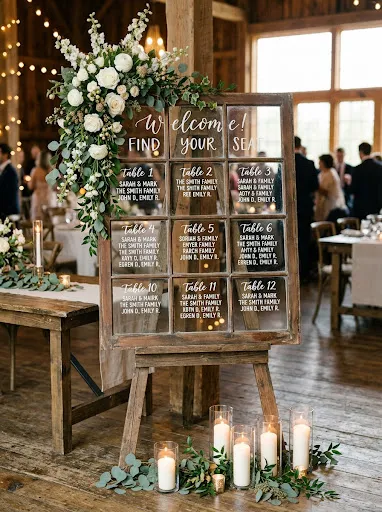
A custom seating chart crafted from multi-pane antique window frames offers a stylish, authentic alternative to traditional printed poster boards. Reclaimed architectural elements introduce vintage warmth and history, tying in effortlessly with the distressed wood walls of a barn interior. The individual glass panes provide clear, natural divisions for organizing guest table lists, while the weathered wooden framing gives the seating assignment station clear structural presence. Suspending or propping this multi-pane installation near the reception cocktail area invites guests to find their dining seats easily without causing crowd congestion at the dining room doors. Decorating the window surround with asymmetrical floral sprays and candle groupings turns functional guest directions into an eye-catching decorative feature that fits the broader rustic theme.
Source an authentic multi-pane wood window frame with at least eight to twelve separate glass sections, thoroughly cleaning the glass with an ammonia-free cleaner and gently sanding any loose, flaking paint on the wood frame. Use fine-tipped white oil-based paint markers or precision-cut vinyl lettering to scribe table numbers and alphabetized guest names onto individual glass panes, working with a printed spacing template taped to the reverse side to keep text straight. Seal the dry painted lettering with a light mist of clear workable fixative to protect it from smudges during transit and setup. Mount two heavy-duty D-ring brackets to the upper back corners of the wooden frame, securing the display securely to a heavy-duty wooden easel or anchoring it to a venue post with strong jute cord. Frame the base of the easel with three varying heights of pillar candles protected inside glass hurricane lanterns, finishing with a lush floral spray wired to the top-right corner of the window frame.
8. Overhead Dance Floor Fairy Light Curtain
How to Create
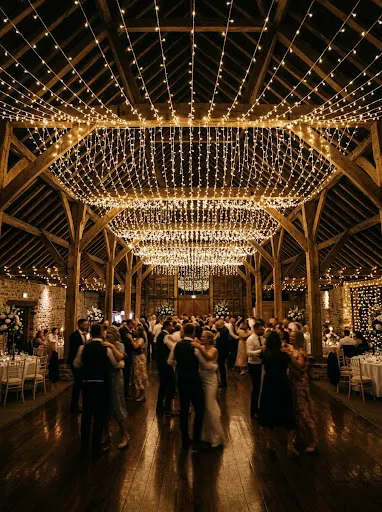
An expansive fairy light curtain suspended over the dance floor transforms the heart of the barn into an open, starlit celebration space. Broad timber floor plans can feel dark and shadowed once primary banquet lighting is dimmed for after-dinner dancing; a dense overhead canopy of warm micro-LED lights defines the dance area and lifts the energy of the room. By running delicate light strands in dense parallel lines directly beneath the ceiling beams, the installation forms an open-weave glowing ceiling that reflects beautifully off polished dance floor rentals. This concentrated lighting creates a warm, photo-friendly atmosphere that simplifies event photography, capturing crisp dance floor moments without relying on harsh on-camera flash. The golden ambient glow provides a stunning visual contrast against the dark weathered rafters, creating a romantic centerpiece for evening celebrations.
Measure the length and width of the designated dance floor area to calculate the necessary spacing for a multi-strand warm-white micro-LED light grid, planning lines eight to twelve inches apart for optimal light density. Anchor high-strength 1/16-inch galvanized steel guide cables to opposing structural timber beams using padded screw-clamps, tensioning each cable with a standard hardware turnbuckle until fully taut. Hang heavy-duty, commercial-grade curtain light harnesses or individual 100-foot copper-wire light strings along the cables, securing the strands at regular intervals using transparent mini cable clips. Drop the light strings horizontally or in gentle uniform swoops across the dance space, keeping all strands at least twelve feet above the floor so they clear active dancers and tall guests. Connect the light runs into a single multi-outlet master cord linked to an in-line rotary dimmer switch, allowing smooth brightness control as the reception transitions from dinner seating to energetic late-night dancing.
9. Cozy Lounge Vignette with Mismatched Vintage Furniture
Setup Method
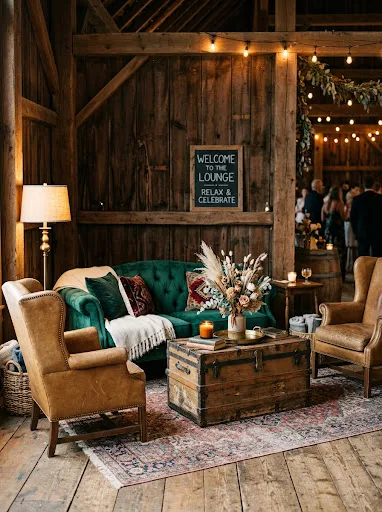
A styled lounge area with comfortable vintage seating provides a welcoming retreat for guests looking to converse away from high-volume music and active dining tables. High-ceilinged barn reception spaces often feel loud and cavernous; grouping plush, upholstered vintage pieces creates an inviting residential corner that absorbs ambient sound and encourages relaxed conversation. Blending tufted velvet armchairs, curved settees, and worn leather sofas balances the rough texture of rustic wood walls with soft, tactile luxury. Grounding the seating arrangement with a distressed area rug defines the space as an independent hospitality zone, preventing furniture from feeling scattered or out of place on the open floor. This comfortable gathering space doubles as a natural photo backdrop for casual guest snapshots, offering elderly family members and conversing guests a restful, aesthetically unified seating alternative throughout the evening.
Select a cohesive three-piece furniture suite featuring complementary fabrics, such as an emerald-green tufted velvet settee paired with two caramel leather wingback armchairs. Lay down an eight-by-ten-foot faded vintage Persian or kilim wool rug over the barn floor boards, positioning it at a deliberate forty-five-degree angle to the room walls to create an inviting visual approach. Position the settee along the back edge of the rug, flanking it with the leather armchairs angled inward toward a central low-profile wooden trunk or brass-topped coffee table. Layer the seating with washed linen throw pillows and a draped knit blanket in neutral oatmeal tones to introduce inviting texture. Finish the lounge vignette with a floor-standing brass pharmacy lamp and a low tabletop arrangement of dried florals and eucalyptus set in an antique stoneware pitcher, hiding any visible lamp cords safely under the perimeter of the area rug.
10. Ambient Aisle and Post Lantern Groupings
How to Make
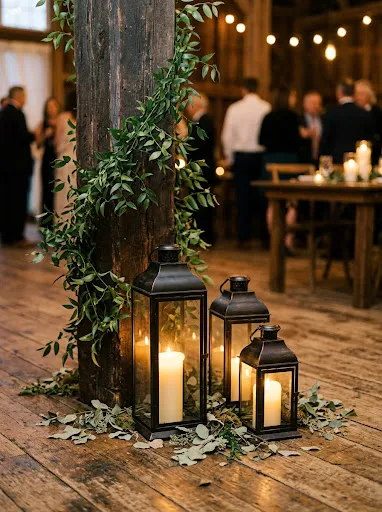
Clustering mixed-height metal and wood lanterns around structural barn posts and along primary walking pathways introduces warm, low-level illumination throughout the room. Large post-and-beam construction creates vertical timber columns that can interrupt visual flow if left unadorned; wrapping these uprights with soft lighting integrates them smoothly into the overall reception design. Grouping lanterns in clusters of three brings practical depth to ground-level surfaces, outlining walking routes safely between the dining area, bar stations, and restroom exits. Using varying lantern sizes, diverse metal finishes, and natural foliage accents transforms structural support posts into warm, charming design features. The layered candle glow reflects off textured wood grain, adding rich visual warmth to the barn interior while guiding guests smoothly and safely through the venue after sunset.
Procure thirty metal, wood, and glass hurricane lanterns in three distinct heights—typically twelve, eighteen, and twenty-four inches tall—choosing consistent finishes like matte black iron or antique brushed bronze. Place flame-resistant, battery-operated LED pillar candles inside each lantern, selecting models with melted-wax rims and realistic flickering wicks set to integrated six-hour automated timers. Position the lanterns around the bases of primary structural posts in clusters of three, arranging them in asymmetrical triangular formations with the tallest lantern resting firmly against the timber upright. Intertwine fresh cut sprigs of salal, olive branch, and seeded eucalyptus around the lantern bases, keeping the greenery stems outside the door frames so the glass panels stay unobstructed. Secure vertical greenery vines, like Italian ruscus, directly to the wooden posts using non-damaging brown gaffer tape or heavy jute twine, running the foliage four to six feet upward from the lantern bases to seamlessly connect the floor lighting with the overhead architecture.
Common Beginner Mistakes and How to Avoid Them
Planning barn reception decor involves unique logistical challenges that can compromise your final design if overlooked during early preparations. A frequent mistake is underestimating the sheer scale of the venue; standard residential centerpieces and small photo frames often look lost and insignificant in high-ceilinged timber spaces. Decorators must prioritize vertical volume by using tall hurricane shades, wide-spreading greenery runners, and overhead ceiling installations that fill the large open space properly. Another widespread issue is ignoring the venue’s electrical limitations; older agricultural buildings frequently have limited, low-amp electrical circuits that can trip when multiple lighting strings and warming trays are plugged in together. Always map out your power distribution early, separate heavy-draw catering equipment onto independent breakers, and choose low-draw LED bulbs for all decor lighting. Finally, using real, uncovered taper candles without protective glass hurricanes presents a serious fire hazard around dry timber framing, while also leaving candles vulnerable to cross-breezes from open barn doors. Always check the venue’s open-flame fire policies, use tall glass chimneys that clear the candle wicks, and choose realistic, battery-powered LED candles whenever you are styling near dry wood or breezy doorways.
Practical Tips for Better Results
Achieving a polished, professional look in a rustic barn setting requires intentional contrast between rough, natural surfaces and delicate, refined design accents. Pair weathered timber tables and rough plank walls with soft, high-thread-count textiles, such as washed linen napkins, fluid sheer drapery, and flowing cheesecloth runners to soften the venue’s agricultural edges. Maintain consistent warm-white color temperatures across all your light sources; mixing cool-toned 5000K daylight strings with warm 2200K amber Edison bulbs creates harsh visual clashes in wedding photography. Use dedicated, non-damaging mounting hardware, such as rubber-padded beam clamps, industrial zip ties, and magnetic hooks, to hang ceiling decor without driving permanent nails or screws into historic venue timbers. Assemble your centerpieces, fill your bud vases, and organize your signage into labeled transparent totes the day before setup, organizing supplies by table numbers and venue zones. Finally, always appoint a designated styling coordinator or lead decorator to manage on-site setup; having a dedicated point person keeps your installation team on schedule and resolves venue challenges smoothly, leaving the wedding party free to enjoy their day.
Styling, Presentation, or Organization Ideas
A well-planned reception floor design balances visual beauty with smooth, intuitive guest movement across the entire space. Position your key focal features—including the bridal table, main bar station, and wedding cake display—along logical visual lines, using decorative overhead lighting or draped fabrics to highlight each point of interest clearly. Maintain wide, open walking aisles between all dining tables, leaving at least four feet of clearance so guests, servers, and photographers can move around the room without squeezing past chairs. Tie different functional areas together visually by repeating a coordinated color palette across the space; for example, match the velvet throw pillows in your lounge area with the cocktail table linens and floral centerpiece ribbons. Use elevated, illuminated directional signs near the entrance doors to clearly point guests toward dining seating, restrooms, and outdoor patio spaces, preventing confusion and keeping foot traffic flowing smoothly. When presenting dining tables, stagger your glassware and flatware in clean, disciplined alignments; bringing sharp geometric order to informal wooden tables creates an elevated, boutique aesthetic that photographs beautifully throughout the celebration.
Budget or Time Planning
Creating an elevated, memorable barn reception design within a realistic budget requires smart resource allocation, focusing funds on high-impact visual features while simplifying low-visibility details. Direct your decor budget toward high-impact installations—such as an illuminated dance floor canopy or a dramatic rafter greenery chandelier—that immediately define the atmosphere of the room. Save significantly on your floral budget by purchasing hardy, long-lasting greenery varieties like silver dollar eucalyptus, Italian ruscus, and salal in bulk boxes from wholesale flower markets, assembling your table runners and accent garlands with a small crew of helpers two days prior. Stagger your decor installation over a dedicated two-day schedule whenever venue policies permit; dedicate day one to lifting heavy overhead drapery and hanging string lights using ladders, reserving the morning of the wedding for delicate tasks like setting out fresh florals, styling linens, and lighting candles. Rent high-end statement items, such as vintage furniture suites or specialty farm tables, from local party rental suppliers to eliminate costly long-distance shipping and storage hassles. Building an organized, step-by-step assembly schedule with dedicated two-hour work blocks keeps setup efficient and stress-free, ensuring every design detail is finished well before guests arrive.
Creative Expansion and Advanced Inspiration
Once you have mastered the foundational decor elements, consider introducing advanced design concepts and tactile details to make the venue uniquely your own. Incorporate suspended architectural ladders draped with flowering branches, hanging glass globes, and geometric brass pendants directly over long family-style banquet tables for an intimate dining experience. Explore projection mapping techniques to project soft, moving leaf patterns or custom botanical monograms across large exterior barn doors or bare interior end walls, introducing a captivating layer of visual storytelling as evening falls. Build an aromatic herbal centerpiece profile by weaving fragrant culinary herbs like rosemary stems, lavender sprigs, and broad-leaf sage directly into your table garlands, filling the dining room with subtle, refreshing garden scents. Experiment with contrasting contemporary elements, such as modern black metal bistro chairs, minimalist typography signage, or architectural neon art installations set against weathered shiplap backdrops, creating a sophisticated, high-end design statement. These thoughtful, creative design choices elevate a classic countryside setting into a rich, personalized celebration space that feels genuinely timeless, inviting, and unique.