Living botanical arrangements have fundamentally transformed modern event styling, offering an eco-conscious alternative to traditional cut-flower displays. Succulents provide an extraordinary visual presence across reception tables, merging sculptural rosette forms with muted, earthy color palettes. This comprehensive guide presents ten distinct styling concepts centered around living succulent centerpieces designed to elevate contemporary reception tablescapes. Readers will explore structural design principles, balanced container pairings, complementary greenery arrangements, and step-by-step assembly workflows. Incorporating living plants allows couples to create enduring decorative focal points that maintain structural integrity and color vibrancy without requiring complex water management during the event. Understanding container volume, plant growth habits, and textural interplay helps decorators produce balanced tablescapes suited for classic banquet layouts and intimate family-style gatherings. By mastering foundational preparation methods and soil mechanics, hosts and DIY enthusiasts can craft bespoke centerpieces that serve as lasting botanical keepsakes beyond the reception dinner. This structured resource details how to approach living plant design with certainty, ensuring your wedding decor balances natural textures, intentional composition, and enduring beauty across every guest table.
Contemporary Value and Enduring Appeal of Living Decor
The sustained popularity of succulent centerpieces across modern design boards stems from their unique union of sustainable design, visual longevity, and tactile interest. Unlike traditional floral arrangements that begin wilting under warm banquet lighting, living succulents remain firm, crisp, and radiant throughout long celebrations. This practical resilience eliminates day-of floral anxiety, permitting setup crews to assemble and position displays days in advance without refrigeration or continuous watering. From a visual standpoint, these desert botanicals bridge diverse aesthetic directions, fitting seamlessly into industrial warehouse spaces, rustic vineyard pavilions, coastal marquees, and modern urban rooftops. Their soft glaucous leaves, ranging from dusty mint and sage green to deep plum and soft lilac, pair harmoniously with organic wood, polished brass, raw concrete, and clear glassware. For budget-conscious hosts and thoughtful event planners, living arrangements provide unmatched long-term utility. Guests can take home the potted plants as living party favors, or couples can replant the botanical elements into home garden beds, keeping wedding memories alive for years to come.
Material Sourcing and Assembly Preparation
Executing high-quality succulent centerpieces requires systematic preparation, healthy plant sourcing, and reliable assembly tools. Begin by procuring graded succulent varieties such as Echeveria, Haworthia, Crassula, and trailing Senecio from certified nursery growers. Choose plants with firm, compact leaf rosettes and well-established root systems. Indispensable hardware components include shallow planter vessels, porous bonsai soil mix, horticultural pumice, fine pea gravel, and preserved reindeer moss. Assembly tools must include long curved tweezers for placing delicate leaves, sharp floral snips, rubber bulb blowers for clearing debris, and durable gardening gloves. Preparation starts approximately one week before the wedding by inspecting every specimen and removing dried bottom foliage. Unpack plants from standard nursery plastic containers and gently loosen tightly bound root balls. Lightly mist the roots forty-eight hours prior to potting, allowing the foliage to dry completely so moisture stays away from the leaf crowns during assembly. Organize clean tabletop workspaces with wide plastic trays to contain loose soil and stones, ensuring an efficient assembly line for your event decor.
1. Natural Driftwood Branch Living Runner
Step-by-Step Guide
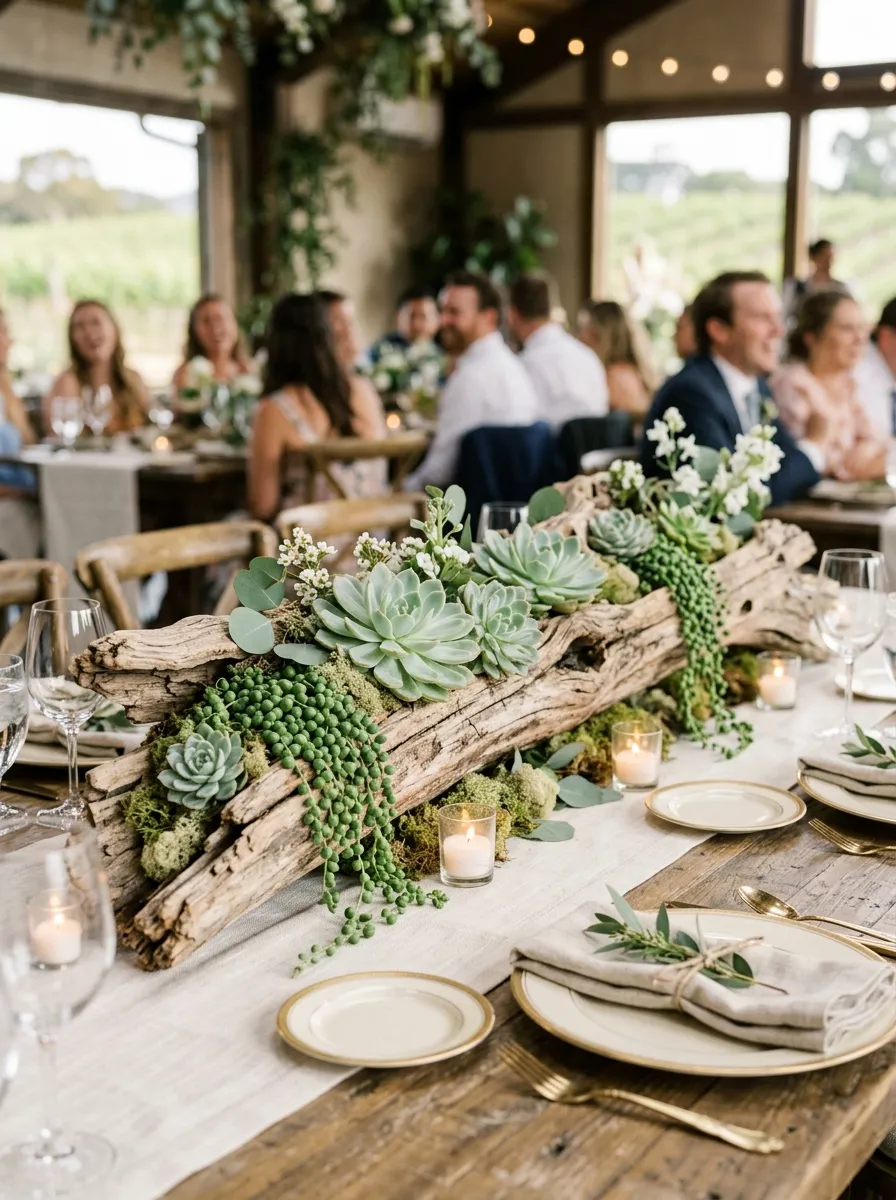
The linear driftwood centerpiece uses weathered timber branches to form a rustic horizontal focal point down long banquet tables. This design celebrates raw organic textures, nestling living rosettes directly into the natural contours, splits, and grain of sun-bleached branch surfaces. Rather than using conventional ceramic bowls, the timber functions as a living raft, anchoring varied botanical heights and textures into a seamless organic line. Muted green succulents contrast with silvery wood grain, bringing an earthy balance suited for vineyard celebrations or coastal weddings. Low horizontal lines keep guest sightlines completely clear across reception tables, encouraging effortless dining conversation. Integrating subtle touches of preserved sheet moss creates soft green transitions between hard wood grain and sculptural foliage, producing an authentic woodland look that feels intentional and refined.
Begin by selecting a sturdy branch of sandblasted driftwood measuring approximately thirty to thirty-six inches in length, ensuring a stable, flat base that sits securely on table linens. Clean all bark hollows and natural crevices using a stiff nylon brush, removing loose debris and dust. Apply a small amount of waterproof floral clay or non-toxic hot glue into natural depressions along the wood’s top surface. Line the bottom of each hollow with a thin layer of damp sphagnum moss to create a protective pad for bare root structures. Select compact succulent cuttings, such as ruffled Echeveria imbricata and trailing string-of-pearls, trimming stem lengths to one inch. Press the stem bases into the moss pads, securing roots with fine floral u-pins inserted directly into the moss matrix. Tuck preserved sheet moss and gray reindeer moss around outer stem margins to conceal mounting points, ensuring the plants appear to grow organically from the weathered branch.
2. Geometric Glass Terrarium Botanical Microcosm
Execution Process
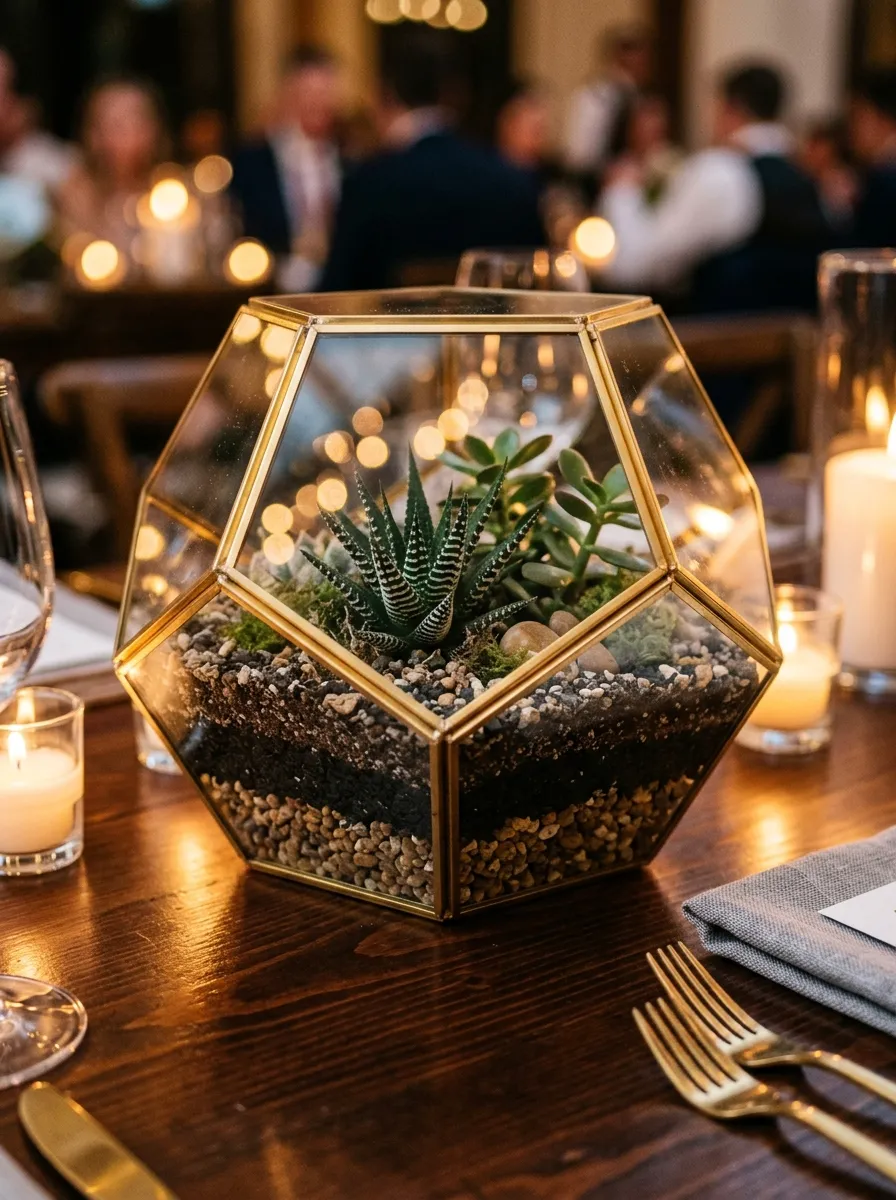
The geometric glass terrarium centerpiece brings sleek architectural structure to reception tables, framing living botanicals within multifaceted brass or black zinc metal frames. Clear glass walls allow guests to admire contrasting layers of potting media, creating visual interest from the gravel foundation up to the plant rosettes. This design suits urban loft weddings, modern gallery venues, and industrial spaces where clean lines and metallic accents define the overall decor. Grouping structural desert plants inside transparent enclosures protects delicate leaves from accidental bumps while reflecting candlelight across polished glass facets. Terrariums offer a tidy centerpiece solution that contains all soil components, keeping banquet table linens completely clean throughout evening dinner service.
Select faceted geometric glass containers featuring an open side panel for ventilation, measuring approximately eight inches in width and ten inches in height. Clean interior glass panels using isopropyl alcohol and a lint-free cloth to eliminate streaks, fingerprints, and manufacturing dust. Pour a one-inch drainage layer of washed pea gravel or black volcanic pumice into the terrarium base, leveling the stones using a straight wooden ruler. Add a thin layer of activated horticultural charcoal over the gravel to maintain internal soil freshness, followed by two inches of fast-draining cactus soil. Use long planting tweezers to create small depressions in the soil, gently inserting root balls of dwarf Haworthia fasciata and jade rosettes. Backfill soil around each root base, tamping down with a wooden dowel before topping with fine white silica sand. Use a rubber bulb blower to clear stray dust from inner glass panels and plant leaves.
3. Tiered Raw Concrete Pedestal Compote
Setup Method
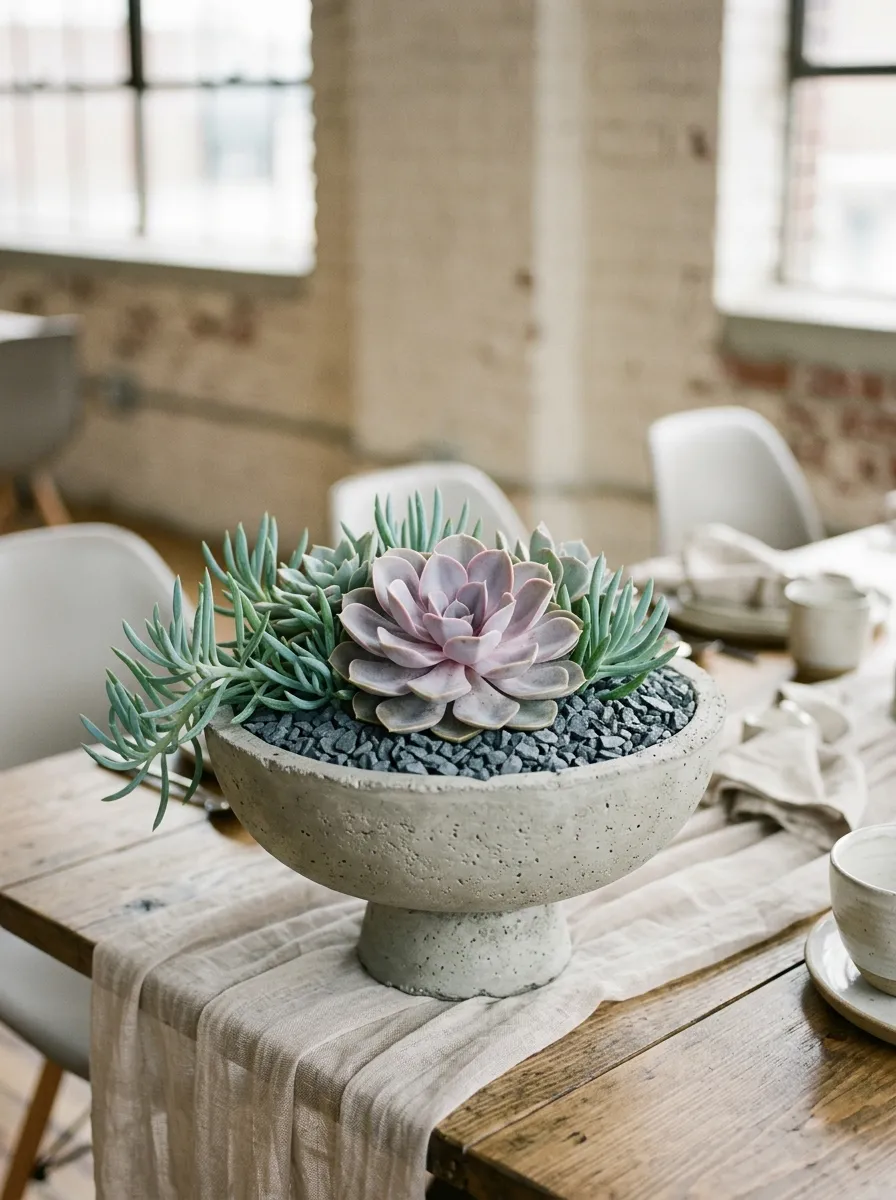
The cast concrete compote centerpiece balances raw industrial materials with the soft, organic lines of living succulent foliage. A low, footed concrete vessel provides an earthy, stone-like texture that anchors reception tables, adding weight and presence without dominating table surfaces. The cool gray hue of concrete flatters chalky blue and lavender succulent rosettes, such as Echeveria ‘Perle von Nurnberg’ and Graptopetalum. This design suits minimalist, contemporary, and urban outdoor wedding themes that embrace neutral, tactile materials. The sturdy, low-profile vessel resists accidental tipping on busy dining tables, providing a dependable anchor for lively dinner receptions.
Source circular cast concrete compote bowls measuring ten inches in diameter with a three-inch vertical foot and sealed interior basins to prevent moisture seepage. Place a circular piece of plastic mesh over the central drainage hole, pouring an inch of coarse expanded clay pebbles across the bottom to ensure aeration. Fill the container with a premixed blend of sixty percent pumice and forty percent organic potting soil, bringing the level half an inch below the concrete rim. Plant a large, symmetrical Echeveria rosette directly in the center to serve as the primary visual anchor. Surround this central specimen with smaller, contrasting varieties, such as blue chalksticks for vertical lines and burro’s tail cascading over the bowl rim. Cover exposed soil with washed slate gray gravel, pressing the stones flush against the concrete rim to achieve a clean, modern finish.
4. Polished Brass Tray Miniature Landscape
Step-by-Step Guide
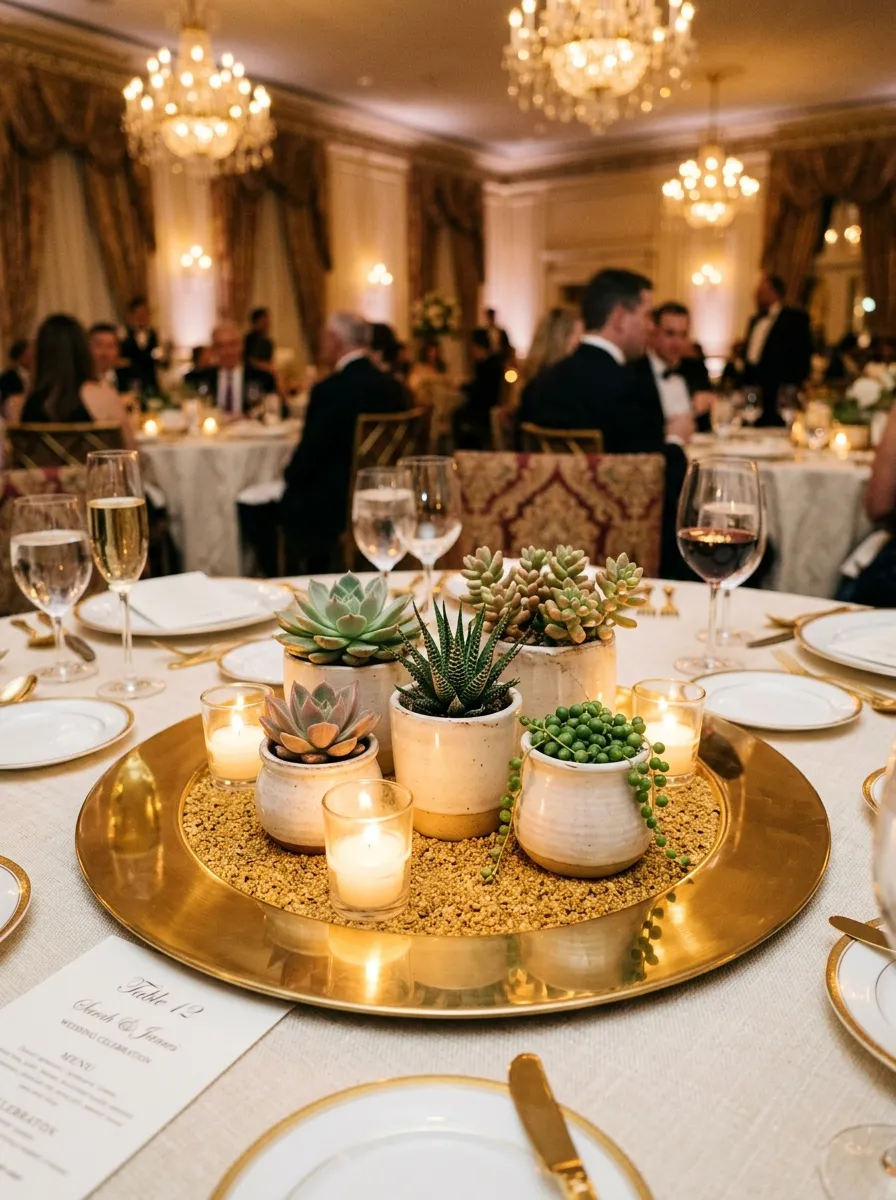
The polished brass tray arrangement pairs refined warm metallics with cool desert flora, creating an opulent and inviting centerpiece for formal wedding banquets. A shallow, mirrored or polished brass serving tray reflects flickering candlelight, adding warmth and movement across the table surface throughout the evening. This concept arranges distinct miniature potted succulents together on a single platter, allowing for dynamic styling with varied heights, textures, and container silhouettes. The metallic surface contrasts beautifully with dusty green, silver, and plum plant foliage, bringing an understated luxury to traditional ballroom settings. The modular layout also makes post-reception cleanup easy, as individual potted elements can be lifted and gifted directly to departing guests.
Acquire round or octagonal brass charger trays measuring twelve to fourteen inches across, ensuring bases are lined with felt pads to protect venue tables from scratches. Polish the brass surface with a microfiber cloth and specialized metal cleaner to remove fingerprints and surface tarnish. Gather five to seven miniature ceramic pots in ivory and warm sand finishes, ranging between two and four inches in diameter. Plant each container with a distinct succulent variety, such as dwarf tiger tooth aloe, split-rock pleiospilos, and flowering crassula, topping each pot with golden decomposed granite. Arrange the ceramic pots asymmetrically atop the brass tray, placing taller upright plants toward the back and lower rosettes in front. Fill empty spaces between the pots with clear glass tea light holders and small tumbled river pebbles, creating a luminous, cohesive botanical display.
5. Hollowed Birch Log Woodland Trough
How to Make
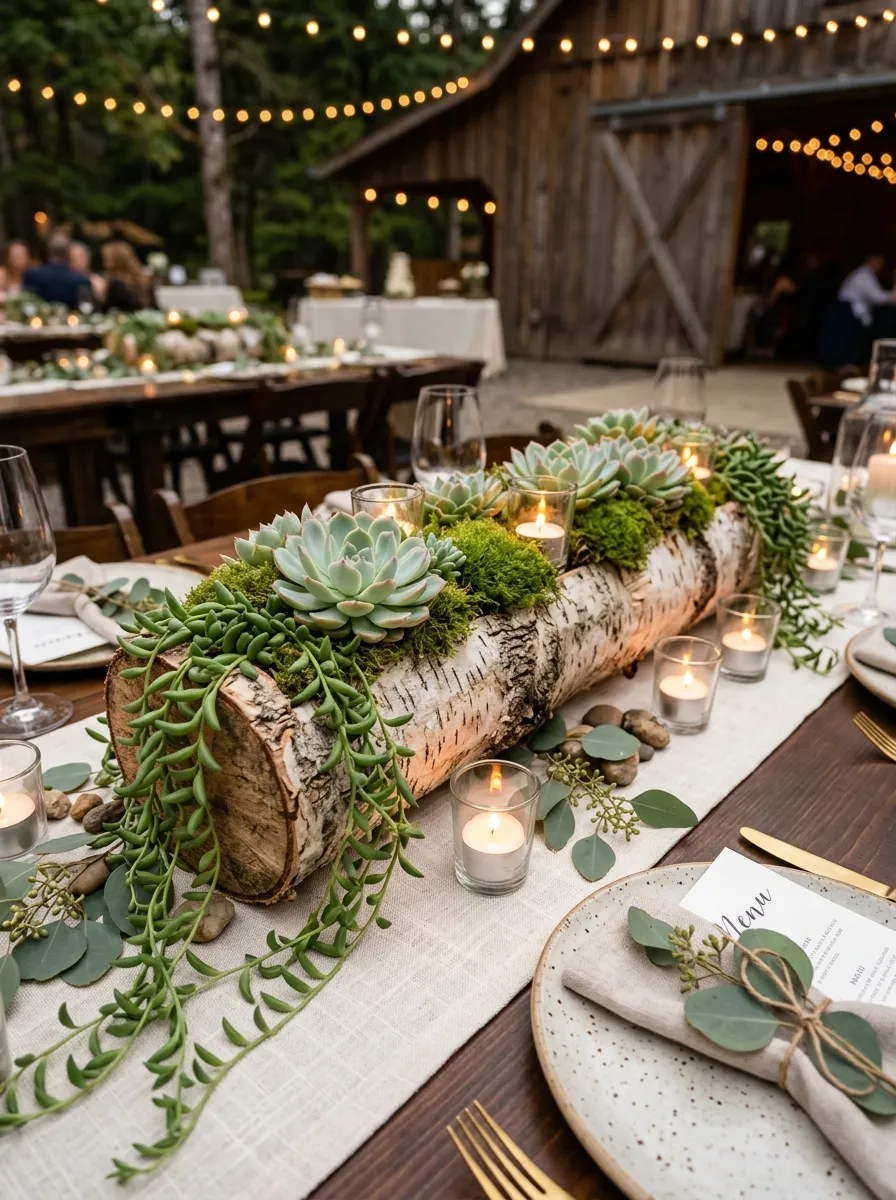
The birch log trough centerpiece brings rustic woodland charm to reception styling, encasing living succulents in natural, textured white bark. Natural birch timber provides pale, paper-like bark with dark horizontal accents, producing an earthy focal point for mountain lodge receptions, autumn barn weddings, and rustic forest gatherings. The trough shape runs parallel to rectangular dining tables, creating visual continuity while keeping arrangements neatly centered. The natural wood tones pair beautifully with forest ferns, silver dollar eucalyptus, and soft sage succulent rosettes, grounding the tablescape in natural textures. This self-contained wooden trough is easy to transport, allowing pre-potted arrangements to arrive at the venue fully assembled and ready for placement.
Source kiln-dried birch log segments measuring eighteen to twenty-four inches long and five inches in diameter, hollowed down the center to create a three-inch wide planting trench. Check that the log bottom has been planed flat to sit securely on banquet tables without rocking. Line the interior carved cavity with heavy-duty plastic sheeting, securing edges with small stainless staples below the log rim to prevent soil moisture from touching the wood. Add an inch of horticultural gravel to the bottom, followed by a well-aerated succulent potting mix. Arrange three large pale green Echeveria elegans evenly along the trench, angling rosettes slightly toward guest seating. Fill gaps between the focal plants with dark green Crassula ovata and trailing string-of-bananas that cascade over the birch bark. Cover all exposed soil with green cushion moss, trimming stray plastic liner edges to keep mechanics completely invisible.
6. Monochromatic Silver Leaf Pedestal Bowl
Setup Method
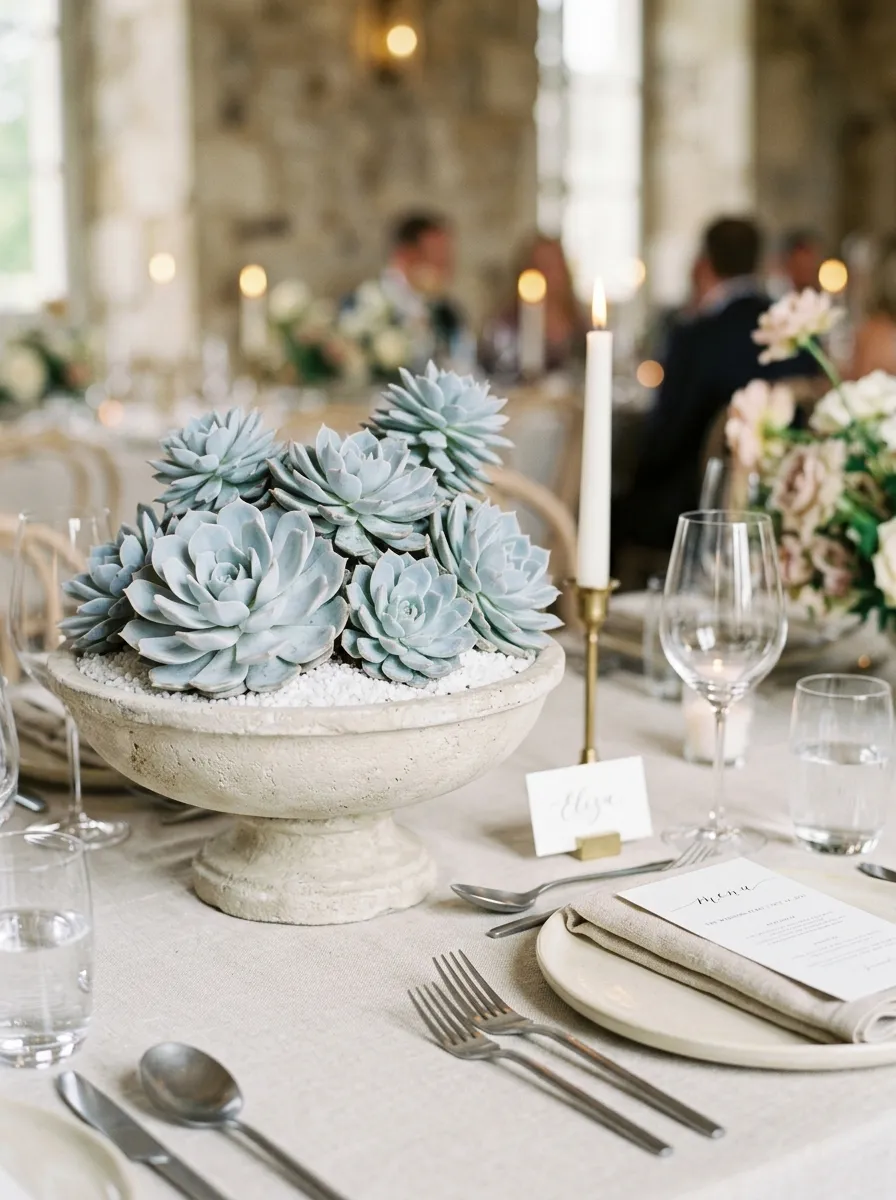
The monochromatic silver leaf centerpiece explores quiet, understated elegance by pairing exclusively cool-toned succulents in a stone pedestal bowl. Focusing on soft gray, frosted blue, and pale silver foliage creates a cohesive and calming centerpiece that complements fine china and polished silverware. Varieties such as Senecio serpens, Echeveria ‘Lola’, and Pachyveria ‘Clavifolia’ feature natural powdery farina coatings that diffuse table lighting with a soft, matte finish. This restrained color palette fits modern minimalist celebrations, black-tie receptions, and winter weddings seeking an organic alternative to standard white florals. The elevated pedestal bowl lifts the botanical composition slightly above dinnerware, adding vertical presence without obstructing sightlines.
Acquire footed stone or cast resin urn vessels measuring eight inches wide and six inches tall, finished in a matte limestone or pale sandstone texture. Position an interior plastic liner within the bowl to contain moisture and soil, trimming the top edge flush with the urn’s rim. Fill the liner with a porous potting blend of perlite, pumice, and coconut coir, packing it firmly to build a slightly domed soil surface in the center. Position a frosty blue Echeveria lilacina at the highest point of the central mound to serve as the dominant crown. Ring the central bloom with pale silver-blue pachyphytum rosettes and cascading strands of silver dollar vine spilling over the bowl rim. Conceal bare soil patches using crushed white marble chips, misting leaves lightly with compressed air to clear away any stray potting dust.
7. Vintage Book Pedestal Botanical Vignette
Execution Process
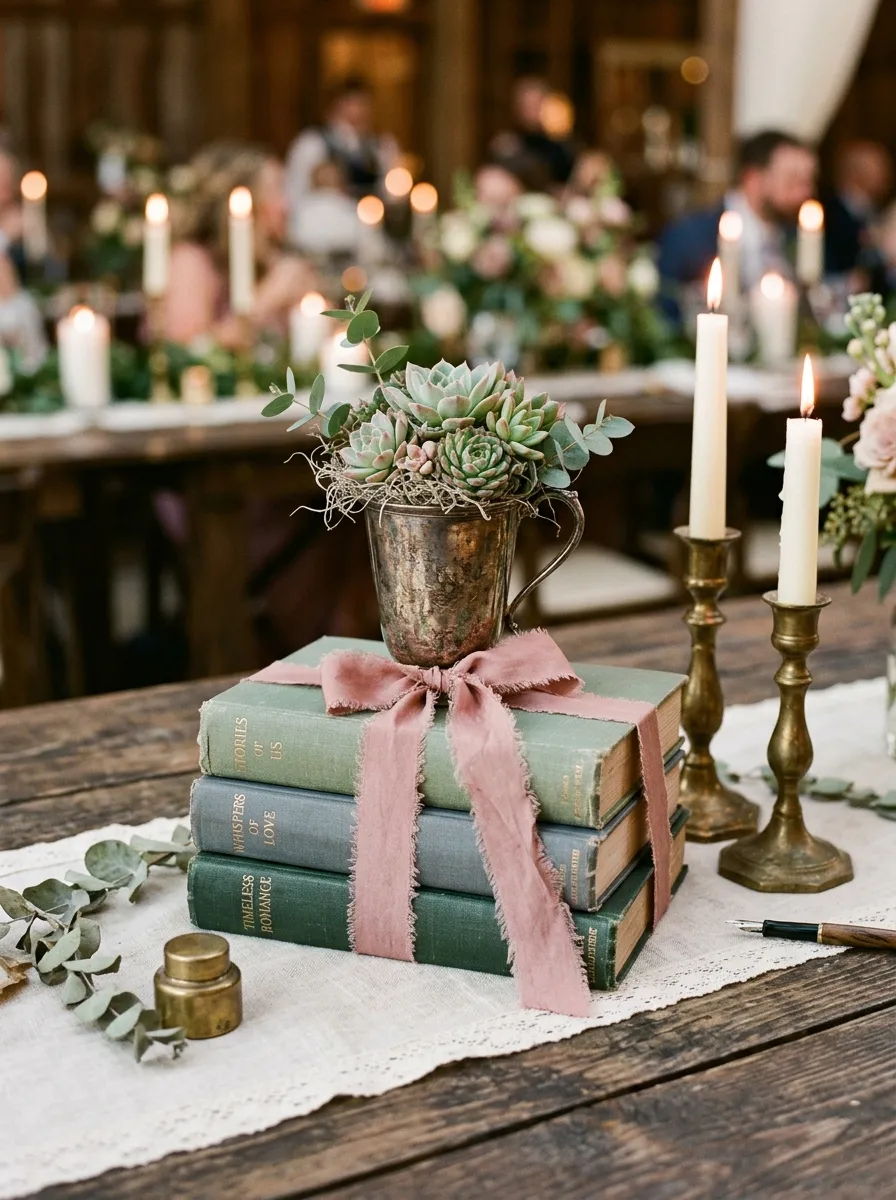
The vintage book stack vignette blends antique literary charm with fresh botanical elements, creating a nostalgic, romantic centerpiece for library, museum, or historic estate weddings. Weathered cloth-bound hardback books in muted shades of sage, slate, and navy serve as decorative pedestals for small living succulent arrangements. Stacking books horizontally creates varied elevations for miniature potted plants, brass votives, and small vintage curios. Succulents provide an unexpected natural contrast against aged paper edges and embossed book spines, adding life to antique styling. This multi-layered design invites guests to admire the table up close, discovering literary details and fine plant textures as they dine.
Source sets of three vintage cloth-bound hardcover books per table, choosing complementary spine colors like dusty olive, faded linen, and antique gold. Wipe book covers with a dry cloth to eliminate dust, and bundle each three-book stack using natural jute twine or torn-edge silk ribbon. Secure the ribbon with a square knot on top, leaving four-inch trailing ends for a soft, relaxed look. Place a flat, low-profile ceramic saucer measuring four inches across atop the upper book, hidden under a bed of preserved Spanish moss. Set a small, pre-potted arrangement of mixed succulent rosettes inside a vintage metal tea tin or tarnished silver cup, placing it directly onto the protected book platform. Scatter two antique brass candlestick holders alongside the book stack to create varied heights and cast a warm glow across the book covers.
8. Preserved Moss and Slate Tile Platform
Step-by-Step Guide
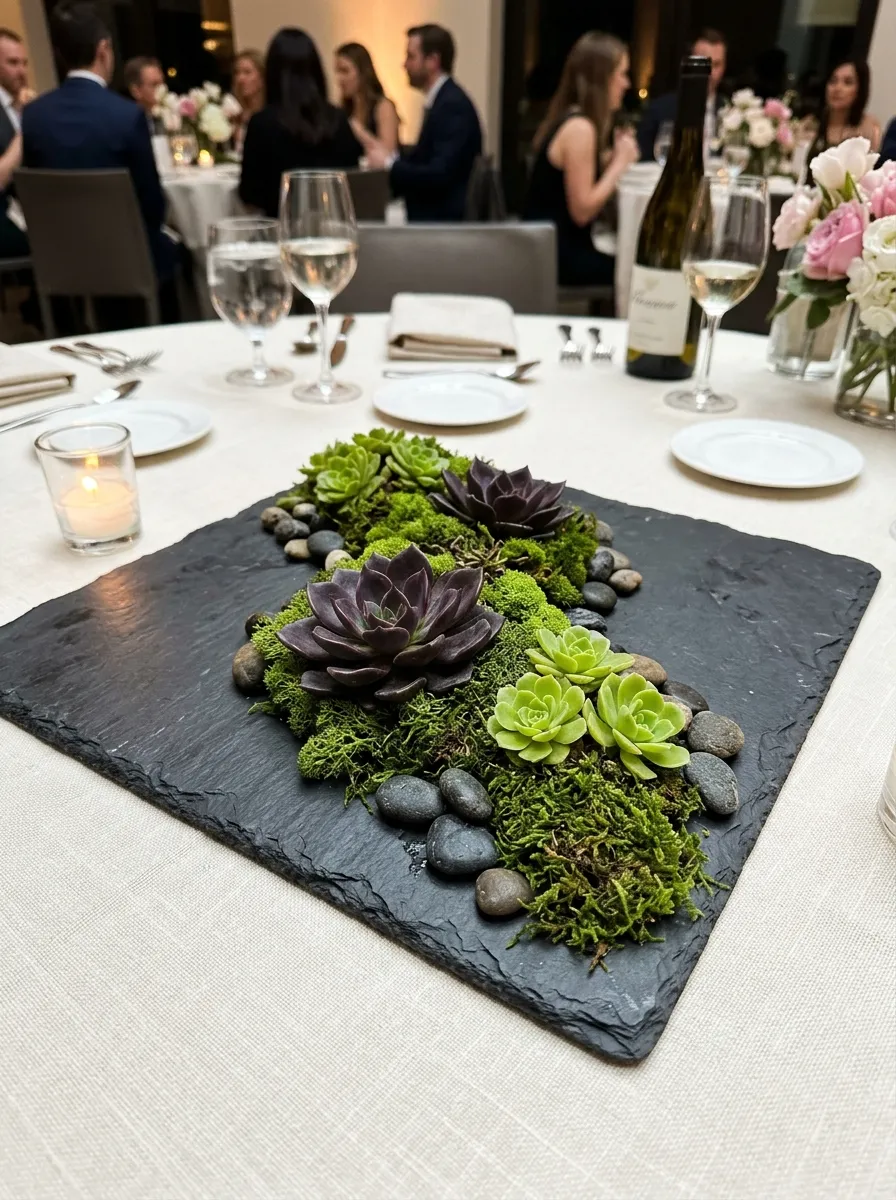
The slate tile and moss platform centerpiece uses clean, flat materials to showcase living botanicals as artful focal points. A piece of natural cleft dark gray slate serves as a grounded, textured foundation, defining the table center without tall containers. Arranging living succulent cuttings directly across lush preserved moss beds produces an organic tablescape that looks like a slice of natural forest floor. The dark charcoal tone of natural slate makes pale green and burgundy succulent leaves stand out with clarity. This low-profile design is particularly practical for family-style wedding receptions where shared food platters and wine carafes require clear space and open sightlines across the table.
Acquire natural dark gray slate floor tiles measuring twelve by twelve inches, checking that the top surface features authentic split-face clefting while the base sits flat. Attach four self-adhesive felt furniture pads to the bottom corners of each slate square to protect fine venue linens from scratches. Arrange preserved green sheet moss, mood moss, and lichen across the slate surface, forming a crescent or diagonal path that leaves portions of the dark stone exposed. Select large, rootless succulent rosettes that have dried and calloused for at least five days, including deep purple Echeveria ‘Black Prince’ and lime green Aeonium. Fasten the base of each rosette securely onto the moss path using discreet drops of clear, floral cold glue. Accent the moss margins with tiny dried botanical pods and smooth river pebbles, misting the moss lightly before guests arrive to enhance its rich green color.
9. Clear Glass Compote and Submerged Root Display
Setup Method
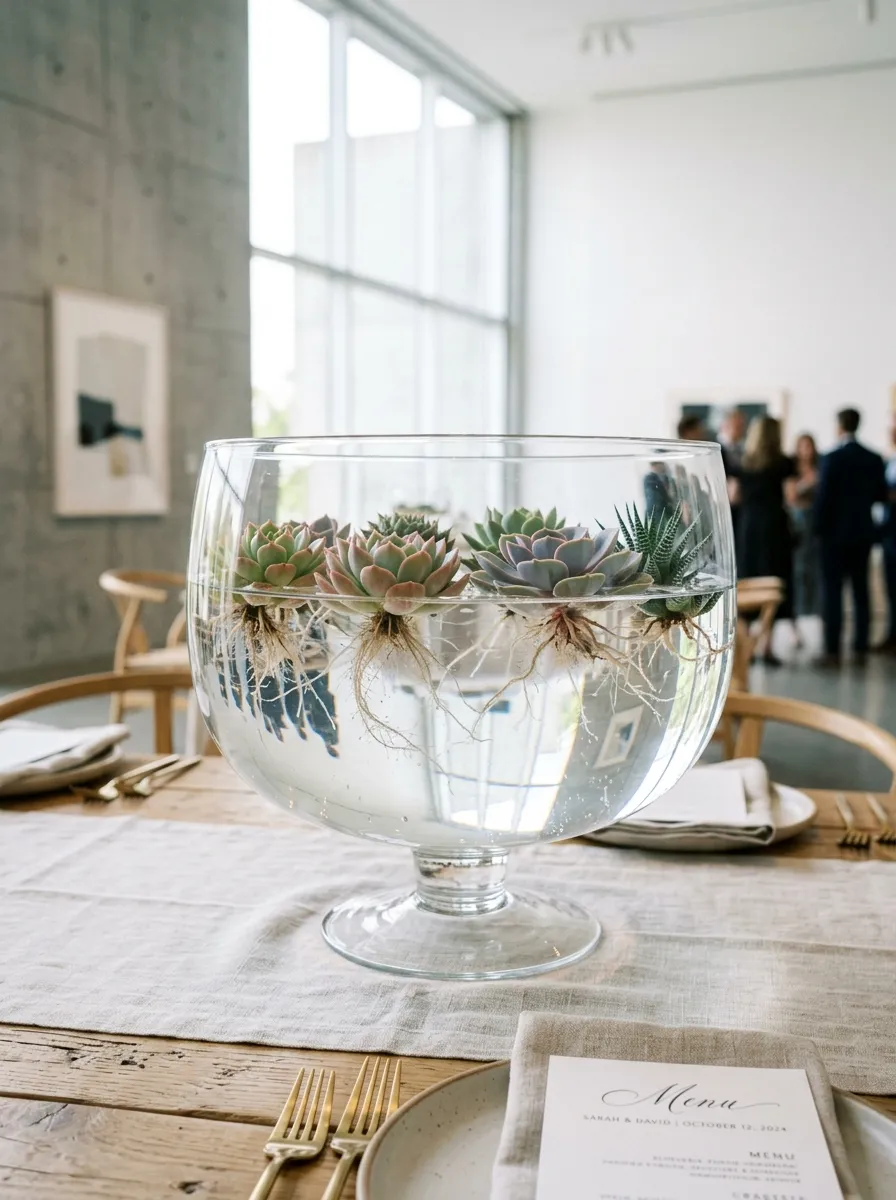
The clear glass compote display highlights the entire living succulent plant, featuring washed, bare root systems floating cleanly in water. Clear glass vessels filled with purified water turn healthy root strands into a sculptural design element, pairing botanical biology with modern elegance. This style suits contemporary gallery weddings and modern minimalist events that favor clean, transparent decor over heavy rustic materials. Water reflects and magnifies ambient reception lighting, creating a bright, open feeling across long banquet tables. Removing soil eliminates any risk of loose potting media near dinner plates, providing an exceptionally tidy centerpiece that remains fresh and vibrant without soil preparation.
Select wide-mouthed clear glass compote bowls measuring eight inches in diameter and five inches in height, ensuring clarity free from bubbles or manufacturing tints. Clean both interior and exterior glass surfaces thoroughly with a mixture of vinegar and distilled water to achieve a streak-free shine. Unpot mature succulent rosettes, such as Echeveria ‘Tippy’ or Haworthia cymbiformis, and soak root balls in lukewarm water to remove all soil particles. Trim away dead or damaged root strands, rinsing the remaining roots under a gentle stream of water until completely clean. Rest a custom-cut wire floristry mesh ring across the vessel opening just below the rim to support the rosettes above the water. Fill the bowl with distilled water up to the wire grid, resting rosettes on the mesh so only root tips sit submerged in the water.
10. Antiqued Terra Cotta Herb Pot Cluster
How to Make
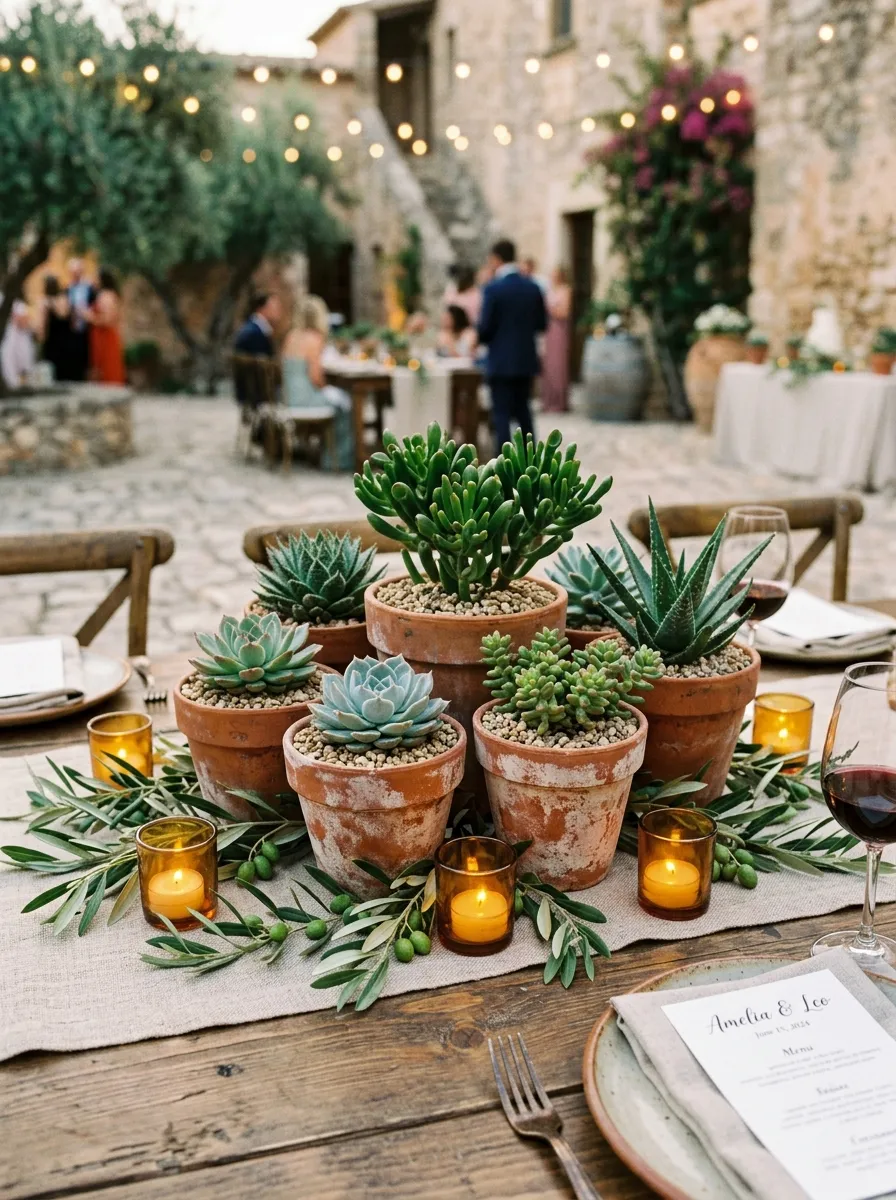
The antiqued terra cotta cluster brings warm, Mediterranean courtyard character to wedding dining tables, gathering varied clay pots into an inviting central grouping. Aged terra cotta pots feature natural mineral patinas, chalky salt lines, and warm burnt-orange clay tones that pair beautifully with dusty desert flora. Grouping pots in clusters of three or five creates casual, asymmetrical interest that feels collected over time rather than rigidly styled. This approach works wonderfully for outdoor garden dinners, farmhouse receptions, and bohemian celebrations. Guests can also interact with the display, admiring different leaf textures and easily taking individual potted plants home as lasting keepsakes at the end of the evening.
Gather collections of small, aged terra cotta pots ranging from three to five inches in height, soaking new pots in a light baking soda wash to quickly achieve an authentic weathered white patina. Line the bottom drainage hole of each pot with a curved pottery shard, then fill containers three-quarters full with a gritty succulent soil mix. Plant an individual variety into each pot, featuring upright structural plants like Crassula ‘Gollum’ alongside mounding varieties like Graptosedum ‘Darley Sunshine’. Top the soil in every pot with fine gravel to keep the presentation tidy. Arrange pots in the center of the reception table in an organic cluster of odd numbers, varying heights to create a balanced silhouette. Weave fresh sprigs of olive branches or silver dollar eucalyptus around the pot bases, finishing the display with ribbed amber glass tea lights to cast warm light across the weathered clay.
Common Beginner Mistakes and How to Avoid Them
Designing successful living succulent wedding centerpieces requires avoiding several common horticultural and styling pitfalls. A frequent mistake is using standard, moisture-retentive indoor potting soil without adding gritty minerals like pumice or coarse perlite. Rich peat-based soils hold moisture too long and lack the density needed to keep shallow-rooted rosettes stable on dining tables; always use a mix with at least fifty percent inorganic grit. Another common issue is overwatering plants immediately before the wedding. Soaking succulent soil shortly before the event can cause foul standing water odors in warm ballrooms, soften stems, and lead to leaks on venue linens. Instead, keep soil dry during the week leading up to the celebration; succulents store ample water in their leaves and remain crisp without day-of moisture. Finally, avoid crowding plants too tightly against one another without negative space. Cramming rosettes hides their sculptural petal shapes and can cause bruising during setup. Leave small buffers between plants, framing stems with clean gravel or preserved moss to let each specimen stand out.
Practical Tips for Better Results
Applying thoughtful floristry and styling techniques will elevate your living plant centerpieces from simple potted crafts into polished, boutique-quality displays. Always use high-contrast top dressings, such as crushed white quartz, gray basalt gravel, or golden decomposed granite, over exposed soil. Adding gravel hides dark dirt, keeps loose soil in place during transport, and gives containers a clean, professional finish. When working with delicate varieties like Echeveria, handle rosettes gently by their lower stem base or root ball rather than touching the foliage. Fingers can easily rub away the natural white epicuticular wax coating, leaving dark smudges on pale leaves. Maintain visual rhythm on long banquet tables by varying your arrangements: pair a low driftwood branch with flanking ceramic bud vases or clusters of brass taper candles. This alternating pattern creates visual movement down the table while keeping dinner settings cohesive. Finally, assemble a day-of styling kit containing extra preserved moss, long planting tweezers, floral cold glue, and a soft artist’s brush to dust away stray particles during final venue walkthroughs.
Styling, Presentation, or Organization Ideas
Thoughtful presentation across the reception space brings visual harmony and turns individual centerpieces into a cohesive room experience. On long rectangular tables, arrange centerpieces along a clear central axis, leaving balanced buffers between place settings, glassware, and serving areas. For round dining tables, group arrangements centrally within an intentional circular footprint, using low-profile vessels so guests across the table can converse comfortably without moving decor aside. Pair your botanical displays with warm ambient lighting by clustering ribbed glass votives, brass tea lights, or clear hurricane lamps around vessel bases. The glow of candlelight highlights the powdery silver, plum, and sage green tones of succulent leaves as the sun goes down. Coordinate your stationery with your living decor by printing table numbers and place cards on heavy cotton paper, securing them in small brass card holders or slotted wooden blocks nestled alongside plant containers. This unified styling approach creates a polished, welcoming dining atmosphere across every table.
Budget or Time Planning
Careful project scheduling and smart plant sourcing ensure your living centerpieces remain cost-effective and stress-free to produce. Purchase succulents in wholesale nursery plug flats containing thirty-two to seventy-two specimens, which significantly lowers per-plant costs compared to retail garden centers. Because living succulents are exceptionally hardy, you can pot centerpieces two to three weeks before the wedding without worrying about wilted blooms or petal loss. Establish an organized assembly schedule: wash and prep containers during the first week, pot the plants and apply gravel top dressings during the second, and clean outer vessels and pack transport crates in the third. When packing, place arrangements inside sturdy plastic bins partitioned with cardboard dividers to prevent shifting and leaf damage during transport. Setting up living arrangements ahead of time eases wedding-week stress, freeing up valuable hours for ceremony details and ensuring your centerpieces arrive at the reception fresh, stable, and ready to shine.
Creative Expansion and Advanced Inspiration
Once you master basic potting and container composition, you can explore exciting new ways to personalize your succulent tablescapes. Experiment with varied vessel materials by pairing raw concrete bowls with polished metallic elements like brushed brass candle sleeves or copper table number holders, creating dynamic industrial contrast. Introduce seasonal fruit accents—such as whole fresh figs, split pomegranates, or dark wine grapes tucked into moss margins—to add rich, dark colors to vineyard and autumn wedding settings. For evening receptions, weave micro warm-white fairy lights through driftwood hollows or underneath moss beds, casting a gentle glow upward through the foliage. You can also customize your color themes by pairing specific succulent cultivars; try deep chocolate Aeonium ‘Zwartkop’ with cream-colored garden roses, or powdery blue Echeveria with silvery dried lavender. These creative touches let you tailor your living centerpieces to your personal style, crafting memorable reception decor that celebrates natural beauty and thoughtful design.