The wedding reception head table anchors the entire dining space, serving as the visual center where newlyweds, bridal parties, or immediate families gather during the celebration. Designing an intentional head table requires balancing practical dinnerware placement with artistic visual styling that commands attention across the venue. This comprehensive tutorial explores ten distinct wedding reception head table decor concepts, breaking down the exact mechanics, material pairings, and assembly techniques required to create a memorable focal point. Readers will discover how to layer continuous organic greenery runners, build floating overhead floral clouds, style textured fabric drops, and position ambient candle groupings to establish visual depth. Handcrafting or curating this central display provides a dependable way to express your wedding aesthetic while maintaining complete control over your decorating budget and timeline. Transforming a standard banquet trestle into a curated stage sets a refined tone that enhances wedding photography from cocktail hour through evening speeches. By following systematic steps for foundation stabilization, horizontal foliage weaving, and vertical illumination balance, anyone can execute a polished head table design with technical precision.
Why This Idea Is Trending or Useful
The sustained popularity of specialized head table decor across modern wedding inspiration boards stems from its dual role as a high-impact photo backdrop and a welcoming gathering space. In contemporary reception planning, couples increasingly prefer dedicated focal tables—such as elongated king tables or intimate sweetheart layouts—that differentiate the honor party from standard guest seating. Concentrating decorative resources along this single central surface maximizes visual impact, allowing couples to create a luxurious environment without overspending on every individual guest table. From a practical DIY perspective, head table styling offers accessible opportunities for beginners because it relies on repeatable modular layouts, continuous greenery garlands, and clustered candle elements that require no commercial floristry refrigeration. Preserved foliage, reusable glass hurricane sleeves, and textured linen runners can be sourced and pre-assembled well ahead of event day. Furthermore, prioritizing the head table ensures that the central location captured most frequently in speeches, toasts, and cake-cutting photographs maintains a cohesive aesthetic that ties the reception together.
Materials and Preparation
Achieving an upscale, balanced finish when building head table decor requires deliberate material procurement and thorough workspace preparation before styling begins. Essential hardware includes heavy-gauge table clamps, overhead metal suspension bars, floral chicken wire cages, non-drip wax taper candles, and glass hurricane chimneys. Decorative components range from raw-edge silk chiffon and heavy linen runners to freshly conditioned ruscus foliage, statement garden roses, brass candlesticks, and micro-wire fairy lights. Preparation begins with measuring the head table dimensions accurately, noting table length, width, and distance from the rear wall to ensure guest movement remains unobstructed. Clean all glassware and metallic candle holders thoroughly using an equal-parts white vinegar and distilled water mixture to eliminate wax residue and fingerprints. Sort botanical stems into hydration buckets, cutting woody stem bases at forty-five-degree angles twenty-four hours before assembly. Establishing an organized layout plan ensures each decorative zone maintains clear sightlines, keeping place settings functional while preventing tabletop decor from interfering with dinner service.
1. Lush Italian Ruscus and Garden Rose Running Garland
Step-by-Step Guide
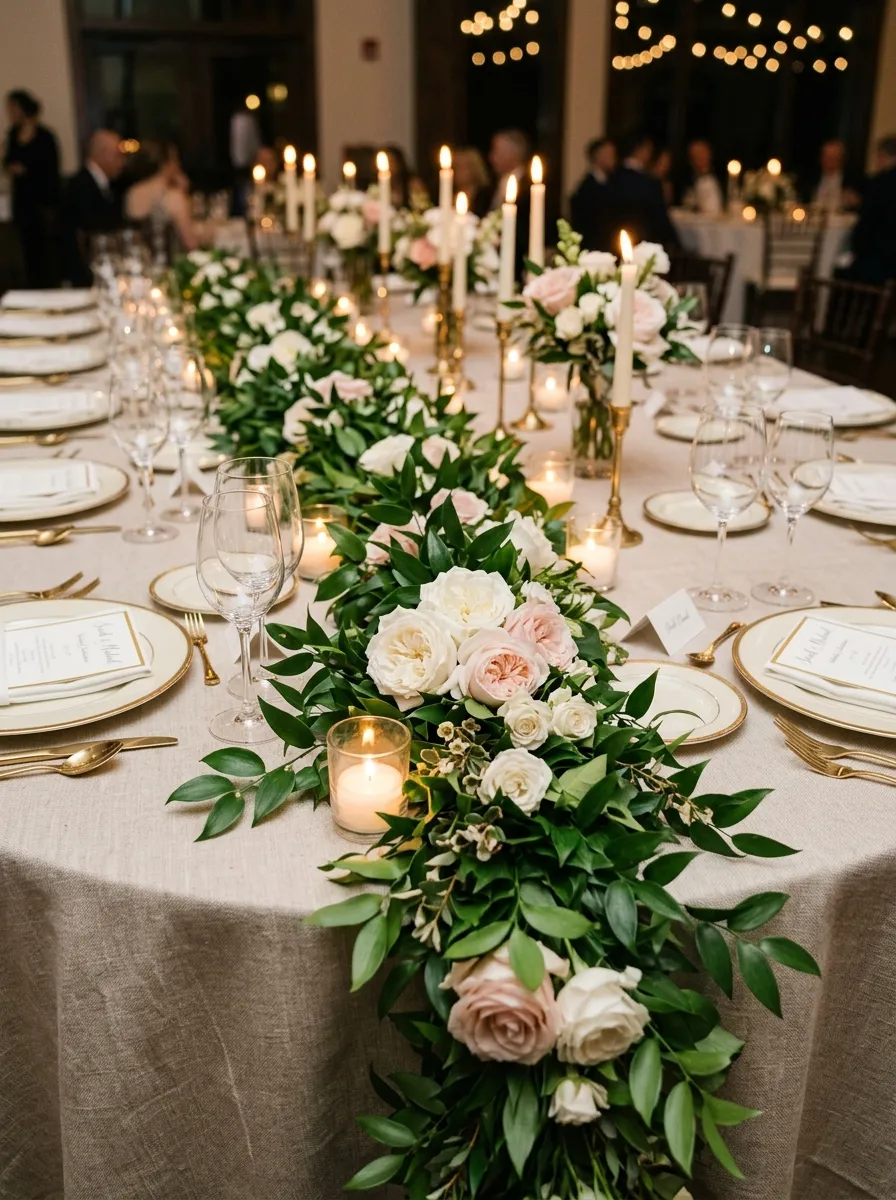
The lush Italian ruscus and garden rose running garland creates a continuous, organic botanical line along the front lip of the head table. This design utilizes layered vines of fresh Italian ruscus and salal leaves to establish a wide, leafy foundation that spills naturally over the table edges. Statement garden roses, open lisianthus, and spray roses in creamy blush and ivory tones are nested into the foliage at varied intervals. By keeping the floral elevation low and continuous, this runner frames the newlyweds while keeping sightlines clear for guests seated across the room. The contrast between deep glossy foliage, soft layered petals, and textured wooden table surfaces delivers an understated romantic aesthetic suited to vineyard estates, country clubs, and historic garden properties.
Begin by rolling out an unbleached neutral linen runner along the entire length of the head table, smoothing out surface wrinkles. Lay thick branches of fresh Italian ruscus end-to-end along the front edge of the table, overlapping the woody stem ends by six inches to create an unbroken garland. Secure intersecting branch nodes using thin green floral paddle wire, allowing soft leaf tendrils to drape two to four inches over the front edge. Cut the stems of white garden roses and spray roses to three inches, inserting each stem into a water-filled plastic floral pick to preserve hydration. Insert the tubed roses directly into the ruscus base at an asymmetrical forty-five-degree angle, clustering blooms in groupings of three every two feet down the table. Place clear glass votive holders containing six-hour soy tea lights along the garland line to illuminate the fresh petals.
2. Minimalist Monochromatic Taper Forest on Raw Timber
Execution Process
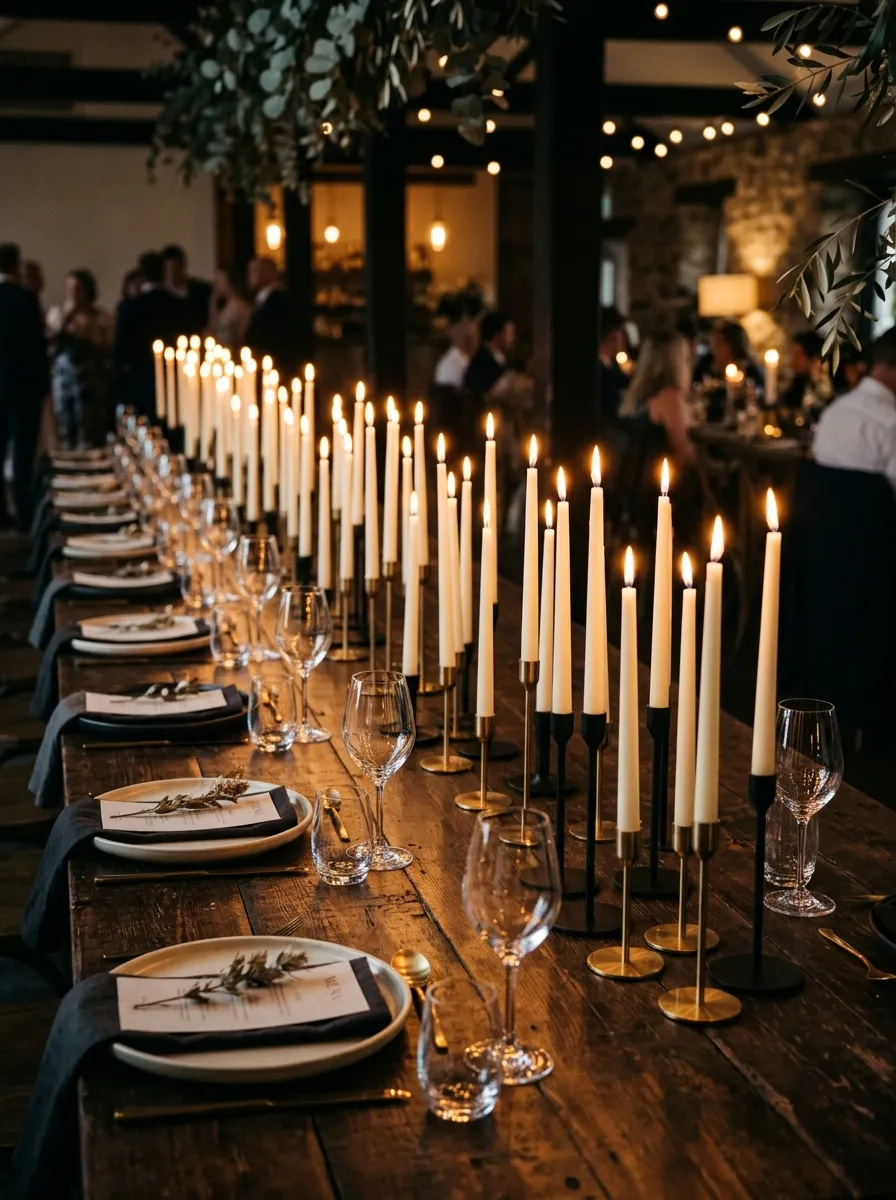
The minimalist monochromatic taper forest pairs clean architectural lines with warm living illumination, transforming bare wooden harvest tables into striking contemporary focal points. This concept relies on grouping dozens of slender, dripless taper candles in varying heights across the length of the table without heavy botanical fillers. The candles are housed in minimal brass, matte black, or ceramic holders placed at irregular, rhythmic intervals down the center board. The clean ivory wax columns contrast against dark stained wood, producing a warm glow that bounces off polished glassware and flatware. This design works well in industrial warehouse lofts, modern art galleries, and minimalist barn venues where clean simplicity takes precedence over heavy floral arrangements.
Start by selecting an untreated or matte-finished solid wood harvest table, wiping the surface clean with a dry microfiber cloth to remove dust. Choose thirty solid-dyed, dripless paraffin or beeswax taper candles in heights ranging from nine to fifteen inches, pairing them with heavy-base metal candle holders. Arrange the holders down the center spine of the table in an organic, meandering wave, maintaining a four-inch safety perimeter around every dinner plate and glassware setting. Melt a single drop of wax into the base of each holder well, inserting the taper firmly to ensure it stands vertically without leaning. Inspect the entire row from both ends of the table to verify that the vertical lines remain straight and spaced evenly. Light the wicks fifteen minutes before guest arrival using an extended butane utility lighter, keeping replacement candles stored nearby.
3. Suspended Aerial Floral Cloud with Hanging Glass Orbs
How to Create
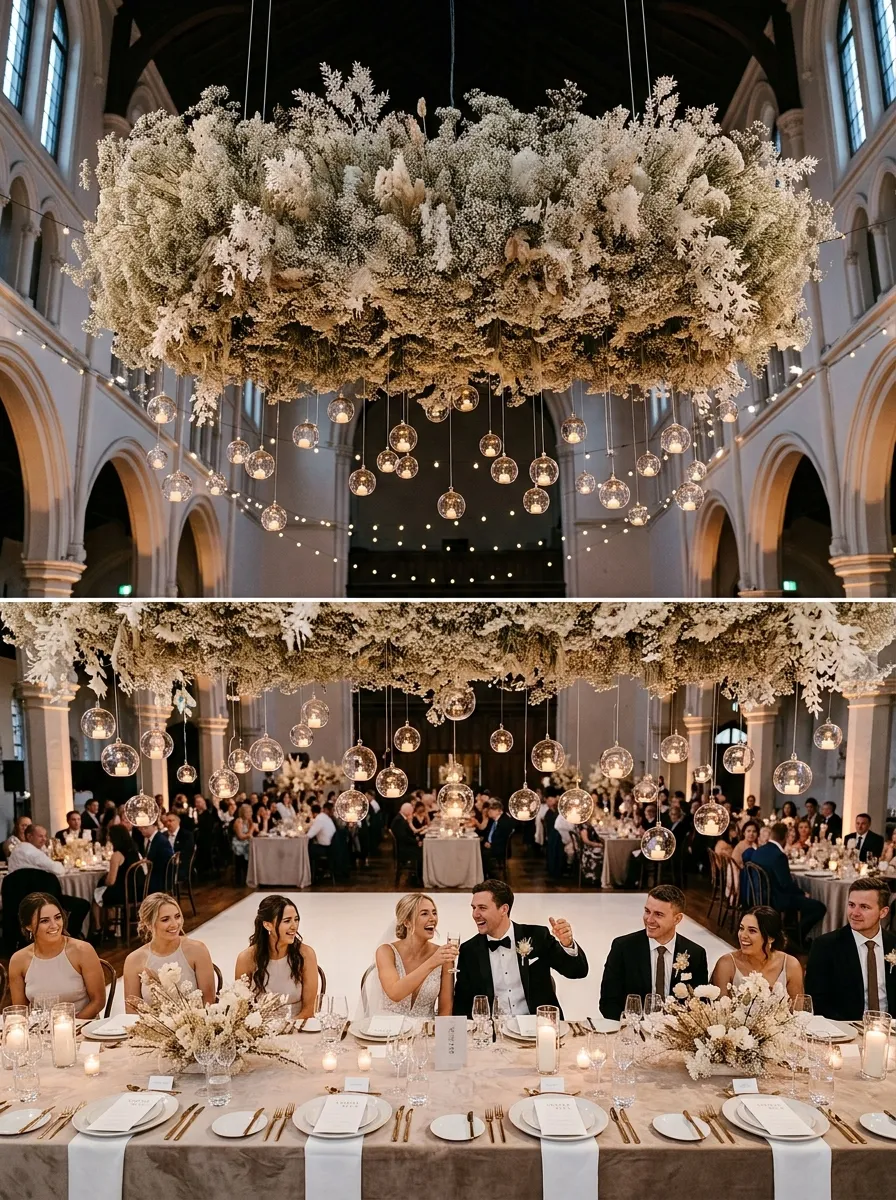
The suspended aerial floral cloud lifts the primary decorative weight entirely off the dining surface, creating an overhead canopy that leaves the table clear for place settings and dinnerware. This design utilizes a lightweight chicken wire armature packed with preserved baby’s breath, dried bleached ruscus, and soft amaranthus plumes hung directly above the head table. Delicate hand-blown glass globes containing glowing LED tea lights dangle from the cloud structure at varied elevations via clear monofilament line. The floating installation frames the seated wedding party beneath a cloud of delicate texture, drawing the eye upward into high venue ceilings. This aerial layout suits industrial spaces, historic armories, and modern banquet halls with overhead rigging points, creating an architectural statement without crowding the table below.
Construct a rectangular wire frame measuring six feet long by eighteen inches wide using twenty-gauge coated floral chicken wire, rolling the edges inward to form a hollow, three-dimensional cylinder. Secure two rated steel hanging cables to the frame at the quarter-points, connecting the upper cable ends to approved venue ceiling beams using heavy-duty carabiners. Fill the wire frame by pushing dense clusters of dried baby’s breath and bleached ferns into the mesh openings, working from the bottom upward until the metal structure is concealed. Tie six-pound monofilament nylon lines to fifteen three-inch clear glass tea light orbs, varying line lengths from twelve to twenty-four inches. Knot the lines securely to the lower wire mesh of the suspended cloud, inserting battery-operated warm-white LED tea lights into each glass globe. Ensure the lowest hanging glass orb sits at least thirty inches above the tabletop surface.
4. Layered Gauze Drape with Terracotta Urn Accents
Setup Method
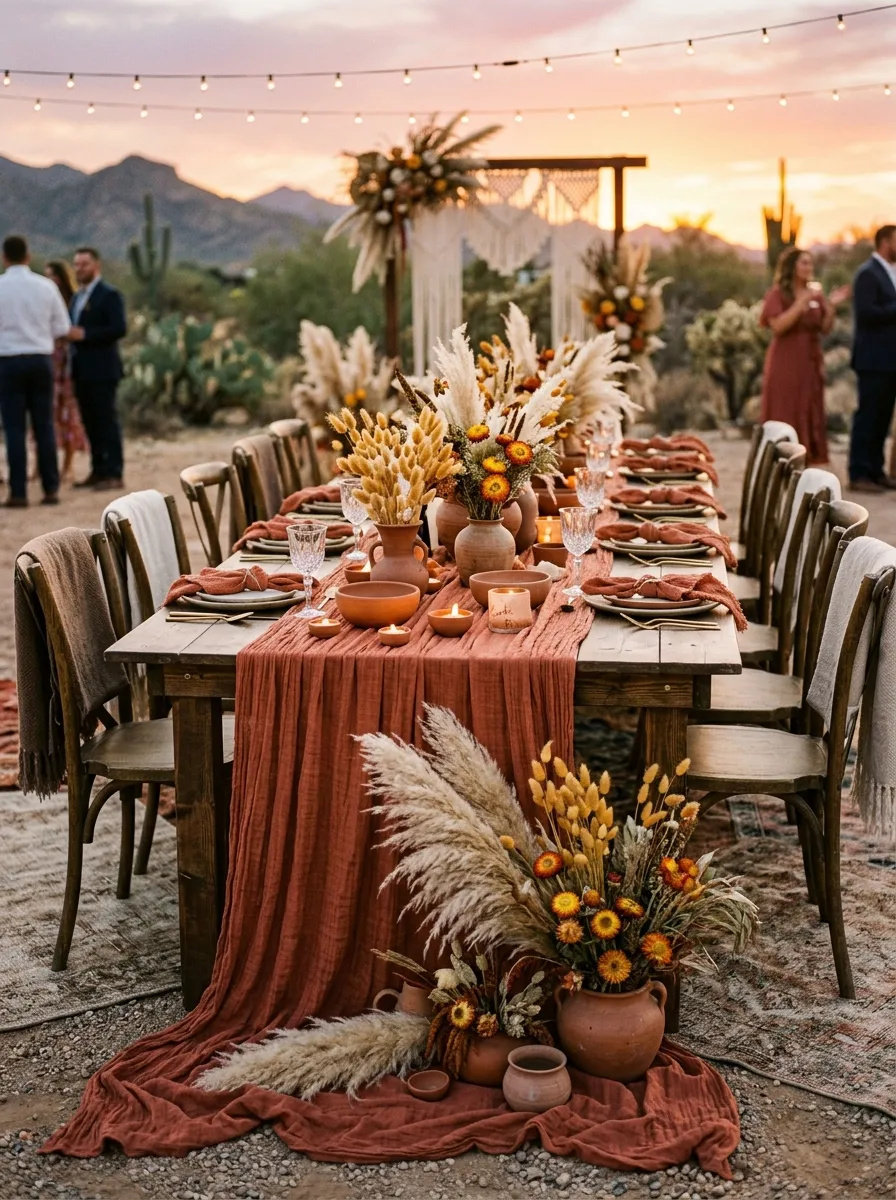
The layered gauze drape centerpiece combines tactile fabric movement with earthy earthenware vessels, creating a warm, bohemian tablescape suited for outdoor autumn celebrations. This design features an extra-long, hand-dyed cotton gauze or cheesecloth runner pooled generously across the tabletop and spilling onto the floor at both table ends. Low, unglazed terracotta compotes and rustic clay urns are spaced along the fabric folds, holding dried pampas plumes, bunny tails, ochre strawflowers, and preserved seed pods. The soft, textured cloth catches directional lighting, creating dimensional ridges that ground the pottery vessels. This warm palette harmonizes with open-air vineyard dinners, desert botanical venues, and rustic farm receptions, offering an inviting, approachable aesthetic that stays picture-perfect all evening.
Lay a sixty-inch wide by sixteen-foot long terracotta-dyed cheesecloth runner down the center of an eight-foot banquet table, scrunching the fabric inward with your hands to create natural, wavy folds three to four inches deep. Allow three feet of extra fabric to drape gracefully over each end of the table, pooling softly onto the floor. Position three low, eight-inch unglazed terracotta bowls along the center line: one in the exact middle and two flanking it two feet away. Place a block of dry floral foam inside each clay vessel, securing the foam with brown floral tape crossed over the rim. Insert dried pampas grass plumes, preserved terracotta strawflowers, and golden bunny tails into the foam, fanning stems outward to create a low, horizontal shape. Scatter loose dried seed pods and miniature terracotta tea light cups into the fabric folds between the urns.
5. Architectural Glass Hurricane Corridor with Pillar Columns
Step-by-Step Guide
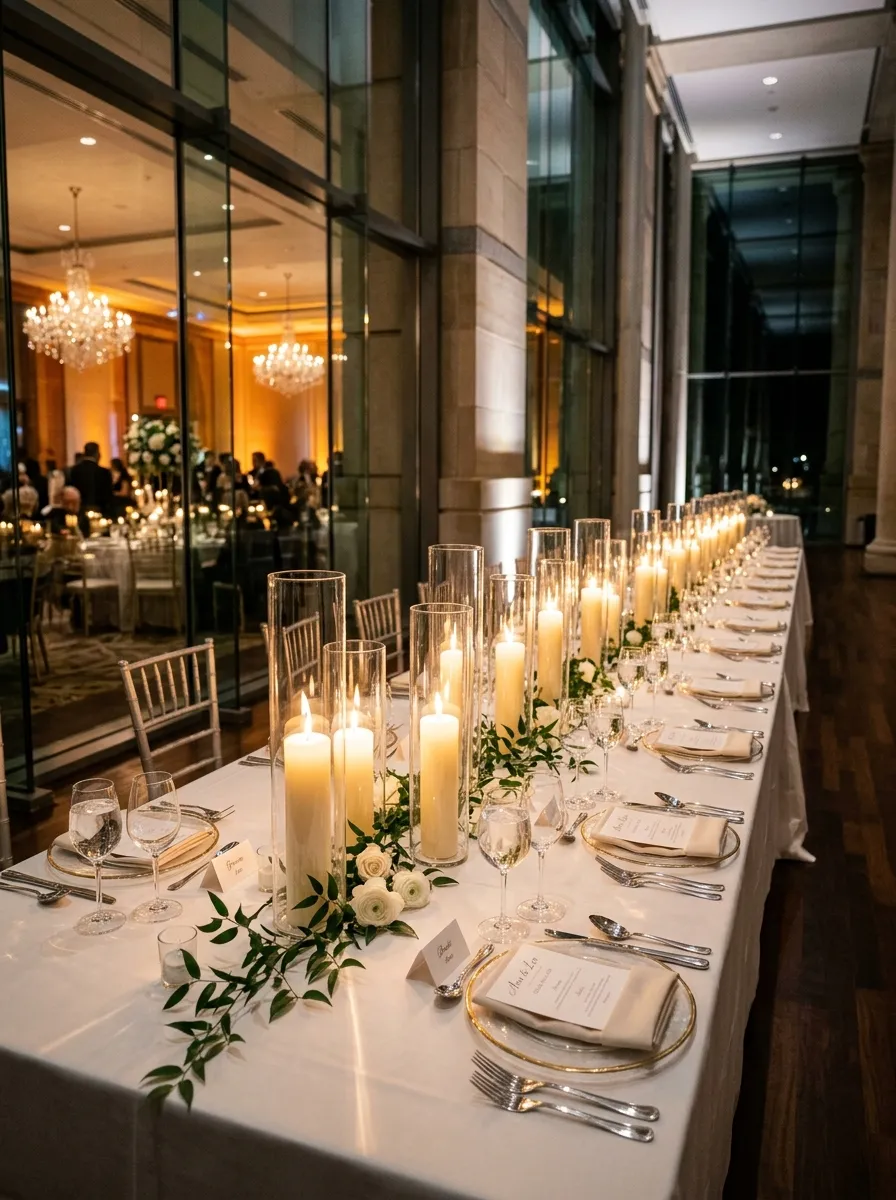
The architectural glass hurricane corridor establishes a structured, safe lighting design that encloses candle flames behind clean cylindrical glass walls. This concept lines the front edge of the head table with pairs of clear borosilicate glass hurricane sleeves of staggered heights, each holding a thick ivory pillar candle. The vertical glass surfaces shield the flames from indoor air vents and room drafts while reflecting warm candlelight across table settings. Placing the hurricane sleeves close together forms an illuminated boundary that distinguishes the head table across the room. This design works exceptionally well in historic venues with strict open-flame restrictions, breezy outdoor garden tents, and modern black-tie ballrooms, providing classic elegance with minimal maintenance.
Wipe down twenty cylindrical glass hurricane sleeves measuring eight, ten, and twelve inches in height using an equal-parts water and isopropyl alcohol solution to remove surface marks. Arrange the sleeves along the table center in alternating pairs, pairing a twelve-inch cylinder with an eight-inch cylinder every eighteen inches down the table length. Center a three-inch diameter, non-drip ivory paraffin pillar candle inside each glass sleeve, pressing a double-sided adhesive wax dot beneath each candle to prevent shifting. Weave a delicate strand of preserved smilax vine or fine leatherleaf fern flat along the tabletop between the glass bases, keeping all foliage outside the glass cylinders. Light the pillar candles thirty minutes before room doors open, using a flexible-neck butane lighter to reach the wicks without leaving soot on the inner glass walls.
6. Asymmetrical Corner Botanical Spray with Floor Meadow
How to Create
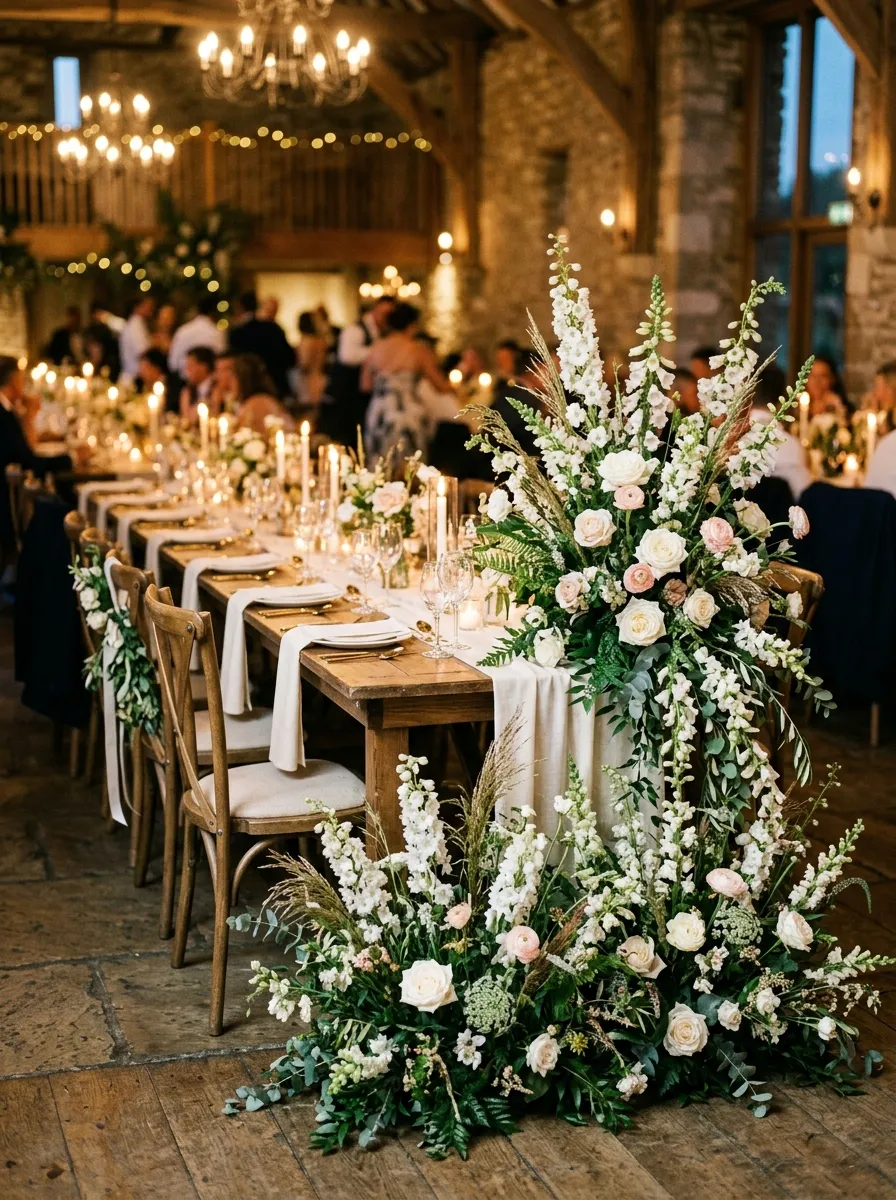
The asymmetrical corner botanical spray with a floor meadow creates an organic frame around the head table, blending the tabletop decor seamlessly into the venue floor. Rather than running an even centerpiece down the table length, this design concentrates flowers and foliage on one front corner of the table, spilling down the legs into a ground-level meadow. The arrangement utilizes a mix of blooming delphiniums, foxgloves, garden roses, and field grasses emerging from hidden low-profile water trays. This layout leaves the main tabletop open for dinner service while creating a natural, meadow-like frame on one side that photographs beautifully from wide room angles. This styling works well for romantic garden weddings, historic library receptions, and artful museum dinners.
Place a low, plastic floral tray fitted with water-soaked floral foam onto the front-right corner of the head table, securing it to the surface with protective non-marking table clamps. Position two matching floral trays on the floor directly below the decorated corner, arranging them in a slight curve around the table leg. Insert tall stems of white delphinium, larkspur, and snapdragons into the rear of both floor and table foam blocks to establish a continuous vertical line connecting floor to tabletop. Fill the lower layers with open white garden roses, fluttering cosmos, and Queen Anne’s lace, angling stems outward to conceal the plastic bases completely. Weave trailing ivy and jasmine foliage between the table corner and the floor trays to visually unite the two levels into a single, cohesive botanical installation.
7. Floating Mirror Basin with Gardenias and Taper Accents
Setup Method
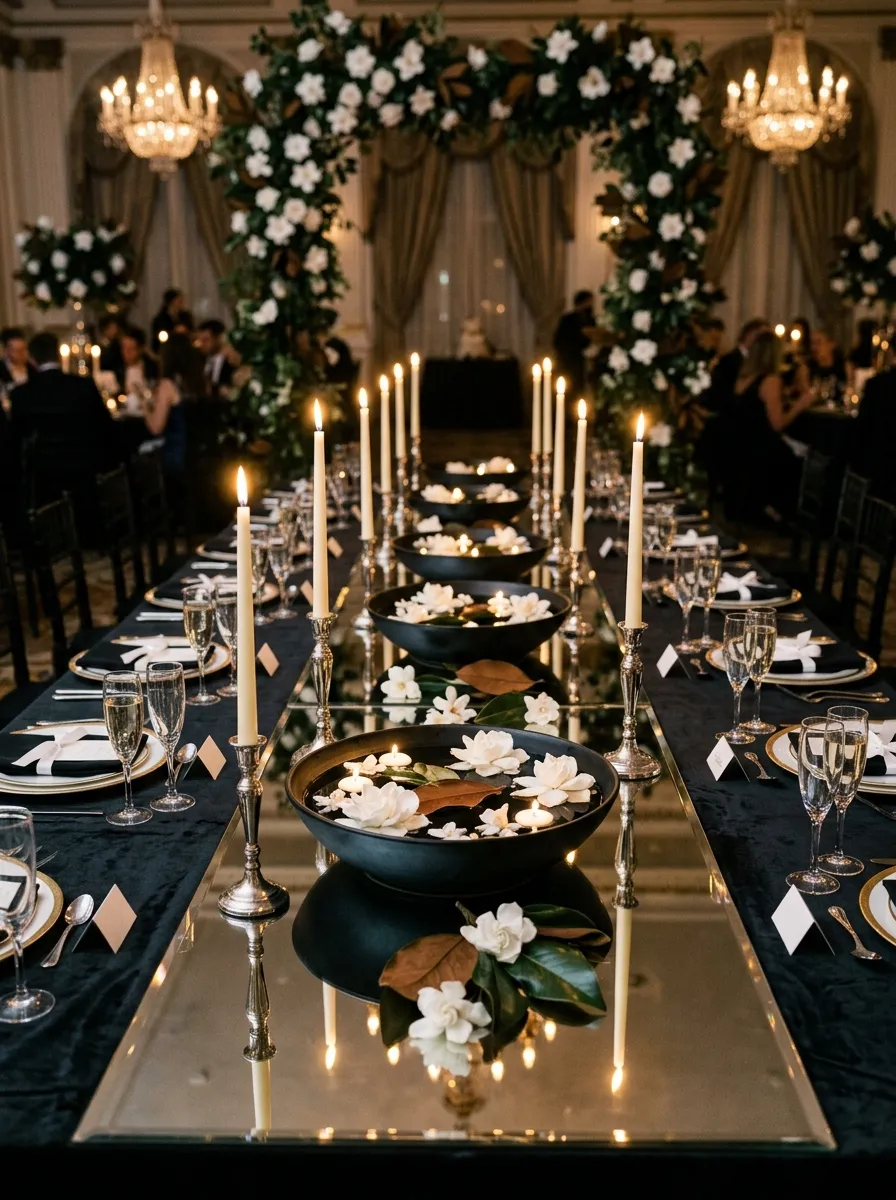
The floating mirror basin centerpiece uses water surface reflections and floral scent to create a sensory tablescape with minimal physical height. A shallow, matte-black or dark ceramic dish rests atop an antique beveled mirror runner along the center of the head table. The bowl is filled with clean water where fragrant white gardenias and dark magnolia leaves float peacefully beside glowing floating wax discs. The reflective mirror runner bounces light from surrounding tapers upward through the water, creating an open, luminous effect across the table surface. Choosing fragrant blooms fills the immediate head table area with fresh aroma, making the dining experience feel special and memorable. This design fits into formal ballroom receptions, evening museum weddings, and classic romantic settings.
Clean a six-foot long, beveled-edge glass mirror table runner with lint-free glass polish, placing it flat down the center of the head table over a dark tablecloth. Set three twelve-inch wide, two-inch deep circular black ceramic basins evenly along the mirror runner. Pour room-temperature distilled water into each basin until the liquid reaches half an inch below the rim, using a narrow-spout kettle to avoid splashing the mirror surface. Float four glossy magnolia leaves around the outer water edges, placing three trimmed white gardenia blooms in the center of each dish so they float level. Place two small circular floating candles in the water between the blooms, lighting their wicks carefully. Position slender silver or brass taper candle holders along the bare sections of the mirror runner to complete the reflective arrangement.
8. Vintage Silver Candelabra Trio with Wild Floral Interludes
Execution Process
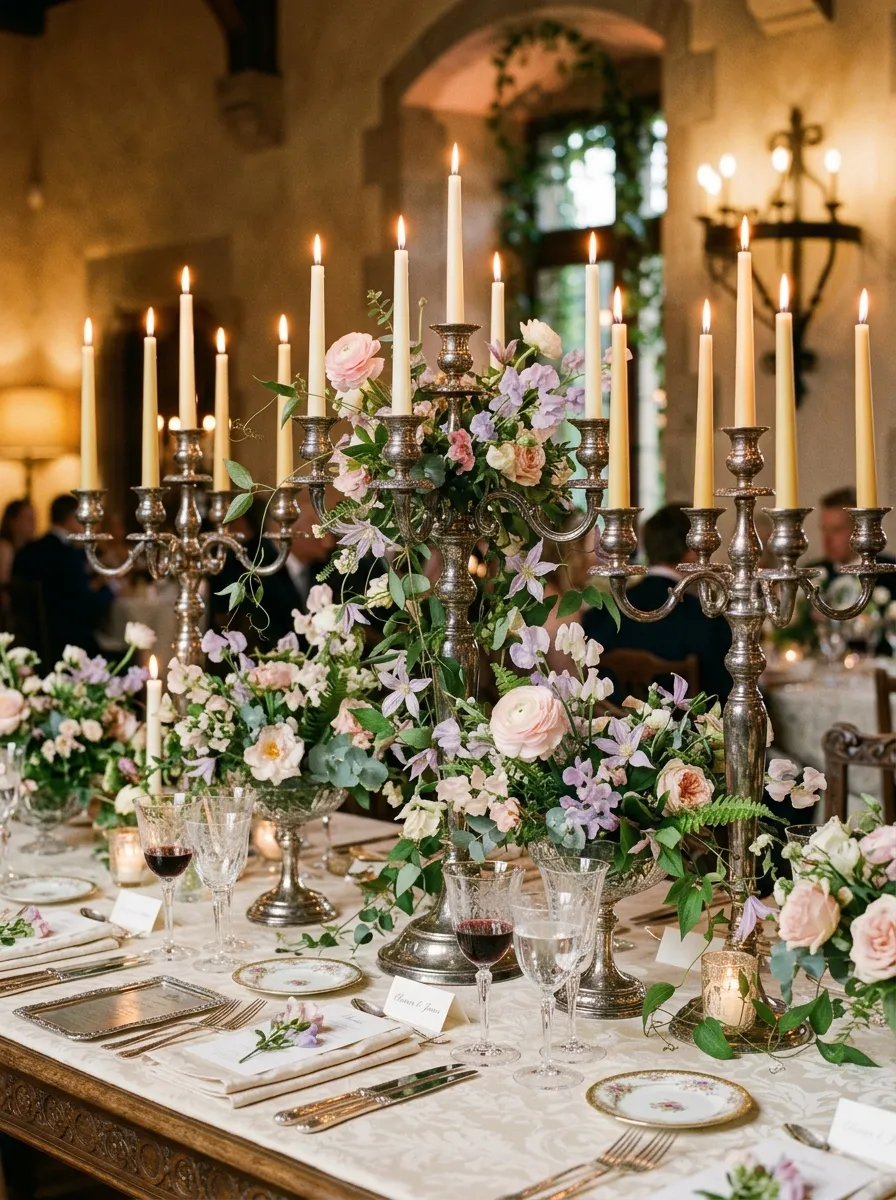
The vintage silver candelabra trio pairs old-world elegance with relaxed organic floristry, creating an elevated display suited for historic estate weddings. This concept features three multi-arm silver candelabras spaced along the head table, each supporting five tall beeswax taper candles. Rather than using formal spherical floral balls, the bases of the candelabras are softened with wild garden arrangements featuring spilling sweet peas, ranunculus, and trailing honeysuckle vines. The contrast between weathered, polished silverware and informal garden flowers strikes a balance between grandeur and natural warmth. The elevated candle arms keep flames safely above seated eye levels, allowing guests to talk and celebrate without visual obstruction.
Source three matching twenty-inch, five-arm silver-plated candelabras, polishing their exterior surfaces with non-abrasive silver cream to bring out a warm luster. Place the primary candelabra in the center of the table, setting the two secondary candelabras three feet to the left and right to establish balanced visual rhythm. Secure ten-inch hand-dipped ivory taper candles into all fifteen candle cups, using adhesive floral wax rings inside the sockets to keep every taper straight. Cut small blocks of water-soaked floral foam to fit inside shallow plastic cages, wiring a cage securely around the central stem of each candelabra just beneath the arm branches. Insert trailing clematis vines, soft pink ranunculus, and sweet peas into the foam cages, letting the blooms cascade outward to soften the rigid metal framework. Ensure all foliage clears the candle flame level by at least six inches.
9. Modern High-Low Smoked Glass Flute Installation
Step-by-Step Guide
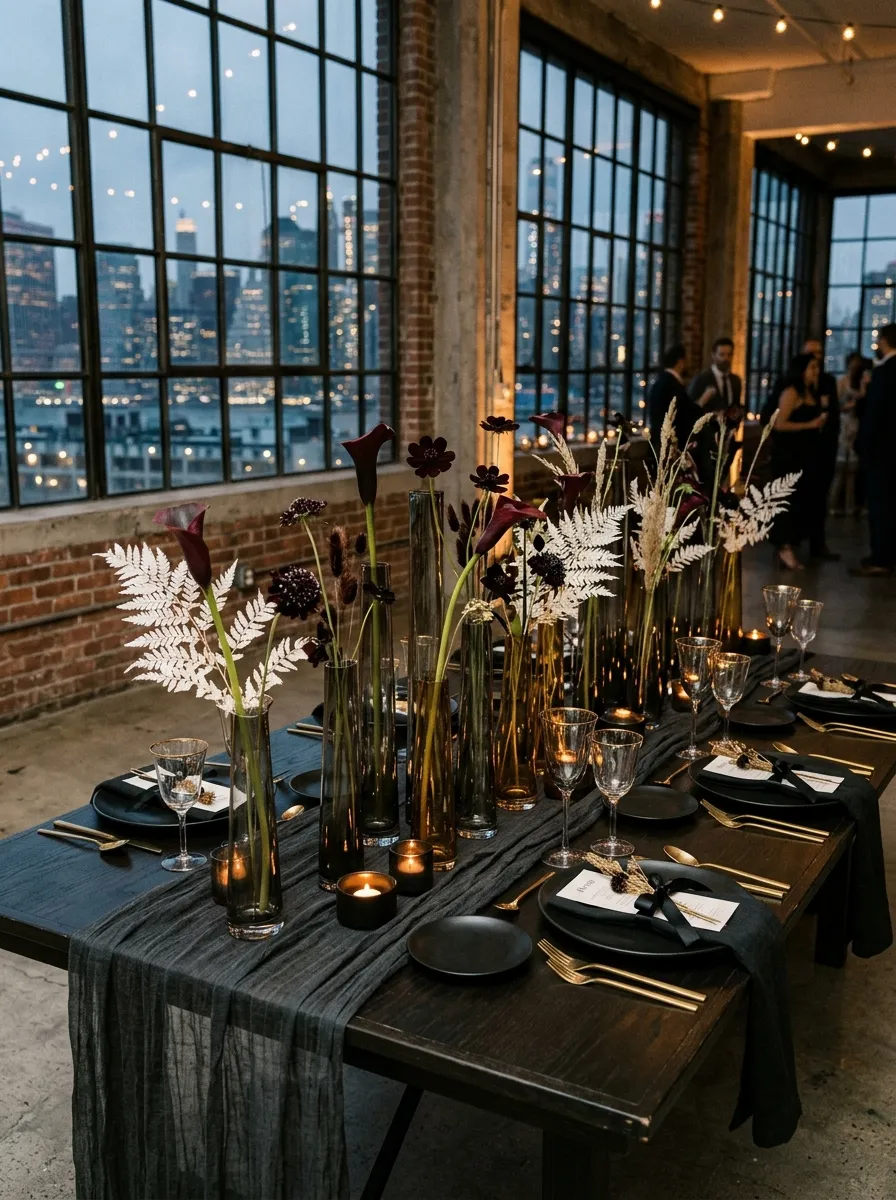
The modern high-low smoked glass flute installation plays with transparency, moody tones, and varied heights to deliver an editorial head table display. This design groups slender, smoked-gray and amber glass bud vases of varying heights in tight clusters down the center of the table. Each flute holds one or two architectural stems—such as dark burgundy calla lilies, chocolate cosmos, or single stems of bleached ruscus. The translucent dark glass reflects surrounding lights while hiding murky stem ends and water lines, maintaining a clean visual appearance throughout dinner service. The varied heights create a rhythmic skyline along the table, drawing the eye across the setting without forming a solid wall between the wedding party and guests.
Arrange forty smoked-glass flutes ranging from five to eleven inches in height down the center of an eight-foot head table, grouping them in clusters of three and five. Fill each flute half full with water mixed with floral preservative using a precision watering can to keep the exterior glass dry. Trim stems of dark burgundy calla lilies, black baccara roses, and chocolate cosmos to varied heights, cutting stems so each flower head hovers just above or several inches beyond its vase rim. Insert one statement stem into each narrow flute, adding a secondary delicate texture like dried bunny tails or bleached fern fronds into select vessels. Weave a dark charcoal silk gauze runner around the vase bases to link the clusters together, finishing the look with six low black metal tea light holders.
10. Living Potted Herb and Citrus Topiary Trough
How to Create
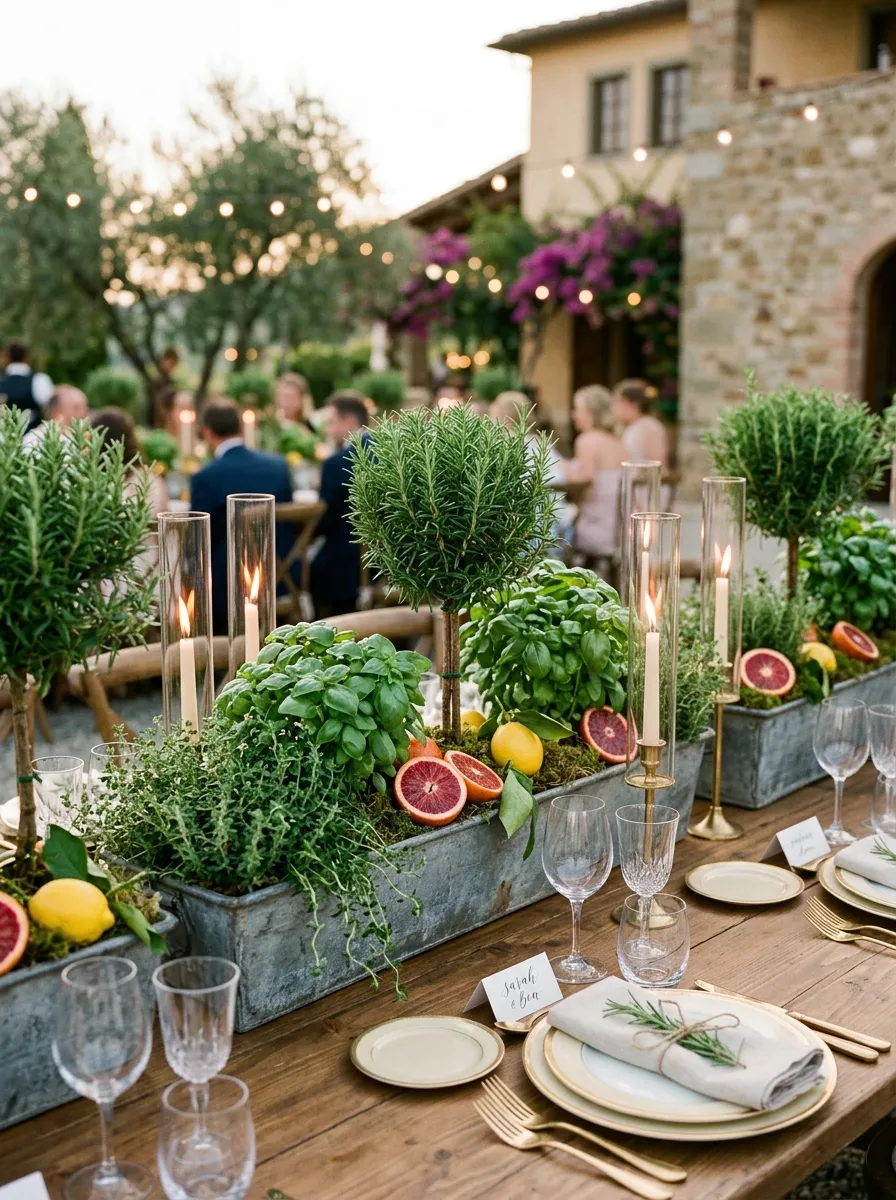
The living potted herb and citrus topiary trough brings farm-to-table freshness and sustainable garden charm to the wedding reception head table. This design arranges low rectangular wooden or zinc troughs filled with living potted culinary herbs—such as rosemary, thyme, and variegated sage—interspersed with miniature potted myrtle and citrus topiaries. The combination of varied green leaf textures, natural terracotta pots, and fresh sliced citrus fruit provides an organic, tactile display that suits Mediterranean, vineyard, and summer garden celebrations. Because the plants remain alive in their soil pots, these centerpieces can be prepared weeks ahead of time without wilting, and they double as thoughtful post-event gifts for bridal party members to take home.
Source three thirty-inch weathered zinc or cedar planter troughs measuring four inches deep, lining the interior with plastic sheeting to protect table linens from moisture. Arrange small potted rosemary topiaries, bushy sweet basil, and trailing variegated thyme plants inside the troughs, keeping the plants in their individual nursery containers for easy watering. Fill the spaces between the pots with loose, moist potting soil, packing the surface firmly before topping the soil with clean sheet moss to hide the plastic pots. Halve fresh blood oranges and Meyer lemons with a sharp paring knife, patting the cut surfaces dry with paper towels to prevent dripping. Nest the citrus halves and whole small fruits into the moss around the herb bases. Place tall, slender glass oil lamps among the potted plants to provide clean, adjustable lighting for the evening meal.
Common Beginner Mistakes and How to Avoid Them
The most widespread mistake when designing wedding reception head table decor is building arrangements too tall at table level, creating visual barriers that block seated guests and photographers. Tabletop elements should either stay beneath the twelve-inch threshold or be lifted well above eye level using slender pedestals or suspended ceiling rigs. Another common oversight is neglecting the practical needs of place settings, crowding out dinner plates, wine glasses, and cutlery with excessive greenery and decor. Always mark out complete, full-sized place settings for every seated person before finalizing decor placement, leaving an eight-inch clear zone in front of each guest. Beginners also frequently overlook the fire hazards of placing unshielded taper candles near fluttering silk runners and dry botanical foliage. Enclose all open wicks in tall glass hurricane sleeves that rise at least two inches above the flame, or use high-grade flameless LED candles instead. Finally, failing to secure long runners and garland ends can lead to tripping hazards; always tape or pin fabric drops securely along table ends to prevent guests or servers from catching them during dinner.
Practical Tips for Better Results
To achieve clean, professional results on your head table, focus on layering varied textures rather than overloading the table with uniform floral volume. Combine smooth glass surfaces, rough linen fabrics, glossy evergreen foliage, and soft rose petals to create natural depth that photographs well under dim reception lighting. When selecting candles, choose 100% dripless, solid-dyed paraffin or beeswax options, as dipped candles melt quickly and leave messy residue on table runners. If your design includes fresh greenery runners, prepare the foliage thirty-six hours in advance, keeping the cut ends submerged in cool water and misting the leaves with an anti-transpirant spray to lock in moisture. When laying out long table runners, scrunch the fabric with your hands to create natural, wavy folds rather than pulling it tight; this relaxed draping adds visual interest and helps hide cords for fairy lights or microphone wires. Finally, step back twenty feet and inspect the head table from the center of the reception hall to ensure the entire display looks balanced and centered within the broader room.
Styling, Presentation, or Organization Ideas
Styling an unforgettable head table requires treating the entire seating area—including the chairs, backdrop, and table perimeter—as a single visual composition. Frame the head table with distinctive seating for the couple, using velvet armchairs, vintage bentwood seats, or cross-back wooden chairs accented with subtle greenery ties to set the newlyweds apart. Enhance the table background with a simple backdrop—such as sheer floor-to-ceiling drapery, an exposed brick wall, or hanging fairy light curtains—to separate the head table from busy catering areas. Match table stationery, such as menus, place cards, and table numbers, to the centerpiece finishes by incorporating torn-edge cotton paper, hand-lettered calligraphy, or metallic wax seals. For long tables, repeat key decorative elements every four feet, maintaining a cohesive rhythm down the line while alternating high and low accents to keep the eye moving. Finally, use soft, focused uplighting beneath the front table edge to illuminate draping fabrics and floor runners, adding a gentle glow that enhances evening wedding photography.
Budget or Time Planning
Creating custom head table decor offers substantial cost savings when backed by clear sourcing strategies and structured production timelines. Concentrating your decor budget on this single high-profile table allows you to incorporate premium statement blooms and upscale glassware while using simpler, budget-friendly designs on surrounding guest tables. Sourcing foundational hardware—such as glass hurricane cylinders, brass candelabras, and terracotta compotes—from wholesale event distributors or secondhand wedding groups reduces rental costs significantly. Establish a clear production timeline: clean glassware, test LED lighting, and press table runners two weeks before the event date, packing supplies into labeled storage bins by table section. If working with fresh foliage and flowers, schedule your trimming, water-tubing, and floral preparation thirty-six hours before the reception to keep botanicals fresh and crisp. Dividing assembly tasks into focused, assembly-line steps—such as laying runners, placing candles, and weaving greenery—streamlines setup, allowing you to complete the entire head table within ninety minutes on the morning of the wedding.
Creative Expansion and Advanced Inspiration
Once the foundational assembly techniques are mastered, couples and stylists can explore advanced customizations to elevate their head table design further. Experiment with customized color palettes, transitioning flowers from soft blush on one side of the table to deep burgundy on the other to create an eye-catching ombre gradient. Advanced makers can incorporate subtle scent profiles into their runners, tucking sprigs of fresh rosemary, lavender, or dried citrus wheels into the foliage to fill the head table with refreshing natural aromas. You can also explore custom neon signage or laser-cut wooden family names hung directly within overhead floral clouds, adding a personalized modern focal point that shines in evening photos. After the reception, repurposed greenery garlands and potted herbs can easily be adapted into holiday mantelpiece displays, patio planters, and home decor accents, preserving the memories of your celebration for years to come. These creative touches give your wedding decor personal meaning, transforming a traditional banquet table into a memorable centerpiece of your celebration.