Rehearsal dinner celebrations set the visual and emotional tone for the entire wedding weekend, bridging the formal proceedings of the ceremony with welcoming hospitality. Digital mood boards and Pinterest ideas increasingly highlight tablescape designs that reflect the personal story of the couple without repeating the exact aesthetic of the main reception. In this detailed tutorial, readers will discover ten actionable centerpiece concepts that convert affordable materials, everyday glassware, and seasonal foliage into polished tablescape focal points. Designing your own dinner centerpieces is useful because it eliminates costly commercial floral design fees while providing creative freedom over palette and scale. You will learn practical methods for building balanced greenery runners, constructing floating candle vessels, styling citrus topiary displays, and curating vintage glass vignettes. Each concept provides a structured roadmap that balances visual density with comfortable table proportions, ensuring conversational sightlines remain unobstructed across the dining room. Whether your venue is an intimate backyard patio, an industrial urban loft, or a formal banquet hall, these step by step projects demonstrate how to achieve cohesive decoration that coordinates with modern design principles while honoring time-tested handmade traditions.
Why This Idea Is Trending or Useful
DIY rehearsal dinner tablescapes have gained widespread popularity across modern design channels because couples seek intimate, budget-conscious alternatives to mass-produced event packages. A rehearsal dinner brings together close family and wedding parties, making personalized handmade accents more impactful than standard rental items. The practical value of constructing your own centerpieces lies in material repurposing, allowing hosts to transfer tabletop elements directly into post-wedding brunches or domestic home decor. From a design perspective, contemporary trends favor organic textures, warm candlelight, and architectural foliage over rigid, tightly packed floral arrangements. This relaxed approach provides an accessible creative project for beginners, as slight asymmetry and natural variations enhance the visual appeal rather than detracting from it. Using accessible supplies like clear cylinder vases, local grocery foliage, raw wood risers, and pillar candles lowers overall expenses while retaining a sophisticated minimalist style. The trend also reflects a broader movement toward low-waste wedding planning, where durable vessels and potted botanicals replace single-use floral foam and plastic picks. By mastering straightforward assembly techniques, hosts can easily achieve magazine-quality results without specialized floristry equipment.
Materials and Preparation
Proper preparation and methodical sourcing guarantee that assembling your centerpieces remains an organized, stress-free creative project rather than a last-minute scramble. The foundational materials for these projects include clear glass cylinder vases in graduated heights, low-profile ceramic compote bowls, unbleached cheesecloth runners, natural jute twine, and floral shears. Supporting hardware should feature waterproof floral tape, heavy-duty candle adhesive, pruning snips, water reservoirs, and battery-operated warm-white tea lights or traditional unscented wax pillars. Preparation begins by measuring the venue dining tables to determine whether circular focal points or continuous linear runners best suit the seating layout. Glass vessels must be thoroughly washed in warm soapy water and dried with lint-free microfiber cloths to eliminate water spots and manufacturing dust. Fresh greenery like silver dollar eucalyptus, Italian ruscus, and salal should be trimmed at a forty-five-degree angle and conditioned in cool water for twenty-four hours prior to styling. Establishing an assembly station with dedicated containers for trimmings, tape, and tools prevents clutter and accelerates production during final event setup.
1. Tiered Floating Candle Cylinder Trios
How to Create
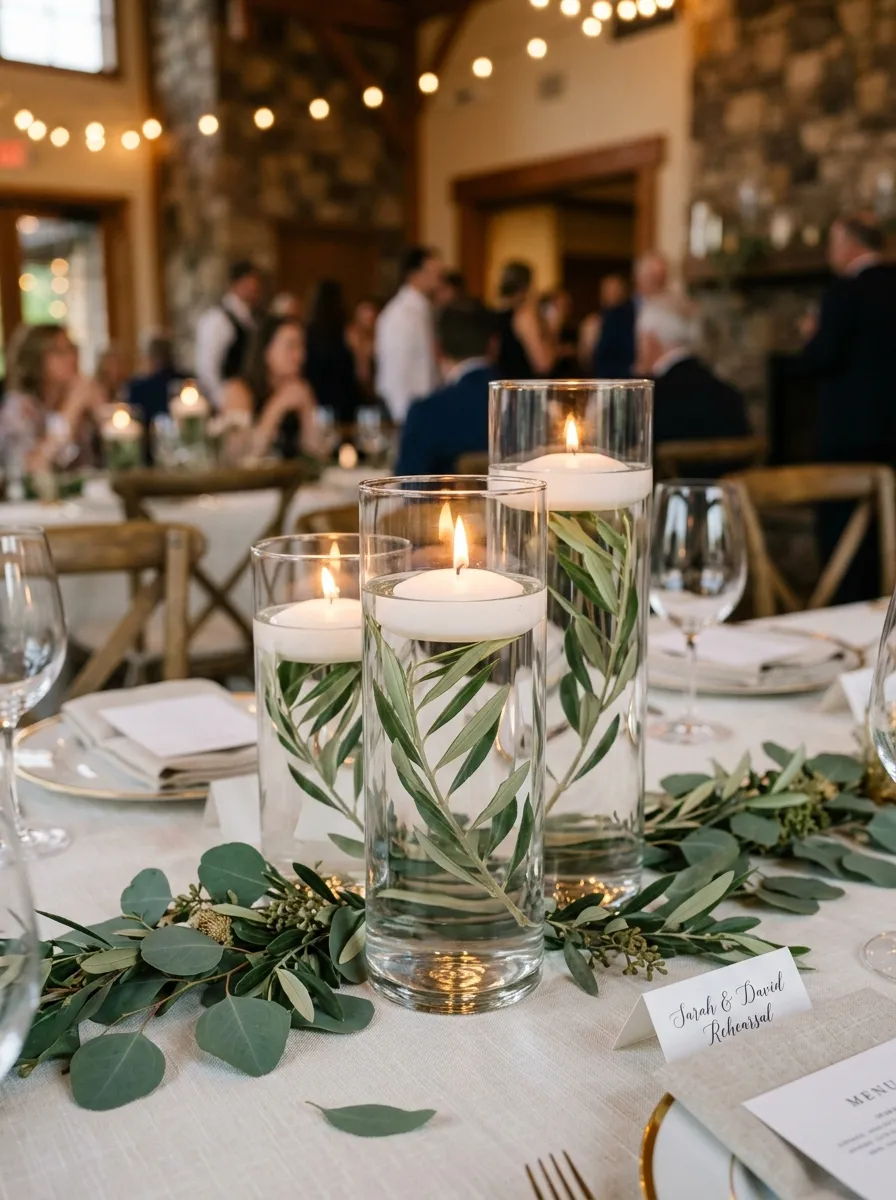
The tiered floating candle trio relies on vertical rhythm, transparent glass refraction, and flickering ambient light to produce a striking evening focal point. This concept groups three smooth glass cylinders of staggered heights, typically six, eight, and ten inches, filled with crystal-clear water and capped with wide disc candles. By incorporating submerged natural elements such as sprigs of fresh rosemary, olive branches, or white dendrobium orchids, the water magnifies botanical textures while keeping the overall footprint compact. The reflective surfaces bounce low light across table settings, establishing an intimate dining atmosphere without obstructing conversation between guests seated opposite one another. The minimalist style coordinates effortlessly with crisp white linens, dark wood farmhouse tables, and metallic flatware, providing versatile application across diverse venue settings. Because water adds substantial weight, these sturdy glass towers resist accidental tipping from active dinner service or passing shared platters. The clean geometry of the cylinders provides an architectural counterpoint to loose table linens, delivering high visual sophistication through modest, affordable glassware.
Begin by setting three clean, graduated cylinder vases in a tight triangular cluster on a level surface covered by a neutral linen runner. Cut submerged botanical stems to lengths two inches shorter than each respective cylinder, stripping lower leaves to prevent water clouding. Anchor the base of each cut stem to the interior bottom of the glass using clear floral adhesive tape or a clean glass pebble. Pour distilled room-temperature water down the inner wall of each cylinder until the liquid sits one inch below the top rim, taking care to minimize trapped air bubbles along the submerged foliage. Gently lower a three-inch disc-shaped floating candle onto the water surface of each vase, keeping the cotton wick completely dry during placement. Arrange a delicate ring of loose salal leaves or faux ivory pearls around the exterior base of the glass grouping to conceal table gaps. Light the wicks fifteen minutes before guest arrival using a long-reach fireplace lighter to ensure steady, clean flames throughout the evening.
2. Italian Ruscus and Lemon Garlands
Step-by-Step Guide
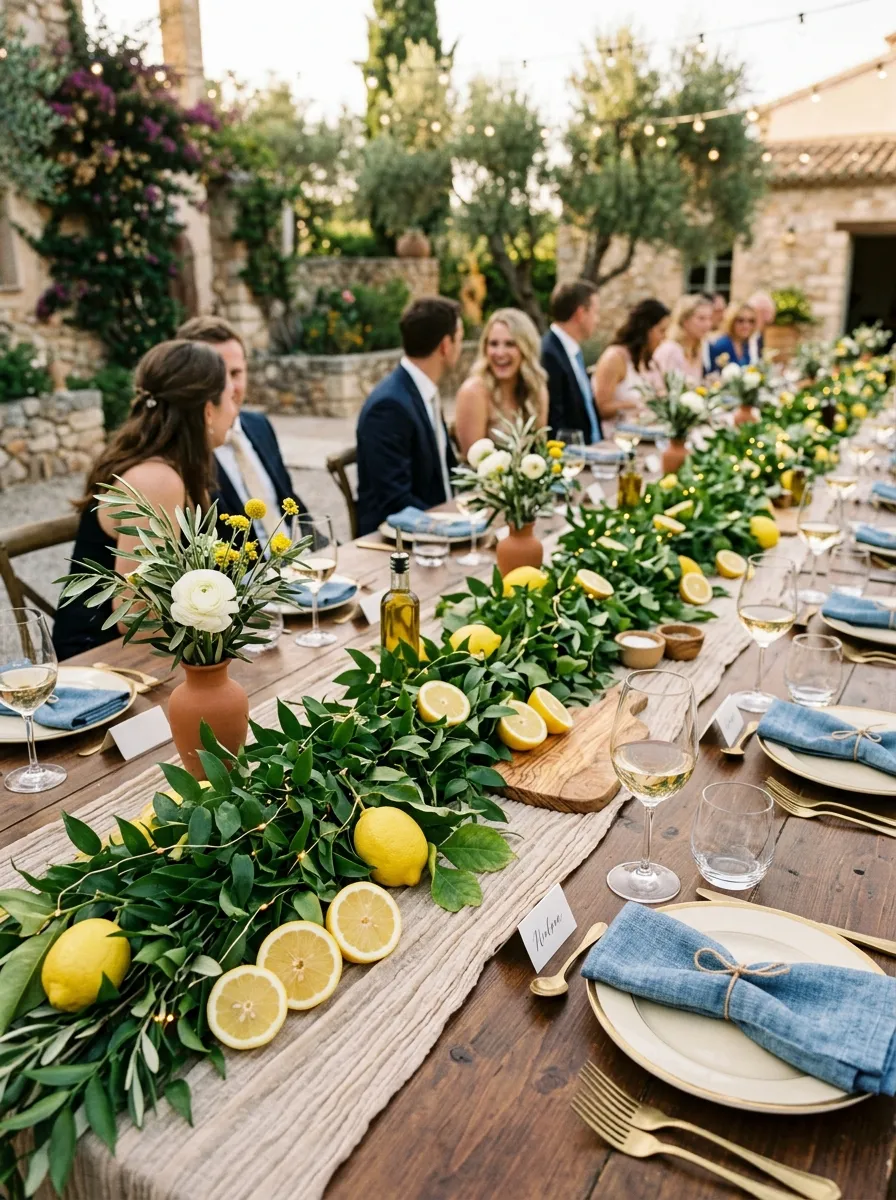
The Italian ruscus and lemon garland brings fresh Mediterranean warmth to banquet-style dinner tables through vibrant color contrast and natural foliage movement. This design lays a continuous spine of deep green, glossy ruscus leaves directly along the center axis of a long wooden dining table, interspersed with whole and halved fresh lemons. The rich yellow citrus fruit introduces an energetic color accent that enlivens neutral table runners while releasing a subtle, refreshing botanical fragrance. This style works exceptionally well for outdoor garden parties, vineyard dinners, and coastal celebrations where fresh, food-focused hospitality takes center stage. The low, horizontal orientation of the greenery ensures zero sightline obstruction, allowing lively cross-table storytelling and easy sharing of family-style platters. The natural waxy coating on ruscus leaves prevents premature wilting, maintaining structural crispness across long dining intervals without water tubes. By combining affordable commercial produce with hardy foliage, this easy project delivers an abundant, farm-to-table aesthetic that feels both deliberate and welcoming.
Lay a pressed ivory or natural sand cheesecloth runner down the entire length of the table, gently bunching the fabric along the center line to create organic texture and shadows. Interlock three to four long branches of fresh Italian ruscus end-to-end along the runner, overlapping the stem joints to establish a continuous, unbroken leafy spine. Cut four fresh lemons into clean halves with a paring knife, reserving four to six additional whole lemons with their natural peel intact for structural balance. Place the whole lemons along the outer edges of the ruscus runner, wedging them firmly between overlapping stems to prevent them from rolling across the table. Tuck the sliced lemon halves face-up into natural pockets within the greenery, positioning them near the center where their juicy cut patterns capture ambient candlelight. Weave thin, warm-white micro fairy light strands through the underside of the foliage, hiding the battery pack beneath the bunched cheesecloth at the table edge.
3. Terracotta Potted Herb Clusters
How to Make
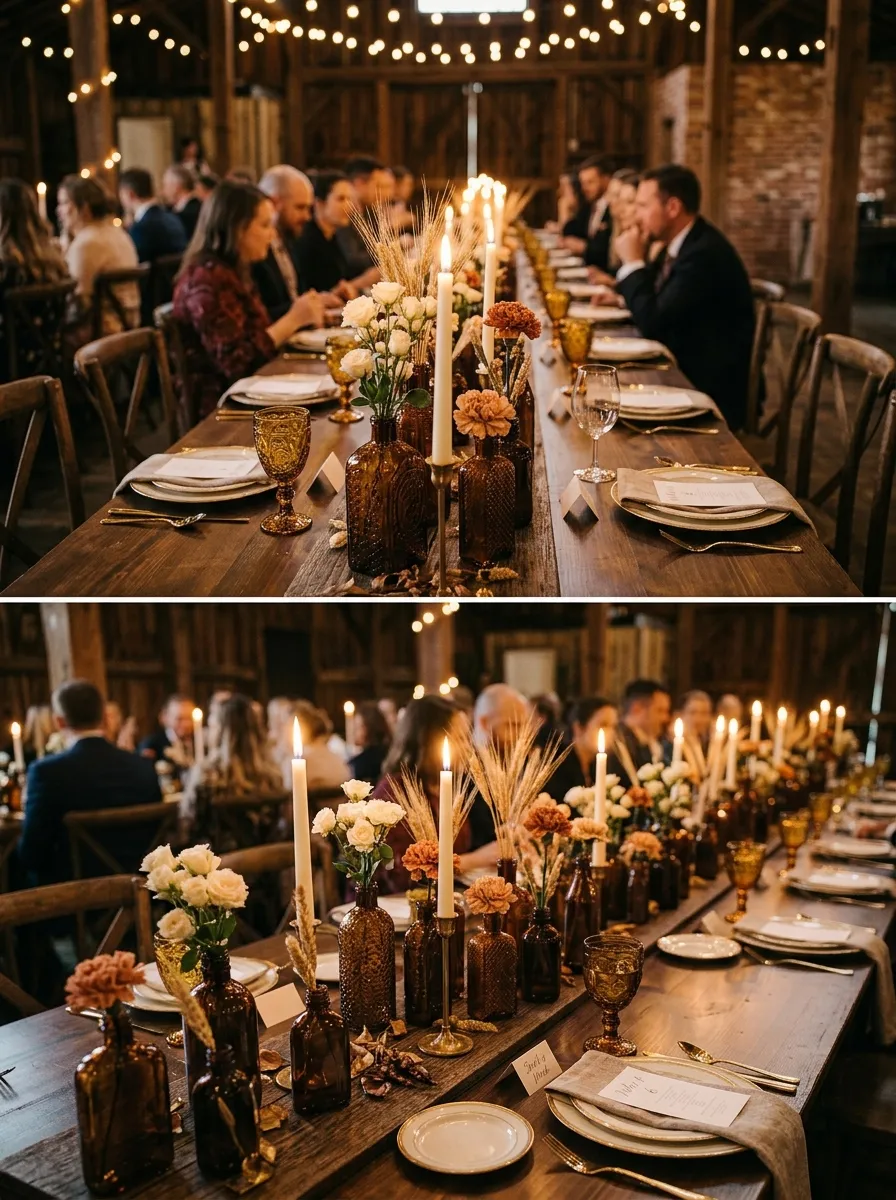
Terracotta potted herb clusters combine rustic artisan charm with functional, culinary-inspired table styling. This centerpiece concept utilizes weathered clay pots filled with fragrant culinary herbs like sweet basil, rosemary, culinary sage, and English thyme, clustered in groups of three down the center of dining tables. The warm, porous orange clay provides an earthy tactile contrast against polished dinnerware, evoking European countryside trattorias and relaxed outdoor gatherings. Because living herbs remain firmly rooted in moist soil, they will not wilt, droop, or shed petals regardless of ambient room temperatures or dry air conditioning. Guests are treated to gentle releases of natural herbal aroma whenever platters pass overhead or nearby air circulates, enhancing the sensory dimension of the meal. After the rehearsal dinner concludes, these sustainable potted plants double as thoughtful, living favors for bridal party members or practical additions to your home garden. The simple, unpretentious shapes celebrate slow living and culinary appreciation, setting a relaxed tone for the weekend ahead.
Select weathered or whitewashed terracotta pots in four-inch and six-inch diameters, ensuring each vessel is thoroughly clean and fitted with an internal waterproof plastic saucer to protect table linens. Transplant healthy, dense culinary herb plants into the pots using standard potting soil, pressing the root balls firmly down to sit one inch below the pot rim. Wipe the exterior terracotta walls with a damp cloth to remove loose soil particles, then wrap a single turn of natural jute twine around the upper rim, securing it with a small square knot. Position the pots in odd-numbered clusters along the center of your tables, alternating tall upright rosemary stalks with bushy sweet basil and cascading variegated thyme. Insert a handwritten kraft paper plant marker into each pot, identifying the herb variety alongside a short greeting to your guests. Scatter small clusters of smooth gray river stones around the bases of the pots to ground the vignette and create visual transition to the table surface.
4. Vintage Amber Glass Bud Vase Run
Execution Process
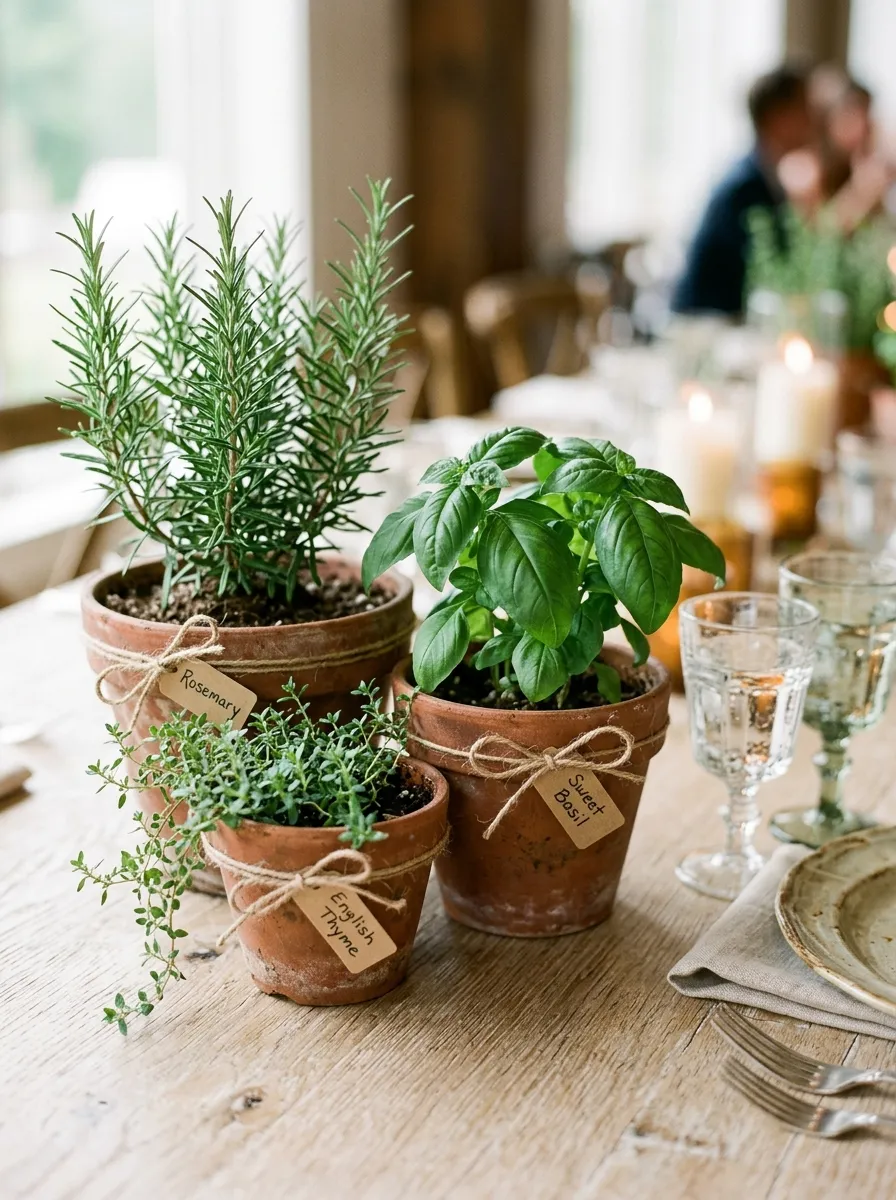
The vintage amber glass bud vase run delivers rich, nostalgic warmth through collection-based styling and loose floral arrangements. This approach arranges a winding path of mixed antique amber medicine bottles, fluted glass flasks, and small apothecary jars down the table spine, each holding one to three botanical stems. The deep amber tone filters dining room light into honey-colored rays, introducing vintage elegance that complements autumn, late summer, and bohemian celebrations. By dispersing single stems across numerous small vessels rather than grouping them inside a single large urn, the visual impact expands across the entire table length while requiring significantly fewer flowers. This design accommodates affordable wholesale blooms like cream carnations, dried bunny tails, bronze chrysanthemums, and delicate sprigs of white waxflower. The varied vessel silhouettes create an effortless, collected-over-time character that avoids stiff corporate symmetry. The low height profile preserves open visual fields, fostering uninterrupted engagement and relaxed interaction across the entire dining party.
Collect fifteen to twenty amber glass bottles per eight-foot banquet table, seeking out varied heights between four and eight inches with clean interiors. Fill each bottle one-third full with room-temperature water mixed with clear liquid floral preservative using a narrow-spout watering can. Trim focal flowers, such as terra-cotta carnations and spray roses, to varying heights so blooms sit between one and three inches above the bottle lips. Insert a single primary blossom into each bottle neck, pairing it with a delicate textural element such as a dried wheat stalk, baby eucalyptus shoot, or dried lagurus stem. Arrange the filled amber bottles down the center of the table in an undulating serpentine line, leaving roughly four inches of open space between each vessel. Interlace the bottles with slender brass candlestick holders fitted with unscented ivory tapers to introduce varying heights of warm evening illumination.
5. White Hydrangea Ceramic Compote Bowls
Step-by-Step Guide
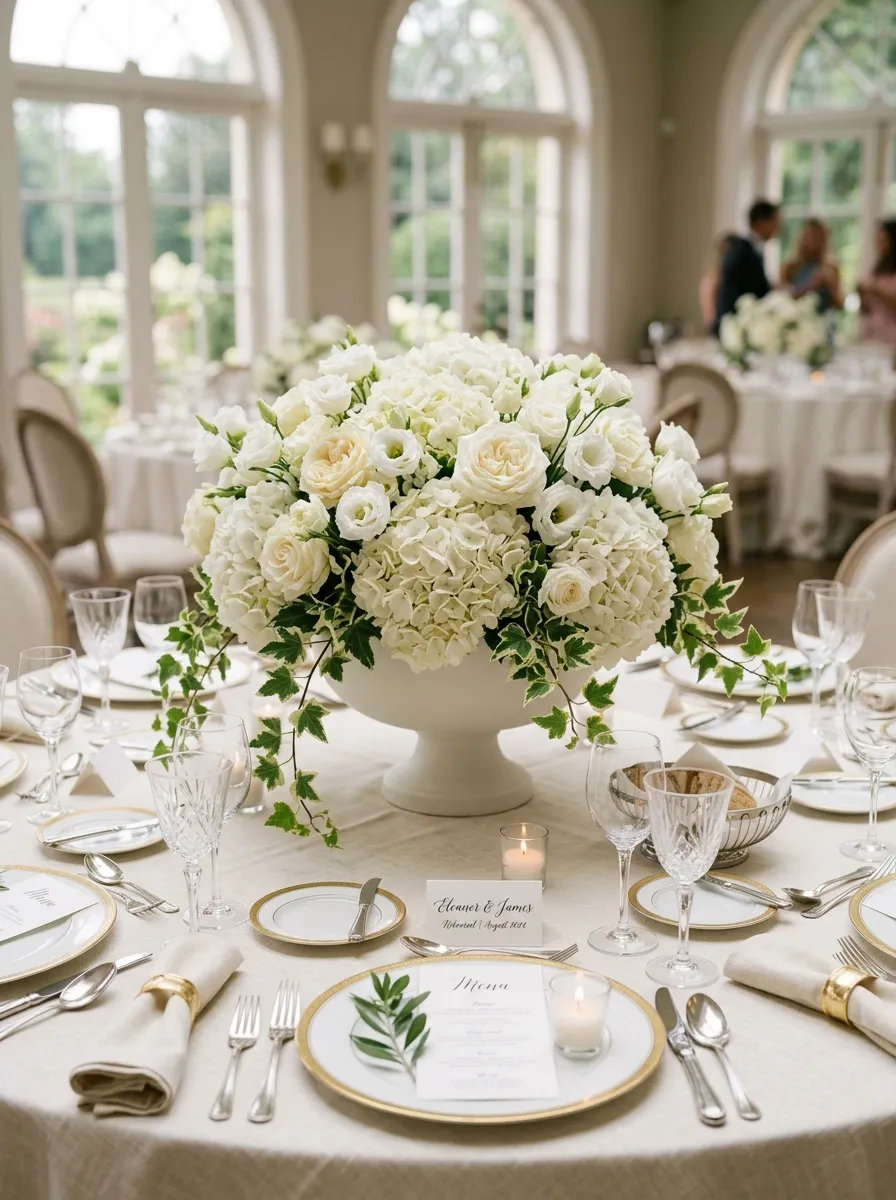
White hydrangea ceramic compote bowls offer timeless, low-profile elegance suited for formal seated rehearsal dinners in traditional venues. This design relies on footed stoneware or matte white ceramic vessels that elevate cloud-like clusters of white hydrangeas, garden roses, and trailing greenery just above the tabletop. The shallow, elevated profile of the compote bowl contains the arrangement within a defined geometric perimeter, preventing stems from encroaching on place settings or glassware. Hydrangeas provide massive volumetric coverage with minimal stem counts, allowing decorators to achieve a lush, high-end aesthetic while maintaining practical budgets. The monochromatic white palette projects crisp cleanliness, contrasting against dark mahogany tables or harmonizing with textured beige linen cloths. By balancing broad floral domes with subtle trailing vines like ivy or variegated pittosporum, the centerpiece achieves graceful movement without becoming unmanageable. This approach translates high-end florist mechanics into an approachable format that even first-time crafters can master with confidence.
Soak a block of professional floral foam in water until fully saturated, trimming it to fit snugly within the cavity of a six-inch footed ceramic compote bowl. Secure the foam into the bowl using waterproof floral anchor tape, crisscrossing two strips over the top to form an X-pattern anchored to the outer bowl lip. Cut three large white hydrangea stems at a sharp angle under running water, inserting them firmly into the center of the foam to build a dense, rounded dome. Insert five to six stems of white spray roses and lisianthus into the natural pockets between the hydrangea florets, staggering the bloom depths to build visual layers. Finish the base perimeter by inserting trailing sprigs of variegated ivy and seeded eucalyptus around the bottom rim of the bowl so they cascade softly toward the table. Position the completed compote bowl directly in the center of circular dining tables, flanked by four clear glass votive candles placed symmetrically around the ceramic base.
6. Geometric Brass Lanterns with Moss
Setup Method
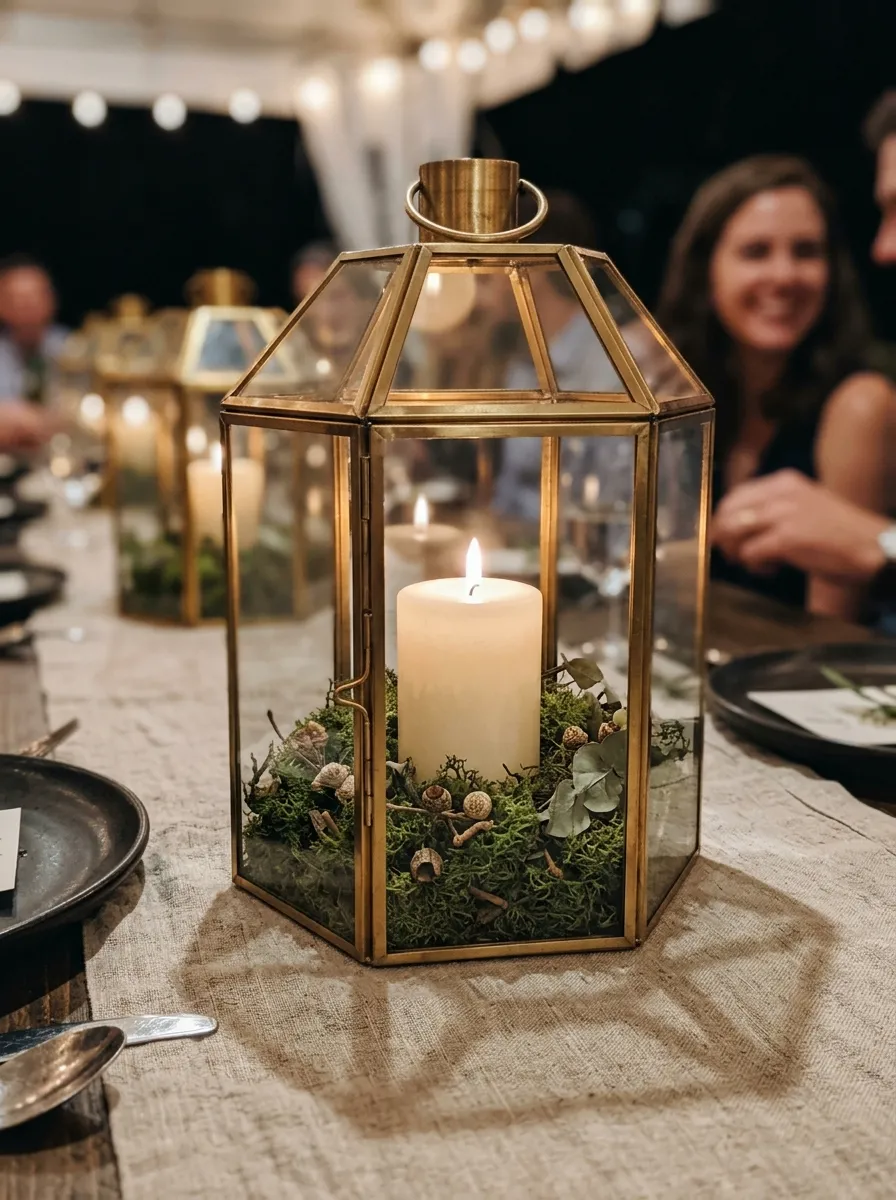
Geometric brass lanterns with moss introduce modern architectural lines and rich organic textures to contemporary rehearsal dinner tablescapes. This concept features glass-paneled metal lanterns finished in matte gold or brushed brass, enclosing a thick ivory pillar candle nestled inside a bed of preserved forest moss. The structured hexagonal or rectangular metal frames introduce clean verticality, while the soft, cushiony moss softens the industrial geometry. These enclosed lanterns are practical for outdoor patio settings and open-air venues where sudden evening breezes might extinguish exposed taper candles. The metallic frames catch and multiply ambient light, casting subtle geometric shadows across surrounding table settings and runners. Because the elements are self-contained within secure glass housing, there is zero risk of hot wax dripping onto rented linens or wooden tables. The contrast between refined architectural brass and woodland moss creates a timeless design balance that complements industrial lofts, botanical greenhouses, and modern farmhouses.
Select clean geometric lanterns in coordinated medium and large sizes, wiping the glass panels inside and out with glass cleaner to eliminate streaks. Apply a heavy-duty double-sided candle adhesive dot to the bottom of a four-inch-wide unscented ivory pillar candle, pressing it firmly into the center of the lantern floor. Distribute preserved reindeer moss and sheet moss around the base of the candle, ensuring the green fibers sit at least two inches away from the candle wick. Scatter three to five small dried floral elements, like bleached scabiosa pods or mini pinecones, across the moss bed to introduce subtle color variation. Close the glass latch securely, setting the prepared lantern atop a natural wood charger plate or directly on the center of the table runner. Light the enclosed pillar candle shortly before guests enter, verifying that the flame has adequate oxygen circulation through the lantern top vents.
7. Wooden Trough Box with Baby’s Breath
How to Create
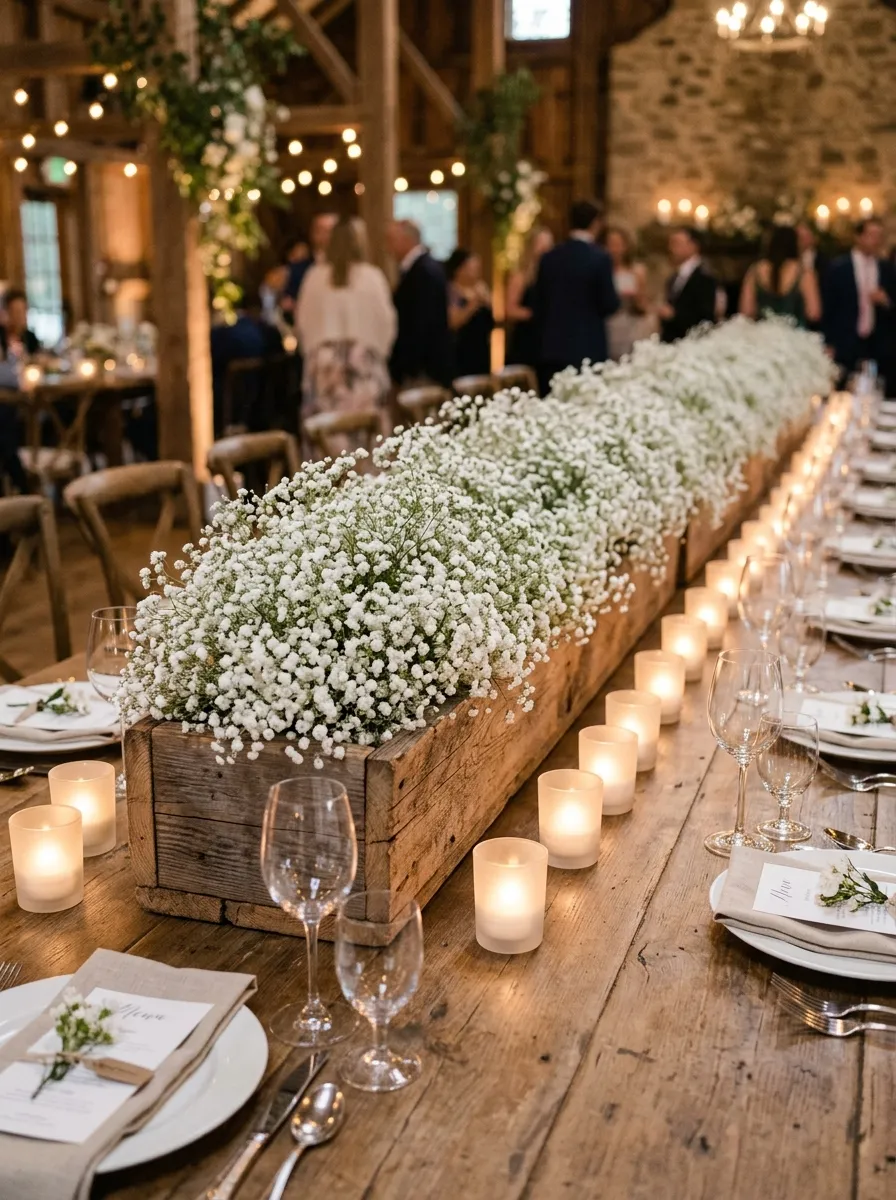
The wooden trough box filled with baby’s breath presents a cloud-like, texturally dense runner that suits rustic, farmhouse, and industrial chic aesthetics. This design uses a long, narrow planter box crafted from natural or whitewashed wood, packed tightly with billowy stems of gypsophila to form a continuous floral hedge. The simplicity of using a single floral variety in high concentration transforms an ordinary, budget-friendly filler flower into a modern artistic installation. The rectangular wooden container provides a crisp, contained frame that keeps the table surface orderly and prevents delicate stems from scattering into dining zones. Baby’s breath is an exceptionally resilient botanical that withstands warm ambient temperatures and dry indoor air without wilting or losing its bright white color over the course of the evening. The uniform, snowy appearance coordinates with all bridal color palettes, providing a clean neutral backdrop for colorful menus and custom place cards.
Assemble or source a narrow wooden centerpiece trough measuring thirty inches long by four inches wide and three inches deep, sealing the interior with a plastic liner. Cut dry floral foam bricks to fit the interior channel snugly, pressing them down into the box until they sit flush with the wooden top edges. Cut fresh baby’s breath stems into uniform four-inch sprigs using sharp floral snips, stripping the lower foliage to ensure clean stem insertion. Insert the stems densely across the entire surface of the foam, placing them closely together so no underlying mechanics or foam surfaces remain visible from any angle. Continue adding stems around the outer edges at a slight outward angle, creating a soft, rounded cloud effect that spills slightly over the wooden rim. Place the completed trough down the center spine of the table, illuminating the white floral canopy with a series of low tea lights set in frosted glass votives along both sides.
8. Olive Branch and Brass Candlestick River
Execution Process
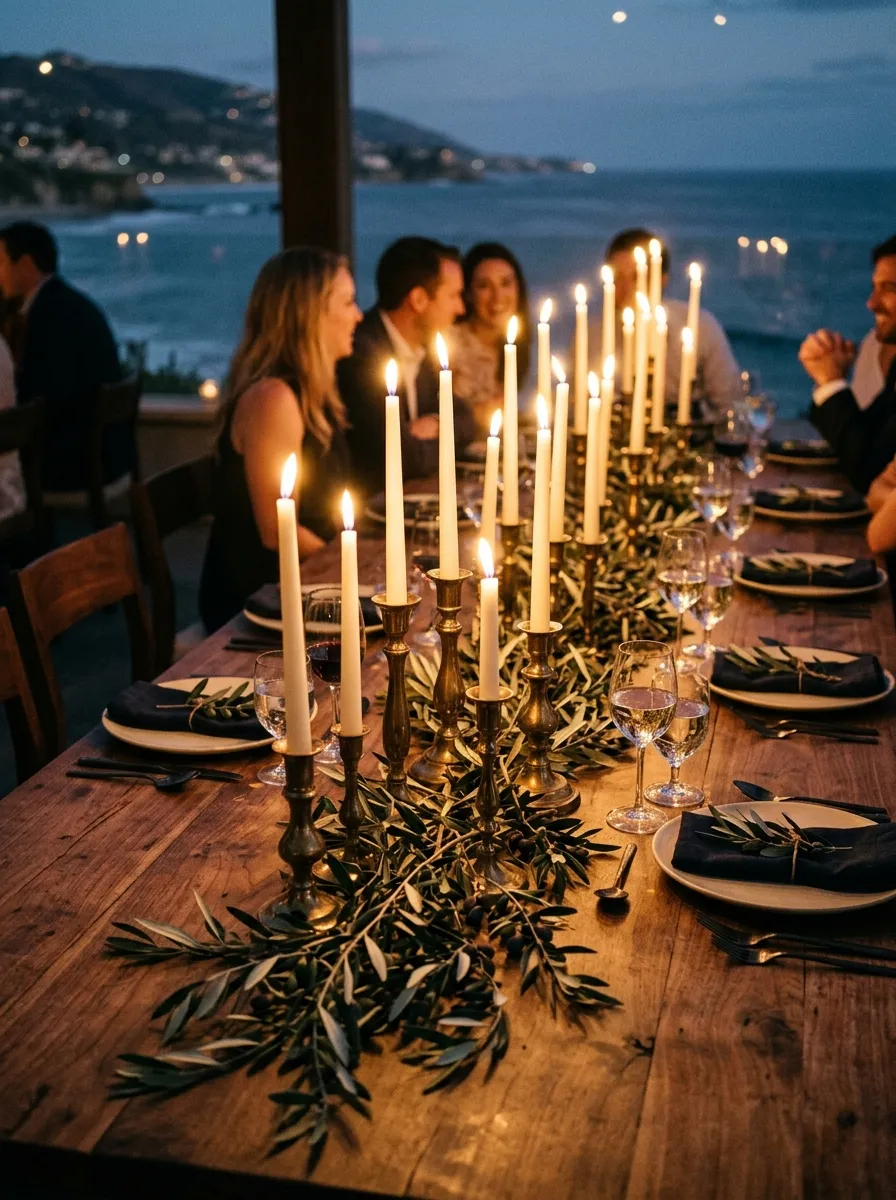
The olive branch and brass candlestick river concept combines classic Mediterranean simplicity with luminous, multi-tiered metal finishes. This design features loose, sprawling branches of fresh silvery-green olive foliage laid flat down the center of the table, winding organically around a collection of vintage brass candlesticks. The varied heights of the brass holders—ranging from three to nine inches—create a dynamic rhythm of living flame that shifts gently as guests converse. Olive branches carry ancient associations of peace and celebration, infusing the rehearsal dinner with thoughtful symbolism that honors the coming marriage. The slender, silvery undersides of olive leaves reflect the warm glow of open taper flames, producing a welcoming, candlelit ambiance. This approach requires minimal hardware, relying entirely on the natural drape of cut branches rather than structured foam or complex wire mechanics. The open design allows table surfaces to show through, creating an airy feel that prevents long dining setups from feeling crowded or heavy.
Clean an assortment of solid brass candlesticks using a soft microfiber cloth, leaving natural patina intact to preserve vintage visual warmth. Insert twelve-inch dripless ivory taper candles into the brass holders, securing each candle base with floral adhesive putty to ensure tapers stand straight and rigid. Arrange seven to nine candlesticks down the center of an eight-foot table in an irregular, zigzag pattern that leaves open spaces for serving platters. Lay fresh cut olive branches along the table surface, weaving the woody stems around the brass bases so the silvery leaves conceal the metal pedestals. Overlap the branch ends naturally, allowing leaf tips to curve outward toward place settings to create a relaxed, organic boundary. Light the taper candles ten minutes before the dinner begins, monitoring room drafts to verify that the dripless tapers burn cleanly and steadily throughout the meal.
9. Monochromatic White Floral Mason Jars
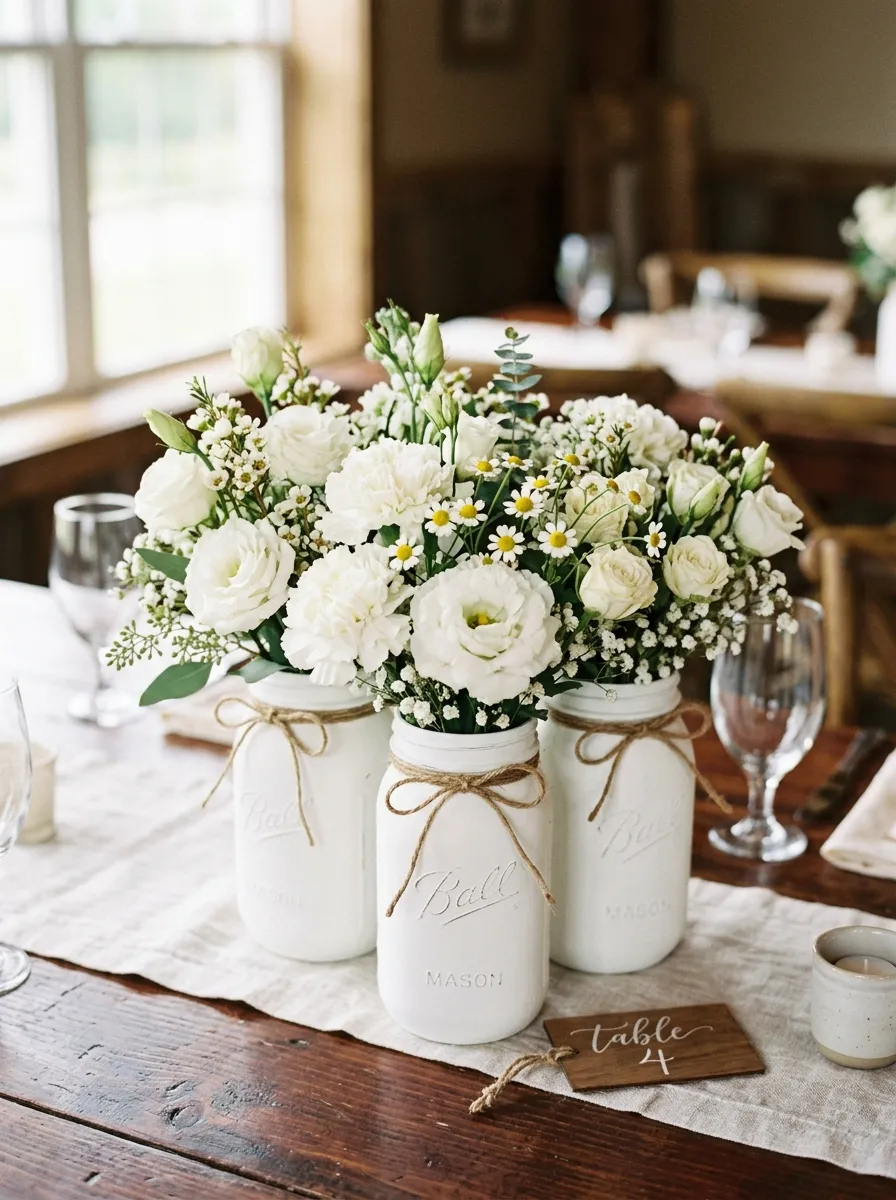
Step-by-Step Guide
Monochromatic white floral mason jars reinterpret traditional rustic glassware through a refined, contemporary lens by focusing strictly on single-tone floral styling. Instead of multicolored country wildflower arrangements, this concept utilizes standard quart-sized glass canning jars painted in matte chalk white or left transparent, filled with pristine white blooms. Combining distinct petal textures—such as fringed white carnations, ruffled lisianthus, and delicate chamomile—gives the monochromatic grouping subtle sophistication without requiring complex color balancing. The clean, uniform white palette elevates the humble glass canning jar, making it suitable for modern barn venues, coastal dinners, and casual bistro settings. Grouped in trios along tables, these arrangements provide flexible modularity, adapting easily to round, square, or rectangular table configurations. Mason jars offer substantial glass weight and broad bases, keeping arrangements balanced and stable throughout lively dining service. This accessible project allows beginners to practice professional flower prep and grouping without expensive vessel investments.
Apply two coats of ultra-matte white chalk paint to the exterior of quart-sized glass mason jars, allowing two hours of drying time between applications to achieve opaque coverage. Distribute floral preservative solution into the jars, filling each vessel halfway with cool water while keeping the painted exterior dry. Create a structural grid across the jar mouth using four strips of half-inch clear floral tape, which holds flower stems upright in their intended positions. Cut white carnations, spray roses, and white stock stems to lengths that allow blooms to hover two to three inches above the jar rim. Insert the sturdiest stems into the center squares of the tape grid, working outward with softer textural blooms to create a compact, rounded dome. Wrap a length of natural jute twine three times around the jar neck, tying it in a neat knot and trimming the tails to two inches.
10. Chinoiserie Porcelain and Peony Vignette
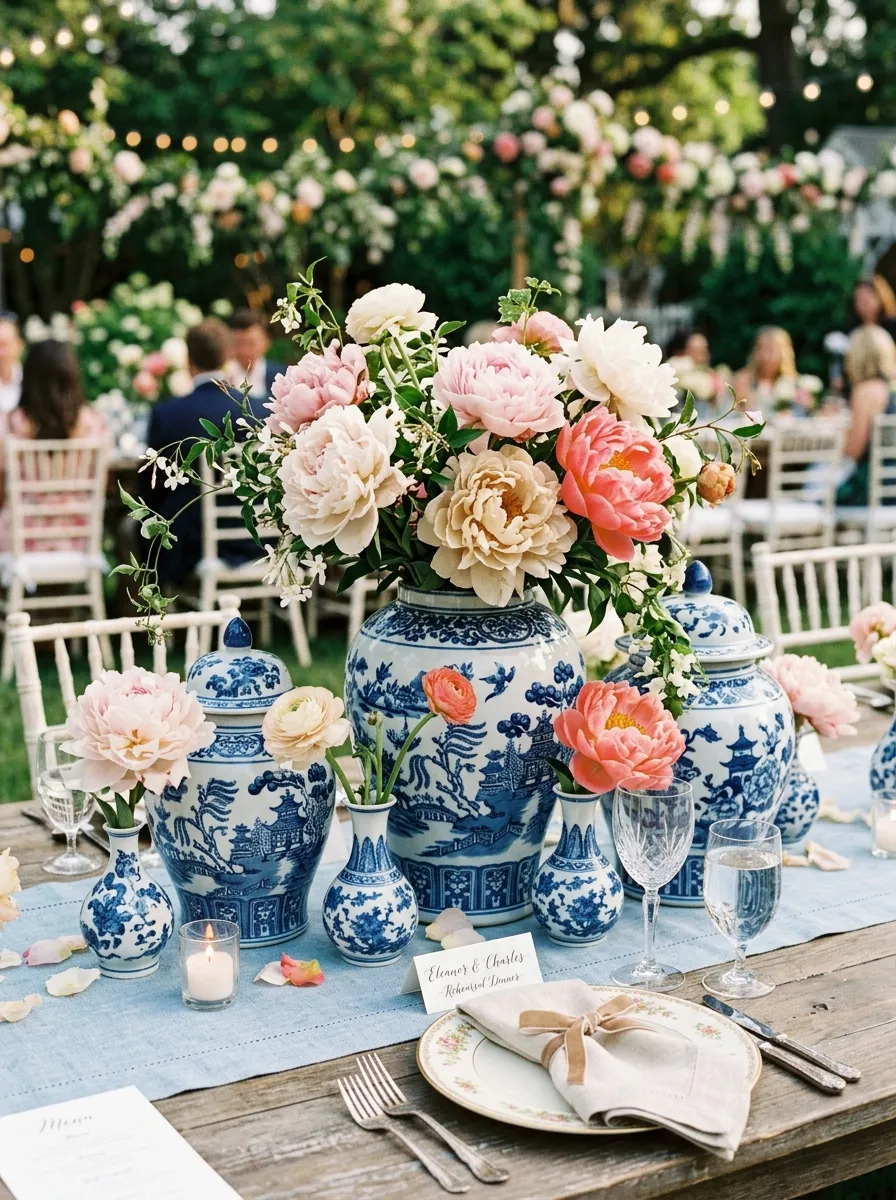
How to Make
The Chinoiserie porcelain and peony vignette introduces timeless blue-and-white ceramic elegance into rehearsal dinner tablescapes. This concept pairs reproduction blue-and-white porcelain ginger jars or bud vases with lush, open blooms in shades of pale blush, cream, and deep coral. The classic hand-painted floral motifs on the glazed ceramics provide decorative richness, eliminating the need for elaborate table runners or excess table accessories. The high-contrast pairing of deep cobalt blue porcelain patterns against soft, layered peony petals produces a photogenic centerpiece that honors traditional design heritage. This approach fits garden pavilions, country clubs, and historic estate settings where classic formal dining elements shine. Because the porcelain vessels are reusable, they transition directly into lasting home decor accents after the wedding festivities conclude. The solid ceramic construction provides weight and balance, easily supporting large, heavy peony heads without tilting or sliding on smooth table linens.
Source assorted blue-and-white porcelain bud vases and small ginger jars in varied heights between five and seven inches, removing any jar lids and storing them safely. Fill each ceramic vessel two-thirds full with fresh, room-temperature water conditioned with a commercial floral nutrient packet. Trim fresh peonies or garden roses at a forty-five-degree angle, cutting stems to double the height of their designated porcelain container. Strip all foliage that falls below the waterline inside the vessel to prevent bacterial growth and maintain clean, odor-free water throughout dinner. Place two to three open blooms into each ginger jar, letting the heavy floral heads rest gently against the glazed ceramic rim for natural support. Arrange the porcelain vessels in clusters of three down the center of the table, spacing them evenly between place settings to establish an uncluttered, high-end visual rhythm.
Common Beginner Mistakes and How to Avoid Them
Assembling your own rehearsal dinner centerpieces requires attention to environmental, mechanical, and spatial factors that beginners often overlook during early planning. A widespread error is constructing arrangements that exceed fourteen inches in height, which creates an awkward visual barrier that prevents guests from conversing naturally across the table. Keep all floral elements below eye level or elevate them above eye height on slender stands to preserve clear sightlines throughout dinner. Another frequent misstep is failing to use commercial dripless candles or ignoring indoor room drafts from air conditioners, leading to fast wax drips that ruin table linens. Prevent this by testing candle brands in advance and placing clear glass hurricane sleeves around open flames in drafty spaces. Beginners also frequently neglect proper botanical conditioning, placing unhydrated stems directly into arrangements where they wilt within hours. Always recut flower stems under water and hydrate them in a cool, dark room for a full day before event assembly. Finally, avoid overfilling dining tables with excessively wide centerpieces that crowd water glasses, bread plates, and shared platters during active dinner service.
Practical Tips for Better Results
Elevating your DIY rehearsal dinner centerpieces from amateur crafts to polished tablescapes relies on subtle professional finishing techniques and mechanical control. Always create a tape grid across the mouths of wide vases using clear floral tape, which secures stems in place without requiring dense, expensive bunches of flowers. When assembling greenery runners, interlock the stems in the same direction down the table, which establishes visual flow and avoids a messy, disorganized appearance. Mix textures within monochromatic designs; pairing glossy leaves with matte petals and rough wood surfaces introduces sophisticated visual depth that looks intentional and refined. Use room-temperature distilled water inside clear glass vessels to prevent cloudiness and avoid unsightly air bubbles along the inside of cylinder vases. To keep fresh botanicals looking crisp, mist completed arrangements with an anti-transpirant floral finishing spray, which seals leaf pores and slows moisture loss during warm gatherings. Finally, assemble a comprehensive day-of emergency kit containing extra floral tape, pruning shears, matches, zip ties, and paper towels to resolve unexpected centerpiece adjustments quickly on the evening of the dinner.
Styling, Presentation, or Organization Ideas
Presenting your DIY centerpieces within a thoughtful, coordinated environment elevates the entire rehearsal dinner atmosphere, creating a memorable visual transition to the wedding weekend. Frame your centerpieces with clean, textured table runners made from stonewashed linen, unbleached cotton gauze, or raw woven silk to soften hard tabletop surfaces. Maintain consistent metal finishes across your settings; pair brass candlesticks with gold-rimmed glassware and brass flatware to establish a cohesive, intentional visual identity. When styling long banquet tables, use modular spacing: place your primary floral or lantern focal point in the center, flanked by secondary candle groupings every eighteen inches down the table axis. Use custom place cards printed on heavy deckle-edge cardstock and handwritten in dark ink, leaning them against small fruit pieces, terracotta pots, or folded napkins. For buffets or cocktail high-tops, adapt your centerpiece concepts into compact, single-vessel versions that maintain design continuity without taking up plate space. Coordinated visual repetition across all dining zones ties the venue together, making the rehearsal dinner feel like a curated, welcoming celebration.
Budget or Time Planning
Efficient time management and disciplined material sourcing allow hosts to craft beautiful rehearsal dinner centerpieces without financial strain or stressful last-minute timelines. Sourcing seasonal foliage and hearty flowers in bulk from wholesale distributors or local farm markets lowers stem costs significantly compared to purchasing retail blooms from traditional florists. Plan your production timeline around the natural lifespan of your materials: source non-perishable glassware, lanterns, and candle supplies two to three months in advance, reserving floral pickup for two days before the dinner. Dedicate the day before the event to cleaning vessels, cutting tape grids, and conditioning fresh stems in cool water buckets. Assemble water-based centerpieces on the morning of the rehearsal dinner, storing completed arrangements in a cool, dark room away from direct sunlight and produce ripening zones. Allocate your budget strategically by investing in reusable items like lanterns and ceramic compotes that can be repurposed in home decor, while keeping perishable floral investments focused on high-volume, affordable greenery. This structured workflow keeps your creative projects organized, affordable, and enjoyable.
Creative Expansion and Advanced Inspiration
Once you feel confident executing basic centerpiece projects, you can expand your design with advanced mixed-media techniques and personalized artistic elements. Experiment with hand-dyed cheesecloth runners using natural botanical dyes derived from avocado stones, onion skins, or black tea to produce subtle earthy tones that match your color story. Introduce customized paper goods into your arrangements, integrating calligraphed table numbers or intimate stories of how the couple met mounted on slender brass picks within the floral displays. You can also incorporate fine sculptural elements, such as hand-carved alabaster candle holders, architectural stone pedestals, or raw mineral specimens nestled among the table greenery. Consider expanding your centerpiece concepts to other areas of the venue, designing a coordinated floral spray for the welcome bar, dessert display, or entryway welcome sign. For autumn or winter celebrations, swap soft summer greenery for dried pampas grass, bleached fern fronds, dried seed pods, and rich velvet ribbons to introduce cozy seasonal warmth. Approaching tablescape design as an adaptable, creative art form empowers you to craft an inviting, authentic celebration that leaves a lasting visual memory for your guests.