Transforming a cluttered, disorganized garage into a high-capacity, streamlined storage workshop is one of the most rewarding home improvement projects a homeowner can undertake. Garages frequently become chaotic accumulation zones for oversized seasonal decor, automotive fluids, landscaping tools, sports equipment, and household overflow, leaving zero floor space for vehicle parking. Implementing intentional, custom-built storage systems directly resolves this spatial bottleneck by shifting heavy items upward onto overhead joists, anchoring tools onto vertical wall planes, and utilizing mobile workbenches. In this comprehensive tutorial, readers will explore ten distinct DIY storage frameworks designed specifically to maximize utility, eliminate ground clutter, and protect valuable equipment from moisture damage. The guide details essential structural methodologies for mounting overhead ceiling sliding racks, constructing custom French cleat walls, assembling modular lumber storage bays, and organizing hardware bins. Mastering the principles of garage organization provides exceptional practical value for anyone seeking to reclaim usable floor area, accelerate project workflow, and cultivate a clean, minimalist style across their home workshop. By following these step-by-step woodworking and mechanical layouts, beginners and seasoned makers alike can build a resilient, beautiful, and organized garage interior that withstands decades of rigorous utility.
Why This Idea Is Trending or Useful
The sustained demand for functional garage storage systems across contemporary Pinterest ideas, home renovation channels, and DIY lifestyle feeds highlights a major movement toward maximizing residential square footage. As suburban home layouts evolve and multi-car garages increasingly serve dual purposes as creative workshops, fitness rooms, and tool sheds, efficient organization is essential. Building custom wooden storage solutions rather than purchasing flimsy, prefabricated sheet-metal shelving units offers tremendous practical value, providing superior weight capacity, exact dimensional customization, and substantial cost savings. Modern design principles emphasize clean architectural lines, concealed hardware containers, and uniform wall grid systems that turn chaotic tool collections into an inspiring aesthetic display. This creative project holds immense appeal for beginners because it requires only foundational carpentry skills, standard dimensional lumber, and accessible hand tools to achieve professional-grade results. Organizing tools and seasonal gear systematically cuts time spent searching for misplaced items, protects costly power tools from accidental floor impacts, and eliminates tripping hazards. By converting unused vertical drywall and overhead ceiling planes into heavy-duty storage matrices, homeowners protect their investments while substantially increasing the overall functional value of their properties.
Materials and Preparation
Constructing high-capacity DIY garage storage fixtures requires deliberate material selection, accurate spatial measurements, and proper structural safety preparation. Essential hardware and materials include two-by-four dimensional framing lumber, three-quarter-inch cabinet-grade plywood sheets, three-inch structural framing screws, heavy-duty lag bolts, steel corner brackets, wall anchors, and full-extension drawer slides. The primary assembly tool collection requires a dual-bevel sliding miter saw, a circular saw with a straight-edge cutting guide, a cordless drill and impact driver set, a digital stud finder, a four-foot bubble level, a carpenter framing square, and a steel tape measure. The physical preparation phase begins by clearing all items out of the garage, sweeping the concrete slab clean, and vacuuming away residual cobwebs along the ceiling rafters. Inspect the interior drywall surfaces for moisture damage, structural cracks, or plumbing penetrations, marking the exact vertical centers of all wall studs and ceiling joists using a chalk line. Measure the clearance height of the overhead garage door tracks, ceiling height, and vehicle parking clearances to ensure new storage racks do not obstruct moving mechanical components or daily car entry.
1. Overhead Ceiling Sliding Tote Storage Tracks
Step-by-Step Guide
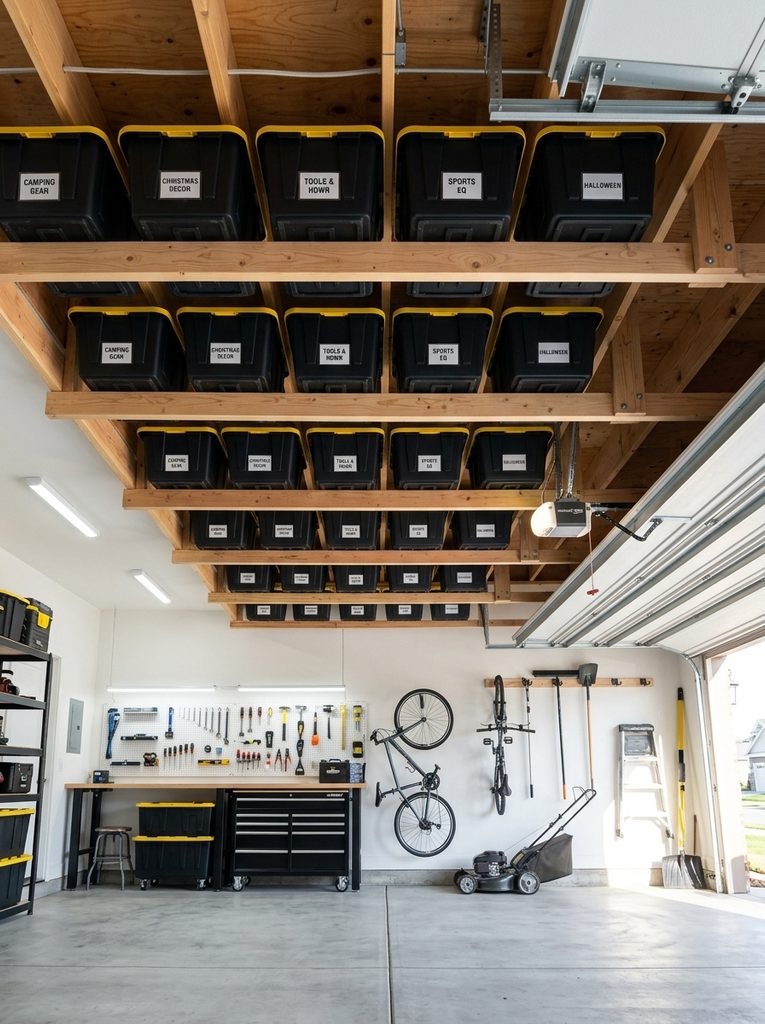
The overhead ceiling sliding tote storage track system utilizes previously wasted air space above garage door tracks to suspend high-capacity plastic storage totes securely from the ceiling. Many homeowners struggle with bulky holiday decorations, camping supplies, and winter sports gear that consume valuable floor square footage for eleven months of the year. Installing horizontal wooden I-beam rails directly into the structural ceiling joists creates a continuous overhead gliding channel that supports standard durable storage bins by their molded lip edges. This ceiling configuration keeps seasonal gear elevated off cold, damp concrete slabs, preventing water damage from seasonal runoff or minor flooding while leaving wall surfaces clear for daily tool access. The clean parallel tracks provide an orderly, industrial aesthetic that conceals substantial storage volume within an otherwise unused vertical plane.
+-------------------------------------------------------------+
|             [Overhead Ceiling Tote Track Matrix]            |
|                                                             |
|   +================ Ceiling Joist Anchor =================+ |
|   |  2x4 Framing Cleats Bolted into Structural Joists     | |
|   +=======================================================+ |
|                               |                             |
|              /\     [T-Flange Track Profile]  /\            |
|             /  \    [2x4 Vertical Drop Spacers/  \          |
|            /    \   [2x2 Lip Support Runners]/    \         |
|                   . - ~ ~ ~ - .                             |
|               . '     . - .     ' .                         |
|             /       /       \       \                       |
|   +================ Suspended Storage Tote ===============+ |
|   |  Heavy-Duty Plastic Tote Flange Gliding on Rails      | |
|   +=======================================================+ |
|                               |                             |
|  ==================== Spatial Elevation ==================  |
|  [ Zero-Footprint Overhead Storage Reclaims Concrete Floor ] |
+-------------------------------------------------------------+
To construct this overhead rack, begin by locating and marking the ceiling joists above the garage door area using a reliable electronic stud finder and a straight chalk line. Cut two-by-four framing lumber into horizontal base plates matching the width of your designated storage zone, securing them perpendicular across the joists with three-inch structural lag screws and washers. Build composite wooden T-tracks by fastening a two-by-two-inch runner along the bottom edge of a two-by-four vertical spacer using wood glue and two-and-a-half-inch pocket screws. Fasten the central T-tracks and outer L-tracks to the ceiling base plates, spacing the parallel channels precisely one-half inch wider than the main tub body of your plastic storage bins. Slide the reinforced lip of each storage tote into the track channels from the open front end, installing a removable wooden safety stop pin through the front of each runner to prevent bins from sliding forward when the garage door operates.
2. The Heavy-Duty French Cleat Wall System
How to Create
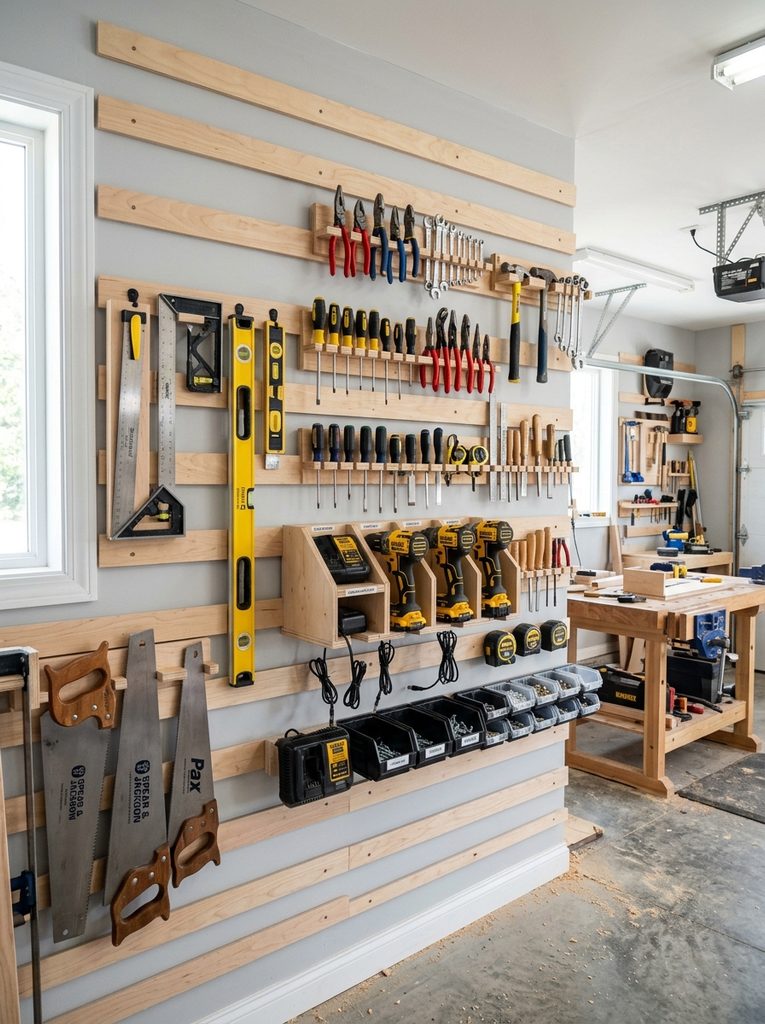
The heavy-duty French cleat wall system represents the ultimate modular storage solution, transforming an ordinary garage drywall surface into an adaptable tool-mounting matrix. Traditional pegboards often bend under the weight of heavy power tools or drop their metal mounting hooks when items are pulled away. In contrast, a French cleat system relies on interlocking forty-five-degree beveled wooden rails that distribute downward shear weight across multiple wall studs, holding hundreds of pounds with absolute rigidity. Crafters and woodworkers can build custom tool holders, drill charging docks, clamp racks, and small parts bins that hook securely onto the wall rails without a single screw. This adaptable layout allows homeowners to rearrange tool layouts instantly as new equipment is acquired, maintaining an organized, ergonomic workshop aesthetic.
+-------------------------------------------------------------+
|              [French Cleat Interlocking Matrix]             |
|                                                             |
|   +================ Wall-Mounted Cleat ===================+ |
|   |  45-Degree Upward Bevel Anchored into Wall Studs      | |
|   +=======================================================+ |
|                               |                             |
|              /\     [Interlocking Gravity Fit]/\            |
|             /  \    [Downward Shear Transfer] /  \          |
|            /    \   [Tool Holder Cleat Plate]/    \         |
|                   . - ~ ~ ~ - .                             |
|               . '     . - .     ' .                         |
|             /       /       \       \                       |
|   +================ Custom Tool Carrier ==================+ |
|   |  Drill Dock, Cordless Charger Shelf, or Hand Tool Rack| |
|   +=======================================================+ |
|                               |                             |
|  ==================== Structural Balance =================  |
|  [ Modular Tool Reconfiguration Without Wall Fastener Holes] |
+-------------------------------------------------------------+
To construct a French cleat wall, rip multiple eight-foot sheets of three-quarter-inch cabinet-grade plywood into six-inch-wide strips using a table saw set to a precise forty-five-degree blade angle. Mount the wall cleats horizontally across the garage wall studs with the forty-five-degree beveled edge facing upward and inward toward the drywall, maintaining a uniform vertical spacing of six inches between rows using a scrap wood spacer block. Secure each cleat into every intersecting wall stud with two three-inch framing screws, checking each rail with a four-foot level to ensure alignment. Construct custom tool carriers by attaching opposing forty-five-degree downward-facing cleats to the rear backs of small plywood boxes, drill holsters, and tape dispensers. Hang the tool fixtures by dropping their rear cleats over the wall-mounted rails, allowing gravity to lock the modular storage holders firmly into place.
3. Mobile Fold-Down Miter Saw and Workbench Station
Step-by-Step Guide
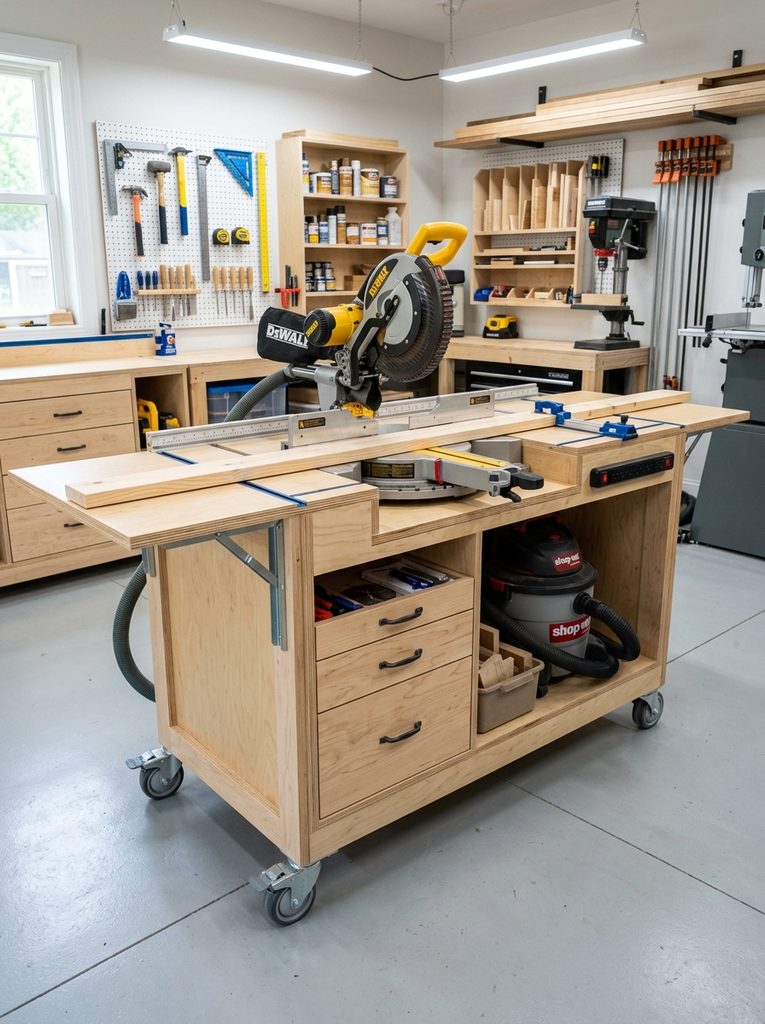
The mobile fold-down miter saw and workbench station combines a rolling tool cart with expandable wing extensions, providing a heavy-duty cutting platform that folds away into a compact footprint. In single-car or crowded two-car garages, stationary workbenches permanently consume floor space, preventing vehicles from parking comfortably. This mobile workstation features a recessed central shelf that drops the miter saw base flush with two folding side extension tables, creating a seamless eight-foot outfeed support surface for processing long dimensional lumber. Heavy-duty locking castor wheels allow the entire station to roll effortlessly into the center of the garage for large building sessions and tuck neatly against a wall when finished.
Construct the central cart frame using two-by-four lumber, building a box measuring thirty inches deep, thirty-six inches wide, and thirty-four inches high, reinforcing all joints with structural corner blocks and wood glue. Build two matching drop-leaf extension table wings measuring thirty inches deep and twenty-four inches wide, attaching them to each side of the central cart using heavy-duty steel piano hinges. Install folding triangular support brackets beneath each wing to lock the extension leaves firmly at a level ninety-degree angle during active cutting projects. Recess the central mounting deck so that the metal cutting table of your miter saw sits completely flush with the top surface of the extended side wings. Mount four four-inch polyurethane locking swivel castors to the bottom base corners, and finish the plywood top surfaces with two coats of paste wax to ensure lumber slides smoothly across the workstation.
4. Vertical Stud-Bay Garden and Yard Tool Rack
Execution Process
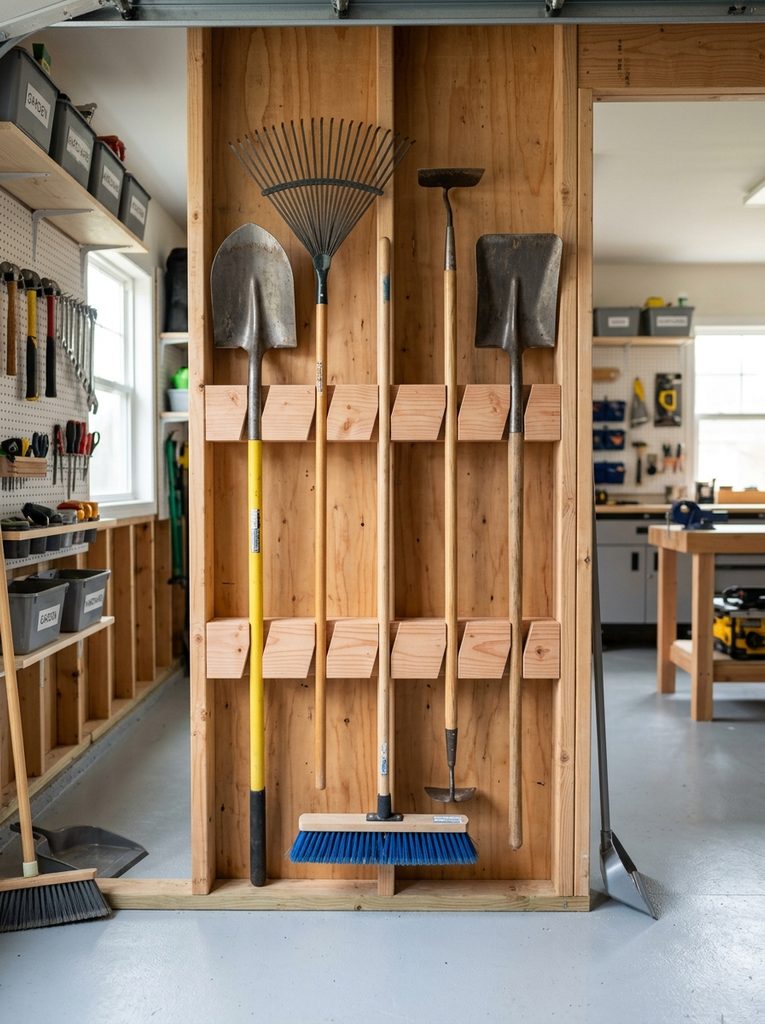
The vertical stud-bay garden and yard tool rack utilizes the shallow four-inch cavity between exposed wall framing studs to store long-handled shovels, rakes, brooms, and weed trimmers. Leaving long-handled tools leaning loosely in garage corners creates chaotic clutter piles that frequently tip over, damaging drywall or scratching parked vehicles. By mounting angled wooden retention brackets and tool slots inside the vertical stud cavities, homeowners create dedicated vertical storage slots that hold garden implements flat against the wall plane. This low-profile organization method consumes zero floor area, keeps sharp garden tines safely enclosed, and allows instant visual identification of every landscaping tool in the collection.
+-------------------------------------------------------------+
|             [Stud-Bay Tool Retention Architecture]          |
|                                                             |
|   +--- Left Stud Column ---+     +--- Right Stud Column --+ |
|   |  2x4 Wall Framing Stud |     |  2x4 Wall Framing Stud | |
|   +------------------------+     +------------------------+ |
|               \                               /             |
|                \   [Angled Retention Notches]/              |
|                 \  [Holds Handles In-Line]  /               |
|                   . - ~ ~ ~ - .                             |
|               . '     . - .     ' .                         |
|             /       /       \       \                       |
|   +================ Base Support Shelf ===================+ |
|   |  Bottom Retention Cleat for Shovel Blades & Rake Heads| |
|   +=======================================================+ |
|                               |                             |
|  ==================== Spatial Recovery ===================  |
|  [ Recessed Wall Cavities Store 15+ Long Tools Flush-to-Wall] |
+-------------------------------------------------------------+
Begin by selecting an open wall section with exposed two-by-four wall studs, or remove drywall across a four-foot-wide section to expose the internal wall framework. Cut multiple pieces of three-quarter-inch plywood into rectangular cleats measuring four inches wide by fourteen inches long to span across adjacent stud faces. Using a jigsaw, cut three evenly spaced one-and-a-half-inch circular slots angled downward at fifteen degrees into the top edge of each plywood cleat to cradle wooden tool handles securely. Fasten the notched cleats horizontally across the stud bays at heights of three feet and five feet from the floor using two-and-a-half-inch wood screws. Place a continuous horizontal two-by-four base board across the bottom of the stud bay two inches above the concrete floor to prevent tool blades from resting in ground moisture, creating an organized, recessed tool corral.
5. Cantilevered Overhead Lumber and Pipe Rack
Setup Method
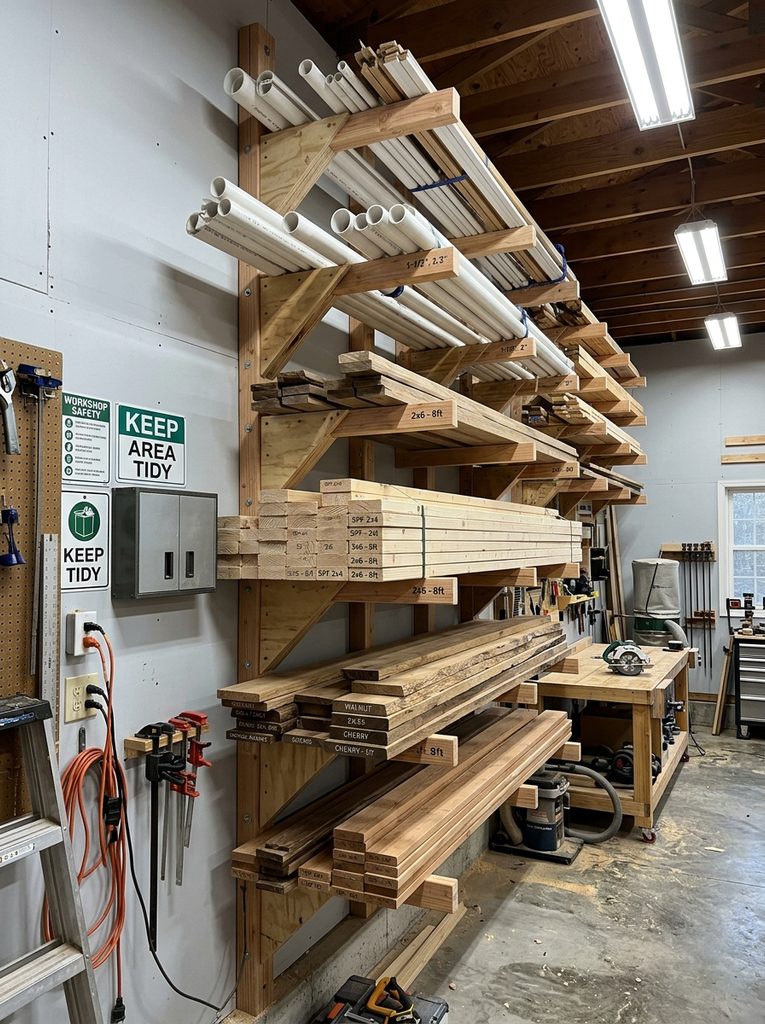
The cantilevered overhead lumber and pipe rack provides high-capacity, multi-tiered horizontal storage for long dimensional boards, electrical conduit, and copper pipe stacks without upright floor posts. Storing long lumber upright in garage corners leads to board warping and creates tipping hazards, while stacking materials directly on the floor exposes expensive hardwood to concrete moisture. This wall-mounted system features heavy-duty horizontal wooden support arms attached to vertical wall standards with angled gusset braces, projecting twelve to sixteen inches outward. By distributing the mechanical load directly into wall studs, the cantilevered tiers keep hundreds of pounds of construction lumber organized, flat, and completely elevated above daily parking zones.
+-------------------------------------------------------------+
|              [Cantilevered Lumber Rack Matrix]              |
|                                                             |
|   +================ Vertical Wall Standard ===============+ |
|   |  2x4 Cleat Lag-Bolted Directly into Wall Studs        | |
|   +=======================================================+ |
|                               |                             |
|              /\     [Plywood Gusset Triangle] /\            |
|             /  \    [Glued & Screwed Support] /  \          |
|            /    \   [3/4" Structural Plate]  /    \         |
|                   . - ~ ~ ~ - .                             |
|               . '     . - .     ' .                         |
|             /       /       \       \                       |
|   +================ Horizontal Cantilever Arm ============+ |
|   |  16" 2x4 Support Arm with 3-Degree Upward Incline     | |
|   +=======================================================+ |
|                               |                             |
|  ==================== Load Capacity ======================  |
|  [ Multi-Tiered System Holds 600+ Lbs of Raw Lumber Flat ]  |
+-------------------------------------------------------------+
To construct this lumber rack, cut four pieces of two-by-four lumber to six-foot lengths to serve as the vertical wall uprights. Cut twelve sixteen-inch horizontal cantilever arms from two-by-four stock, cutting the mounting ends at a slight three-degree upward angle so that stored boards tilt back toward the wall rather than sliding off. Cut twenty-four triangular gusset support plates from three-quarter-inch plywood measuring ten inches on each perpendicular side. Sandwich each horizontal arm onto the vertical upright using construction adhesive and structural screws driven through the triangular plywood gussets on both sides. Mount the completed upright assemblies vertically along your garage wall studs spaced thirty-two inches apart, driving three-eighths-inch by four-inch structural lag screws through the uprights directly into the center of the wall framing.
6. Wall-Mounted Fold-Up Sheet Goods Rack
How to Make
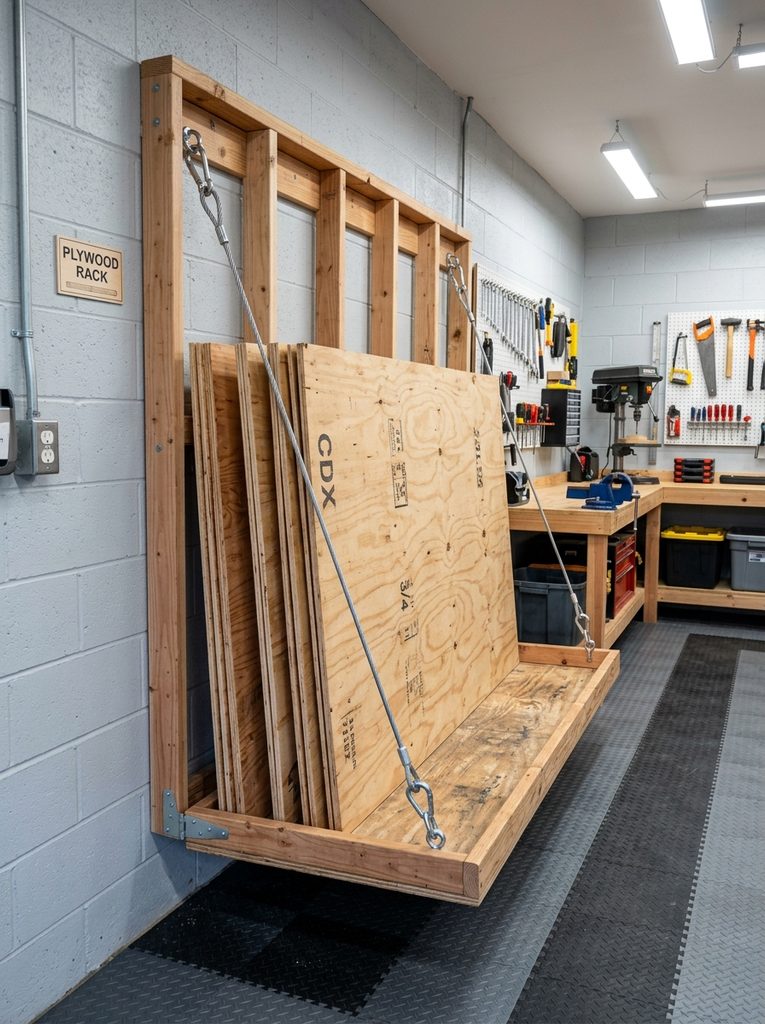
The wall-mounted fold-up sheet goods rack solves the difficult challenge of storing bulky four-by-eight-foot plywood sheets and drywall panels in a compact garage. Storing sheet goods flat on the floor consumes massive surface area, while leaning heavy panels vertically against drywall causes bowing and risks structural wall damage. This space-saving design features a bottom pivoting ledger board and a folding containment frame that holds full-sized panels securely upright against the wall at a safe, slight angle. When completely empty, the bottom platform folds upward flush against the wall studs, reclaiming the floor footprint for vehicle parking or mobile tool movement.
Construct a four-inch-wide by eight-foot-long base tray using two-by-four dimensional lumber and three-quarter-inch plywood, creating a shallow channel to hold the bottom edges of large wooden panels. Attach the rear edge of this base tray to a continuous horizontal ledger board mounted into wall studs four inches above the concrete floor, utilizing heavy-duty steel gate hinges. Install two folding steel arm brackets or braided steel aircraft cables connecting the outer corners of the tray to the wall studs at a forty-five-degree angle to support the weight of heavy sheet goods. Fasten two vertical containment arms to the front of the tray with safety latches at the top to prevent stacked boards from tipping forward into the garage room. When the rack is empty, unhook the lateral support cables and fold the bottom tray upward, locking it flat against the wall with a barrel slide bolt.
7. Slide-Out Vertical Screwdriver and Hardware Tower
Step-by-Step Guide
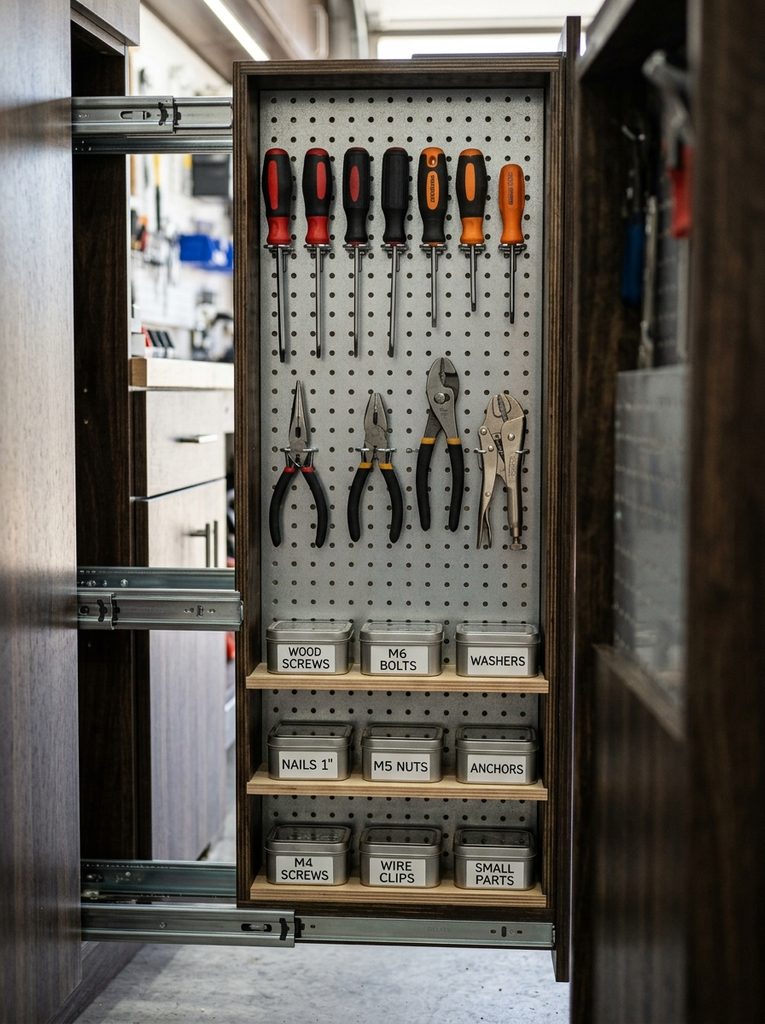
The slide-out vertical screwdriver and hardware tower provides high-density small parts storage by utilizing deep, narrow gaps between larger garage cabinets or appliances. Small fasteners, drill bits, hand tools, and spray cans often become lost in deep, dark standard shelves, leading to cluttered drawer bins and wasted time. This vertical pull-out unit operates like a tall, narrow pantry on full-extension ball-bearing drawer slides, measuring only eight inches wide but thirty inches deep and five feet tall. Both sides of the vertical interior panel feature double-sided pegboard, magnetic tool strips, and shallow wooden spice-style shelves that keep thousands of small hardware items organized and instantly visible with a single pull.
+-------------------------------------------------------------+
|             [Slide-Out Hardware Tower Framework]            |
|                                                             |
|   +================ Fixed Outer Cabinet Box ==============+ |
|   |  Plywood Housing Anchored to Floor and Adjacent Bench | |
|   +=======================================================+ |
|                               |                             |
|              /\     [Heavy-Duty Drawer Slides]/\            |
|             /  \    [150-Lb Ball-Bearing Rails/  \          |
|            /    \   [Full 28" Extension Pull]/    \         |
|                   . - ~ ~ ~ - .                             |
|               . '     . - .     ' .                         |
|             /       /       \       \                       |
|   +================ Vertical Center Divider ==============+ |
|   |  Double-Sided Pegboard with Metal Parts Shelving Bins | |
|   +=======================================================+ |
|                               |                             |
|  ==================== High-Density Storage ===============  |
|  [ 8-Inch Gap Stores Hundreds of Hand Tools & Hardware Tins] |
+-------------------------------------------------------------+
Build a sturdy outer cabinet enclosure using three-quarter-inch plywood, sizing the frame eight inches wide, thirty inches deep, and sixty inches tall, securing the base firmly to the floor or adjacent workbench. Construct an inner sliding vertical tower from a half-inch plywood center panel framed by two-by-two lumber around the outer perimeter. Mount two pairs of heavy-duty, one-hundred-and-fifty-pound-rated full-extension drawer slides along the top and bottom interior surfaces of the outer enclosure, connecting them to the sliding inner frame. Fasten perforated metal pegboard sheets to both sides of the central sliding panel, installing shallow one-by-three-inch wooden shelves along the lower section to cradle spray cans and hardware jars. Attach a large D-handle and a polished metal label plate to the front face of the tower, enabling smooth, effortless pull-out operation in tight spaces.
8. Modular Wall-Mounted Cordless Tool Charging Station
How to Create
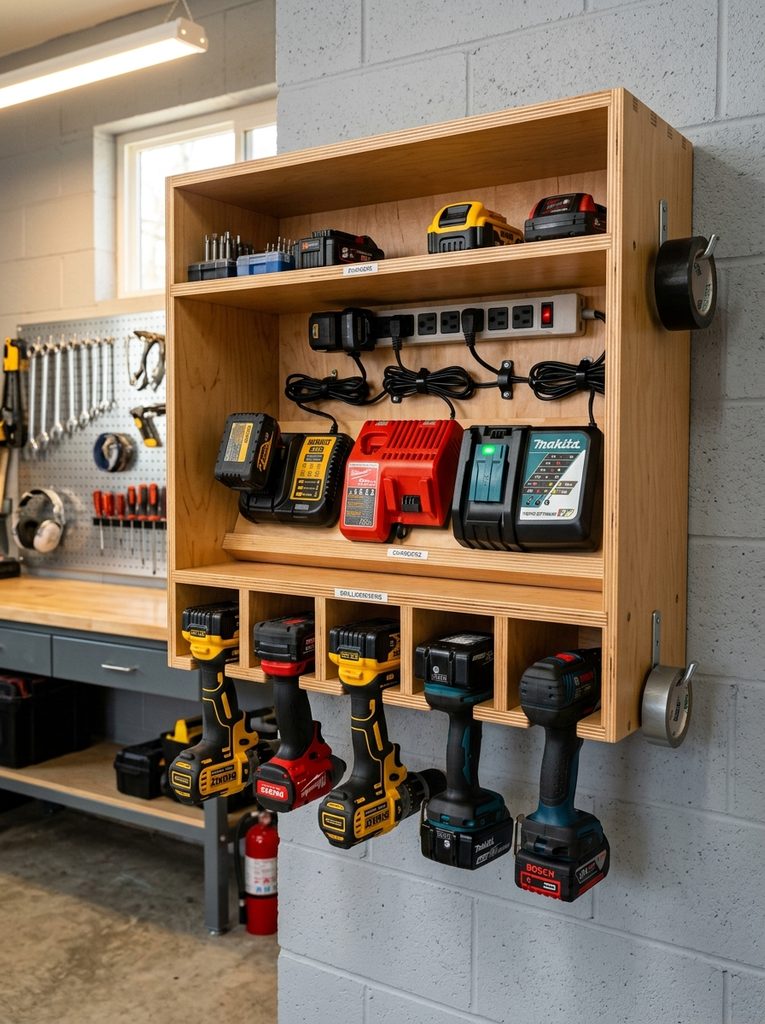
The modular wall-mounted cordless tool charging station concentrates drills, impact drivers, multi-tools, battery packs, and high-speed chargers into an all-in-one power station. Cordless power tools often end up scattered across various workbench surfaces with loose charging cables creating fire hazards and cluttering active assembly areas. This custom wall cabinet features specialized hanging slots along the bottom that hold cordless tools upside down by their battery bases, a ventilated middle shelf for charging docks, and integrated surge-protected power strips. Organizing your cordless ecosystem into a single wall-mounted station ensures batteries remain fully charged, tool bodies stay protected from workshop dust, and workbenches remain clear for project assembly.
Cut the top, bottom, and side panels for a wall cabinet measuring twenty-four inches wide, twelve inches deep, and thirty inches high using three-quarter-inch plywood. To create the lower hanging dock, cut four vertical slots measuring one-and-a-half inches wide and eight inches deep into the bottom shelf panel using a jigsaw, rounding the outer entry edges with sandpaper to allow drill handles to slide in smoothly. Assemble the cabinet box with pocket-hole screws and wood glue, installing a middle shelf four inches above the tool slots to hold charging units. Drill a two-inch grommet hole in the cabinet side panel and mount a multi-outlet metal surge protector along the interior back wall, plugging all charger cords into the internal strip. Mount the entire charging station securely to wall studs using three-inch structural screws, creating a self-contained, dust-managed power tool hub.
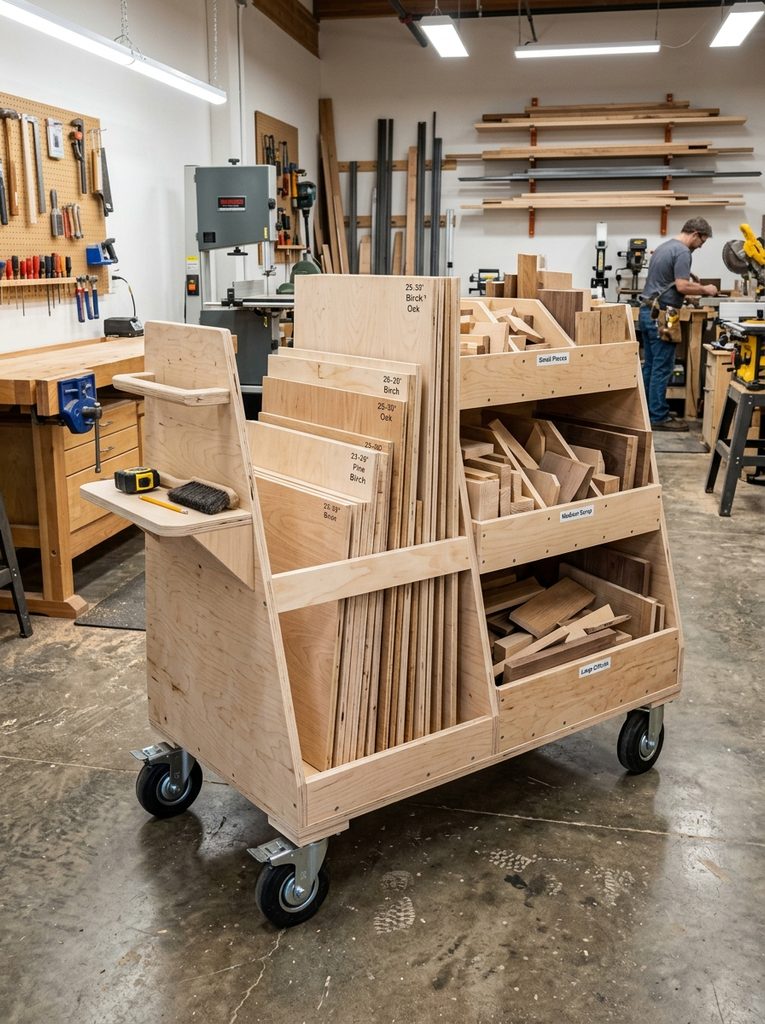
9. Heavy-Duty Rolling Plywood Cart and Offcut Bin
Execution Process
The heavy-duty rolling plywood cart and offcut bin combines vertical sheet storage with an integrated scrap bin, creating a complete mobile lumber station on wheels. Woodworking and DIY home projects inevitably generate awkward scrap cutoffs and partial sheets that accumulate in loose, messy piles against walls. This mobile cart features an angled vertical A-frame base that supports full four-by-four-foot partial plywood panels on one side, while the opposing side features three tiered wooden bins to sort solid wood offcuts by length. Locking castor wheels allow the user to roll the heavy cart directly to the table saw for loading and roll it back into a corner when cleanup begins.
+-------------------------------------------------------------+
|             [Rolling Sheet & Offcut Cart Blueprint]         |
|                                                             |
|   +--- Sheet Good Side ---+     +--- Tiered Offcut Bins --+ |
|   |  Angled A-Frame Deck  |     |  3-Tier Partitioned Bin | |
|   |  Holds 4x4 Sheet Cuts |     |  Short, Med & Long Cuts | |
|   +-----------------------+     +-------------------------+ |
|               \                               /             |
|                \     [Central Triangular Box]/              |
|                 \    [Rigid 3/4" Plywood Core]              |
|                   . - ~ ~ ~ - .                             |
|               . '     . - .     ' .                         |
|             /       /       \       \                       |
|   +================ Heavy-Duty Rolling Base ==============+ |
|   |  Four 4" Polyurethane 300-Lb Rated Locking Castors    | |
|   +=======================================================+ |
|                               |                             |
|  ==================== Waste Management ===================  |
|  [ Consolidates All Wood Scraps & Offcuts into 6 Sq Ft Footprint] |
+-------------------------------------------------------------+
Construct a rectangular base platform measuring twenty-four inches wide by forty-eight inches long from two-by-four framing lumber topped with a three-quarter-inch plywood sheet. Build a central triangular A-frame divider forty inches tall down the center of the base platform, reinforcing the angled joints with structural screws and internal triangular gussets. On the left side of the divider, install a four-inch-wide bottom lip angled inward at ten degrees to cradle leaning plywood sheet cuts securely. On the right side, build three partitioned rectangular wooden bins with graduated front wall heights (twelve, twenty-four, and thirty-six inches) to organize small, medium, and tall lumber cutoffs. Mount four heavy-duty four-inch polyurethane locking castor wheels to the bottom corners, providing smooth mobility for up to six hundred pounds of stored lumber.
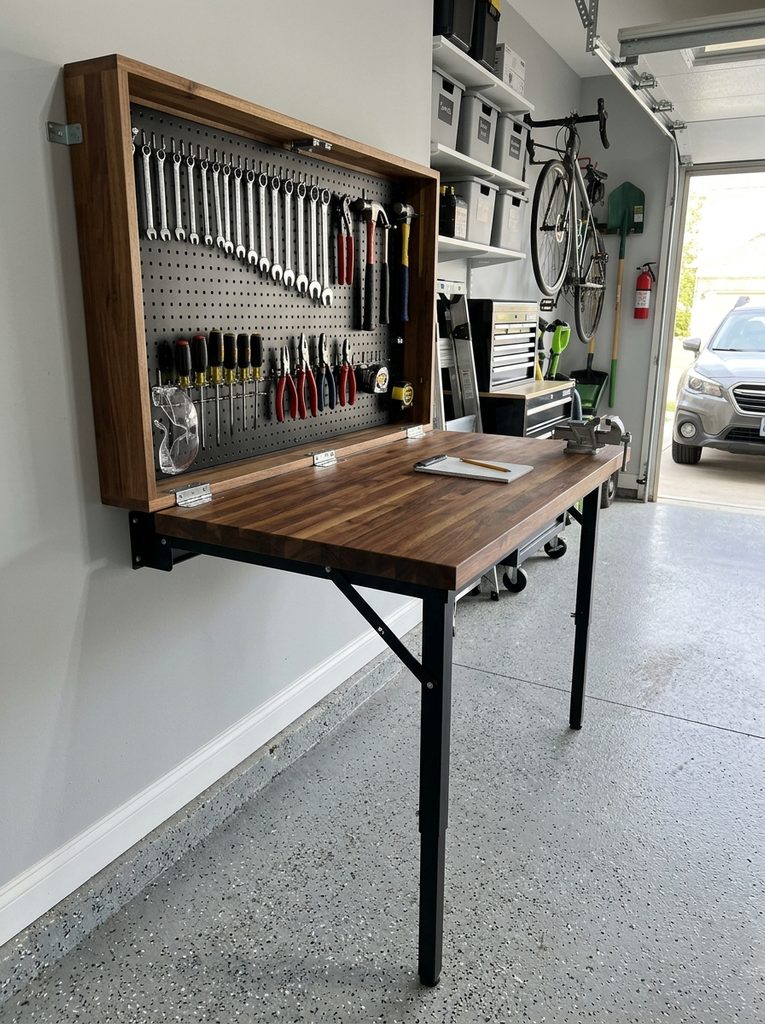
10. Wall-Mounted Drop-Down Workbench with Pegboard Interior
Setup Method
The wall-mounted drop-down workbench with pegboard interior combines a folding heavy-duty work surface with concealed wall storage, providing a complete workspace in garages with limited space. When folded upright, the unit sits only seven inches off the wall, displaying a clean wooden front panel that keeps the garage looking neat. When released, the front panel lowers to a comfortable thirty-six-inch working height, supported by heavy-duty folding steel legs. The fixed interior cabinet attached to the wall features a complete metal pegboard back panel, allowing hand tools, drivers, and safety equipment to remain hanging in place even when the desk is closed.
+-------------------------------------------------------------+
|              [Drop-Down Workbench Wall Matrix]              |
|                                                             |
|   +================ Wall-Mounted Shallow Box =============+ |
|   |  Interior Pegboard Backing with Hand Tool Hooks       | |
|   +=======================================================+ |
|                               |                             |
|              /\     [Heavy-Duty Continuous Hinge]/\         |
|             /  \    [Supports 400 Lbs Dynamic Load/ \       |
|            /    \   [Solid Core Worktop Panel]   /   \      |
|                   . - ~ ~ ~ - .                             |
|               . '     . - .     ' .                         |
|             /       /       \       \                       |
|   +================ Folding Steel Legs ===================+ |
|   |  Adjustable Locking Steel Leg Brackets on Floor Base  | |
|   +=======================================================+ |
|                               |                             |
|  ==================== Dual Utility =======================  |
|  [ Full Heavy-Duty Work Surface Folds Away to 7-Inch Depth] |
+-------------------------------------------------------------+
Build a shallow wall-mounted frame box measuring forty-eight inches wide, thirty-six inches high, and six inches deep using three-quarter-inch cabinet-grade plywood. Line the rear interior back of the cabinet with a twenty-four-gauge powder-coated metal pegboard, securing it with sheet metal screws. Construct a solid, durable worktop panel measuring forty-eight inches wide by thirty inches deep using double-layered three-quarter-inch plywood, sealing the edges with hardwood edge banding. Join the bottom edge of the wall box to the rear edge of the worktop panel using a heavy-duty stainless steel continuous piano hinge rated for high dynamic loads. Install two folding steel table legs to the outer front underside of the worktop, add two heavy-duty industrial barrel latches at the top corners to secure the unit upright when closed, and lag-bolt the cabinet frame into wall studs.
Common Beginner Mistakes and How to Avoid Them
The most dangerous and frequent mistake made during DIY garage storage construction is failing to anchor heavy shelving, lumber racks, and overhead frames directly into solid wooden structural framing studs. Relying on plastic drywall anchors or hollow hollow-wall toggles to support heavy tools and lumber inevitably leads to structural failure, causing racks to collapse and damaging vehicles or causing severe bodily injury. Always locate the true physical centers of wooden studs using a deep-scanning digital stud finder, verifying the edges with a fine drill bit before driving three-inch structural lag screws. Another common mistake is choosing thin, untreated particle board or low-density fiberboard for garage shelving. In unconditioned garage environments, high humidity causes particle board to sag, swell, and disintegrate under heavy loads; always invest in exterior-rated three-quarter-inch plywood or solid dimensional framing lumber. Additionally, beginners frequently construct storage units that block electrical breaker panels, water shutoff valves, or the safety sensor beams of automatic garage doors. Maintain a minimum thirty-six-inch clear perimeter around all utility access panels and keep overhead racks clear of garage door tracks.
| Garage Storage Challenge | Primary Root Cause | Practical Preventive Action |
|---|---|---|
| Collapsing Wall Racks | Fastening into drywall or using weak drywall anchors | Drive 3″ structural lag screws into verified centerlines of framing studs. |
| Sagging, Warped Shelves | Using thin particle board or 1/2″ low-grade MDF | Use 3/4″ exterior-grade plywood supported by 2×4 framing stiffeners. |
| Blocked Garage Door Travel | Installing ceiling racks too close to moving door tracks | Maintain a minimum 4″ clearance above the highest point of open door travel. |
| Moisture Damage to Tools | Storing items directly on porous concrete slabs | Elevate all wood, tools, and boxes at least 4″ off the floor using cleats or feet. |
| Sticky, Binding Drawers | Using light-duty plastic slides under heavy metal loads | Install 100-to-150-lb rated full-extension ball-bearing drawer slides. |
Practical Tips for Better Results
Achieving professional-grade durability and long-term organization in a garage workshop relies on smart material finishing, good lighting, and disciplined storage habits. Always apply two coats of clear water-resistant polyurethane or penetrating deck sealant to all raw plywood and dimensional lumber surfaces before loading them with tools; sealed wood resists oil absorption, chemical spills, and humidity-induced warping over seasonal weather cycles. When illuminating your storage zones, replace dim incandescent ceiling bulbs with four-foot linkable LED shop lights (rated at 5000K daylight and at least 4000 lumens each) positioned directly above workbenches and tool racks to eliminate shadows. Group your garage inventory into strict functional categories—such as automotive, gardening, electrical, plumbing, and seasonal decor—labeling every tote and storage drawer with high-contrast vinyl lettering. Install heavy-duty magnetic tool bars along the front aprons of workbenches to hold active screwdrivers, pliers, and fasteners during projects. Finally, dedicate fifteen minutes at the conclusion of every weekend build to return all tools to their dedicated French cleat holders, keeping surfaces clear for your next creative project.
Styling, Presentation, or Organization Ideas
Organizing a DIY garage storage system involves blending industrial utility with clean, modern design accents to create an inviting, professional workspace. Paint the raw garage drywall in a light, semi-gloss gray or crisp white tone; light wall colors reflect ceiling lighting across the room, making compact garages feel expansive and bright. Finish wooden French cleats, workbench faces, and drawer fronts in a two-tone color scheme, combining a natural clear-coated wood grain with matte charcoal or industrial black accents for a contemporary look. Arrange hand tools, levels, and squares on wall-mounted cleat boards in clean geometric patterns, tracing tool outlines with a fine black marker to create custom tool silhouettes that make missing tools immediately obvious. Add interlocking heavy-duty polypropylene garage floor tiles in a matching dark slate gray across the concrete slab to provide underfoot cushioning while defining clean vehicle parking and workshop zones.
+-------------------------------------------------------------+
|                 [Garage Studio Aesthetic Matrix]            |
|                                                             |
|   +--- Upper Overhead Level ------+  +-- Mid-Wall Workspace + |
|   |  - Sliding Ceiling Tote Rails |  |  - French Cleat Grid | |
|   |  - 5000K LED Shop Light Bars  |  |  - Cordless Dock     | |
|   |  - Cantilevered Lumber Racks  |  |  - Magnetic Bars     | |
|   +-------------------------------+  +----------------------+ |
|                                                               |
|   +--- Lower Floor Level ---------+  +-- Mobile Equipment --+ |
|   |  - Interlocking Floor Tiles   |  |  - Drop-Leaf Bench   | |
|   |  - Elevated Base Shelving     |  |  - Rolling Tool Cart | |
|   |  - Stud-Bay Long Tool Corral  |  |  - Offcut Scrap Bin  | |
|   +-------------------------------+  +----------------------+ |
+-------------------------------------------------------------+
Budget and Time Planning
Constructing a complete custom DIY garage storage system is highly cost-effective and manageable when approached in organized building phases. Rather than spending thousands of dollars on commercial metal tool cabinets, allocate a total raw materials budget of $300 to $600 toward structural lumber: ten two-by-fours, four sheets of three-quarter-inch plywood, heavy-duty lag fasteners, drawer slides, and heavy-duty locking castors. Structure the project across two consecutive weekends: dedicate the first weekend (six to eight hours) to clearing the garage, marking wall studs, building the overhead ceiling tote tracks, and mounting the horizontal French cleat wall matrix. Use the second weekend (six to eight hours) to assemble the mobile fold-down workbench, build custom tool holders, and install the vertical stud-bay garden rack. This phased schedule prevents workshop fatigue, spreads material purchases across manageable milestones, and ensures every storage component is built to exact specifications.
Creative Expansion and Advanced Inspiration
Once you master foundational garage storage carpentry, you can explore advanced mechanical additions, smart technology, and custom workshop upgrades. Install motorized electric ceiling hoists operated by smartphone or wall switches to lift heavy rooftop cargo boxes, kayaks, and bicycles up to the ceiling rafters without manual physical lifting. Integrate smart home automation by connecting your LED shop lights, battery charger power strips, and dust collection vacuums to heavy-duty smart plugs, allowing you to control workshop power with voice commands or scheduled shutoffs. You can also explore specialized woodworking upgrades, such as building an integrated downdraft sanding table into your folding workbench or installing an overhead retractable pneumatic air hose reel and extension cord reel mounted to ceiling joists. These deliberate technical upgrades ensure your DIY garage storage system remains an adaptable, highly functional, and enjoyable workshop that supports your creative projects for decades to come.
Leave a Reply