Illuminating reception tables with candlelight creates an intimate, romantic atmosphere that remains a timeless staple across popular wedding design boards. This comprehensive guide explores ten distinct concepts for…
Illuminating reception tables with candlelight creates an intimate, romantic atmosphere that remains a timeless staple across popular wedding design boards. This comprehensive guide explores ten distinct concepts for building your own glowing tabletop displays using glass cylinders, tapered tapers, floating wicks, and textured botanical accents. Readers will discover safe fire-management mechanics, proportional elevation formulas, vessel grouping strategies, and styling techniques required to design cohesive centerpieces without hiring an expensive production crew. Designing with candles simplifies wedding reception planning because illuminated wax elements deliver immediate warmth, fill vertical space efficiently, and eliminate the need for costly out-of-season fresh floral imports. You will learn how to stabilize wicks securely inside diverse containers, select melt-resistant wax formulas, balance ambient illumination against venue lighting, and curate harmonious textures across long banquet or circular dining tables. Beyond the wedding celebration, these durable glassware collections and metal candleholders easily transition into permanent home decor, offering lasting utility long after the final dance concludes. Whether your event aesthetic leans toward an uncluttered minimalist style or an opulent, vintage-inspired reception, this tutorial equips you with the actionable inspiration and practical knowledge necessary to execute stunning, reliable event decoration.
Why This Idea Is Trending or Useful
Candle displays dominate modern reception inspiration because they provide remarkable visual drama while solving common logistical and financial hurdles faced by event hosts. Unlike delicate fresh blossoms that wilt under changing temperatures or dry venue conditions, high-quality wax elements maintain their crisp structural integrity throughout multi-hour celebrations. This structural consistency makes candle construction an exceptional creative project for hosts who desire stress-free reception planning. From an economic perspective, candle styling delivers practical budget ideas, allowing decorators to purchase glass vessels and wax pillars in bulk at wholesale rates that drastically undercut fresh floral arrangements. Furthermore, the warm, flickering radiance inherent to open flame introduces a cozy, flattering aesthetic that enhances photographic portraits and softens surrounding architectural lines. Because candle arranging does not require delicate floristry hand mechanics or perishable refrigeration, this medium represents a completely beginner friendly pursuit. Both novice creators and seasoned stylists can systematically map out table runners, heights, and glass diameters well ahead of the event date, guaranteeing a uniform, polished presentation that remains structurally sound and visually balanced all evening.
Materials and Preparation
Proper preparation forms the essential backbone of every dependable tablescape tutorial, requiring a balanced collection of flame-resistant containers, high-grade fuels, and safety accessories. Gather core materials including clear borosilicate glass cylinders in staggered heights, heavy dripless taper candles, soy or paraffin wax pillar candles, floating round wicks, and brass or ceramic candleholders before starting the assembly. Mechanical essentials include liquid candle adhesive putty, long-reach butane lighters, snuffer wicks, floral shear clippers, heat-resistant table pads, and clear water-purification drops to keep submerged displays crystal clear. Prior to your primary build sessions, verify venue fire safety guidelines, confirming whether naked flames are permitted or if open wicks must remain fully recessed two inches below protective glass chimneys. Clean every glass vessel thoroughly using microfiber towels and isopropyl alcohol to eliminate fingerprints, manufacturing film, and dust streaks that become visible once illuminated. Finally, establish a clear assembly schedule by measuring your dining table dimensions, calculating exactly how many candle clusters can safely fit alongside formal tableware, dinner menus, and communal glassware.
1. Floating Candle Cylinders with Submerged Ruscus Sprigs
Step-by-Step Guide
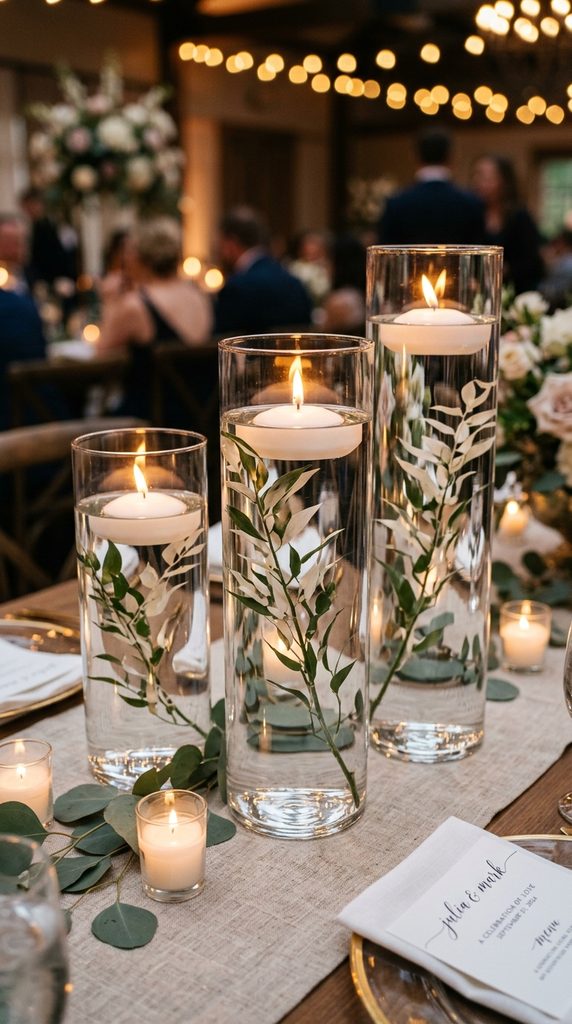
The submerged botanical cylinder display utilizes water refraction and floating wicks to create an ethereal, luminous focal point that spans the center of wedding tables. This concept relies on sets of three varying heights of clear glass hurricane cylinders filled with distilled water, housing crisp stems of preserved Italian ruscus weighted at the bottom. A thick disc-shaped floating candle rests on the water surface of each cylinder, casting light down through the submerged foliage and magnifying the delicate leaf veins. The clear water acts as a natural heat buffer and flame barrier, making this installation exceptionally safe for busy indoor ballrooms and drafty venues alike. By using preserved or faux greenery rather than fresh cut foliage, you prevent water discoloration, trapped air bubbles, and stem decay throughout the duration of the event. The clean, vertical geometry of the glassware brings a crisp modern design sensibility to banquet tables, elevating simple table linens without obstructing eye-level guest conversation across the table.
To build this floating arrangement, begin by selecting sets of clear glass cylinders measuring eight, ten, and twelve inches in height with uniform four-inch diameters. Clean each glass vessel inside and out using a microfiber cloth dampened with glass cleaner, ensuring no lint or grease marks remain on the interior surfaces. Cut stems of preserved bleached or emerald ruscus to lengths that sit two inches below the anticipated water line, attaching a clear glass floral marble or lead fishing sinker to the base of each branch using clear fishing line. Position the weighted stem flat against the bottom of the cylinder, then slowly pour distilled room-temperature water down the tilted inside wall to prevent cloudiness and persistent air bubbles from forming on the leaves. Fill each vase to approximately one and a half inches below the rim, letting the water settle for ten minutes. Gently lower a three-inch circular floating candle onto the water surface, centering the wick carefully to keep it completely dry until lighting time.
2. Multi-Tiered Brass Taper Forest on Raw Silk Runners
How to Create
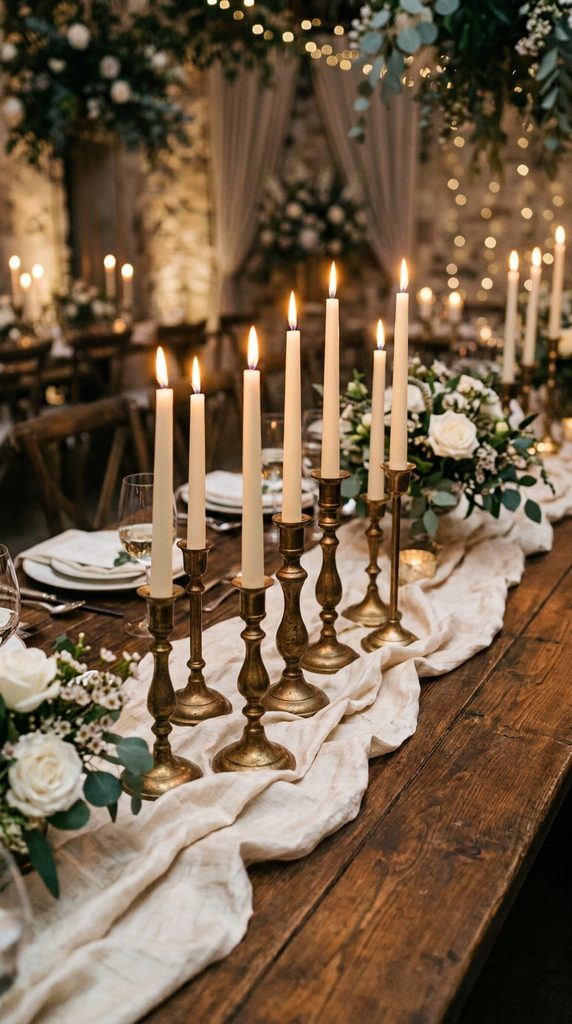
A multi-tiered brass taper forest creates a striking visual rhythm across rectangular dining tables by gathering antique and modern candlesticks into an organic, undulating line. This design concept combines varied warm metallic finishes—such as brushed bronze, polished brass, and aged gold—with tall, slender taper candles in warm neutral hues like ivory, taupe, or soft bone. The varying heights of the brass holders produce a layered visual effect, evoking an enchanted architectural forest that draws the eye down the entire length of the reception space. The slender profile of traditional taper candles preserves generous table space for multi-course meal service, wine glassware, and printed event stationery. When paired with a continuous, pooled runner made of raw textured silk or sheer gauze, the reflective brass surfaces catch the flickering flame light, creating a rich, heirloom aesthetic. This design avoids rigid symmetry in favor of varied clusters, producing a lively, curated ambiance that feels timeless and effortlessly sophisticated.
Assemble this look by sourcing five to seven assorted brass taper holders per six-foot table section, ensuring base diameters vary between three and five inches to provide solid mechanical stability. Clean the candleholder sockets with a soft rag, removing any leftover residue from manufacturing or previous burnings to ensure each stick sits perfectly plumb. Select solid-core, fragrance-free dripless paraffin or soy taper candles measuring ten and twelve inches in height, trimming each wick to exactly one-quarter inch. Secure each taper into its brass socket by applying a pea-sized dab of pliable floral wax putty to the base, pressing the candle down firmly until it stands completely upright without wobbling. Lay down your raw silk runner in loose, organic folds along the table center, nestling the weighted brass bases within the fabric ripples to soften the hard metallic edges. Stagger the taller tapers toward the middle of each cluster while placing shorter stems along the perimeter, maintaining an even balance of negative space between place settings.
3. Pillar Candle Trio Nested in Natural Olive Branch Garland
Execution Process
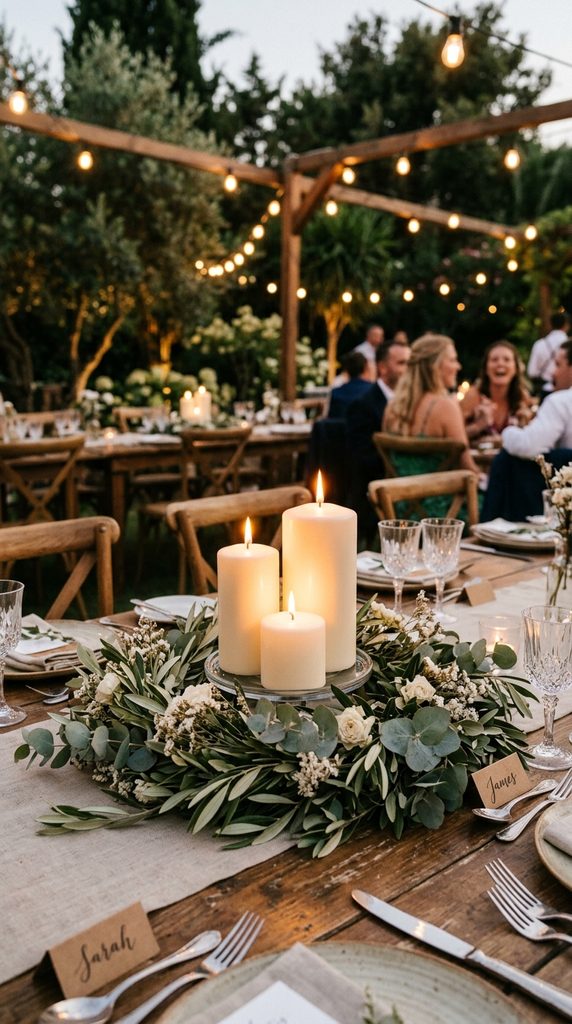
The pillar candle trio nested within olive foliage brings lush Mediterranean texture, rich foliage contrast, and comforting visual weight to celebratory tablescapes. This installation groups three wide-diameter wax pillars of tiered heights within a lush, woven perimeter of preserved olive branches, silver dollar eucalyptus, and dried bay laurel leaves. The substantial presence of three-inch-wide pillar candles anchors the floral wreath, providing a solid, grounded counterpoint to lighter hanging decor or tall reception ceilings. The matte, wax surfaces of the pillars absorb and reflect light gently, casting a continuous, warm glow across the surrounding silvery-green foliage. Because preserved foliage retains its pliability without requiring water sources, the green ring remains vibrant throughout the night without risk of drying out into brittle, brown waste. This classic style works well within rustic vineyard barns, outdoor courtyard dinners, and classic ballroom settings seeking a balance of structured geometry and organic romance.
Begin by selecting thick, pillar candles measuring four, six, and eight inches in height, all sharing a consistent three-inch diameter for visual harmony. Place a protective, heat-resistant clear glass plate or slate disc onto the middle of the table surface to shield the underlying table linens from heat and accidental wax drips. Arrange the three pillars in a close triangular formation on the plate, rotating them so the pre-trimmed braided cotton wicks align evenly. Take a length of flexible preserved olive branch garland and wind it carefully around the outer perimeter of the glass base, creating a thick, multi-layered foliage nest. Weave secondary sprigs of seeded eucalyptus or small white strawflowers into the leafy olive framework, using thin floral wire to bind the stems into a cohesive circular structure. Confirm that all leaves, twigs, and fine botanical fronds sit at least three inches away from the active candle tops to eliminate any potential fire hazard.
4. Architectural Ribbed Glass Chimneys with Modern Black Tapers
Setup Method
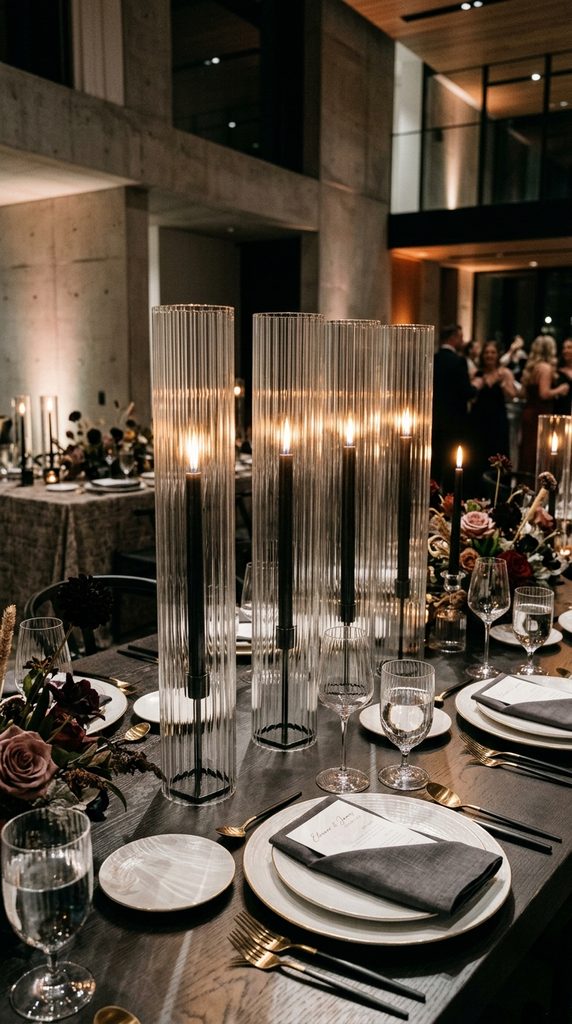
An architectural display featuring fluted hurricane chimneys and bold black taper candles introduces a daring, contemporary statement that transforms traditional wedding lighting into graphic fine art. This style relies on the contrast between translucent, vertically fluted glass chimneys and deep, matte-black beeswax tapers. The textured ridges along the cylindrical glass bend and refract the flame, casting linear geometric light patterns across flat plates, cutlery, and linens. Black tapers add a clean vertical line that grounds light pastel or stark monochrome reception palettes, preventing neutral tables from appearing washed out or flat in flash photography. The protective glass sleeves act as an effective barrier against air drafts from indoor cooling ducts or outdoor breezes, ensuring the tapers burn down smoothly, slowly, and evenly. This edgy presentation suits modern industrial loft spaces, minimalist art gallery celebrations, and urban architectural venues seeking a clean, high-fashion aesthetic.
To execute this installation, procure sets of fluted or ribbed glass hurricane sleeves measuring twelve to fourteen inches in height with open ends at top and bottom. Pair these with low, heavy-base black metal or concrete candle cups that fit securely beneath the inner diameter of the glass shields. Insert a ten-inch matte-black taper candle into each base holder, using an adhesive candle-grip dot to lock the wax base rigidly upright. Lower the ribbed glass cylinder over the taper, centering the sleeve so the flame will burn equidistant from the glass walls. Align three to five of these fluted columns in a clean, equidistant line down the center of each long table, creating a structured visual boundary that complements modern table geometry. Measure the clearance between the wick tip and the open top of the glass, confirming that at least three inches of glass shield extends above the unlit wick for safe draft protection.
5. Terracotta Saucers with Clustered Hand-Poured Beeswax Pillars
How to Make
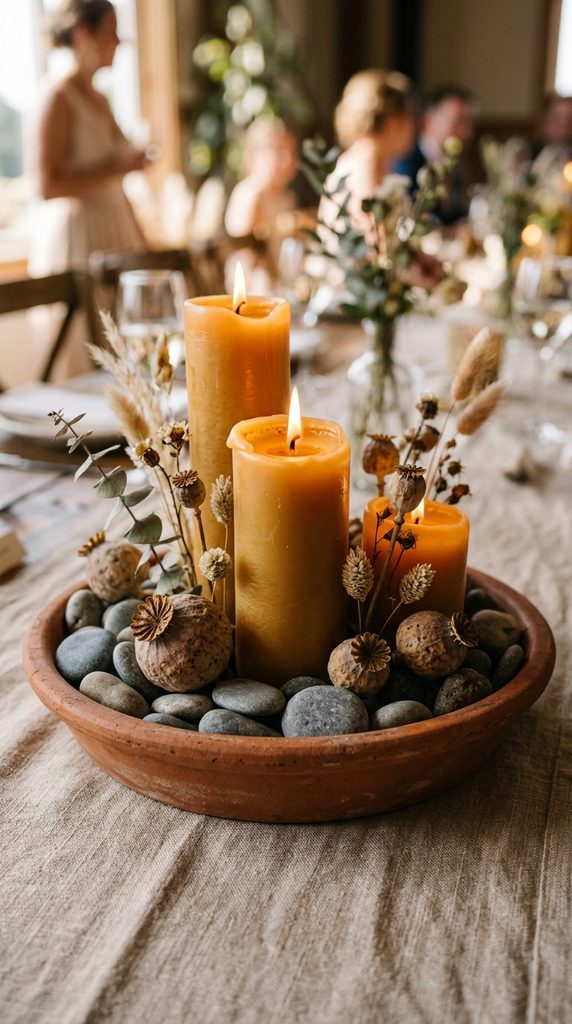
A clustered terracotta saucer display combines the warmth of earthen ceramics with the natural, golden-yellow richness of raw beeswax pillars. This rustic design features broad, low-rimmed Italian terracotta plant saucers filled with grouped beeswax pillars of varying widths and heights, complemented by smooth river stones and dried poppy pods. The unglazed, porous finish of the terracotta pottery absorbs light softly, offering an earthy, artisanal base that complements linen runners, handmade pottery tableware, and wood furnishings. Pure beeswax burns with a naturally brighter, warmer color spectrum than standard paraffin, releasing a very faint, pleasant honey aroma that enriches the dining environment without clashing with food courses. Grouping several substantial pillars inside a single saucer contains any accidental dripping wax, ensuring event furniture remains completely protected throughout the reception. This sustainable, handmade concept speaks directly to couples seeking warm harvest tones, natural crafting materials, and grounded, artisanal reception decoration.
Begin by selecting an eight-to-ten-inch shallow unglazed terracotta saucer, wiping down the interior clay surface with a dry cloth to clear away loose potting dust. Choose three to four solid raw beeswax pillar candles featuring staggered heights of three, five, and seven inches, with widths varying between two and three inches. Warm the bottom edge of each beeswax candle briefly with a lighter flame to slightly soften the wax, then press the base firmly onto the floor of the terracotta saucer to lock it into place. Fill the empty negative space surrounding the wax bases with smooth, clean river pebbles or tumbled grey stones, which provide ballast and hold the pillars steady. Intersperse decorative dried botanicals—such as small dried nigella pods, dehydrated orange slices, or woody pine twigs—among the base stones to add natural texture. Double check that every wick is straight and trimmed to one-quarter inch, ensuring a clean, smokeless initial burn when tables are lit before dinner.
6. Geometric Metallic Lanterns with Chunky Textured Candles
Step-by-Step Guide
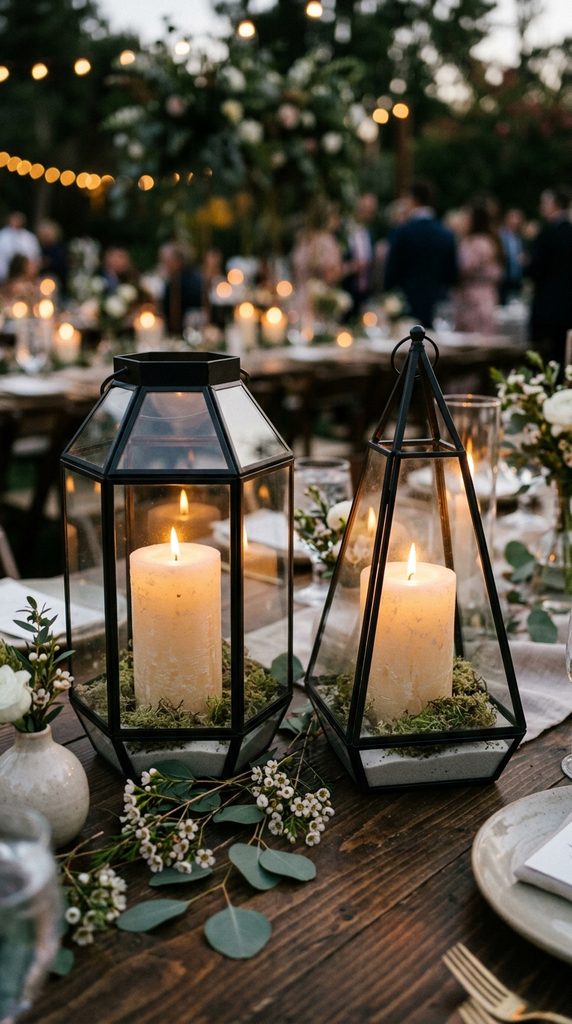
Geometric metal lanterns filled with oversized, textured candles deliver an architectural, multi-faceted look that suits both outdoor garden lawns and indoor industrial spaces. This centerpiece design incorporates black iron, brushed gold, or copper-framed lanterns with clean glass panes, housing broad, textured rustic pillar candles on beds of moss or sand. The faceted geometric framework of the lantern creates an interesting interplay of sharp angles and soft flickering illumination, casting decorative shadows across table settings. Lanterns offer superior structural protection, making them ideal for breezy outdoor wedding receptions where exposed candle wicks would blow out quickly. By selecting pillar candles with rustic, distressed, or ribbed surface treatments, the design avoids looking like standard store fixtures, projecting a thoughtful, curated feel. This adaptable, durable display also serves as an easy project for wedding party members to transport from the ceremony aisle directly onto dining tables for the reception.
Begin by selecting two geometric glass lanterns of complementary shapes and heights—such as a fourteen-inch hexagonal lantern paired with a ten-inch pyramid lantern—for each guest table. Open the hinged glass access doors and thoroughly wipe both sides of every glass pane using an anti-static cloth to remove lint and smudges. Cover the interior floor of each lantern with a one-inch layer of fine white quartz sand, which creates a stable, level bed while catching any errant wax drips during the reception. Press a broad, textured four-inch-wide ivory pillar candle into the sand bed, wiggling the base down firmly until the candle stands perfectly vertical and stable. Arrange small clusters of preserved reindeer moss or dried lichen around the perimeter of the candle base, keeping the greenery pressed low against the sand. Fasten the lantern door shut securely, positioning the paired lanterns at a thirty-degree offset angle on the table to create dimensional depth and architectural interest.
7. Mirrored Tray Reflection with Votive Cups and Tea Lights
Execution Process
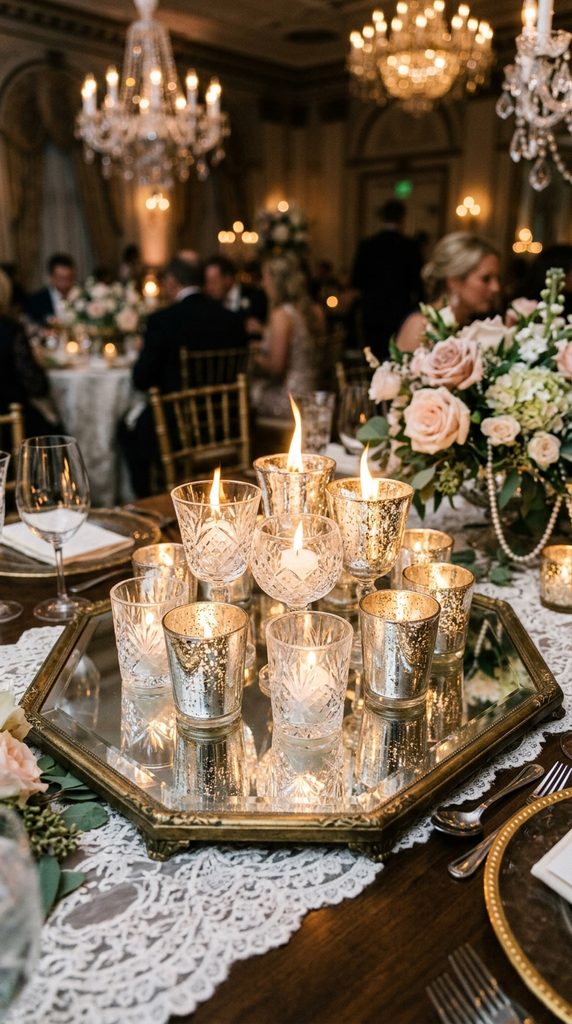
A mirrored tray centerpiece maximizes light output by multiplying individual candle flames across an expansive, highly reflective horizontal plane. This design concept places a vintage-styled bevel-edged mirror tray or antiqued silver platter in the center of the table, holding an assortment of faceted crystal votive cups, mercury glass tea light holders, and smooth glass globes. As the numerous small candles flicker, the mirrored glass reflects the points of light upward, producing an illusion of endless floating flames that makes spaces feel bright and festive. This arrangement is particularly effective in windowless reception ballrooms, evening winter celebrations, or spaces with low ceilings where maximizing ambient light is a priority. The low profile of votive cups leaves cross-table sightlines completely open, encouraging lively dinner conversation between guests seated on opposite sides. The layered reflections off patterned cut crystal and mercury finishes introduce rich, vintage-inspired elegance that elevates simple linen napkins and classic tableware.
To assemble this reflective display, begin by setting an octagonal or rectangular mirrored tray with a beveled safety edge onto the center of each dining table. Clean the mirror surface using streak-free glass cleaner and a microfiber towel, removing all dust and fingerprints before arranging any glassware. Gather a curated collection of twelve to fifteen assorted glass votive and tea light holders per tray, mixing mercury silver finishes with clear hobnail and cut-crystal patterns. Insert a clear-cup soy tea light or heavy eight-hour wax votive into each holder, confirming that wicks sit centered within their cups to avoid uneven glass heating. Group the glass holders onto the mirror tray in small, dense clusters rather than spacing them out in rigid grids, leaving irregular pockets of reflective surface open to bounce the light. Light the tea lights sequentially using a long-reach lighter, starting from the center of the tray and working outward to avoid burning your sleeves.
8. Sand-Cast Ceramic Bowls with Multiple Floating Wax Wicks
How to Make
A wide sand-cast ceramic bowl featuring multiple floating wicks offers a sculptural, artisan-inspired tablescape that feels like a custom pottery installation. This centerpiece concept utilizes a wide, low-profile stoneware bowl finished in a textured sand, bone, or matte charcoal glaze, filled with water and dotted with small floating wicks or disc candles. The contrast between rough, handmade ceramic surfaces and still water creates a Zen-like centerpiece that anchors circular dining tables gracefully. Rather than relying on a single central flame, multiple floating wicks drift across the water surface, creating moving reflections that shift gently as air moves throughout the room. The low, horizontal format keeps the entire composition below twelve inches, preserving line-of-sight across table settings. This design works exceptionally well for modern, organic, or fine-art weddings where tactile handmade elements and subtle earthy palettes take center stage over ornate decorations.
Begin by selecting a shallow, wide-rimmed ceramic or stoneware bowl measuring twelve to fourteen inches in diameter with a watertight, glazed interior basin. Place the bowl firmly onto the center of the dining table, setting it atop a round cork pad or felt runner to protect the table surface from rough ceramic bottoms. Fill the vessel two-thirds full with distilled water, adding two drops of clear water conditioner to prevent mineral haze and settle the surface tension. Prepare six to eight small floating wax discs or natural cork-and-wax floating wicks, trimming their wicks to a uniform three-sixteenths of an inch. Carefully place each floating candle onto the water surface, spacing them evenly across the bowl to prevent them from clustering against the outer ceramic rim. Add a few floating botanical elements, like single dried camellia blossoms or olive leaves, to float alongside the candles without touching the active flames.
9. Monochromatic White Altar Clusters with Varied Diameter Pillars
Setup Method
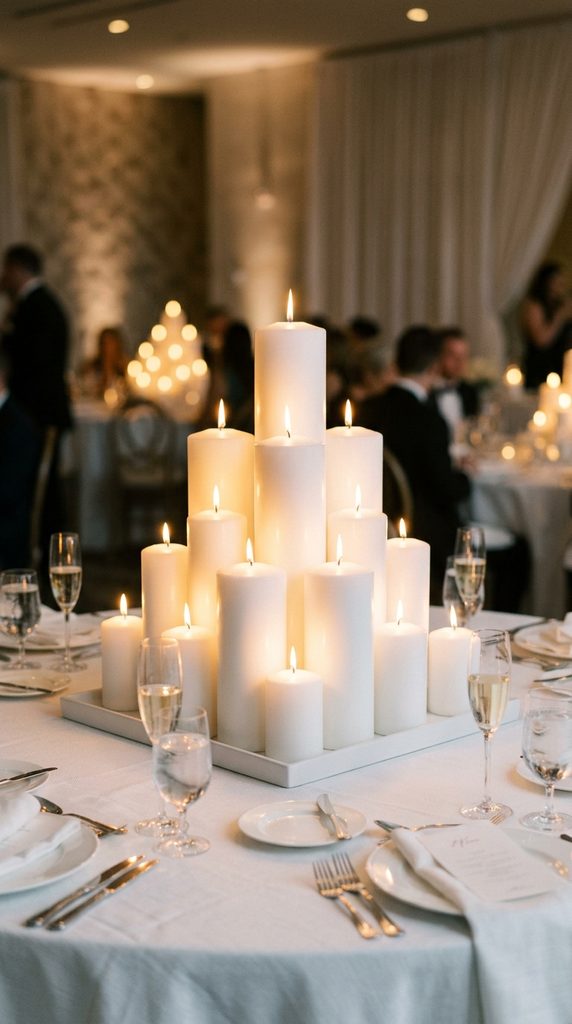
The monochromatic white altar cluster creates an opulent, clean visual display inspired by grand architectural installations, using only white wax pillars of diverse dimensions. This look brings together fifteen to twenty pure white pillar candles of varied heights and widths, arranged closely together directly on the table center or within a low, custom lacquer tray. The impact comes from the sheer density and volume of solid white wax, forming a unified installation that feels sculptural, modern, and striking. By omitting contrasting colored flowers, colorful ribbons, and metallic accents, the pure white palette creates a calming visual focus that coordinates effortlessly with crisp white tablecloths and modern glassware. The varying burn rates and heights of the grouped pillars produce a tiered topography of living light as the evening progresses, offering an evolving display that looks lovely throughout the celebration.
To construct this high-density centerpiece, source sixteen high-quality, dripless solid paraffin or soy pillar candles per table, varying heights from three to twelve inches and diameters from two to four inches. Lay down a low white acrylic or powder-coated metal tray along the table center to collect any accidental wax runoff and define the boundary of the installation. Arrange the tallest candles in the center of the tray to form a sturdy architectural spine, securing their bases to the tray surface with double-sided candle adhesive tabs. Surround these tall center pillars with medium-height candles, finishing the outer edges with the shortest, widest three-inch pillars to create a gently sloping pyramid profile. Ensure a uniform one-inch buffer space remains between each candle body to prevent adjacent heat build-up from causing premature melting or wax wall collapse. Light the candles twenty minutes before guest arrival to establish an even, melted wax pool across the tops for photos.
10. Antiqued Silver Candelabras with Trailing Ivy Stems
Step-by-Step Guide
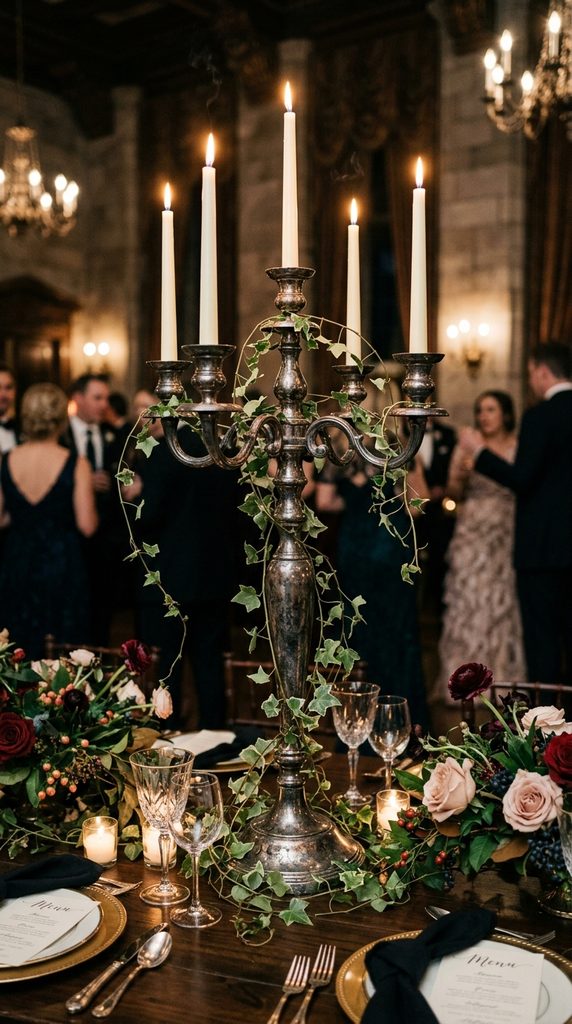
An antiqued silver candelabra centerpiece brings dramatic vertical height, historical romance, and timeless elegance to formal wedding tablescapes. This concept features a tall, three- or five-arm vintage silver-plated candelabra elevated twenty-four to thirty inches above the table surface, supporting long taper candles and draped with real greenery. By elevating the candle flames well above eye level, this design leaves table surfaces clear for chargers, bread baskets, and glassware, while preserving sightlines across the table. Slender, pliable stems of English ivy, smilax vine, and dried sweet pea tendrils wrap around the silver stem and arms, softening the cool metal with rich, living movement. The aged, oxidized patina of antique silver reflects candlelight with a subtle, soft glow, lending an authentic heirloom quality to ballroom or estate garden celebrations. This design bridges formal tradition with relaxed botanical accents, producing a photo-ready focal point that commands attention.
To execute this classic candelabra arrangement, source a sturdy five-arm silver-plated candelabra that stands between twenty-four and twenty-eight inches tall, ensuring the weighted base sits flat without tipping. Polish the silver surface lightly with a polishing cloth to bring out highlights while preserving the dark patina within the ornate engraved details. Insert five twelve-inch dripless taper candles into the arm sockets, securing each base with a strip of adhesive floral wax tape to keep them standing plumb. Secure a small ring of floral mechanic foam or an aluminum wire armature around the central stem just below the branching arms, wrapping it tightly with green florist tape. Weave stems of wired English ivy or fresh smilax through the mechanical framework, winding the vines down the vertical stem and allowing delicate tendrils to trail outward along the horizontal arms. Check that no trailing leaves or tendrils cross directly above or within three inches of any candle cup before lighting.
Common Beginner Mistakes and How to Avoid Them
Designing a candle-based centerpiece requires close attention to flame safety, room drafts, and wax mechanics that differ from standard floral arranging. The most frequent mistake beginners encounter is purchasing inexpensive, non-dripless tapers or novelty candles containing low-melting-point paraffin. These inferior waxes melt unevenly in the presence of minor room drafts, sending hot wax spilling across fine linen tablecloths and creating unsightly messes. Always invest in certified dripless, solid-core wax or dense beeswax pillars, testing a sample burn in your venue environment prior to the wedding date. Another common error is underestimating the effect of overhead air conditioning ducts, ceiling fans, or open windows on flame stability. Strong drafts force flames to flicker aggressively, causing smoke, black soot deposits on glass chimneys, and accelerated burn rates that exhaust candles before the reception ends. Guard against drafts by selecting glass hurricanes that extend at least two to three inches above the active wick. Additionally, never crowd candle wicks too close together in multi-pillar clusters; candles placed within two inches of each other radiate heat laterally, softening adjacent wax walls and causing unexpected blowouts. Keep adequate space between individual containers, use reliable wick adhesive to stabilize bases, and ensure your candle displays remain safe, clean, and beautiful all night.
Practical Tips for Better Results
Achieving professional, gallery-quality results with candle wedding centerpieces comes down to careful preparation, proper wick maintenance, and thoughtful lighting execution. Begin by trimming every candle wick to exactly one-quarter inch using dedicated wick trimmers before the event begins. Wicks left at factory lengths burn too hot, creating tall, unstable flames and smoking wicks that generate unsightly soot inside protective glass chimneys. To make lighting dozens of tables quick and safe on the wedding day, supply your setup team with extended-reach butane lighters or extra-long wooden fireplace matches, rather than small disposable pocket lighters that can easily burn fingers. If you are styling submerged botanical arrangements with floating candles, use distilled or demineralized water rather than hard tap water. Tap water contains dissolved minerals that create cloudy water and cling to submerged leaves as small bubbles, diminishing the crystal-clear effect you want in event photos. When securing taper candles inside holders, wrap the base in a small strip of textured floral wax tape or use a drop of melted wax to anchor the candle securely upright. Finally, assign a responsible day-of coordinator or trusted friend to inspect tables fifteen minutes before reception doors open, refreshing any burnt wicks and lighting the display smoothly.
Styling, Presentation, or Organization Ideas
The overall visual success of a candle centerpiece depends on how thoughtfully it integrates with surrounding reception table elements, including table linens, place settings, and printed stationery. When styling long banquet tables, avoid creating isolated, disconnected clusters; instead, establish a continuous visual pathway down the table by weaving low votives, loose greenery, or fabric runners between taller candle groupings. Pair the warm glow of candlelight with contrasting textured surfaces—such as rough linen, raw silk, matte ceramic chargers, or polished crystal stemware—to add depth and visual interest to your tablescape. Incorporate subtle variations in height across each table setting to create an undulating skyline of light that feels balanced, avoiding walls of flame that block conversation between seated guests. For circular guest tables, keep the overall footprint compact and centered, ensuring that plates, wine glasses, and family-style serving platters have plenty of breathing room. When organizing multi-table setups, pack your glassware and candle elements into labeled plastic storage crates organized by table number, keeping corresponding holders, tapers, and safety plates grouped together to streamline venue setup on the wedding morning.
Budget or Time Planning
Creating your own candle wedding centerpieces yields significant cost savings compared to traditional floral arrangements, but keeping the project stress-free requires organized purchasing timelines and methodical assembly phases. Begin sourcing your glassware, candleholders, and bulk wax three to six months prior to the wedding date to take advantage of wholesale quantity discounts and avoid expedited shipping fees. Because glass containers and wax candles have an indefinite shelf life, you can purchase supplies gradually across multiple pay cycles, spreading event costs comfortably rather than facing an enormous last-minute bill. Schedule dedicated prep sessions two to three weeks before the wedding to wash all glass cylinders, inspect candleholder sockets, and pre-trim candle wicks to their ideal burning lengths. Calculate your wax requirements carefully, always ordering a fifteen percent overage to accommodate broken glass during shipping, testing sample burns, and providing backup candles for extended reception timelines. Establish an assembly-line packing routine when preparing storage crates: wipe down vessels, affix safety base pads, and inventory lighters and snuffers together so your setup team can execute the final tabletop placement efficiently on the big day.
Creative Expansion and Advanced Inspiration
Once you master fundamental candle arranging and safety techniques, you can expand these principles into larger reception installations and coordinated decor elements throughout your venue. Use identical glass hurricane cylinders and chunky pillar candles to illuminate the primary ceremony aisle, creating a warm, glowing pathway that can be repurposed around the reception dance floor or sweetheart table after the vows. Integrate subtle scents thoughtfully by blending unscented dining table candles with lightly fragranced botanicals—like fresh eucalyptus, rosemary, or dried lavender sprigs—tucked safely into the outer greenery runners away from direct flames. You can also produce matching, miniature versions of your main candle displays to adorn cocktail hour high-top tables, bar stations, and guest book tables, weaving a cohesive, romantic lighting thread across every corner of your venue. After the wedding festivities wrap up, clean and repurpose the glassware and brass holders as permanent, functional home decor accents or offer complete sets as meaningful gifts to family and wedding party members. The classic appeal of candlelight turns your wedding decor investment into an enduring source of warm memories and home decoration for years to come.