Vintage wedding aesthetics remain a cornerstone of bridal styling, offering timeless elegance, romantic textures, and nostalgic charm. Incorporating vintage lace into wedding centerpieces transforms everyday glass vessels, wooden elements, and floral arrangements into bespoke tabletop features. This comprehensive guide details ten distinct, practical centerpiece concepts centered on repurposed, heirloom, and modern reproductions of vintage lace trims and doilies. Readers will learn how to apply lace across diverse mediums, including aged glassware, structural wood, metallic lanterns, and organic botanical displays. Utilizing lace in wedding tablescapes provides practical utility by softening table silhouettes, diffusing ambient candlelight, and establishing cohesive visual narratives across sprawling event venues. Beyond aesthetic appeal, crafting lace centerpieces represents a realistic, budget-friendly approach to event styling, allowing planners and couples to achieve high-end artisanal decor without exorbitant floral expenses. Each design provides actionable guidance regarding adhesive compatibility, tension control, dimensional layering, and spatial balance. By understanding how to manipulate delicate textiles alongside complementary materials, crafters can produce durable, sophisticated reception displays that honor classic bridal heritage while harmonizing effortlessly with contemporary event design standards.
Why Vintage Lace Styling Is Trending
The resurgence of vintage lace wedding decor across modern Pinterest ideas stems from the growing preference for sustainable, heirloom-inspired, and personalized celebrations. Modern couples frequently seek alternatives to generic, single-use reception decor, opting instead for repurposed textiles and upcycled vessels that carry character and authenticity. Lace elements provide remarkable practical value; the intricate openwork patterns naturally filter light, creating warm, diffused illumination across reception dining tables. From an event design perspective, lace bridges rustic barn settings, historic estate ballrooms, and outdoor garden receptions, adapting easily to bohemian, Victorian, or minimalist styling themes. The DIY appeal of lace crafting is substantial, offering accessible techniques that require no formal floral or woodworking background. Beginners can quickly master basic decoupage, wrapped borders, and suspended textile installations using standard craft tools. Because vintage doilies and yardage can be collected affordably from thrift stores, estate sales, or family collections, lace projects deliver luxurious texture at an economical price point, making them an essential staple for stylish event planners.
Materials and Preparation for Lace Centerpieces
Executing refined lace centerpieces requires careful collection of compatible materials, proper adhesive selection, and thoughtful pre-event preparation. The foundational supplies include vintage crochet doilies, antique lace ribbons, Guipure lace trims, and delicate Chantilly borders, alongside glass cylinders, amber apothecary jars, footed compotes, and weathered wooden foundations. Essential tools comprise fabric-specific shears that prevent edge fraying, matte decoupage adhesives, high-temperature hot glue applicators, natural jute twine, and measuring tape for accurate container wrapping. Preparation begins with laundering authentic vintage textiles: soak older lace pieces in warm water with gentle oxygen-based cleaners to remove age spots, then press them flat with a low-heat steam iron to restore crisp openwork motifs. Planning considerations must account for venue regulations, particularly concerning open flame; battery-operated LED pillars or fairy light strands must be selected if naked flames are prohibited inside decorated glassware. Pre-measuring vessel circumferences and pre-cutting lace panels in uniform batches ensures consistency across dozens of tables, preventing assembly delays during the final countdown to the celebration.
Idea 1: Frosted Amber Glass and Lace Lanterns
How to Create
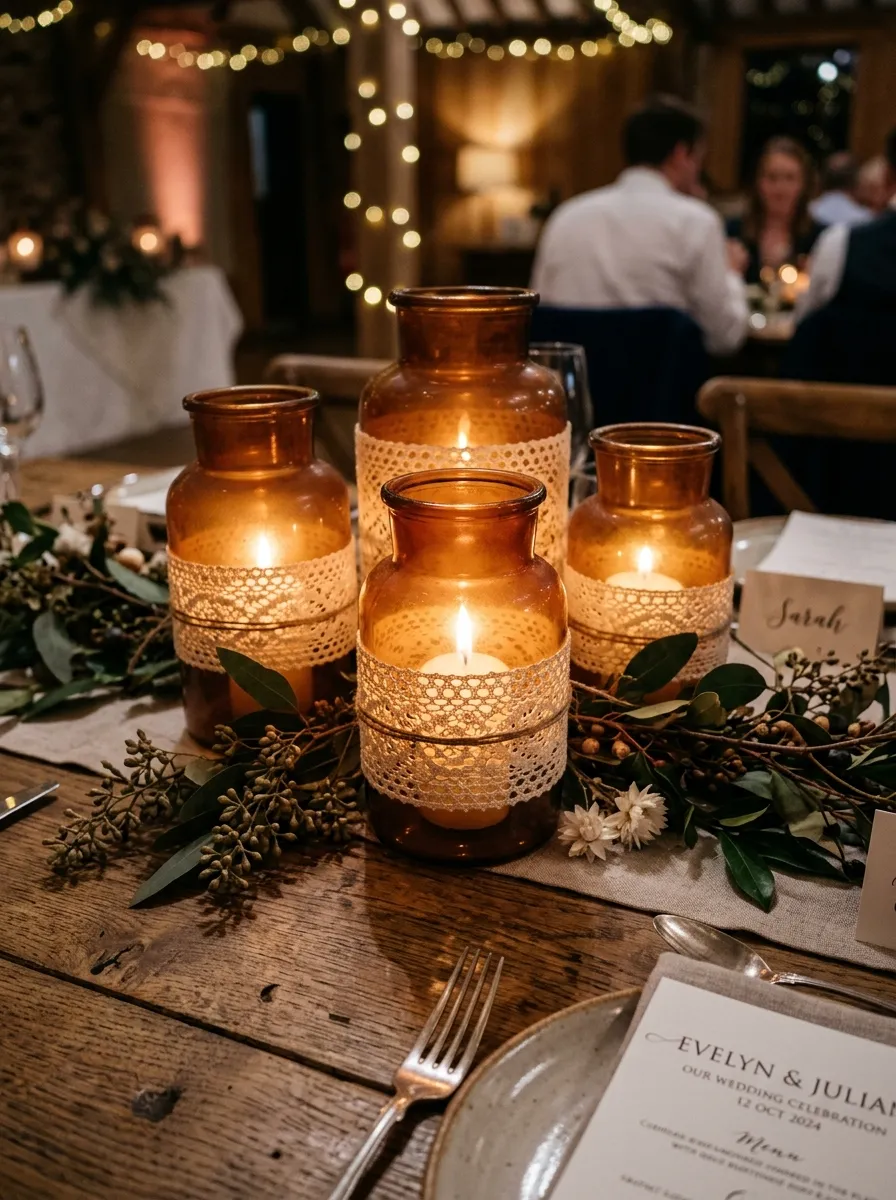
Frosted amber glass combined with antique ivory lace creates a warm, atmospheric centerpiece that casts intricate lace shadow patterns across reception tables. This concept pairs deep golden-amber bottles, apothecary jars, or textured glass jugs with wide bands of cotton crochet lace wrapped around the midsection. The natural translucency of amber glass softens artificial LED glow, producing an intimate, candlelit ambiance reminiscent of historic countryside gatherings. The contrast between smooth, glossy glass and raised, tactile textile motifs provides rich visual dimension without requiring dense floral arrangements. Small botanical sprigs, such as dried seeded eucalyptus, baby’s breath, or pale blush ranunculus, can be inserted into the narrow bottle necks to introduce height and natural movement. This design works exceptionally well for autumn and twilight receptions, where low ambient lighting accentuates the detailed openwork of the lace patterns. The finished vessels function as standalone accents on small bistro tables or as cohesive clusters of three on large banquet surfaces.
To construct these lanterns, thoroughly clean vintage amber glass jars using isopropyl alcohol to eliminate surface oils, dust, and fingerprint residue. Measure the circumference of the widest section of each vessel and cut matching lengths of wide cotton crochet lace, adding a five-millimeter overlap for secure seaming. Apply a thin, uniform line of clear craft adhesive or high-tack fabric glue along the back edge of the lace trim, wrapping the textile snugly around the glass cylinder while keeping horizontal tension completely straight. Press the overlapping seam firmly against the glass, securing it temporarily with a small piece of painter’s tape until the bond cures fully. Insert a long-burning LED tealight or a string of warm white micro-fairy lights powered by a concealed coin battery into the interior cavity. Finish the neck of the jar by wrapping fine natural jute cord three times around the threaded lip, securing the cord with a discreet square knot and trimming the raw ends flush.
Idea 2: Repurposed Doily Cloche Terrarium
Step-by-Step Guide
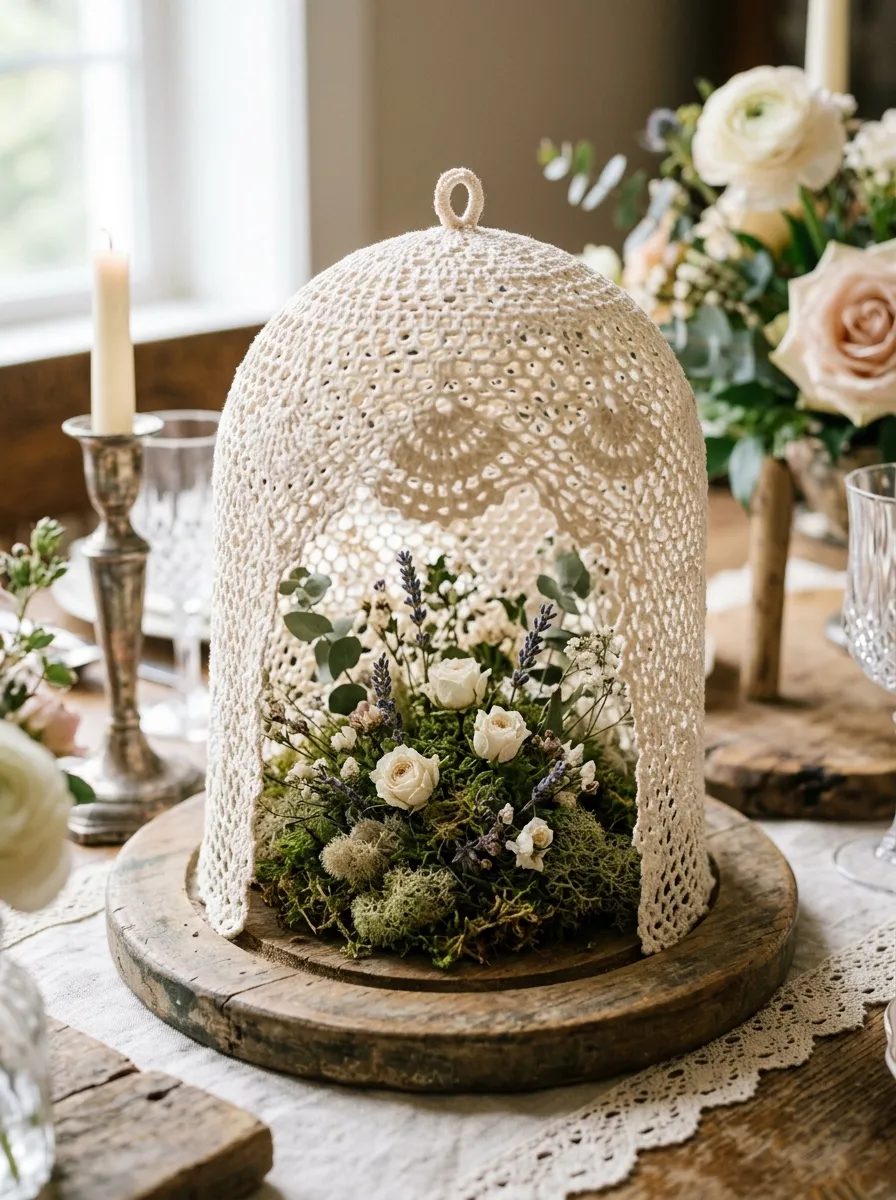
The repurposed doily cloche terrarium transforms flat vintage crochet rounds into architectural, three-dimensional domes that encase delicate botanical arrangements. This design involves stiffening antique lace doilies around curved molds, producing freestanding textile cloches that rest over small floral or candle foundations. The hardened openwork lace allows viewers to observe the natural elements preserved beneath, creating an intriguing layering of organic and textile textures. Inside the dome, a compact display of preserved moss, polished river stones, and delicate dried blooms—such as helichrysum, lavender, or miniature white roses—provides a miniature landscape that requires no watering. The pale cream lace dome softens the display, adding an antique heirloom aura suitable for vintage garden weddings and Victorian-inspired table settings. Because the materials are completely dried and cured, these cloches can be manufactured weeks in advance, eliminating day-of-event assembly stress.
To make the stiffened lace cloches, select circular vintage doilies measuring between eight and ten inches in diameter with open, geometric lace patterns. Coat each doily thoroughly in a bowl filled with liquid fabric stiffener or diluted PVA adhesive, ensuring every cotton fiber is saturated. Stretch the damp doily over a balloon or an inverted glass bowl lined with plastic wrap, smoothing out folds to keep the lace pattern centered and taut. Allow the lace to dry undisturbed for twenty-four hours in a well-ventilated room until the textile becomes rigid and completely firm to the touch. Gently deflate the balloon or remove the inner mold, carefully lifting the dome free. For the centerpiece base, arrange a bed of preserved sheet moss and dried floral elements atop a circular wooden disc or vintage ceramic saucer. Lower the stiffened lace dome over the botanical arrangement, securing the perimeter with four tiny drops of hot glue to prevent accidental displacement during the reception dinner.
Idea 3: Weathered Timber and Lace Table Runner
Execution Process
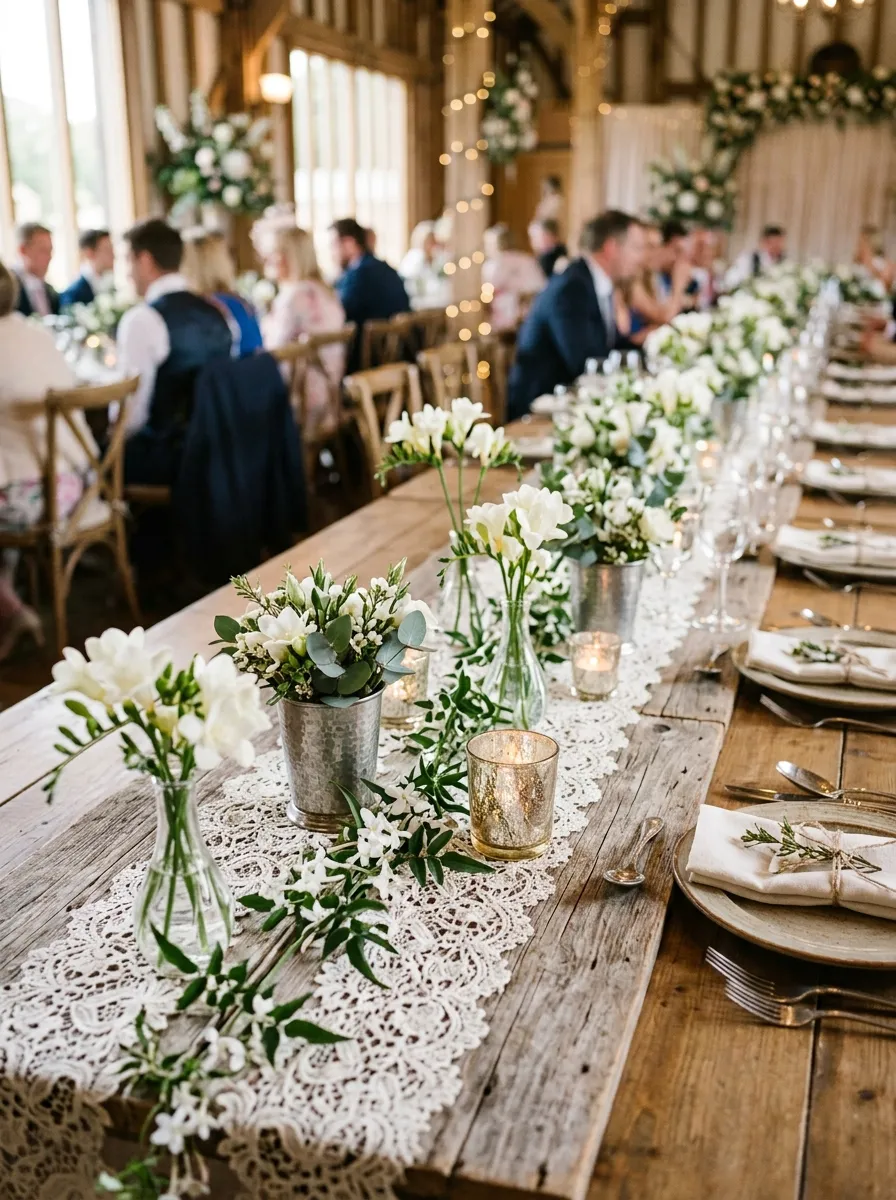
The weathered timber and lace table runner blends rugged, rustic architectural elements with soft, feminine textiles along long communal banquet tables. This concept features a continuous runner constructed from reclaimed wooden planks or whitewashed cedar laths, overlaid with an unbroken panel of vintage floral Guipure lace. The rough, organic grain of the timber shows through the negative spaces of the lace openwork, establishing an appealing dialogue between hard and soft textures. Low floral vessels, including hammered pewter cups, clear bud vases, and silver mercury glass votives, are set directly atop the timber-lace runner at staggered intervals. This arrangement solves the problem of tall, obstructive centerpieces by keeping all decorative elements below eye level, fostering effortless conversation among seated guests. The structured runner also provides a stable anchor for scattered greenery garlands, such as silver dollar eucalyptus and olive branches, preventing loose leaves from intruding onto personal dining settings.
Begin by selecting flat, kiln-dried pine or reclaimed barn wood boards measuring eight inches wide, cutting them to match the length of your banquet tables. Lightly sand the timber surfaces to remove splinters, then apply a semi-transparent white wax or driftwood gray stain to accentuate the natural grain patterns. Once dry, roll out an uncut length of high-contrast floral lace runner measuring ten inches wide, centering the textile along the length of the wooden plank so two inches of lace drape gracefully over each end. Secure the lace along the underside edges of the wood at eighteen-inch intervals using a heavy-duty staple gun, maintaining gentle lengthwise tension to avoid ripples. Position the assembled runner down the table center, anchoring each end with a heavy glass pillar candle holder. Distribute low bud vases filled with white freesia, garden roses, and trailing jasmine vines along the lace surface, interspersing them with ribbed glass votive cups containing unscented white candles.
Idea 4: Lace Decoupage Mason Jar Trios
How to Make
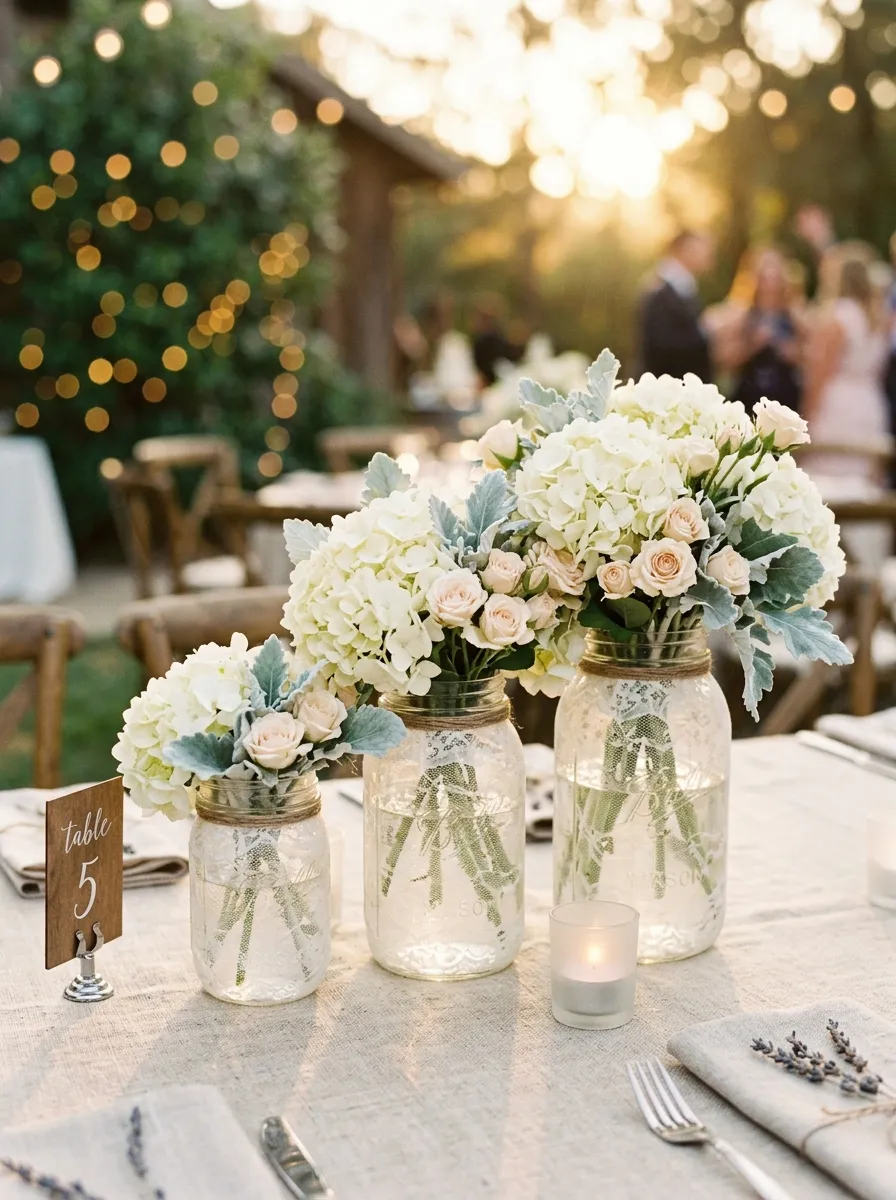
Lace decoupage mason jar trios provide an accessible, high-impact method for transforming standard utilitarian glass containers into charming vintage vases. By adhering fine Chantilly or Nottingham lace directly to clear glass with a clear-drying matte medium, the containers gain an etched-glass appearance with tactile relief. Grouping the jars in clusters of three—utilizing varying heights such as pint, quart, and half-gallon vessels—creates dynamic visual rhythm on round banquet tables. The decoupaged surface diffuses natural daylight while providing an opaque backdrop that conceals the stems of fresh flowers inside the water bath. These vessels are typically filled with romantic, loose floral arrangements featuring ivory hydrangeas, pale peach spray roses, white lisianthus, and trailing dusty miller. The clean, understated aesthetic makes this project exceptionally versatile, coordinating seamlessly with casual backyard celebrations, rustic barn receptions, or refined country club dining rooms without requiring complex floral mechanics.
To prepare the jars, wash clear glass canning jars thoroughly and wipe the exteriors down with lint-free cloths dipped in white vinegar. Cut panels of fine vintage lace yardage to match the height and circumference of each jar, ensuring the floral motifs align attractively across the vessel body. Using a wide foam brush, apply a generous, even coat of matte decoupage medium over the glass surface, working around the perimeter in three-inch sections. Carefully smooth the dry lace panel over the wet medium, pressing outward from the center with your fingers to eliminate air bubbles and ensure full textile contact. Apply a second protective topcoat of decoupage medium directly over the outer lace surface, paying special attention to sealing raw cut edges along the top and bottom seams. Allow the vessels to cure completely for twelve hours until the adhesive turns clear and matte. Fill each cured jar with water and floral preservative, then insert loosely gathered floral stems arranged in an asymmetrical, garden-style silhouette.
Idea 5: Ornate Vintage Mirror and Lace Pedestal
Setup Method
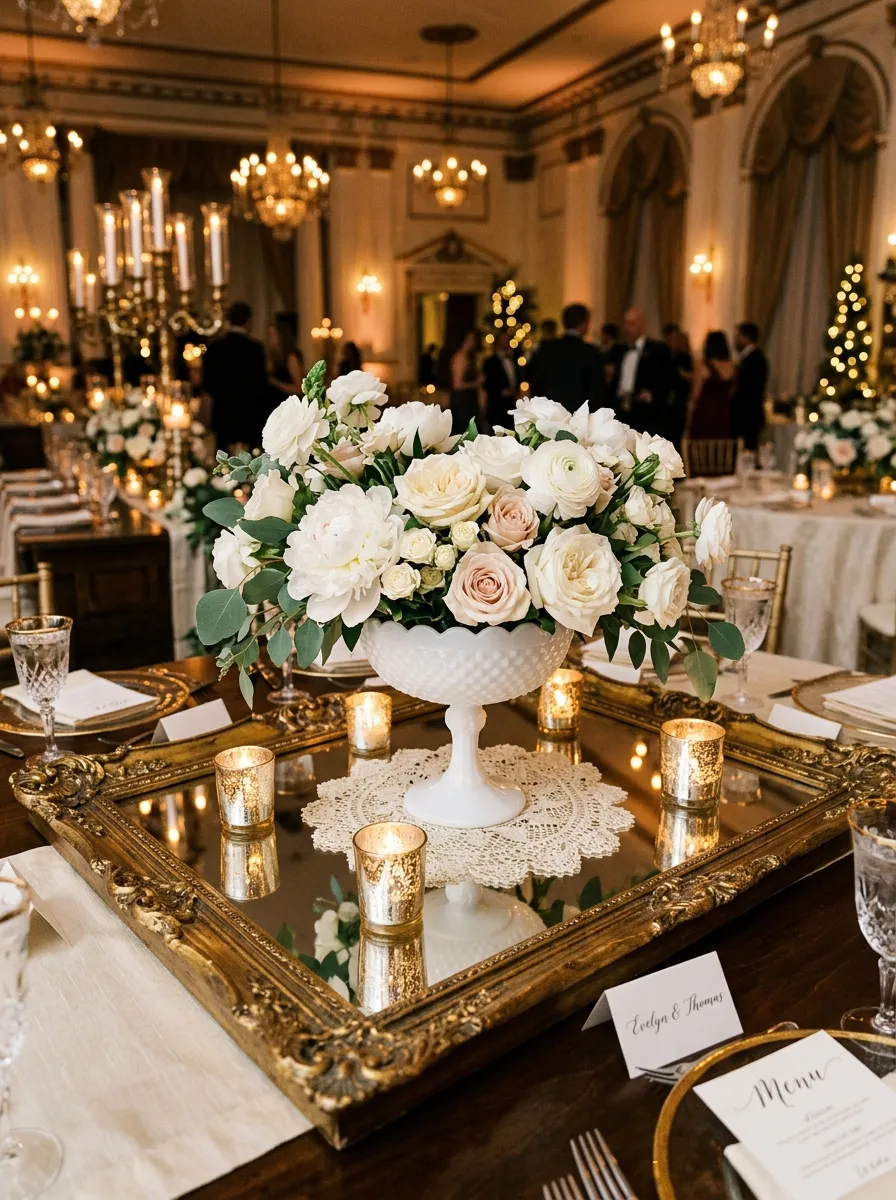
The ornate vintage mirror and lace pedestal elevates reception table styling by reflecting ambient light, floral textures, and delicate linens back up into the room. This centerpiece centers around a framed antique mirror—either rectangular, oval, or baroque in shape—featuring an aged gilt, bronze, or distressed ivory finish. A tailored vintage lace runner or oversized crochet doily is positioned across the reflective glass surface, covering only thirty percent of the glass so the reflective properties remain functional. Resting atop the lace base is an elevated, footed compote bowl filled with an abundant, spilling arrangement of fresh bridal blooms, surrounded by scattered metallic tea lights. The mirror amplifies the warm glow of the candles while reflecting the intricate underside of the lace openwork, creating an illusion of expanded space and lavish visual depth. This design is particularly well-suited for historic hotel ballrooms, candlelit estates, and intimate evening celebrations where luxurious, layered textures are desired.
Select vintage vanity mirrors or framed wall mirrors measuring twelve to sixteen inches in diameter, cleaning the glass with streak-free glass cleaner and dusting the ornate frame details. Place a circular or oval vintage lace doily off-center across the reflective glass, allowing the metallic framework of the mirror to frame the textile naturally. In the center of the lace piece, position an antique footed milk glass or silver compote bowl equipped with a pre-soaked cylinder of floral foam secured with waterproof tape. Insert sturdy structural greenery, such as Italian ruscus and lemon leaf, around the base of the foam to conceal the rim of the bowl and create an outward, cascading spill. Layer in premium focal flowers, including white peonies, ruffled carnations, and quicksand roses, cutting the stems at varying heights to establish a lush, dome-shaped canopy. Arrange four ribbed mercury glass votive holders on the exposed glass perimeter of the mirror, lighting the candles fifteen minutes before reception guests enter the dining hall.
Idea 6: Suspended Lace Hoop Chandelier
Step-by-Step Guide
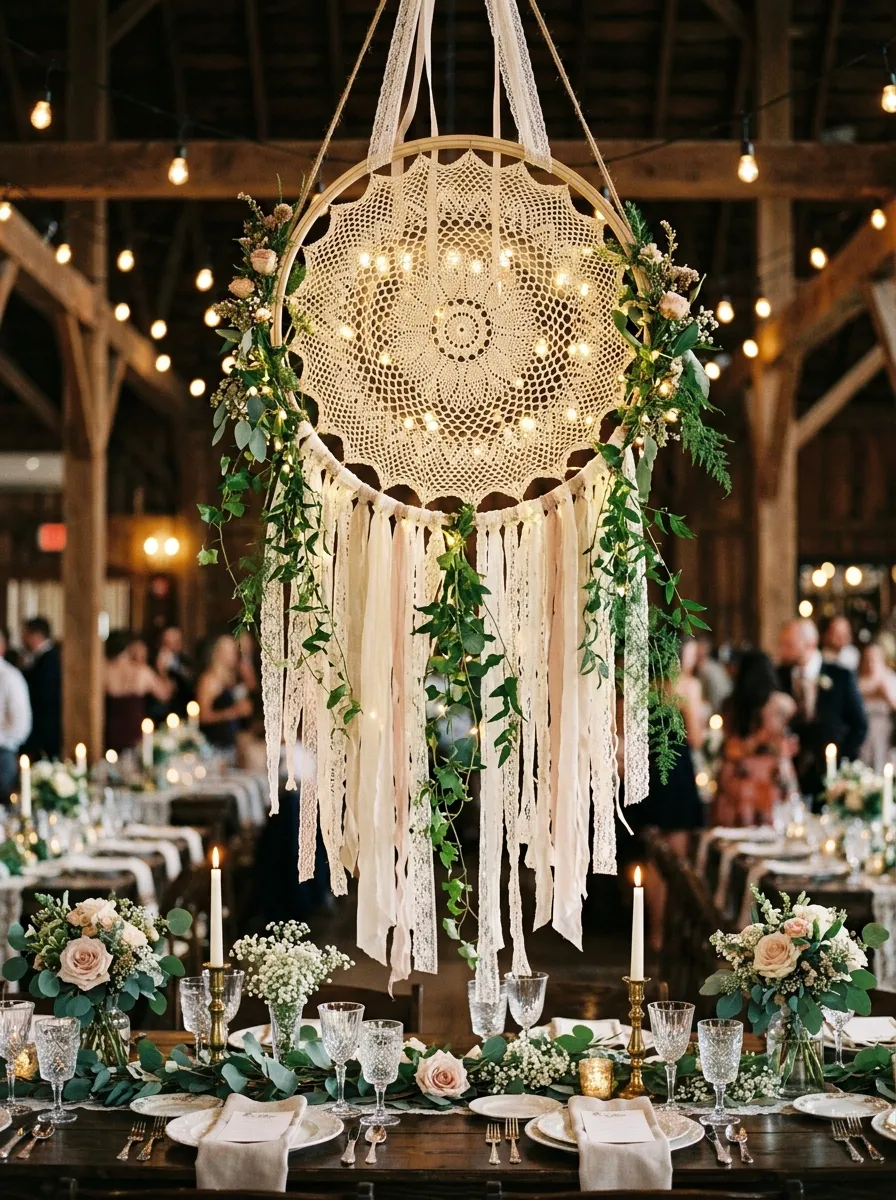
The suspended lace hoop chandelier moves tabletop decor into the vertical plane, clearing table surfaces while creating an intimate, canopy-like environment for seated guests. This installation utilizes wooden embroidery hoops or vintage metal rings wrapped in fine lace ribbon, with an authentic crochet doily stretched taut across the central opening. Trailing lace streamers, silk ribbons, and preserved greenery vines—such as eucalyptus, ivy, or smilax—hang gracefully from the lower hoop perimeter, extending downward toward the dining table below. A cluster of battery-operated hanging fairy lights or a central suspended glass terrarium sphere with an LED candle provides illumination from above. By elevating the focal point of the centerpiece above eye level, banquet tables remain open for family-style food service, glassware, and unhindered guest conversation. This design is exceptionally popular for high-ceilinged venues, rustic barns, and outdoor tented receptions, where introducing vertical volume prevents the space from feeling stark.
Begin by selecting an eight or ten-inch wooden embroidery hoop, separating the inner and outer circular frames. Place a clean, pressed vintage crochet doily over the inner hoop, then press the outer hoop over the textile, tightening the brass screw until the lace is drum-tight within the frame. Trim excess lace around the rear perimeter using sharp fabric shears, leaving a neat three-millimeter allowance hidden beneath the wooden band. Wrap the exposed exterior wood of the hoop with narrow ivory lace trim, securing the ends with tiny dots of clear craft adhesive. Cut four twenty-four-inch lengths of fine cream lace ribbon, knotting them at equal ninety-degree intervals around the hoop to serve as the hanging harness. Tie several forty-inch strips of assorted vintage lace ribbons, chiffon fabric, and faux greenery vines along the bottom hoop edge, letting them cascade naturally. Suspend the assembled chandelier from ceiling trusses or shepherd hooks over the table center using clear monofilament wire rated for five pounds.
Idea 7: Distressed White Books Tied with Lace
How to Create
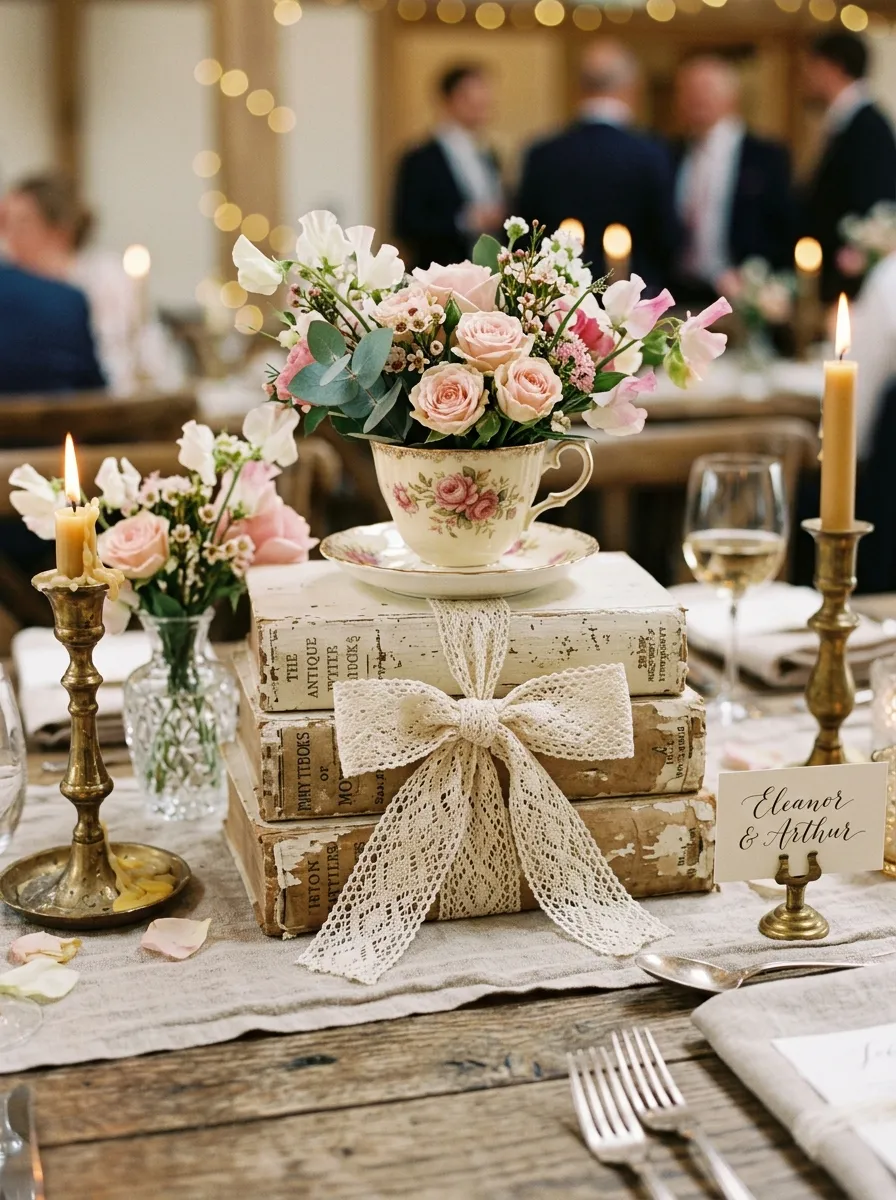
Distressed white books tied with lace offer a literary, romantic centerpiece concept that introduces height variation, structural stability, and nostalgic charm to reception tables. This idea stacks two or three vintage hardcover books with their original spines removed or their covers painted in soft antique white, creating neutral risers for secondary decor elements. A wide band of delicate ivory lace ribbon is wrapped horizontally around the stacked literary volumes, tied into an understated flat knot or secured beneath a wax seal. Perched atop the book stack is a single vintage teacup filled with small floral stems, an antique brass candlestick, or a small crystal bud vase. The stacked volumes provide practical structural support for floral vessels while contributing nostalgic personality to the tablescape. This design coordinates effortlessly with library weddings, historic estate celebrations, and vintage romantic themes, pairing exceptionally well with antique calligraphy table numbers and handwritten menu cards.
To prepare the foundation, source vintage hardcover books of varying widths and lengths from secondhand shops, selecting volumes that measure approximately one to two inches thick. Remove any torn dust jackets and apply two coats of diluted chalk paint in warm antique white over the covers, allowing the edges of the pages to retain their natural aged patina. Stack three books from largest to smallest to form a stable, graduated pedestal on the center of the table. Wrap a thirty-inch length of two-inch-wide Guipure lace ribbon around the entire stack, crossing the ribbon beneath the base and securing the loose ends across the top book with a neat, flat overlap. Secure the lace seam using double-sided adhesive tape or a discreet drop of craft glue to keep the stack secure. Position an antique ceramic teacup or a mini silver bud vase filled with delicate spray roses, sweet peas, and waxflowers on top of the books, finishing the perimeter with scattered brass candlestick holders of varying heights.
Idea 8: Antique Brass Lanterns with Lace Trim
Execution Process
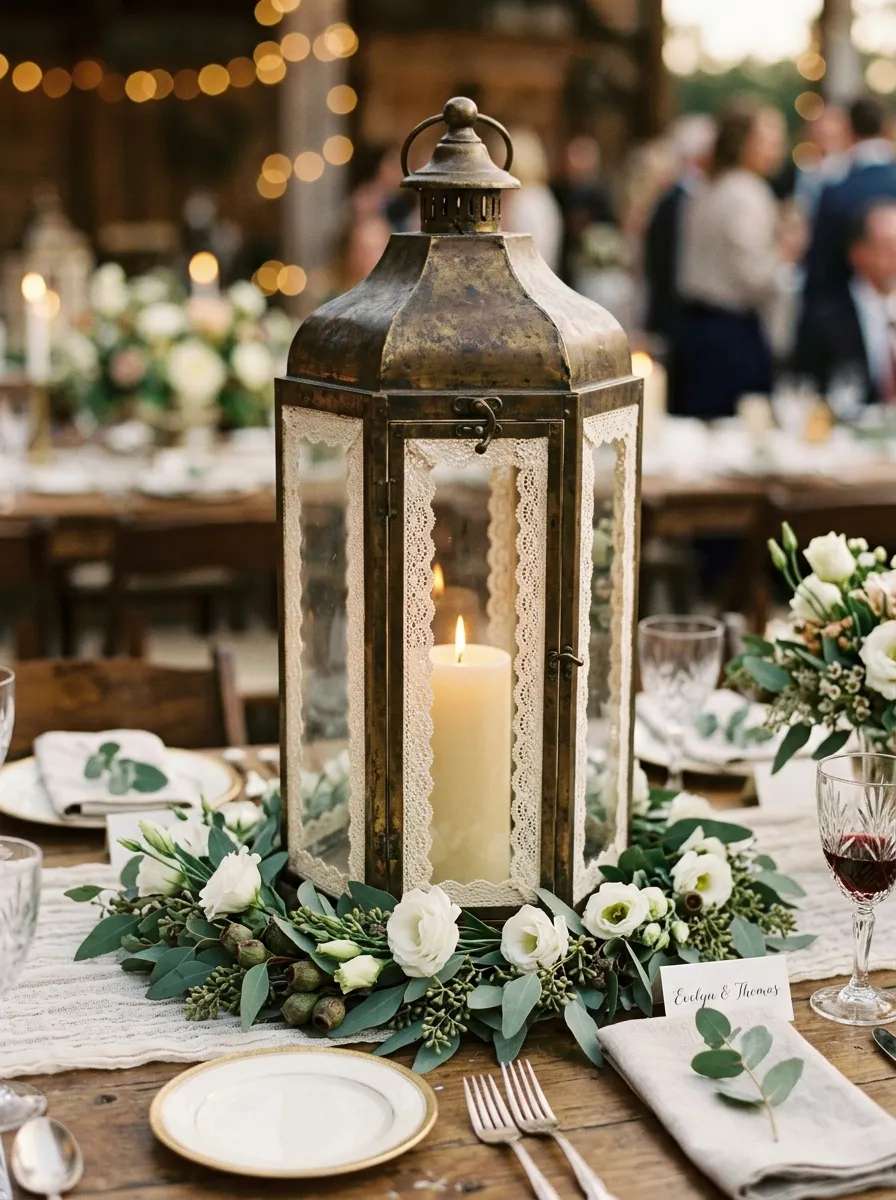
Antique brass lanterns with lace trim combine the warmth of traditional metalwork with the delicate softness of bridal textiles. This centerpiece features weathered gold, bronze, or brass lanterns with clear glass panes that protect flame-free lighting sources from drafts. Rather than covering the entire lantern, narrow bands of fine French Valenciennes lace are adhered along the perimeter of each glass pane, framing the inner candle with delicate textile borders. The metallic frame provides structural weight and architectural lines, preventing the lightweight lace from feeling fragile or out of place on wide banquet tables. Inside the lantern, a large wax pillar candle or a cluster of varied LED candles provides warm, golden light that catches both the polished brass surfaces and the raised threads of the lace. This versatile centerpiece design functions comfortably in both indoor and outdoor wedding venues, offering exceptional wind resistance and safety throughout the reception.
Clean the interior and exterior of all glass lantern panes using a microfiber cloth and rubbing alcohol to remove grease. Measure the width of each glass pane and cut eight matching strips of half-inch-wide cotton lace trim per lantern to frame the upper and lower pane boundaries. Apply tiny dots of clear-drying glass glue along the outer surface edges of the glass panes, pressing the lace trim strips into place so they run parallel to the brass framework. Allow the adhesive to cure undisturbed for twelve hours to ensure the lace does not detach when exposed to internal candle heat. Place a high-quality wax pillar candle equipped with a realistic flickering LED wick inside the lantern, anchoring the base onto a small square of adhesive putty. Open the lantern door to arrange a loose wreath of seeded eucalyptus, ivory spray roses, and olive branches around the exterior brass base, allowing the foliage to spill casually outward onto the guest table surface.
Idea 9: Lace Embroidered Linen and Ceramic Vases
How to Make
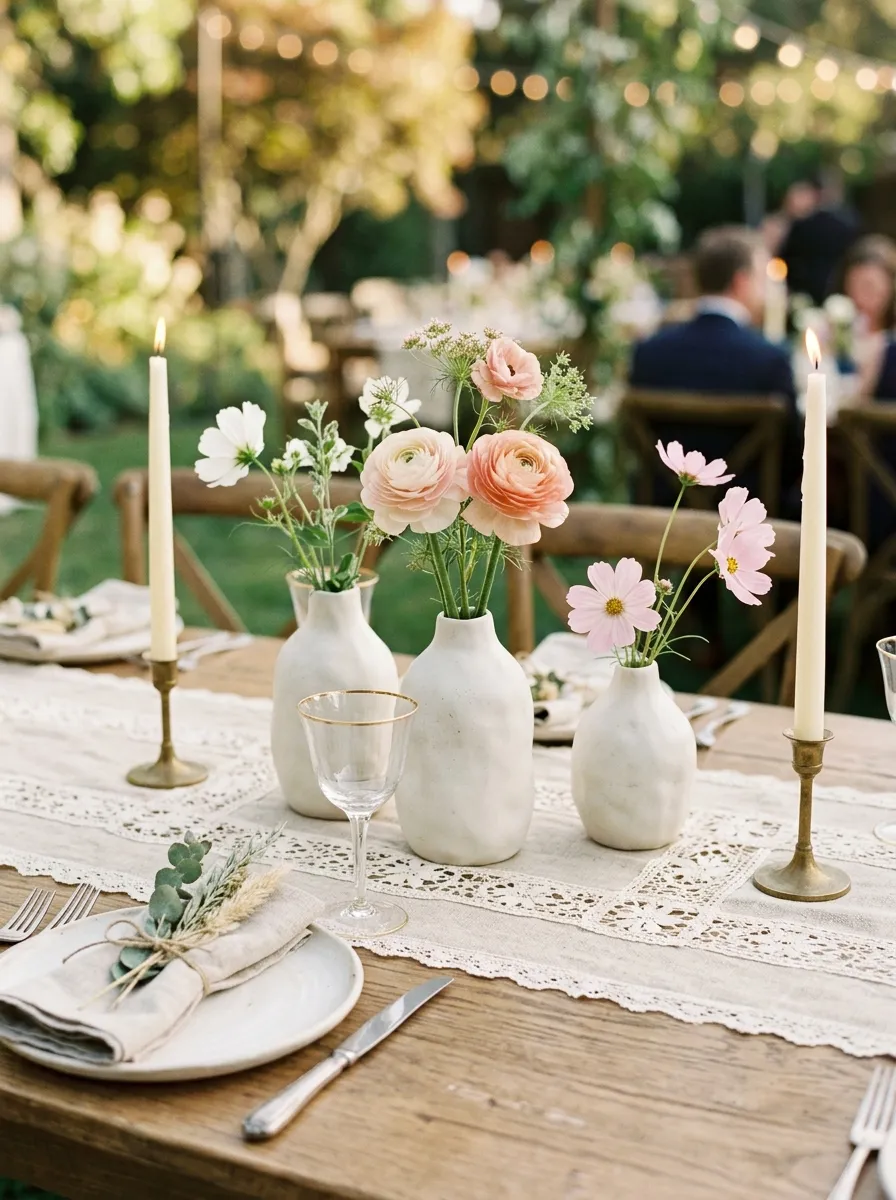
Lace embroidered linen combined with artisanal ceramic vases presents a refined, minimalist interpretation of vintage bridal decor. This concept replaces elaborate multi-piece centerpieces with a single exquisite focal point: a custom linen table runner detailed with inset antique lace bands, supporting an assortment of matte ceramic pottery. The unglazed, organic surfaces of contemporary ceramics—such as speckled stoneware, terracotta, or creamy porcelain—provide a tactile foil against the intricate openwork of the lace inserts. The vases are dressed minimally with architectural, sculptural florals, such as single-stem Japanese ranunculus, delicate cosmos, sweet peas, and dried branches. This clean, modern approach appeals to couples who appreciate historic craftsmanship but prefer an uncluttered, modern minimalist aesthetic on their reception tables. The low-profile runner keeps the table visually light and spacious, making it ideal for venues with scenic outdoor backdrops or intimate historic dining rooms.
Begin by selecting a raw natural flax linen table runner measuring fourteen inches wide, pre-washing the fabric to soften the weave. Cut rectangular windows into the linen fabric at regular twenty-inch intervals, pinning panels of antique lace into the cutouts using dressmaker pins. Sew the lace panels into the linen using a tight zigzag stitch on a sewing machine, trimming excess fabric from the reverse side to create seamless inset lace windows. Press the completed runner flat with a hot iron, then position it smoothly along the center of the dining table. Group three matte-glazed off-white ceramic vases of varying heights and organic silhouettes together over the central lace insert. Fill the vessels halfway with fresh water, then arrange three to five tall floral stems per vase, cutting stems at deliberate alternating angles to emphasize negative space. Complete the arrangement by setting pale ivory beeswax taper candles into small ceramic candle holders placed alongside the pottery.
Idea 10: Vintage Doily Table Runner with Floating Florals
Step-by-Step Guide
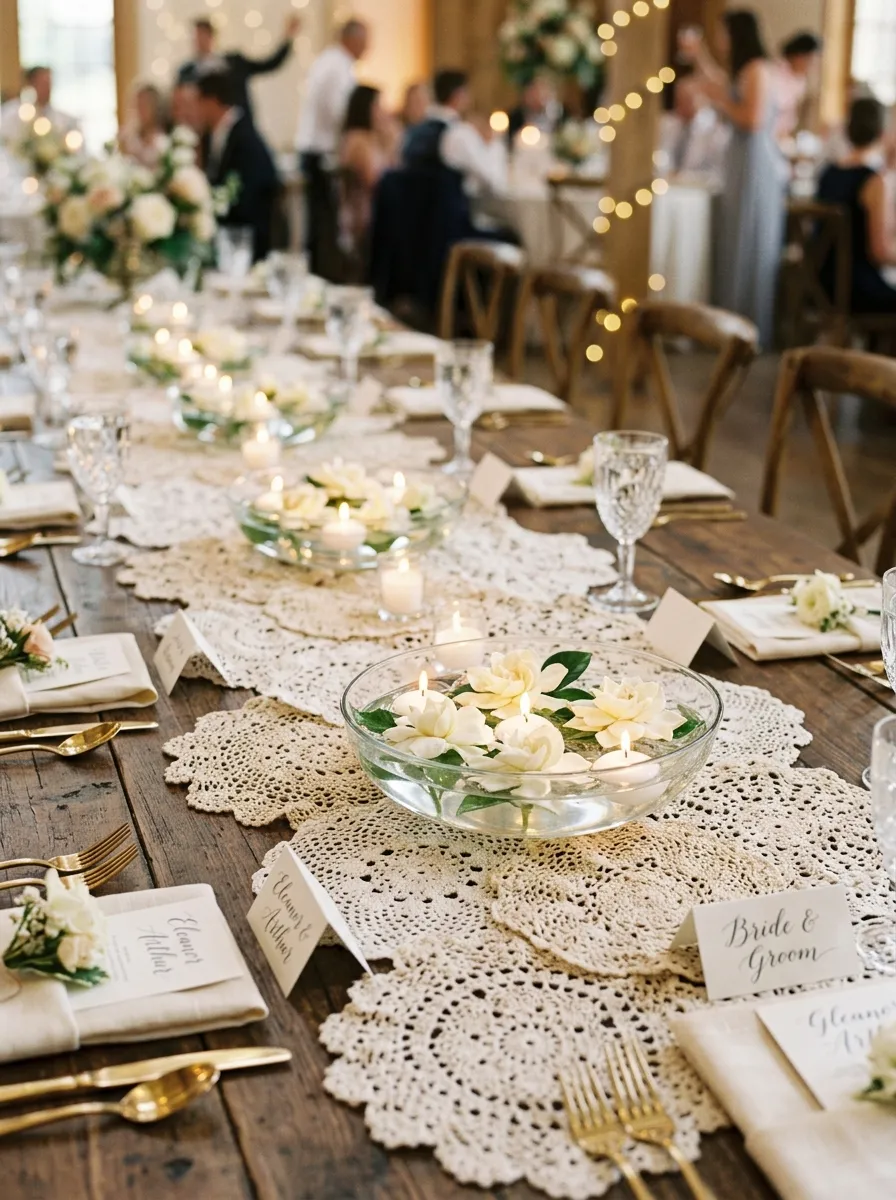
The vintage doily table runner with floating florals creates an organic, continuous textile tapestry down the entire length of the bridal table. Instead of using a single manufactured runner, this design assembles dozens of authentic, mismatched crochet doilies overlapping each other in a fluid, asymmetrical arrangement. The natural variation in color tones—ranging from stark white and unbleached ecru to warm caramel antique hues—adds rich visual depth and authentic vintage character to the tablescape. Positioned along the irregular lace border are low, clear glass compote bowls filled with water, holding floating floral heads such as gardenias, open garden roses, and delicate camellias. Small floating wax candles bob alongside the flowers, casting shimmering, animated reflections through the water onto the lace below. This design is practical and budget-friendly, making efficient use of thrifted or heirloom doily collections while requiring far fewer floral stems than traditional massive floral foam installations.
Collect twenty to thirty vintage cotton crochet doilies of assorted sizes, ranging from four to twelve inches in diameter, ensuring all pieces are clean and pressed. Lay the doilies out on a large flat working floor, overlapping their outer margins by one to two inches to form a continuous, flowing runner that matches the length of the reception table. Using a hand-sewing needle and fine ivory cotton thread, execute small, discrete tacking stitches through the overlapping points where the doilies touch, joining them into a single, cohesive textile unit. Transport the joined runner to the venue table and lay it down the center line, allowing the asymmetrical edges to drape naturally. Place four to six shallow clear glass bowls along the length of the runner, filling each bowl two-thirds full with room-temperature water. Snip the stems of open garden roses and gardenias flush beneath the bloom heads, placing two blooms and one floating white disc candle into each water vessel.
Common Beginner Mistakes and How to Avoid Them
When executing vintage lace centerpieces, novice decorators often encounter technical issues that can compromise the appearance and stability of their reception tables. A primary mistake is using incompatible adhesives when attaching delicate textiles to smooth glass surfaces. Standard white craft glues often dry cloudy or peel away easily when exposed to venue humidity or cold water condensation from floral arrangements; decorators should always use specialized clear-drying glass glue or high-tack fabric adhesives. Another common error is failing to wash and press authentic vintage lace before assembly. Older textiles frequently hold residual oils, yellow oxidation spots, or deep creases that distract from an otherwise clean table presentation; proper soaking in gentle oxygen cleansers followed by steam pressing restores the textile’s bright, crisp texture. Additionally, crafters often select lace with motifs that are too dense, which blocks light transmission rather than diffusing it softly; prioritizing openwork patterns ensures ambient candlelight passes through effortlessly. Finally, avoid using flammable adhesives close to open flame candle zones; always maintain a minimum clearance of three inches between textile elements and open flames, or switch exclusively to high-grade LED lighting.
Practical Tips for Better Results
Achieving refined, boutique-quality finishes with vintage lace decor requires adopting several professional styling and construction techniques. When cutting lace trim or yardage, always use sharp professional fabric shears rather than general utility scissors to prevent frayed edges and unraveling threads along visible seams. To permanently seal the raw cut edges of delicate synthetic or blended lace trims, lightly run the edge near a flame source or apply an invisible line of fray-check seam sealant along the perimeter before mounting. When wrapping cylindrical glass containers, begin and end your lace wrapping along the same vertical seam line, placing this joined edge toward the center of the table where it remains hidden from seated guests. If using vintage crochet doilies that feature slightly differing shades of white and cream, unify the entire collection by soaking all pieces in a weak, warm black tea bath for three minutes; this gentle organic dye process establishes a consistent, harmonious warm antique ivory tone across disparate textile sources. Finally, conduct a full centerpiece mock-up under realistic evening lighting conditions well in advance to verify that candle brightness and shadow projection perform as intended.
Styling, Presentation, or Organization Ideas
Integrating vintage lace centerpieces into an overall event space requires balanced spatial distribution and harmonious surrounding table elements. To prevent tables from feeling visually cluttered, balance highly detailed lace textiles with understated tableware, such as smooth ceramic plates, clean-lined modern flatware, and unadorned crystal glassware. When dressing round guest tables, keep the footprint of lace containers concentrated within the central third of the table surface, leaving ample open space for place settings, bread baskets, and wine glasses. For long banquet-style seating, distribute lace elements at regular eighteen-inch intervals, varying container heights between low bud vases, medium glass jars, and slender taper candles to establish an engaging visual landscape. Enhance the vintage aesthetic by incorporating natural organic elements alongside the lace, such as rough linen napkins, raw wooden place card holders, and soft velvet ribbons tied around menus. When organizing centerpieces for transport to the reception hall, pack delicate lace-wrapped vessels individually in divided cardboard cell boxes lined with bubble wrap, preventing abrasive friction from snagging delicate textile threads during loading and transit.
Budget or Time Planning
Executing cohesive lace wedding centerpieces for large guest counts requires structured timeline management and strategic budget allocation. Sourcing authentic vintage lace can be exceptionally economical if planners begin collecting materials several months in advance from thrift shops, flea markets, and online community resale platforms, where doilies and lace yardage are frequently sold in low-cost bulk bundles. Creating a set of twenty complete centerpieces typically requires a modest investment of seventy-five to one hundred and fifty dollars for glassware, adhesives, and textiles, yielding considerable savings compared to standard professional floral arrangements that cost upwards of eighty dollars per table. To manage production time efficiently, adopt an assembly-line methodology: dedicate one day to washing and ironing all vintage textiles, a second session to measuring and cutting lace panels, and a third focused session to adhering the trims onto prepared glass vessels. Completing all non-perishable crafting steps three to four weeks prior to the wedding date eliminates eleventh-hour anxiety, leaving only fresh floral trimming and water filling for the morning of the celebration.
Creative Expansion and Advanced Inspiration
Once foundational lace assembly techniques are mastered, event designers can explore sophisticated variations that incorporate mixed-media elements and custom artisanal finishes. Consider experimenting with botanical cyanotype printing onto white lace trims, using sun-reactive dyes to print delicate fern or leaf silhouettes directly onto the openwork textile before mounting it to glass containers. Advanced makers can also explore combining vintage lace with architectural elements, such as casting rigid concrete planter bowls using lace doilies as textured negative-space molds to produce modern stone vessels with intricate relief patterns. Another compelling design direction involves integrating miniature battery-powered micro-lights directly into woven lace table runners, concealing fine copper wires between overlapping crochet motifs to create a glowing textile carpet down the center of the wedding party table. You can also explore dipping vintage lace scraps into liquid porcelain slip and kiln-firing them, which burns away the cotton fibers while vitrifying the ceramic into permanent, paper-thin lace pottery votives. These artistic expansions demonstrate the incredible versatility of lace, allowing makers to craft unforgettable, museum-grade wedding decor.