Bridal shower centerpieces serve as the visual anchor for guest tables, setting the celebratory atmosphere and establishing a unified design aesthetic throughout the event venue. Crafting your own table decorations offers a personalized approach to event styling, allowing hosts to tailor every floral stem, vessel, and lighting element to match the bride’s personal taste. This comprehensive tutorial explores ten distinct DIY bridal shower centerpiece concepts that blend modern design sensibilities with cost-effective assembly methods. Readers will learn the essential mechanics of floral preparation, structural balance, water retention, vessel selection, and multi-tier styling suitable for varied event formats. Understanding these practical concepts enables party organizers to construct durable, professional-grade displays without requiring commercial floral certifications or expensive workshop equipment. These table decorations establish comfortable conversational sightlines while providing high visual impact for celebration photography. By breaking down the exact step by step methods for each creative project, this guide provides actionable inspiration that turns basic raw materials into elegant tabletop features. Mastering these straightforward decorating techniques empowers hosts to approach wedding season planning with absolute confidence, ensuring the finished reception space feels cohesive, welcoming, and memorable for all attending guests.
Why This Idea Is Trending or Useful
DIY bridal shower centerpieces have emerged as a dominant trend across digital inspiration boards because hosts increasingly seek personalized, authentic alternatives to generic commercial party packages. Handcrafting these table decorations provides direct practical value by redirecting event budgets toward culinary experiences or venue upgrades while maintaining an elevated visual standard. The ongoing popularity of thoughtful DIY decor aligns with contemporary preferences for sustainable, reusable materials, including thrifted glassware, terra cotta vessels, potted greenery, and natural fiber accents. For event planners and family members, these projects provide a remarkably beginner friendly entry point into floral and event design. Most configurations rely on basic building blocks, such as repetitive cluster arrangements, pre-cut foam mechanics, or simple water submersion, eliminating complex technical barriers. Furthermore, modern aesthetic trends favor relaxed, organic arrangements over stiff, artificial floral geometry, which naturally forgives minor placement inconsistencies. These versatile centerpiece ideas adapt effortlessly across varied venues, from casual backyard luncheons and garden gatherings to formal restaurant banquets, proving that accessible materials can produce timeless, high-end styling.
Materials and Preparation
Achieving durable, visually refined bridal shower centerpieces begins with methodical workspace preparation and appropriate material selection. Assemble your structural vessels first, gathering items such as clear glass cylinders, ceramic compotes, rustic wooden boxes, or vintage metal compotes according to your chosen theme. Core tools include bypass floral shears, sharp craft knives, waterproof stem tape, chicken wire or flower frogs, and non-toxic floral food packets. If you are working with fresh flowers, prepare your stems twenty-four hours in advance by cutting the bases at a forty-five-degree angle and placing them into clean buckets filled with cool, conditioned water stored away from direct sunlight. Remove all submerged foliage along the lower half of each stem to inhibit bacterial growth and preserve water purity. When planning your decorative arrangements, measure your venue’s table dimensions to ensure that final centerpiece heights remain either below twelve inches or elevated above twenty-four inches, preserving clear eye-level sightlines across the dining surface. Establish an organized assembly station lined with plastic sheeting to make cleanup rapid and efficient.
1. Floating Citrus and Blossom Cylinders
How to Create
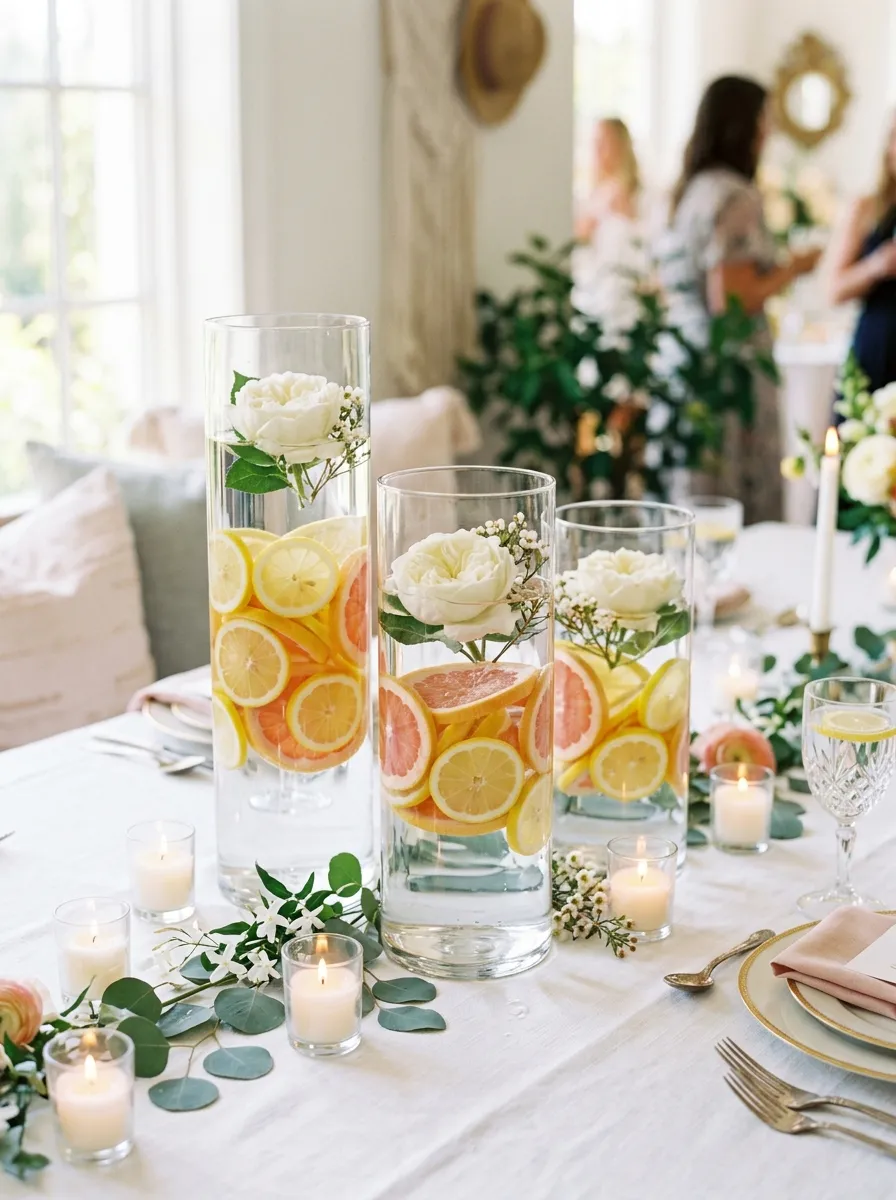
Floating citrus and blossom cylinders combine vibrant botanical colors with clean water-submersion mechanics to construct a refreshing, contemporary table focal point. This design utilizes transparent glass cylinders filled with clear water, submerged whole and sliced citrus fruits, and floating wax-coated floral heads resting atop the surface. Sliced lemons, grapefruits, or blood oranges reveal graphic geometric patterns through the glass walls, bringing an organic pop of saturated color that invigorates neutral table linens. The surrounding water acts as a natural lens, magnifying the interior textures of the fruit while keeping the flowers hydrated throughout the event. This concept draws inspiration from Mediterranean summer celebrations, providing an easy project that feels bright, clean, and modern. Because the materials are affordable and accessible at standard grocery stores, this centerpiece delivers maximum visual volume while adhering to strict budget ideas.
Begin by thoroughly washing three clear glass cylinder vases of varying heights, such as six, nine, and twelve inches, using warm soapy water and a lint-free cloth. Using a sharp kitchen knife, slice three large grapefruits and six lemons into uniform rounds measuring one-quarter inch in thickness, discarding the uneven end caps. Press the citrus slices firmly against the interior walls of each glass vase, layering them upward until the fruit forms an internal perimeter lining. Slowly pour room-temperature water into the center of each cylinder until the fluid reaches two inches below the top rim, ensuring the citrus slices remain pinned against the glass. Trim the stems of fresh garden roses or ranunculus down to one inch, and place two to three blooms gently onto the water surface so they float securely. Complete the display by clustering the three cylinders in the center of the table alongside small votive candles.
2. Tuscan Terracotta Herb and Olive Potted Cluster

Step-by-Step Guide
The Tuscan terracotta herb and olive potted cluster replaces conventional cut flowers with living, aromatic botanicals arranged in textured clay pots. This design embraces earthy Mediterranean minimalism, utilizing potted culinary herbs like rosemary, sweet basil, and silvery sage alongside miniature olive topiaries. The combination of unglazed terracotta pottery with rich green foliage introduces warm, tactile textures to the tablescape, creating a cozy and relaxed environment. An added practical advantage of this design is its reusability; guests can take the living pots home as eco-friendly party favors, or the host can integrate the plants into a personal home decor garden after the shower concludes. The natural fragrance released by the fresh leaves provides subtle, non-intrusive aromatherapy that complements food service without overwhelming the senses. This design is exceptionally practical for daytime brunches, winery venues, and outdoor patio settings.
To assemble this living arrangement, source five small to medium unglazed terracotta pots ranging from three to six inches in diameter, ensuring all pots have drainage holes with matching clay saucers. Repot your selected herbs—such as bushy French lavender, upright rosemary, and curly parsley—into the terracotta containers using organic potting soil, tamping the soil down firmly around the root balls. Wipe the exterior of the clay pots with a damp cloth to remove any stray soil particles. Arrange the pots in a tight, staggered cluster down the center of a bare wood table or neutral linen runner, placing the tallest olive or rosemary plant in the middle to create vertical balance. Wrap the outer rim of each pot with a strip of natural jute twine, tying a simple knot to secure it. Fill any empty spaces between the pots with loose sprigs of fresh olive branch clippings and small unlit beeswax tea light candles.
3. Tiered Vintage Teacup and Garden Rose Towers
Execution Process
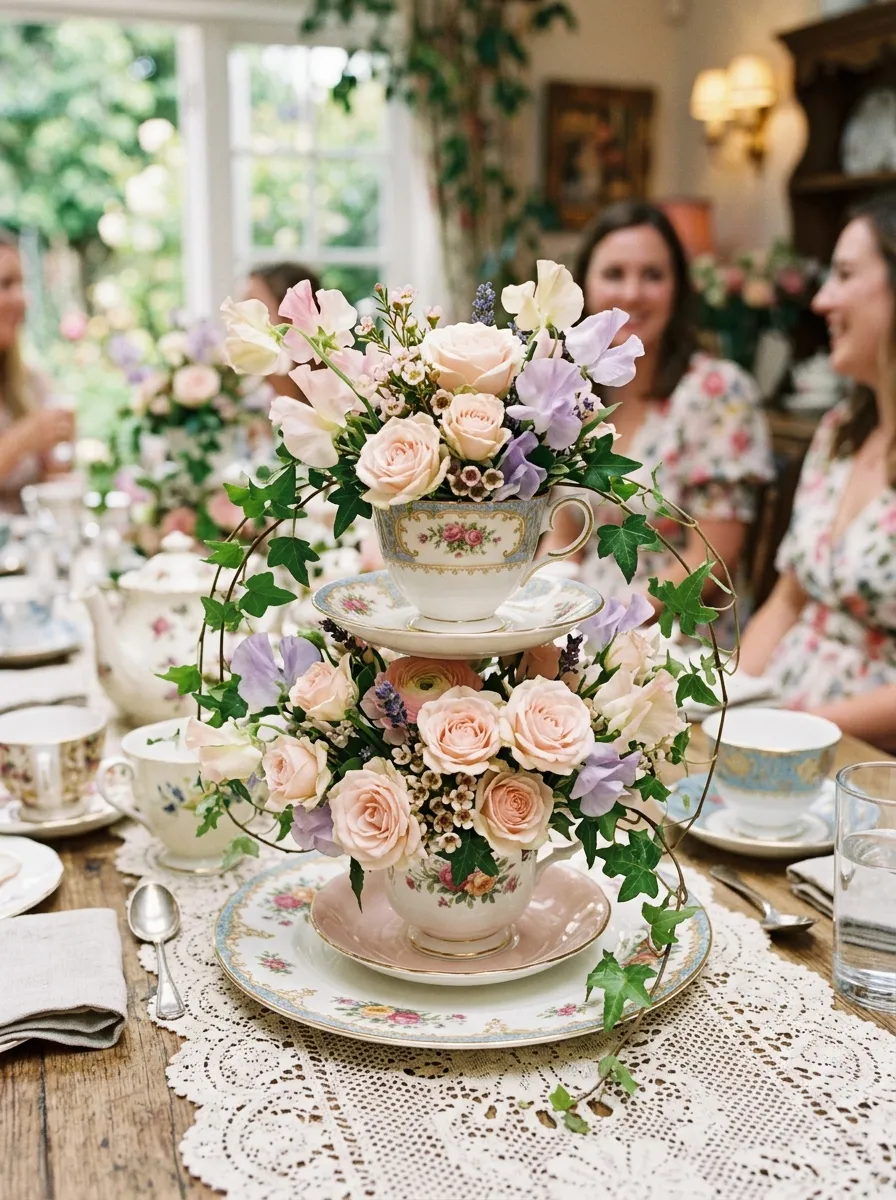
The tiered vintage teacup and garden rose tower presents a whimsical, nostalgic silhouette that pays homage to traditional afternoon tea celebrations. This concept stacks mismatched antique porcelain teacups, saucers, and small dessert plates into a vertical tower filled with delicate garden blooms. The pastel glazes, gilded rims, and intricate floral patterns of vintage china bring romantic cottage charm to the tabletop, creating visual variety where no two place settings are identical. By building the centerpiece upward in a slender profile, this design saves valuable table space for shared pastry tiers, teapots, and sandwich platters. The combination of delicate heritage porcelain with soft, ruffled roses evokes an authentic English garden aesthetic that appeals to vintage enthusiasts. It serves as an engaging creative project for hosts who enjoy sourcing eclectic glassware from flea markets and thrift boutiques.
Source three coordinating vintage teacups with matching saucers and two small porcelain bread plates from thrift shops, ensuring all pieces are clean and crack-free. Secure the base saucer to the table center, and apply a small disc of floral clay or non-damaging adhesive putty to its center to anchor an upside-down teacup. Place a porcelain plate over the inverted teacup base, securing it with floral putty, and repeat the stacking process with a second teacup to create a stable two-tiered pedestal. Soak a small block of wet floral foam in water until fully saturated, and trim small two-inch cubes of the foam to fit inside the upright top teacup and around the plate edges. Insert short-cut stems of spray roses, delicate sweet peas, and trailing English ivy into the foam, angling the stems so the foliage spills over the porcelain rims. Mist the completed tower lightly with cool water to maintain petal hydration.
4. Minimalist Monochromatic Bud Vase Runner
Setup Method
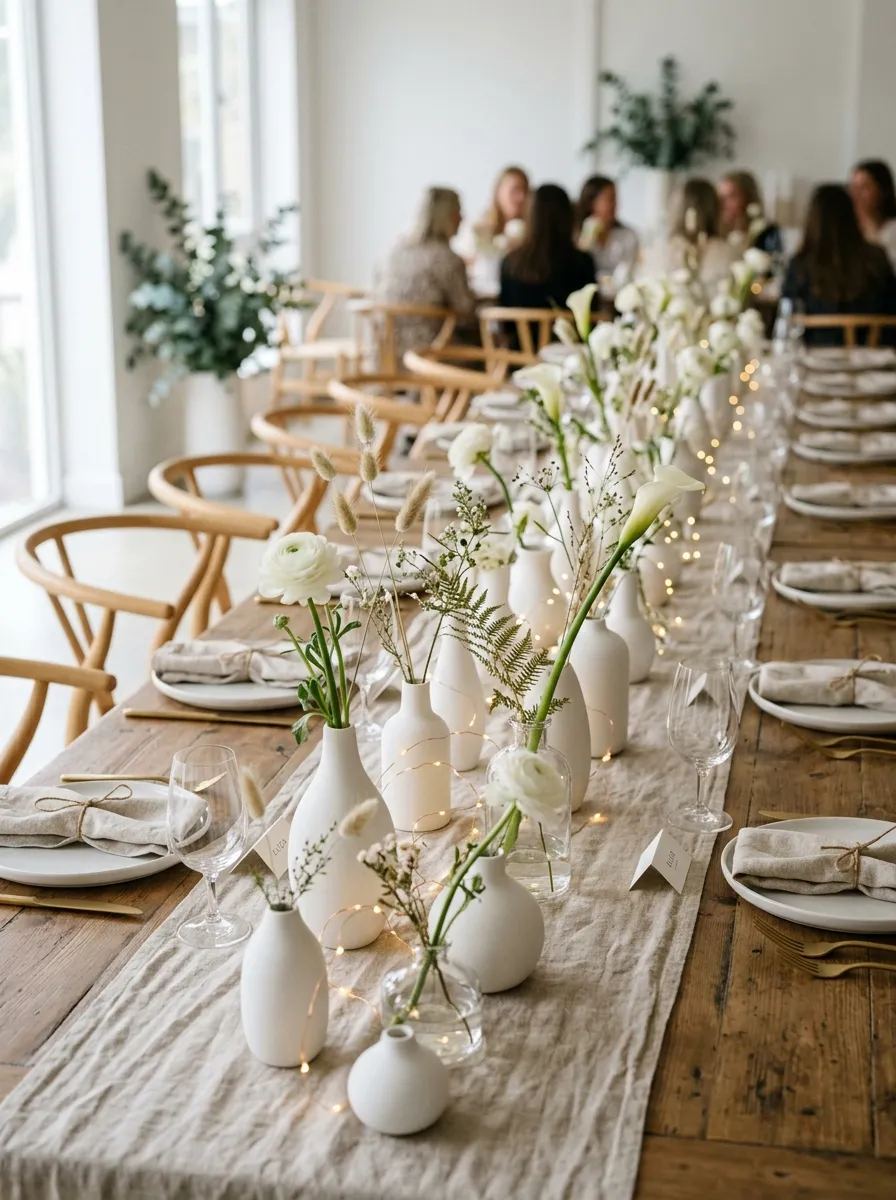
The minimalist monochromatic bud vase runner relies on continuous repetition, clean negative space, and disciplined color cohesion to create a sleek modern design. Rather than grouping all elements into a single bulky centerpiece, this arrangement scatters numerous slender glass or ceramic bud vases along the entire length of the table. Each vessel houses only one or two sculptural stems, such as white calla lilies, pale carnations, or minimalist bleached grasses. This open layout allows light to pass freely across the table, providing unobstructed sightlines that encourage lively, natural conversation among seated guests. The simplicity of the single-stem format makes it an ideal project for beginners who want to avoid the complex mechanics of large-scale floral arranging. The finished aesthetic aligns with contemporary Scandinavian styling, delivering high visual sophistication with minimal material waste.
Gather twenty to thirty narrow, clear glass or matte white ceramic bud vases featuring varied geometric silhouettes, ensuring the heights stay between five and eight inches. Lay a crisp, ironed linen table runner in a matching neutral shade—such as oat, off-white, or dove gray—down the center of a long banquet table. Fill each bud vase two-thirds full with fresh water mixed with liquid floral preservative. Cut the stems of white ranunculus, pale sweet peas, and dynamic cosmos at varying heights ranging from six to eleven inches using clean floral shears. Place a single focal blossom into each vase, occasionally adding a second delicate stem to create subtle variation in density. Position the filled vases down the center of the linen runner in a loose, winding zigzag pattern spaced approximately three to four inches apart, finishing the display by weaving a strand of delicate micro-wire fairy lights between the vases.
5. Rustic Wooden Trough with Wildflowers
Step-by-Step Guide
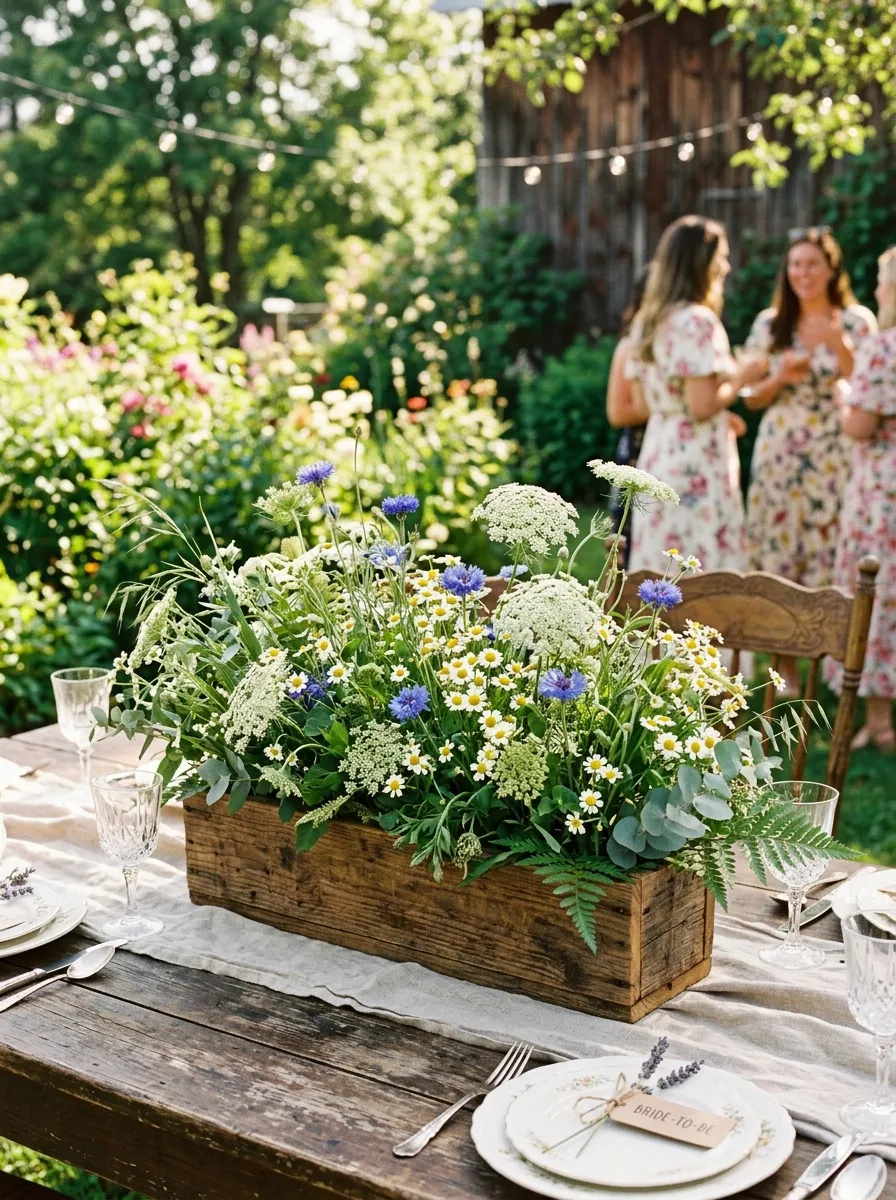
The rustic wooden trough with wildflowers combines farmhouse warmth with the breezy, unstructured beauty of natural meadow flora. This design features a low, rectangular wooden planter box filled with an abundance of textural blooms, including chamomile, blue cornflowers, queen anne’s lace, and feathery grasses. The rectangular shape follows the natural dimensions of long banquet tables, creating a balanced, linear display that anchors the space without obstructing view lines. The weathered grain of natural pine or reclaimed wood provides a textured contrast against the soft petals, lending a relaxed, handmade appeal to the gathering. This arrangement is well-suited for outdoor barn receptions, casual garden luncheons, and rustic country showers where informal charm takes precedence over rigid formality.
Construct or purchase a shallow wooden planter box measuring twenty-four inches long, six inches wide, and four inches deep, lining the interior with heavy-duty plastic sheeting secured with staples. Cut two blocks of wet floral foam to fit snugly inside the lined box, soaking the foam in a bucket of treated water until fully saturated before placing it inside. Begin the arrangement by inserting broad-leafed salal or lemon leaf foliage around the outer perimeter of the foam, angling the leaves downward to conceal the wooden box edges. Insert taller stems of snapdragons, larkspur, and green bell branches into the center of the foam to establish an airy, peaked height of approximately ten inches. Fill the remaining space with clusters of chamomile daisies, feverfew, and aster, distributing the colors evenly across the trough. Mist the completed wildflower arrangement with fresh water and place it directly onto the table center.
6. Romantic Tiered Candle and Greenery Wreath

How to Create
The romantic tiered candle and greenery wreath pairs classic candlelight with lush, winding foliage to create an intimate, celebratory ambiance. This arrangement features a circular wreath of fresh greenery resting flat on the table, encircling a grouping of pillar candles enclosed in glass hurricane cylinders. The varying heights of the glass chimneys create structural interest, while the enclosed wax candles produce a safe, steady glow that flickers through the leaves. Using mixed foliage such as silver dollar eucalyptus, Italian ruscus, and seeded willow introduces varied green tones and fine leaf shapes without requiring expensive focal flowers. This versatile centerpiece transitions smoothly from afternoon luncheons into evening events, providing warm ambient lighting as the party progresses. It serves as an easy project for hosts who prefer working with sturdy, long-lasting greenery rather than delicate, temperature-sensitive petals.
Select three clear glass hurricane cylinders in stepped heights of six, eight, and ten inches, placing a white unscented pillar candle securely inside the base of each vessel. Position the three candle cylinders in a close triangle in the middle of your guest table. Form a circular wreath base around the lanterns using a nine-inch pre-formed wire ring or grapevine frame. Cut fresh sprigs of silver dollar eucalyptus, feather-leaf bay laurel, and Italian ruscus into six-inch segments, securing them to the wreath frame using flexible green paddle wire. Continue wrapping and layering the foliage in a continuous clockwise direction until the wire base is completely hidden and the wreath appears full and natural. Tuck small sprigs of fresh baby’s breath or white waxflower into the leaves for subtle floral contrast, and light the pillar candles shortly before guests are seated.
7. Gilded Geometric Terrariums with Succulents
Execution Process
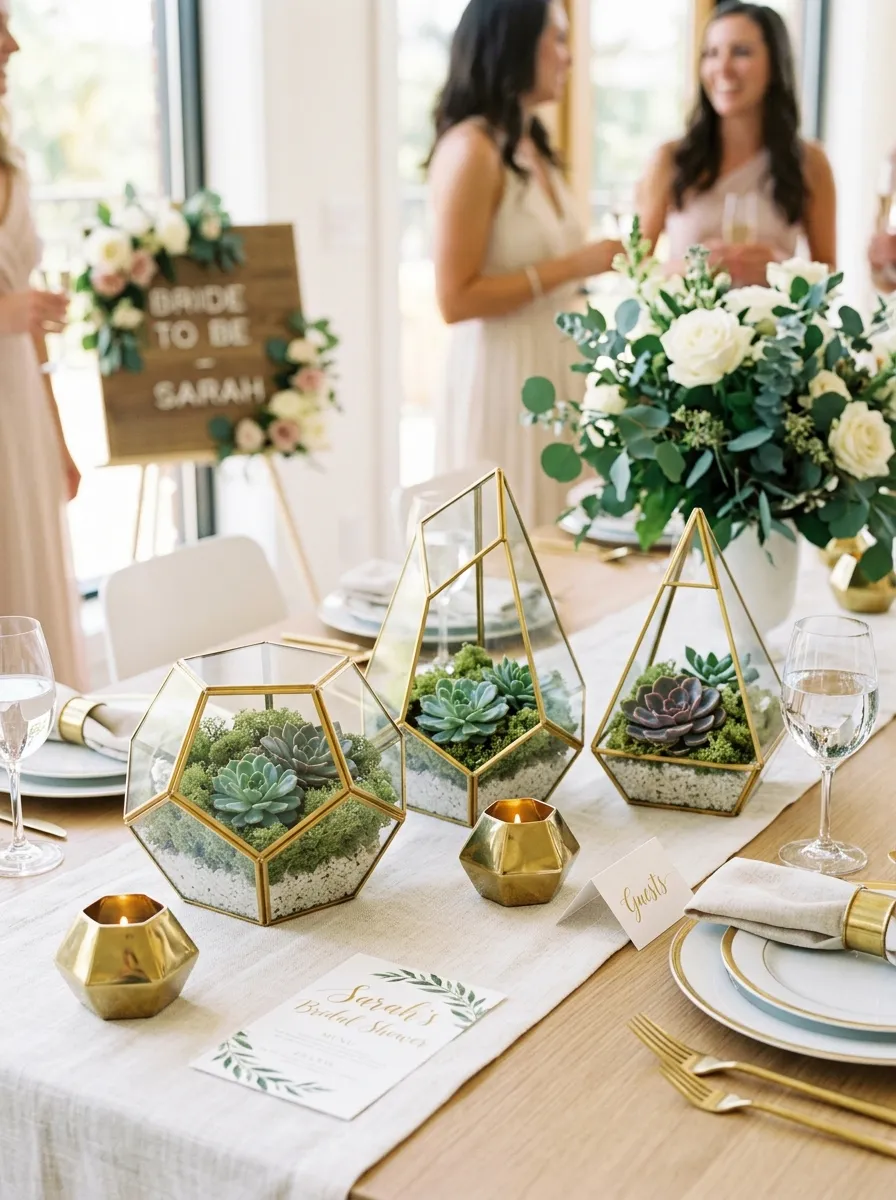
Gilded geometric terrariums filled with living succulents and moss offer an architectural, modern design that suits contemporary chic celebrations. These multi-faceted glass and brass structures feature clean geometric silhouettes, bringing an eye-catching industrial element to soft party tablescapes. Inside each faceted container, a mix of hardy succulents, natural reindeer moss, and polished river pebbles creates a self-contained miniature terrarium. The metallic brass frames reflect ambient light, adding a touch of glamour that pairs well with modern flatware and glassware. This option is exceptionally durable, requiring zero refrigeration or delicate water management, which eliminates the stress of last-minute floral wilting. It functions as an ideal keepsake gift that the bride or wedding party members can take home to enjoy as permanent home decor after the event.
Source two or three faceted geometric glass terrariums featuring brass or copper soldered seams, ensuring at least one container has a tall pyramid or pentagon shape for vertical variation. Pour a one-inch layer of small, washed white decorative gravel into the bottom of each terrarium to provide a level drainage base. Gently remove miniature succulents—such as echeveria, haworthia, and jade—from their nursery plastic containers, shaking away excess soil from the root systems. Arrange two to three small succulents inside each terrarium, pressing the root balls firmly into the gravel layer. Fill the empty spaces around the plants with preserved chartreuse reindeer moss and smooth quartz stones to conceal the exposed roots. Position the terrariums in a loose cluster on the table, accenting the geometric metal frames with small brass votive cups holding tea light candles to enhance the reflective metallic finish.
8. Elegant Hydrangea and Pear Footed Compote
Setup Method
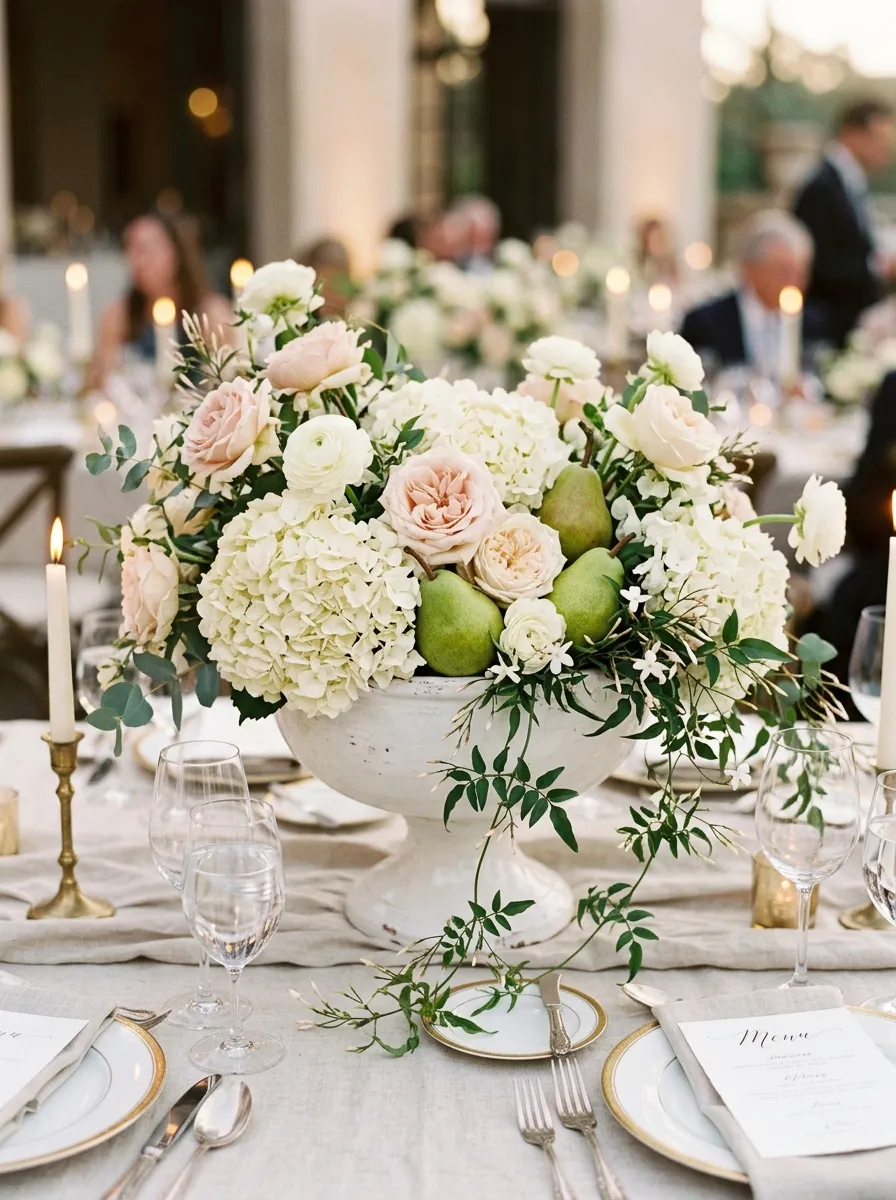
The elegant hydrangea and pear footed compote draws inspiration from classical European still-life paintings, combining lush, ruffled blossoms with fresh orchard fruit. A footed compote bowl elevates the arrangement off the table surface, giving the centerpiece a regal presence while leaving space underneath for dining essentials. The dense, cloud-like volume of white and pale green hydrangeas acts as a full structural base, supporting the insertion of slender garden roses and organic fruit picks. Firm green d’Anjou pears nestled among the blooms introduce unexpected organic textures, giving the display a curated, artisanal feel. This centerpiece feels generous and elegant, making it well-suited for formal sit-down dinners, historic venue spaces, and upscale celebratory luncheons where traditional romance is the guiding theme.
Select a wide, shallow footed compote bowl made of white ceramic, polished silver, or antique brass, measuring eight to ten inches in diameter. Cut a piece of wet floral foam to fill the compote bowl, shaping the corners with a craft knife and securing the foam across the bowl opening with waterproof floral tape. Cut large heads of white hydrangeas with two-inch stems, inserting them into the base of the foam at outward angles to establish a full, rounded foundation. Pierce the bases of three firm, unblemished green pears with wooden florist picks, and insert the picks deeply into the floral foam between the hydrangea heads so the fruit sits securely nestled in the petals. Tuck individual stems of blush spray roses, white lisianthus, and trailing jasmine vines into the remaining open spaces, ensuring the arrangement looks balanced from all viewing angles around the table.
9. Monogrammed Wine Bottle Trio with Dried Florals

Step-by-Step Guide
The monogrammed wine bottle trio with dried florals transforms recycled glass bottles into charming, customized decorative accents. This creative project utilizes cleaned, upcycled wine bottles coated in matte chalk paint, with the bride’s future monogram painted or decaled onto the center vessel. Filling the bottles with a selection of dried and preserved florals—such as fluffy pampas grass, bleached bunny tails, dried lavender, and preserved eucalyptus—creates a long-lasting display that requires zero water. The matte finish of the painted glass combined with the feathery textures of the dried plants delivers an on-trend, bohemian aesthetic that is both budget-friendly and durable. Because dried materials do not spoil or wilt, hosts can assemble these centerpieces weeks ahead of the bridal shower, significantly reducing event-week setup pressure and organization stress.
Collect three empty glass wine bottles of similar shape, soaking them in warm soapy water with a tablespoon of baking soda for thirty minutes to easily peel away paper labels and adhesive. Spray the dry bottles with two coats of ultra-matte chalk spray paint in soft ivory or warm linen, allowing two hours of drying time between coats. Apply a customized vinyl monogram sticker featuring the bride’s initials to the center bottle, smoothing out air bubbles with a flat card. Select a complementary bundle of dried florals, including fluffy mini pampas plumes, bleached lagurus bunny tails, palm spears, and dried wheat stalks. Trim the dried stems to stepped lengths using wire cutters, arranging the tallest stems in the center bottle and shorter stems in the flanking vessels. Group the three painted bottles together on the table, tying a frayed silk ribbon around the necks of the outer bottles to finish the design.
10. Floating Candle and Submerged Orchid Cylinders
How to Create
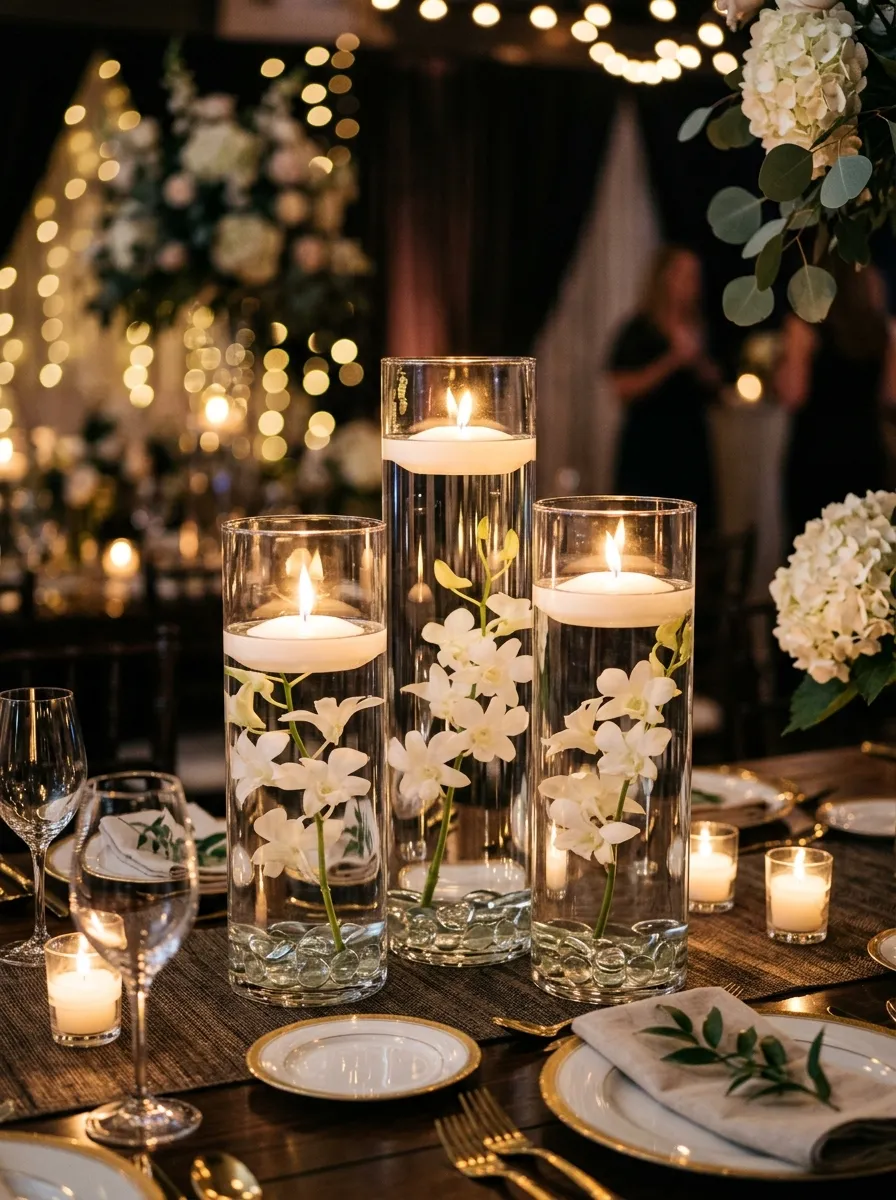
Floating candle and submerged orchid cylinders deliver an upscale, spa-like elegance characterized by clean symmetry, crystalline water, and dramatic illumination. In this setup, single stems of exotic blooms—such as dendrobium orchids or calla lilies—are weighted and fully submerged inside tall, water-filled glass vases topped with a glowing floating candle. The water acts as a magnifying lens that highlights the delicate, architectural form of the submerged petals, creating an ethereal focal point that feels luxurious and serene. When lit, the floating wax candles cast downward light through the water columns, making the blooms appear to glow from within. This arrangement is exceptionally fast to assemble on-site, requires few floral stems, and stays completely fresh regardless of room temperature, making it a reliable solution for high-heat summer gatherings and sophisticated evening banquets.
Begin by selecting a trio of heavy-bottomed, straight-sided glass cylinder vases in graduated heights of eight, ten, and fourteen inches, cleaning the glass thoroughly inside and out. Attach a small lead floral anchor or fishing weight to the cut bottom of a single fresh dendrobium orchid stem using clear monofilament wire. Lower the weighted flower stem into the dry vase, ensuring the stem stands straight and the blossom clusters face outward toward the primary viewing angle. Fill a clean pitcher with distilled water, pouring it slowly down the inside wall of the cylinder to prevent bubbles from forming on the flower petals until the water level reaches one inch below the rim. Gently place a wide, white disc-shaped floating candle on top of the water surface, ensuring the wick stays completely dry. Light the floating candles fifteen minutes before guests arrive to create a radiant, luminous tablescape.
Common Beginner Mistakes and How to Avoid Them
When executing DIY bridal shower centerpieces, beginners frequently encounter predictable pitfalls that can compromise the visual appeal and functionality of their tables. The most prevalent error is designing centerpieces that violate the sightline zone, creating a visual wall that prevents guests from talking across the table. Centerpieces should either remain under twelve inches in height or be raised on narrow pedestals above twenty inches to keep eye levels unobstructed. Another frequent mistake is neglecting proper flower preparation; placing unconditioned, thirsty stems directly into dry floral foam leads to rapid petal drooping before the party begins. Always hydrate your flowers in water buckets containing floral food for twenty-four hours before arranging, and ensure floral foam is fully saturated by letting it sink naturally in water without forcing it down. Additionally, hosts often overcrowd tables with too many competing decor pieces, leaving no room for drinkware, bread plates, or family-style serving platters. Maintain a balanced footprint by leaving at least twelve inches of clear space between the centerpiece perimeter and guest place settings. Finally, avoid using heavily scented flowers like oriental lilies or tube roses near dining areas, as their strong aromas can clash with food service and cause discomfort for sensitive guests.
Practical Tips for Better Results
Achieving professional, long-lasting results with DIY centerpieces requires systematic attention to small construction details and environment management. When preparing cut flowers, always trim stems at a sharp forty-five-degree angle using clean, bypass shears rather than standard kitchen scissors, which can crush water-conducting vascular bundles. Use waterproof florist tape to build a crisscross support grid across the mouth of wide vases; this simple grid keeps stems upright in their intended positions without clumping in the center. If your event takes place in warm weather, keep your completed floral arrangements in a cool, shaded room or air-conditioned space until the morning of the shower to slow bloom opening. For arrangements incorporating fresh fruits or citrus, select firm, slightly underripe produce that will not leak juices or soften under warm room lighting. Store a small emergency kit in your assembly bin containing floral tape, extra wire, green zip ties, paper towels, and extra stems so you can perform fast touch-ups on-site without stress. Taking these proactive steps ensures your handmade arrangements maintain a fresh, vibrant, and professional appearance throughout the entire event.
Styling, Presentation, or Organization Ideas
The overall impact of a bridal shower centerpiece depends heavily on how thoughtfully it integrates with the surrounding table elements, linens, and venue layout. When styling long banquet-style tables, repeat your chosen centerpiece formula down the center in a structured rhythm, alternating between floral vessels and low ambient candles to establish visual continuity. For round tables, ground your centerpiece arrangement on a circular wooden riser, mirrored plate, or fabric doily to define the table’s central axis. Incorporate subtle paper goods—such as custom-printed menu cards, personalized place cards, and small favor boxes—that share typography and color themes with the centerpiece components. Maintain color balance by pulling one accent color from the flowers into the table napkins or glassware, creating a cohesive design thread across the space. When setting up at the venue, arrange all tables systematically: place linens and chargers first, position central centerpiece vessels second, and insert delicate elements like candles and water last. This structured approach prevents accidental spills on fresh linens, keeping the assembly process orderly, safe, and efficient.
Budget or Time Planning
Executing bridal shower centerpieces smoothly requires realistic budget tracking and a disciplined preparation timeline. Allocate your decorative budget toward high-impact elements like quality glassware and key focal blooms, utilizing inexpensive greenery stems like salal, ruscus, and tree fern to build lush volume affordably. Sourcing vessels from thrift shops, borrowing matching containers from friends, or purchasing glassware in bulk online helps keep container costs low. In terms of time management, structure your workflow over a four-day timeline: spend Thursday gathering vessels, cleaning glassware, and buying non-perishable hardware; dedicate Friday to picking up fresh flowers, trimming stems, and hydrating flowers in water buckets; spend Saturday assembling durable bases, soaking foam, and styling table arrangements; and reserve Sunday morning for transporting completed pieces and lighting candles. Grouping identical production tasks together—such as cutting all foam blocks or stripping foliage in single sessions—speeds up assembly and minimizes cleanup. This structured schedule keeps your creative process relaxed, enjoyable, and free of last-minute party panic.
Creative Expansion and Advanced Inspiration
Once you feel comfortable executing basic centerpiece designs, you can explore advanced creative variations that introduce sensory elements, dynamic lighting, and personalized storytelling. Consider incorporating personal family heirlooms into the arrangements, such as displaying the bride’s grandmother’s silver sugar bowls as bud vases or integrating vintage lace runners passed down through generations. You can also explore dynamic lighting installations, using submersible micro-LED lights nestled beneath colored glass gems in aquatic centerpieces to create a magical, glowing water effect during evening receptions. Another creative avenue is designing edible botanical centerpieces, mixing ornamental kale, fresh berry clusters, and aromatic herbs into floral arrangements, which look gorgeous and highlight culinary themes. For modern artistic flair, experiment with painting dried palm spears or monstera leaves in muted pastel or metallic tones, pairing them with fresh flowers for a bold, mixed-media presentation. Viewing each table centerpiece as an evolving creative canvas allows you to craft a one-of-a-kind celebration that highlights your personal craftsmanship while honoring the bride on her special day.