Celebrating an upcoming marriage begins with the engagement party, where tabletop styling sets an inviting, celebratory tone for gathering families and friends. This comprehensive guide explores ten versatile…
Celebrating an upcoming marriage begins with the engagement party, where tabletop styling sets an inviting, celebratory tone for gathering families and friends. This comprehensive guide explores ten versatile concepts for building your own engagement party centerpieces using fresh cut botanicals, ambient candlelight, sculptural fruit, textured ceramics, and repurposed vintage vessels. Readers will discover clear mechanics for building balanced arrangements, stabilizing tall stems, managing water levels, and designing cohesive tablescapes without hiring professional event florists. Crafting your own event decor simplifies party planning because every vessel, color harmony, and height profile can be adapted directly to suit your home dining room, rented venue, or backyard garden. You will learn how to prepare perishable blooms for multi-hour stability, assemble continuous table runners, arrange multi-candle clusters safely, and curate harmonious textures across long banquet or round cocktail tables. Beyond marking this special relationship milestone, these durable glassware collections, ceramic compotes, and metallic candleholders transition effortlessly into future wedding events or permanent home decor. Whether your aesthetic leans toward a crisp minimalist style or an organic, abundant botanical display, this tutorial provides the foundational principles and creative ideas needed to complete memorable, photo-ready party decoration on an organized schedule.
Why This Idea Is Trending or Useful
Handcrafted engagement party centerpieces maintain significant momentum across popular Pinterest ideas because they merge intimate personal storytelling with practical financial flexibility. As couples take charge of their pre-wedding festivities, self-executed tabletop decor provides practical budget ideas that keep overall wedding budgets manageable from the very first celebration. Modern hosting trends prioritize relaxed, thoughtful gatherings over rigid formal ballroom traditions, favoring personalized details, tactile natural materials, and approachable elegance. The practical value of this approach lies in its versatility, allowing hosts to test centerpiece concepts, finalize color stories, and refine assembly methods well before the larger wedding day arrives. Because these designs utilize accessible structural mechanics like floral pin frogs, chicken wire netting, and vessel grouping, crafting your own centerpieces serves as an approachable, beginner friendly creative project. Contemporary tablescaping celebrates asymmetrical movement, loose botanical groupings, and dynamic candle spacing, meaning slight variations only enhance the organic charm of the tables. Furthermore, mastering these hands-on styling techniques gives hosts lifelong entertaining confidence for anniversary dinners, holiday celebrations, and casual dinner parties throughout married life.
Materials and Preparation
Proper preparation forms the essential foundation of every dependable tablescape tutorial, guaranteeing stability, hydration, and polished execution across all guest tables. Gather core hardware materials before beginning, including heavy stoneware compote bowls, clear glass hurricane sleeves, fluted bud vases, brass taper candleholders, metal pin frogs, and rolls of green floristry wire netting. Fundamental hand tools include bypass floral shears, sharp kitchen snips, waterproof floral tape, stem strippers, clean hydration buckets, and adhesive floral putty to lock mechanical armatures into dry vessels. Prepare fresh botanical materials by picking up wholesale flowers two days prior to the event, trimming stems at sharp forty-five-degree angles, and conditioning them in cool water with floral preservative in a dark room. For candle-focused designs, source certified dripless taper candles and long-burning soy tealights to maintain smokeless, steady illumination throughout the dinner. Establish a clean, organized workstation by laying down protective craft paper, grouping your botanicals by variety and stem length, and measuring table dimensions accurately to ensure your completed centerpieces preserve clear sightlines between seated guests.
1. Low Footed Stoneware Compote with Lush Garden Roses and Jasmine
Step-by-Step Guide
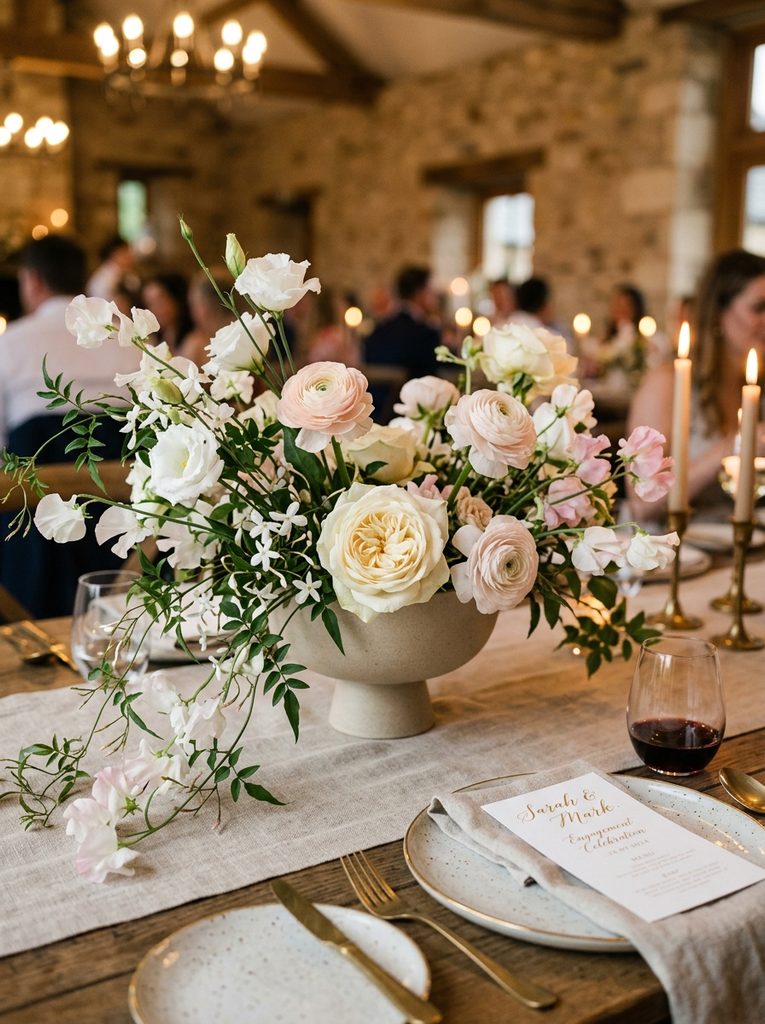
The footed stoneware compote arrangement brings classical fine-art balance, soft romance, and natural movement to engagement party dining tables. This concept elevates creamy garden roses, airy lisianthus, and cascading jasmine vines inside a matte, neutral ceramic pedestal bowl. The gentle elevation of the footed bowl lifts the floral crown slightly off the table, allowing trailing greenery to drape downward toward table runners while keeping blooms well below seated eye level. Using a soft palette of blush, ivory, champagne, and deep olive green, this arrangement delivers an understated, luxurious aesthetic that complements linen napkins and fine ceramic dinnerware. The open, asymmetrical arrangement of stems prevents the piece from looking stiff, allowing each bloom space to open naturally. By focusing on generous horizontal width rather than intrusive vertical height, the compote design provides an expansive floral presence that feels generous, sophisticated, and thoroughly welcoming.
To construct this garden-inspired arrangement, begin by securing a small ball of coated chicken wire or a brass floral frog into the base of a clean stoneware compote using floral adhesive putty. Fill the vessel two-thirds full with cool water mixed with floral food, making sure the exterior rim remains completely dry. Insert curved branches of olive foliage, seeded eucalyptus, and trailing jasmine vine along the outer edges of the wire frame, letting several stems arch down toward the table surface to set the shape. Trim focal blooms—such as large ivory garden roses and blush ranunculus—at varied stem lengths and insert them into the center of the armature at gentle outward angles. Fill the intermediate spaces with fluttering white lisianthus, sweet peas, and pale spray roses, concealing all underlying mechanics beneath the greenery collar. Rotate the compote frequently during assembly, ensuring the floral silhouette looks balanced, dimensional, and fully finished from all viewing perspectives.
2. Minimalist Cluster of Ribbed Glass Bud Vases and Single Stems
How to Create
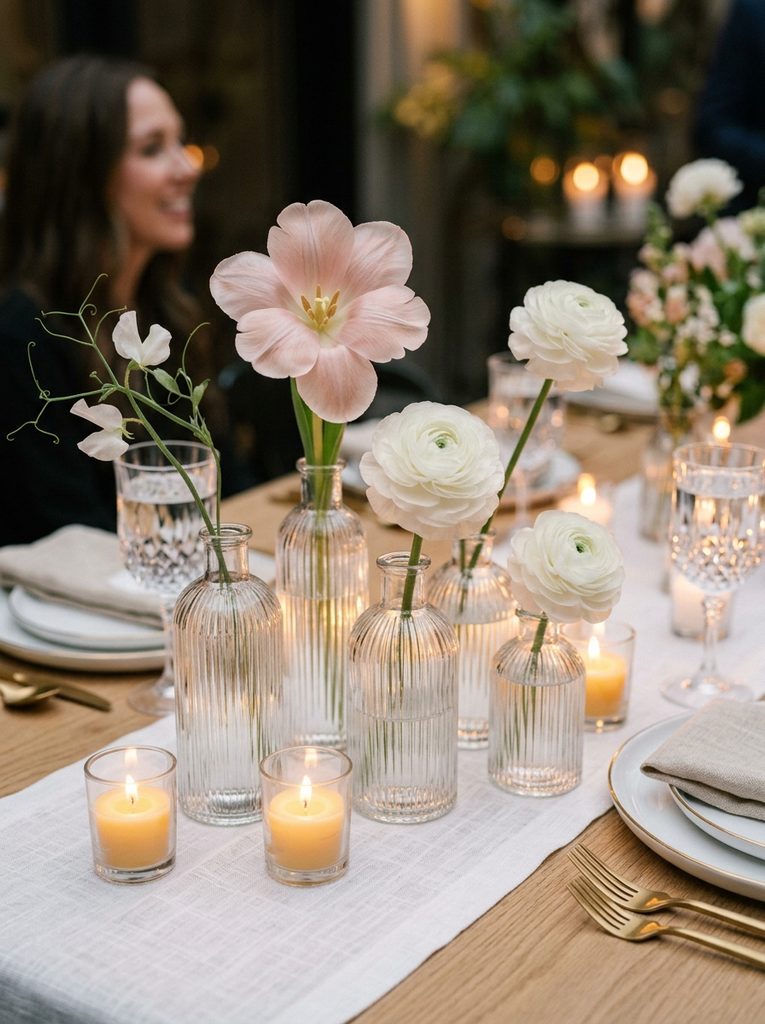
A cluster of ribbed glass bud vases provides a clean, modern tablescape that highlights the sculptural beauty of individual botanical specimens. This design concept groups three to five small, textured glass bottles of varying heights along the center of dining tables, each holding only one or two striking blooms. By isolating individual stems, such as an open French tulip, a fluttering butterfly ranunculus, or an architectural anthurium, the arrangement celebrates unique petal contours and organic lines. The textured ridges along the clear glass catch ambient lighting, adding delicate vertical refraction that enlivens simple table linens without introducing visual clutter. This modular format is lightweight, exceptionally easy to transport, and quick to set up, making it an ideal choice for busy hosts decorating rented dining spaces or restaurant back rooms. The open space between the clear glass vessels maintains clear sightlines, encouraging lively conversation among dinner guests.
To assemble this minimalist cluster, gather four or five ribbed glass bud vases measuring between four and seven inches in height, cleaning every piece thoroughly with glass cleaner. Fill each vase two-thirds full with fresh water using a small, narrow-spout watering can to keep the outside glass clean and dry. Trim your chosen focal flowers at varied heights, cutting stems so each blossom hovers between two and four inches above its vase rim. Insert a single architectural stem—such as an open blush tulip, an ivory anemone, or a stem of sweet peas—into each container, gently angling the heads to create natural movement. Group the vases in an organic, staggered cluster in the table center, leaving two to three inches of open space between the bottles. Intersperse two clear glass votive cups with soy tealights among the bud vases, ensuring the warm candlelight illuminates the ribbed glass and floral silhouettes.
3. Continuous Citrus Branch and Taper Candle Tuscan Runner
Execution Process
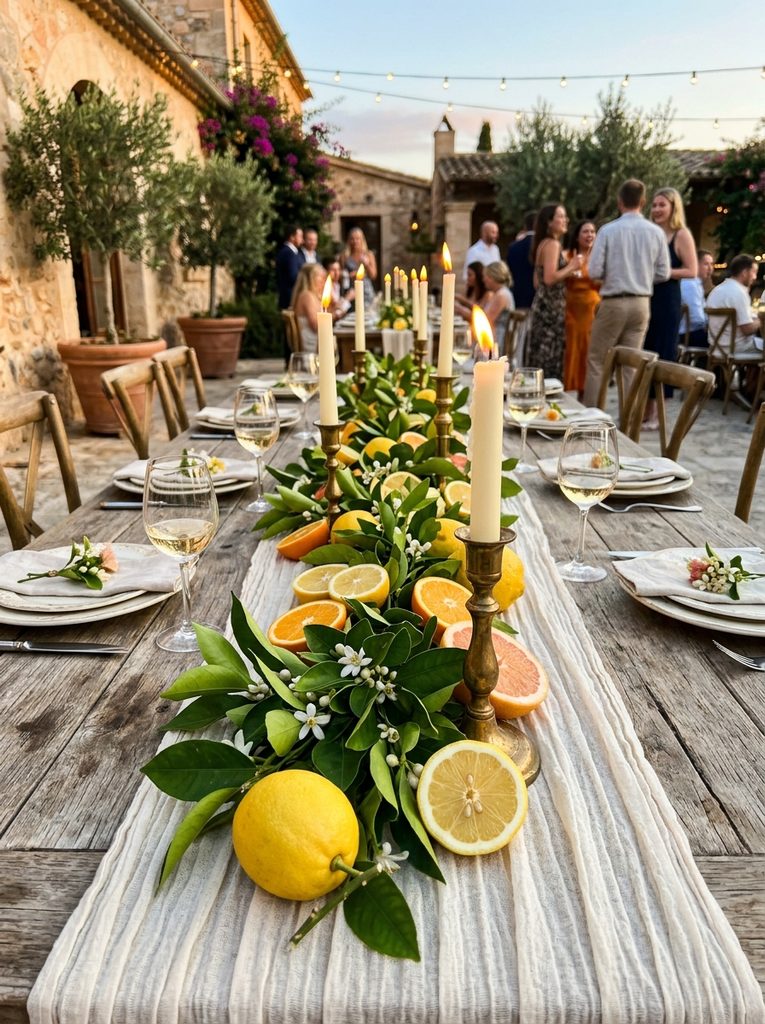
A continuous citrus branch runner combined with glowing taper candles brings vibrant Mediterranean warmth, tactile organic abundance, and celebratory cheer to engagement party tables. This low-profile design weaves fresh leafy lemon or orange branches down the center of long rectangular tables, nestled among whole fresh lemons, cut citrus halves, and brass candlesticks. The glossy deep green leaves provide a rich, natural base that contrasts with the bright yellow citrus skins and warm ivory taper candles. The low greenery layout eliminates vertical barriers, allowing uninterrupted sightlines and photography across communal dining setups. As the evening progresses, the fresh citrus and greenery release a faint, refreshing fragrance that enriches the atmosphere without overpowering food courses. This flexible format adapts seamlessly to any table length, making it a natural fit for outdoor patio dinners, vineyard gatherings, and family-style Italian feasts.
Begin by laying a neutral, unbleached linen or natural gauze fabric runner down the center of your dining table, creating soft, organic ripples with the fabric. Lay fresh leafy citrus branches end to end down the length of the runner, overlapping the woody stem cuts beneath the foliage of the adjacent branch to hide all mechanics. Intersperse solid brass taper candleholders of varied heights along the foliage line, spacing them eighteen to twenty-four inches apart to maintain balanced light down the table. Insert dripless ivory or beeswax taper candles into each holder, pressing a dab of candle putty into the cup to ensure each candle stands perfectly plumb. Arrange whole fresh lemons, small clementines, and a few cleanly halved citrus fruits along the greenery edges, exposing the glossy fruit pulp for textural contrast. Check that all fruit halves rest on small protective wax paper discs to prevent citrus juice from staining the underlying linen runner.
4. Architectural Floating Candle Cylinders with Submerged Olive Branches
Setup Method
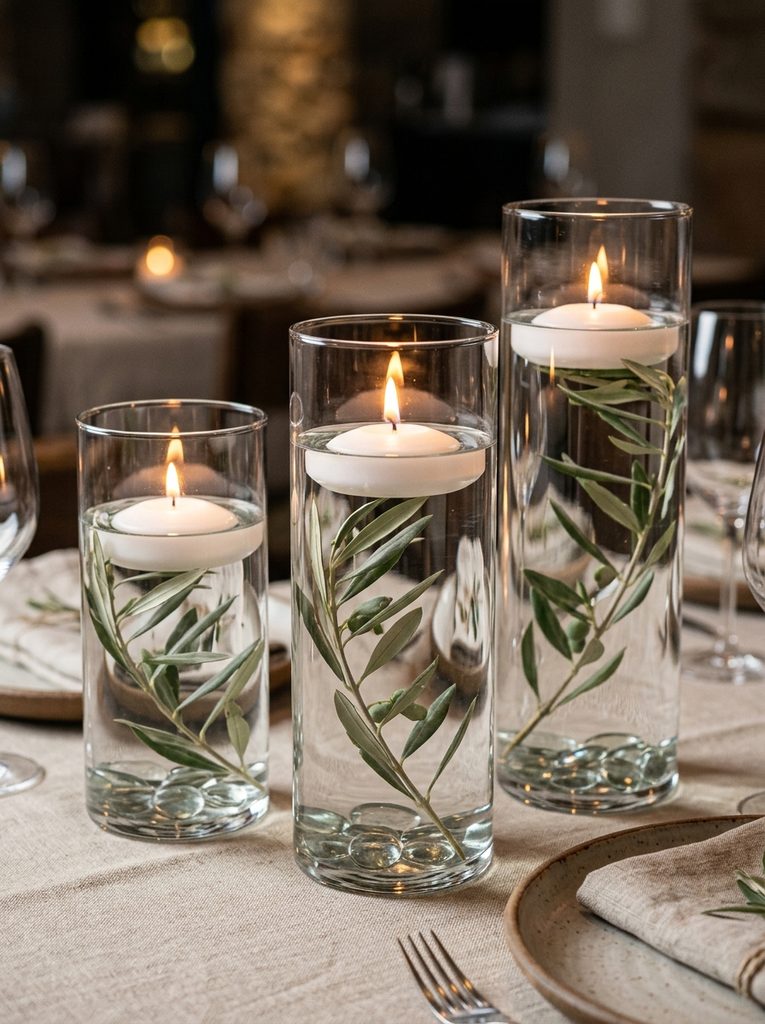
A submerged olive branch cylinder display utilizes water refraction and floating wicks to create an ethereal, glowing focal point down the center of reception tables. This concept groups three clean-lined glass hurricane cylinders of varying heights, each containing a weighted stem of silvery-green olive foliage submerged beneath a floating wax disc. The clear water magnifies the delicate leaf structures and woody branches, casting shimmering light reflections across glassware and dinner plates. Water also acts as a natural heat buffer and wind shield, making this design exceptionally safe for both indoor dining rooms and breezy outdoor garden patios. The clean vertical geometry of the glassware brings a crisp modern design sensibility that feels disciplined and uncluttered, coordinating effortlessly with minimalist place settings and modern tableware. Because the design uses durable foliage, it can be assembled hours in advance without any risk of wilting.
To construct this underwater centerpiece, select clear glass cylinder vases measuring eight, ten, and twelve inches in height with uniform four-inch diameters. Clean each glass vase inside and out using a microfiber cloth and rubbing alcohol to remove all fingerprints, lint, and water spots. Cut fresh olive branches to heights that finish roughly two inches below each cylinder rim, securing a small lead floral weight or clear glass marble to the base of each stem using clear fishing line. Place the weighted branch flat against the bottom of the cylinder, then slowly pour distilled room-temperature water down the inside wall to prevent persistent air bubbles from forming on the leaves. Fill each vase to approximately one and a half inches below the top rim, letting the water settle for ten minutes. Gently lower a three-inch white floating candle onto the water surface, keeping the wick completely dry until lighting time.
5. Terracotta Compote with Sun-Drenched Meadow Florals
Step-by-Step Guide
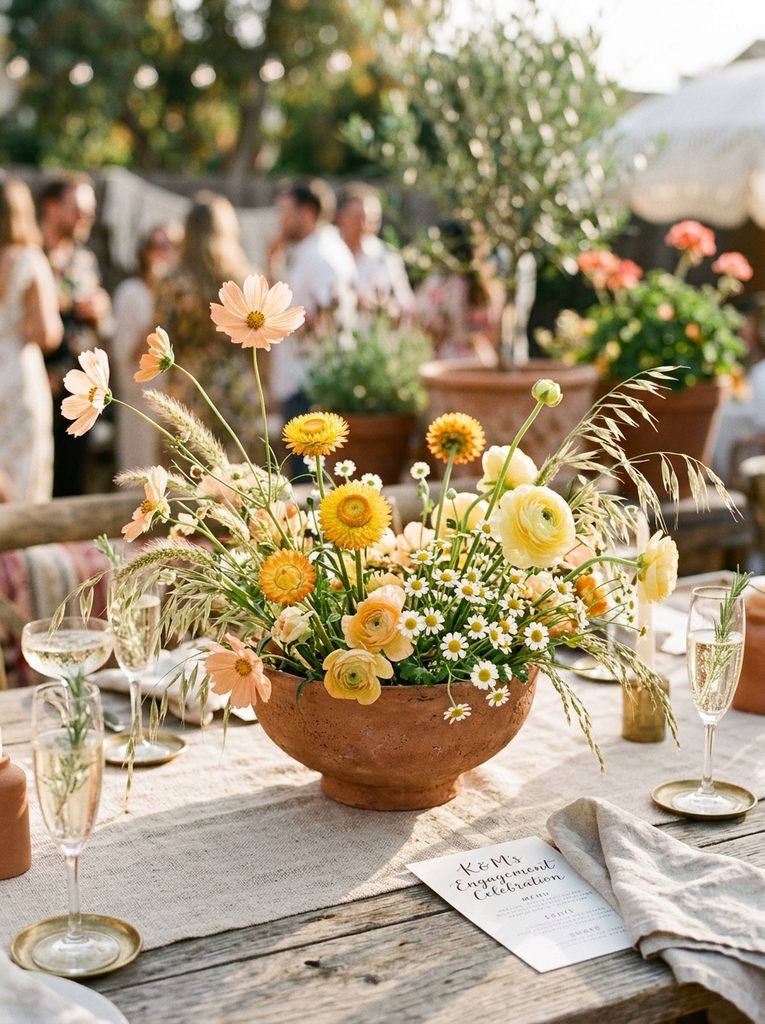
The terracotta meadow compote brings warm earth tones, textural variety, and relaxed botanical charm to daytime engagement brunches and garden celebrations. This design combines shallow unglazed terracotta bowls with seasonal meadow flowers, featuring golden strawflowers, chamomile daisies, fluttering cosmos, and soft ornamental grasses. The porous, warm clay vessel anchors the composition, providing natural visual weight that complements rust, apricot, and mustard color palettes. Rather than following a tight, rounded shape, this arrangement prioritizes loose, airy stems that evoke a blooming summer meadow swaying in the breeze. The juxtaposition between smooth, matte terracotta pottery and crisp, papery petals creates an engaging visual rhythm that feels deliberate yet relaxed. This centerpiece works wonderfully for bohemian gatherings, barn celebrations, and casual outdoor patio lunches where an approachable, artisanal aesthetic is desired.
Prepare the terracotta compote by pressing a heavy brass floral frog into the base of the container using a generous ring of floral adhesive putty. Pour two inches of fresh water into the bowl, keeping the level just below the vessel rim to avoid accidental spills during table placement. Cut stems of wild grasses, dried oats, and airy chamomile to staggered lengths, inserting them into the outer perimeter pins of the frog to establish an open, dancing silhouette. Add your focal blooms—such as peach cosmos, yellow ranunculus, and warm strawflowers—into the central pins, varying stem heights between five and nine inches to create natural depth. Fill open gaps around the base with sprigs of feverfew, soft bunny tails, and mint foliage to hide the metal frog mechanics completely. Inspect the completed arrangement from seated eye level, adjusting stem angles so the finished piece remains light, transparent, and balanced from every angle.
6. Tiered White Ceramic Pedestals with Abundant Fresh Figs and Grapes
How to Make
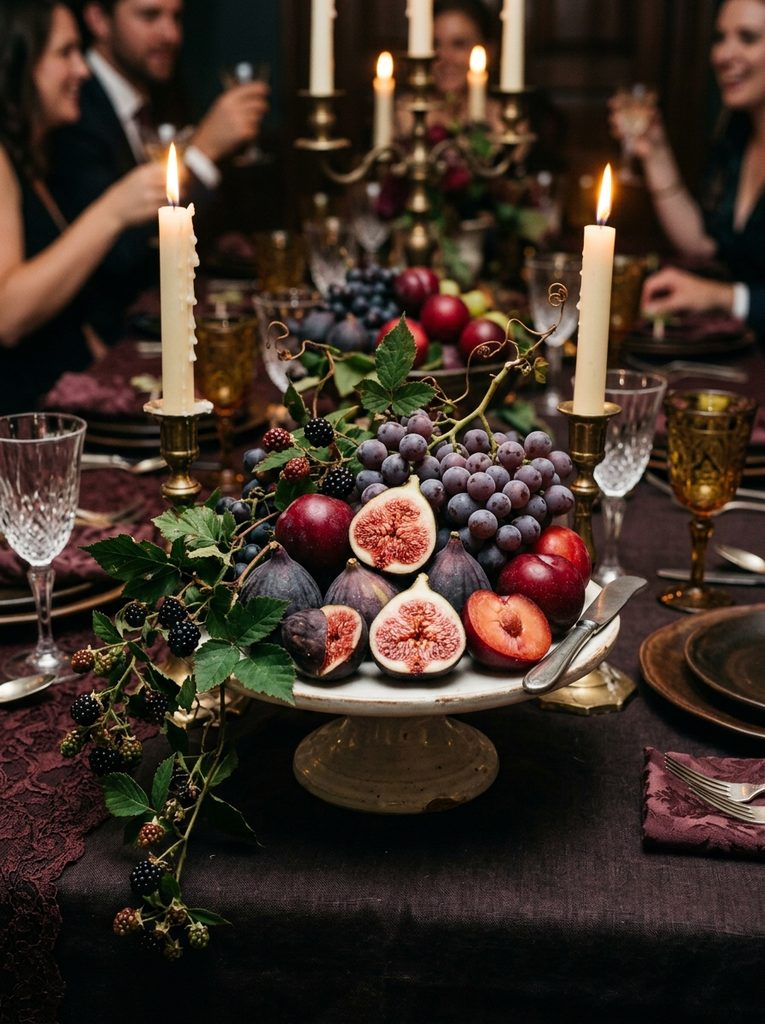
A tiered ceramic fruit pedestal centerpiece combines classical banquet abundance with rich, edible textures, celebrating hospitality and romance through nature’s bounty. This concept arranges dark purple figs, dusty concord grapes, ripe plums, and trailing blackberry brambles across low white ceramic cake stands and footed compotes. The rich jewel tones of the ripe fruit contrast against the clean, chalk-white ceramic glaze, creating a painterly tablescape reminiscent of historical Dutch still-life art. Using fruit as a primary decorative element introduces deep, complex colors without the high cost of rare dark-toned fresh flowers. The solid presence of the ceramic pedestals lifts the fruit displays off the table surface, preserving room for place settings and personal glassware below. This design is exceptionally well-suited for autumn engagement celebrations, winery dinner parties, and intimate evening feasts where rich, sensory styling is prioritized.
Begin construction by selecting two low ceramic cake pedestals or footed fruit platters measuring eight and ten inches in diameter, placing them along the table center. Clean the ceramic surfaces thoroughly, then lay a small protective circle of parchment paper across each pedestal top to keep the platters clean. Lay a foundation of fresh, leafy botanical vines—such as dark salal leaves, seeded eucalyptus, or bay laurel—around the pedestal rims, allowing several leafy stems to trail off the edges toward the table. Arrange dense clusters of black grapes and deep red plums across the plates, building a supportive base for more delicate fruits. Cut four or five fresh purple figs cleanly in half, nestling the cut halves into the fruit cluster with their vibrant pink centers facing outward. Intersperse small clusters of blackberries and woody rosemary sprigs into the gaps, finishing the look with brass candlesticks and ivory tapers placed nearby.
7. Mirrored Reflection Tray with Pressed Glass Votives and Florals
Execution Process
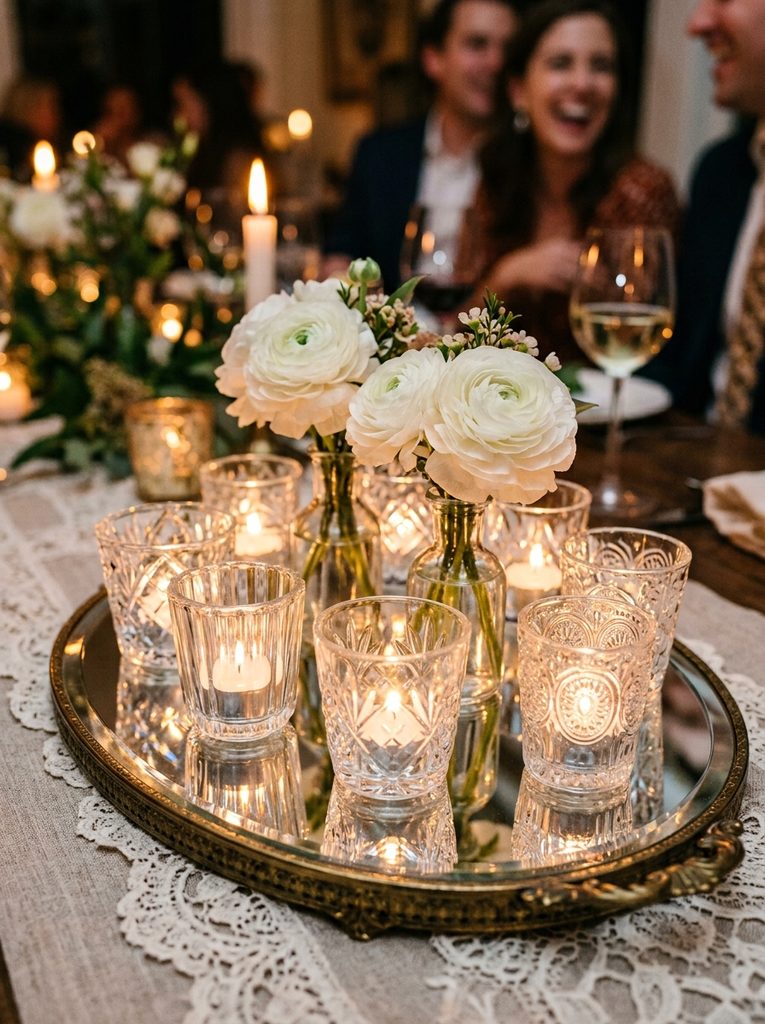
A mirrored reflection tray centerpiece maximizes evening candlelight by bouncing illumination across a reflective horizontal plane, creating an intimate, glowing atmosphere. This design places an antiqued, beveled-edge mirror tray in the table center, holding an assortment of clear pressed-glass votive holders, crystal bud vases, and floating blossoms. As the numerous candles flicker, the mirror reflects the points of light upward, producing an illusion of endless floating flames that makes evening dining spaces feel bright and festive. This arrangement is particularly effective for evening cocktail gatherings, indoor private dining rooms, or spaces with dim ambient lighting where maximizing warmth is essential. The low profile of the display keeps sightlines open across the table, encouraging lively conversation among dinner guests. The mix of cut crystal and pressed glass surfaces introduces vintage elegance that elevates simple table linens and classic tableware.
To assemble this reflective display, begin by setting an ornamental, beveled-edge mirror tray measuring twelve to fourteen inches directly in the center of each guest table. Clean the mirror surface using streak-free glass cleaner and a microfiber towel, removing all dust, lint, and fingerprints before styling. Gather six to eight pressed-glass and cut-crystal votive holders along with two miniature glass bud vases, arranging them organically across the reflective tray. Fill the miniature bud vases with fresh water, inserting two or three short-stemmed white ranunculus or sweet peas into each vase. Insert eight-hour soy votive candles or clear-cup tealights into the remaining glass holders, checking that wicks sit centered within their cups to ensure an even burn. Group the glassware in small, dense clusters rather than rigid lines, leaving pockets of open mirror surface to bounce the flickering candlelight across the table.
8. Rustic Wooden Planter Box with Blooming Potted Orchids and Moss
Setup Method
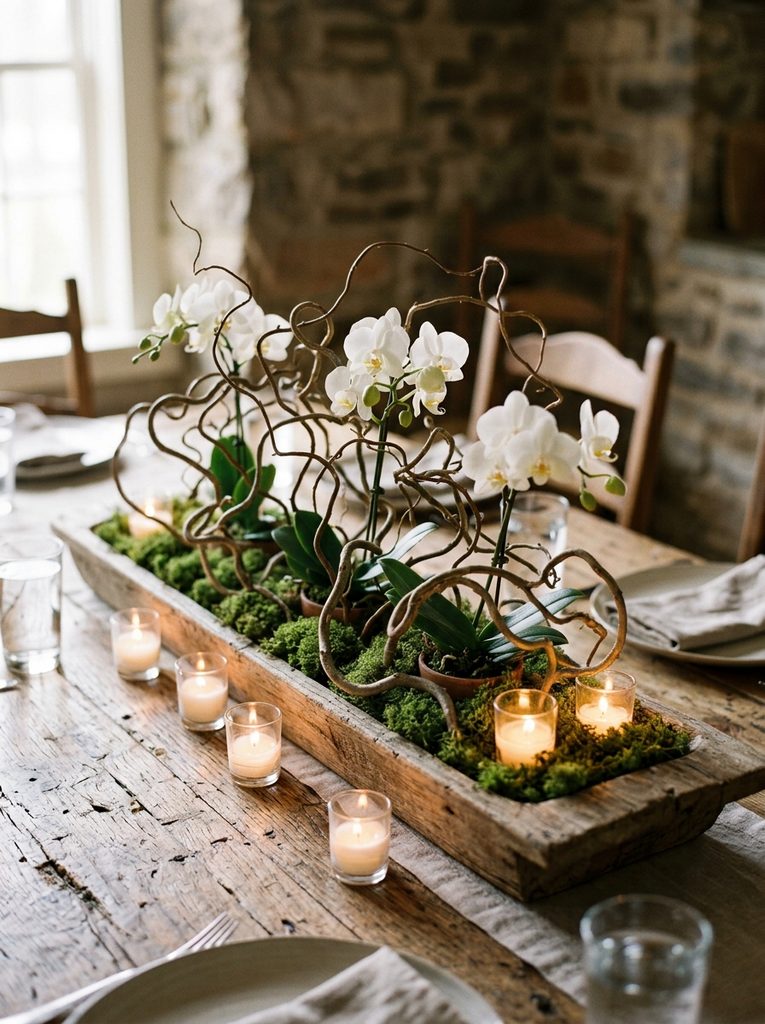
A wooden planter box filled with potted orchids and lush moss provides a structured, long-lasting centerpiece that bridges rustic woodwork with refined tropical botanicals. This design utilizes a narrow, untreated or weathered timber trough holding miniature potted white phalaenopsis orchids surrounded by preserved pillow moss and curly willow branches. The warm, textured wood grain grounds the delicate white orchid blossoms, creating an approachable, upscale rustic look that suits farmhouse dining spaces and barn venues. Because the orchids remain living in their nursery containers rather than cut from stems, this centerpiece stays pristine throughout the entire party without wilting. After the engagement celebration ends, the living potted plants can be kept as home decor or gifted to parents and bridal party members, extending their functional value well beyond the party.
To construct this planter centerpiece, select a narrow wooden box measuring approximately twenty inches in length and five inches in width, lining the interior with heavy plastic sheeting to catch excess moisture. Place three miniature potted white phalaenopsis orchids inside the trough, spacing them evenly along the box length while keeping the plants in their plastic pots. Fill the empty spaces around the plastic pots with hydrated green sheet moss or preserved pillow moss, packing it firmly until the top surface completely conceals the containers. Insert two or three stems of natural curly willow branches between the orchids, gently bending the branches into low arches that wrap around the orchid stems. Secure the arching willow ends into the moss base, creating an open branch framework that frames the white blossoms. Wipe the exterior wood panels clean, placing the finished planter in the table center accompanied by small glass votives along the flanks.
9. Monochromatic Neutral Cloud with Bleached Ruscus and Pampas
Step-by-Step Guide
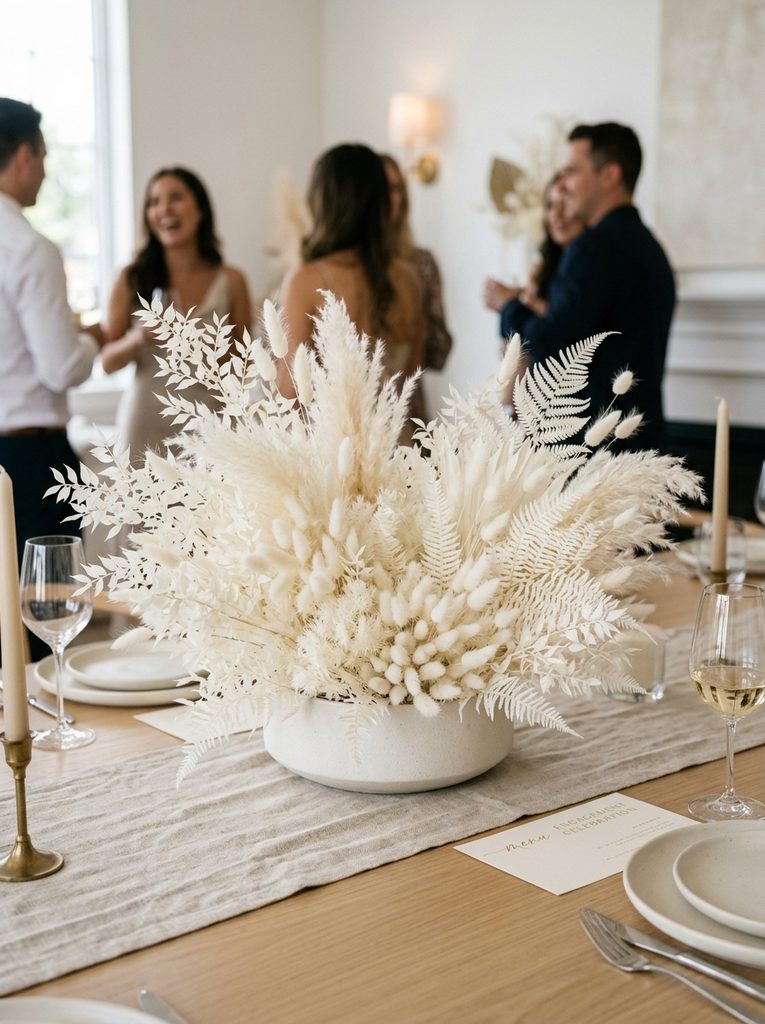
The monochromatic neutral cloud centerpiece relies on creamy, ivory tones to introduce soft volume, modern design lines, and tactile depth to engagement party tables. This concept strips away visual noise by focusing entirely on varied textures within an identical color family, producing a cloud-like installation that feels light and expansive. The structure features sweeping arcs of preserved bleached Italian ruscus, fluffy mini pampas plumes, natural bleached ferns, and soft bunny tails arranged in a low ceramic dish. Because the arrangement omits dark greens and saturated hues, it reflects room lighting softly, creating a bright atmosphere that coordinates naturally with modern neutral linens and stoneware plates. The overall silhouette remains low and wide, preserving open sightlines between guests seated across from one another. By pairing matte dried leaves with soft grass plumes, the piece captures an elevated, modern aesthetic that feels clean, curated, and timeless.
To make this monochromatic arrangement, select a wide, shallow ceramic dish in a matte oatmeal or stone finish, securing a dome of coated chicken wire across the rim with waterproof tape. Begin assembly by inserting horizontal stems of preserved bleached ruscus into the outer edges of the wire frame, establishing the overall width of the display. Next, cut mini pampas plumes to varied heights and insert them vertically into the central grid to establish the core density and crown of the piece. Integrate preserved bleached ferns throughout the midsection, distributing them evenly to conceal the structural wire and soften transitions between outer stems. Finish the composition by nestling soft clusters of ivory bunny tails into the foreground, angling them outward slightly to break the container rim. Inspect the finished form from all four sides, adjusting individual stem depths to verify that the profile remains balanced, symmetrical, and fully stable on the tabletop.
10. Antiqued Brass Candelabra with Trailing Smilax and Ivory Tapers
How to Create
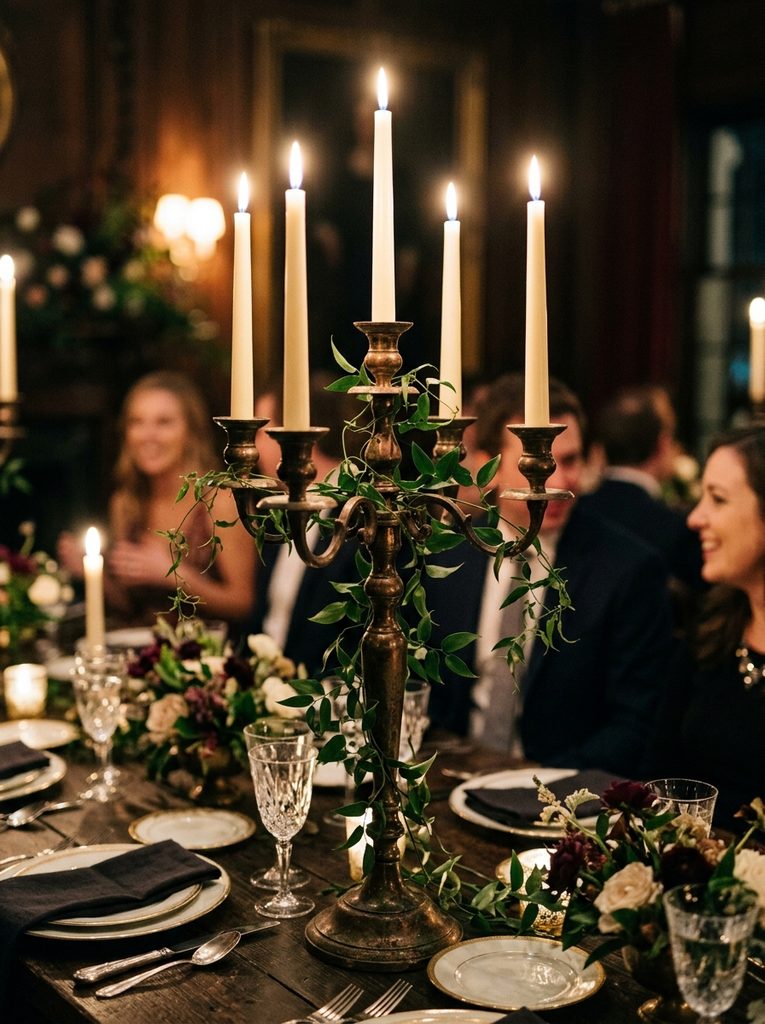
An antiqued brass candelabra centerpiece brings dramatic vertical height, historical romance, and timeless elegance to formal engagement party dining spaces. This concept features a tall, three- or five-arm vintage brass candelabra elevated twenty to twenty-four inches above the table surface, supporting long taper candles and draped with real greenery. By elevating the candle flames well above seated eye level, this design leaves table surfaces clear for dinner plates, wine glasses, and shared platters, while preserving sightlines across the table. Slender, pliable stems of fresh southern smilax vine and Italian ruscus wrap around the brass stem and arms, softening the metal with living movement. The warm, oxidized patina of antique brass catches candlelight with a soft glow, lending an authentic heirloom quality to evening celebrations. This design bridges formal tradition with relaxed botanical accents, producing a photo-ready focal point that commands attention.
To execute this classic candelabra arrangement, source a sturdy five-arm brass candelabra standing twenty to twenty-four inches tall, ensuring the weighted base sits flat without wobbling. Polish the brass lightly with a dry cloth to bring out highlights while preserving the dark patina within the engraved details. Insert five twelve-inch dripless ivory taper candles into the arm sockets, securing each base with a strip of adhesive floral wax tape to keep them standing plumb. Secure a small ring of floral mechanic foam or an aluminum wire armature around the central stem just below the branching arms, wrapping it tightly with green florist tape. Weave stems of fresh smilax or wired English ivy through the mechanical framework, winding the vines down the vertical stem and allowing delicate tendrils to trail outward along the horizontal arms. Check that no trailing leaves or tendrils cross directly above or within three inches of any candle cup before lighting.
Common Beginner Mistakes and How to Avoid Them
Constructing engagement party centerpieces requires careful attention to balance, floral hydration, and room safety that differs from casual everyday flower arranging. The most frequent mistake beginners make is constructing arrangements that sit directly at guest eye level, typically between twelve and twenty-four inches above the tabletop. Centerpieces built within this visual zone block cross-table sightlines, frustrating guests and disrupting natural table conversation throughout the celebratory meal. Always keep your arrangements either low—under twelve inches—or elevate them above twenty-four inches using tall, slender risers that preserve clear views across the table. Another common issue is failing to hydrate fresh cut flowers correctly before assembly, which causes delicate blooms to wilt prematurely under warm indoor lighting. Always condition wholesale stems in fresh water treated with commercial floral preservative for at least twelve hours in a cool room before arranging. Beginners also frequently overlook flame safety when styling candles, placing exposed wicks too close to dry greenery runners or air conditioning vents. Guard against fire hazards by enclosing active flames inside glass hurricane sleeves that extend at least two inches above the wick, and anchor every candle base securely with wax adhesive.
Practical Tips for Better Results
Achieving professional, boutique-quality results with DIY engagement centerpieces comes down to proper mechanics, temperature control, and smart transport planning. When arranging flowers in compotes or shallow bowls, use coated wire netting or heavy metal pin frogs rather than traditional green floral foam whenever possible. Wire netting allows stems to drink water freely, extending bloom life and allowing you to adjust stem angles without tearing foam foundations. To keep greenery runners looking vibrant on dry dining tables, mist the leaves with a gentle spray of anti-transpirant floral sealant thirty minutes before setup; this locks internal moisture into the foliage, preventing curling and wilting throughout the evening. When working with floating candle cylinders, always carry water in dedicated pour pitchers directly to the dining tables rather than trying to move pre-filled vases, preventing spills across dry table linens. If your design includes taper candles, place them in the refrigerator for two hours prior to the event; chilled wax burns more slowly and resists dripping caused by passing air currents. Finally, always prepare one complete backup centerpiece, storing it in a cool area with spare tools so your setup team can resolve any accidental table mishaps quickly.
Styling, Presentation, or Organization Ideas
The overall visual impact of an engagement party centerpiece depends on how thoughtfully it integrates with surrounding reception table elements, including linens, dinnerware, lighting, and printed menus. When designing long banquet layouts, avoid isolated floral clumps by bridging the space between primary arrangements with low votives, loose greenery sprigs, or running fabric runners that guide the eye down the table. Pair textured botanical arrangements with contrasting smooth surfaces, such as polished ceramic charger plates, clean crystal stemware, and pressed linen napkins, to create an inviting, multi-layered tablescape. For round dining tables, maintain a compact circular footprint that leaves at least fourteen inches of perimeter space for dinner plates, wine glasses, and family-style bread baskets. When planning multi-table setups, establish clear visual harmony by using identical vessel materials across every table, while allowing slight, natural variations in bloom placement within each bowl. This subtle variation creates an authentic, curated ambiance rather than a rigid, factory-produced look. Organize your completed centerpieces into sturdy, divided plastic storage crates labeled with assigned table numbers, streamlining venue setup and keeping your team organized on the party morning.
Budget or Time Planning
Crafting your own engagement party centerpieces yields significant financial savings compared to full-service commercial floristry, but keeping the project enjoyable requires realistic scheduling and disciplined purchasing timelines. Begin sourcing your glassware, ceramic compotes, mechanical frogs, and candleholders two to three months before the party date, purchasing materials in bulk from wholesale suppliers to secure quantity discounts. Because durable hardware has an indefinite shelf life, you can purchase vessels gradually across several weeks, spreading expenses comfortably rather than facing an enormous last-minute bill. Order your fresh flowers through reputable wholesale distributors to arrive two days before the party, allowing the closed buds twenty-four to forty-eight hours to hydrate, relax, and open to their ideal photographic fullness. Schedule your primary centerpiece assembly session for the day before the event, assembling a dedicated team of two or three helpers to work through an efficient assembly line: one person trims stems, one handles water and mechanics, and one places the flowers. Keep completed fresh arrangements in a cool, air-conditioned room away from direct sunlight and ripening fruit, ensuring the blooms remain crisp, vibrant, and ready for venue delivery.
Creative Expansion and Advanced Inspiration
Once you master foundational floral mechanics and vessel styling, you can expand these principles into larger party installations and coordinated decor elements throughout your venue. Use the same compote vessel mechanics and floral palettes to build matching arrangements for the welcome drink bar, dessert table, and guest book station, creating a cohesive visual thread across every area of the celebration. You can also incorporate subtle personal touches, such as weaving polaroid photos of the couple’s relationship timeline into the greenery runners or writing guest place cards on smooth river stones nestled beside the centerpieces. For dramatic evening entrances, scale up your cylinder candle clusters along the front walkway or line the perimeter of the patio to cast a romantic, flickering glow as guests arrive. After the party concludes, invite close family and friends to take the compote arrangements home as living party favors, extending the joy of the celebration into their own living rooms. The practical skills you develop while designing your own engagement party centerpieces transform a one-day party project into lasting design confidence that you can draw on for wedding planning and home entertaining for years to come.