Curating antique-inspired tabletop styling has emerged as a cornerstone of modern interior design, filling digital mood boards with timeless decor inspiration. This comprehensive guide details ten authentic DIY vintage centerpiece ideas structured to help homeowners, event hosts, and decorators design elevated tablescapes. Throughout this tutorial, readers will discover step-by-step methods for upcycling historic household artifacts into cohesive floral displays and atmospheric focal points. You will learn how to balance aged patina, structural heights, and complementary botanicals to produce refined centerpieces suitable for dining rooms, seasonal weddings, and intimate gatherings. Exploring vintage curation offers substantial practical value by bridging nostalgic craftsmanship with budget-conscious upcycling. Rather than purchasing mass-produced retail plastic or resin ornaments, salvaging authentic vessels—such as mercury glass vessels, weathered wooden boxes, aged ironstone pitchers, and pressed amber medicine bottles—introduces historic character and narrative depth into your living space. Each section provides practical material requirements, structural preparation guidelines, and actionable design rules that empower beginners to craft durable, visually balanced displays. By understanding proportional styling, water management, and surface textures, you can transform forgotten heritage pieces into enduring decorative highlights.
Why This Idea Is Trending or Useful
Aged tabletop decor continues to dominate modern interior inspiration feeds because it delivers exceptional textural warmth and authentic sustainability. In contemporary design, sterile uniformity has shifted toward character-rich spaces that celebrate antique finishes, imperfect patinas, and generational history. Vintage tabletop arrangements offer immense practical value by extending the usable lifespan of discarded household objects, keeping antique glassware and rustic wooden containers in active domestic rotation. From a DIY perspective, these projects allow decorators to achieve an upscale aesthetic without incurring high retail costs. Salvaged flea market goods, thrifted heirloom ceramics, and garage sale glassware cost significantly less than designer showroom sets while providing unique architectural variety. Furthermore, the accessibility for beginners is unmatched. Crafting a vintage centerpiece requires no advanced construction skills, industrial carpentry tools, or specialized botanical floristry training. Anyone can assemble visually compelling arrangements by understanding basic balance principles, layering heights, and grouping odd-numbered items. These flexible designs adapt effortlessly to diverse interior environments, enhancing cozy rustic farmhouses, layered cottagecore breakfast nooks, industrial urban lofts, and romantic garden celebrations with equal grace.
Materials and Preparation
Producing stable, long-lasting vintage centerpieces requires deliberate materials sourcing and methodical workspace preparation before arranging flowers and props. Essential containers include authentic antique milk glass vases, tarnished silverplate hollowware, embossed amber glass apothecary bottles, zinc planter boxes, and aged ceramic ironstone tureens. Floristry tools include sharp bypass pruning shears, clear waterproof floral tape, heavy brass pin frogs, floral foam bricks, and monofilament support wire. To ensure fire safety when using illumination, procure dripless beeswax taper candles, clear glass chimney hurricane shades, or battery-powered LED pillar candles. Preparation begins with deep cleaning and sanitization. Wash antique glassware and stoneware thoroughly using warm water and mild dish detergent, using a flexible bottle brush to clear historic internal sediment. If working with aged wooden crates or metal vessels with compromised joints, insert heavy plastic pond liner or water-tight plastic trays inside to prevent water seepage onto wooden tabletops. Finally, condition fresh floral stems by slicing ends at a forty-five-degree angle and submerging them in cold water for two hours before insertion into your prepared vessels.
Idea 1: Weathered Wooden Crate with Pressed Amber Glass Bottles
Execution Process
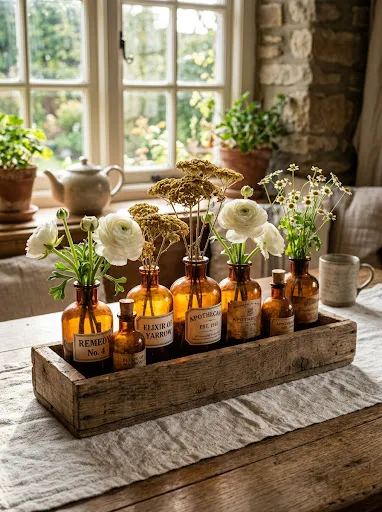
The weathered wooden crate centerpiece pairs rustic reclaimed timber with the warm, glowing translucence of antique amber glass medicine bottles. This concept relies on horizontal visual weight, using a shallow wooden produce box or reclaimed shipping crate as a low-profile anchor for dining tables. Inside the crate, a curated cluster of mismatched amber apothecary bottles, extract jars, and patent medicine vials stand in staggered heights, creating rhythmic vertical lines. The deep amber hue filters natural daylight into warm golden tones, providing a cozy foundation that complements autumn, winter, or rustic evening tablescapes. When filled with delicate, wispy botanical cuttings such as dried wheat stalks, wild chamomile, and dried bunny tails, the installation offers rich organic texture without obstructing eye-level conversation across the table.
To build this arrangement, select a clean, shallow wooden crate measuring approximately eighteen inches long by five inches wide, wiping away loose dust with a dry rag. Line the crate interior with waterproof parchment paper or a thin plastic craft tray to shield the timber base from accidental moisture drops. Collect seven to nine clean amber glass bottles ranging from four to eight inches in height, verifying that each glass vessel sits flat and stable. Arrange the bottles within the wooden crate in a staggered, fluid row, placing the tallest vessels toward the center and shorter apothecary jars near the outer ends. Fill each bottle two-thirds full with fresh water mixed with flower food, using a narrow-spout watering pitcher. Insert two to three slender floral stems—such as white ranunculus, dried golden yarrow, or fresh olive branch sprigs—into each bottle neck, cutting stems at varied lengths to produce an organic, flowing botanical canopy.
Idea 2: Antique Ironstone Tureen Overflowing with Garden Hydrangeas
How to Make
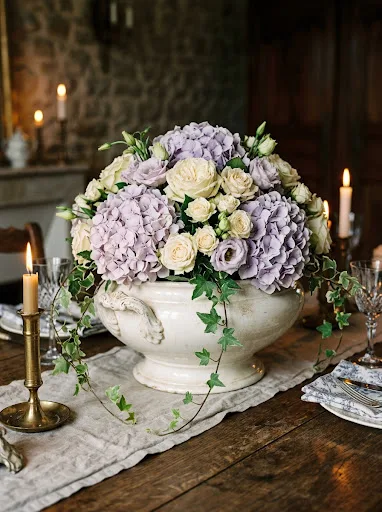
The antique ironstone tureen centerpiece captures classic European country elegance through high-contrast volume and stately porcelain structure. White or cream ironstone soup tureens feature substantial rolled handles, pedestal footings, and subtle sculptural embossing that convey quiet historical luxury. When paired with oversized, domed garden hydrangeas, garden roses, and sprawling greenery, the rigid stoneware container softens into an opulent garden display. The broad, deep cavity of the soup tureen allows floral stems to branch outward horizontally, creating a low, sweeping oval shape that fills the center of long banquet or oval dining tables. The clean, off-white glaze of the ironstone reflects ambient candlelight, providing a neutral backdrop that highlights the soft petals of muted lavender, blush, or antique white flowers.
Begin by inspecting your ironstone tureen for internal hairline cracks, placing a lightweight plastic food storage bowl inside if the antique porcelain is no longer completely watertight. Cut a block of water-absorbing floral foam so it sits snugly inside the interior bowl, extending approximately one inch above the tureen rim. Soak the foam thoroughly in a bucket of water until fully submerged, then secure the foam across the tureen opening using a crisscross grid of green floral tape pressed firmly to the dry container handles. Strip the lower leaves from fresh garden hydrangea stems, cut each stem at a sharp angle with bypass shears, and insert five large hydrangea heads deeply into the foam to build a dense foundation dome. Layer fresh garden roses, spires of white snapdragons, and trailing variegated ivy vines between the hydrangeas, angling perimeter stems downward to gently drape over the porcelain handles.
Idea 3: Tarnished Silver Teapot and Creamer Floral Vignette
Step-by-Step Guide
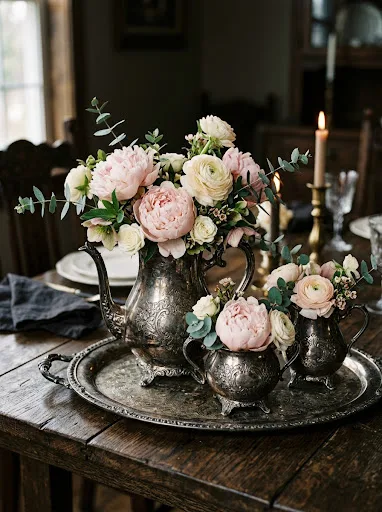
The tarnished silver service vignette transforms unpolished heirloom tea pieces into a charming, reflective tabletop arrangement with vintage English allure. Rather than polishing the metal to a high mirror shine, this design celebrates the authentic black-grey tarnish and dark oxidized patina settled into engraved scrollwork and ornate handles. The centerpiece consists of a clustered trio: a tall silver teapot, a matching two-handled sugar bowl, and a petite creamer arranged closely on an oval silver tray. This grouping introduces varied elevations and asymmetrical metal reflections that catch evening candlelight. The metallic grey tones provide an exquisite, moody contrast against delicate soft-petaled florals like pale pink peonies, fragrant sweet peas, and silver-dollar eucalyptus foliage, establishing a romantic, heirloom-inspired mood.
Start by selecting an authentic silverplate or pewter three-piece tea set from thrift stores or family collections, leaving the aged surface oxidation intact to preserve its historical character. Clean the internal chambers thoroughly with hot soapy water, using small drinking glasses or plastic cups as internal liners if the silver exhibits corrosion or leaks. Place the three pieces onto an oval silver-plated tray or a dark wooden cutting board, setting the tall teapot at the rear center with the sugar bowl and creamer nestled diagonally in front. Fill the vessels with cool water and place a dense cluster of blush peonies and ivory ranunculus in the main teapot opening, allowing outer blossoms to rest directly on the rim. In the lower sugar bowl and creamer, arrange shorter sprigs of waxflower, garden herbs like flowering thyme, and trailing eucalyptus, building a cascade that spills forward onto the serving tray surface.
Idea 4: Stacked Antique Leather-Bound Books with Brass Candlesticks
Setup Method
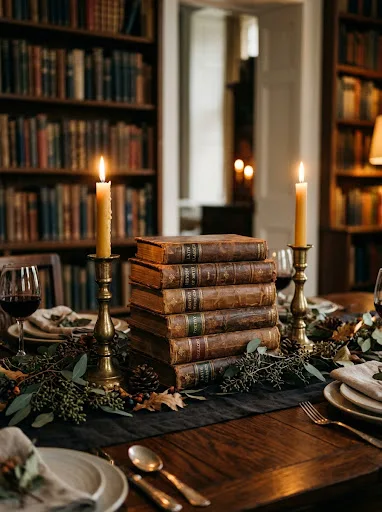
The stacked leather-bound book centerpiece delivers a scholarly, historic library atmosphere that works exceptionally well for autumn and winter dining settings. This concept utilizes aged hardcover books featuring gold-gilt spines, marbled endpapers, and worn leather textures as structural pedestals. Stacking volumes horizontally creates varied display tiers across the table, elevating auxiliary decorative elements above the table plane. Surrounding the book foundations are slender solid brass taper candlesticks of staggered heights, bearing natural beeswax candles that cast a warm, radiant illumination. Intertwining loose, dried greenery vines and fresh woodland elements around the paper pages introduces organic movement that softens the geometric angles of the stacked volumes, resulting in a cozy, intellectual, and nostalgic focal setting.
Begin by sourcing six to nine genuine vintage books with weathered cloth or leather covers in coordinated earthy hues, such as hunter green, oxblood burgundy, and deep navy. Divide the volumes into two or three horizontal stacks along the table runner, placing the largest, thickest books on the bottom and stacking two smaller volumes on top. Place three to five solid cast-brass candlesticks directly beside and between the book stacks, varying heights from six to twelve inches to establish a dynamic vertical rhythm. Insert pure beeswax or dripless ivory taper candles firmly into the candlestick cups, trimming wicks to a quarter-inch for a clean, soot-free burn. Weave flexible strands of dried seeded eucalyptus, Italian ruscus, and natural pinecones loosely around the perimeter of the book bases, taking care that foliage remains safely clear of the open candle flames.
Idea 5: Vintage Mason Jar Trio in a Distressed Wire Carrier
How to Make
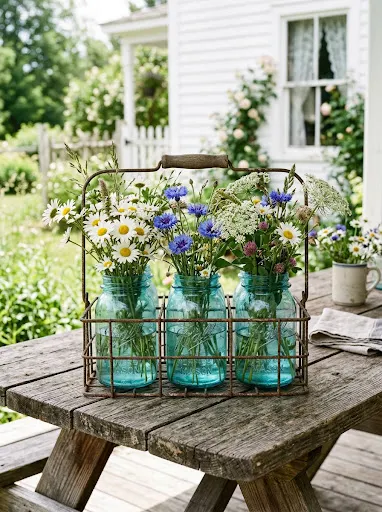
The vintage mason jar carrier centerpiece embodies authentic Americana farmhouse design through simple utilitarian glassware and industrial wire framing. This layout utilizes historic embossed canning jars—specifically genuine zinc-lidded, aqua-blue, or light green vintage glass vessels—nested securely inside an antique metal milk carrier or wire bottle basket. The textured wire framework provides industrial structure and convenient portability, while the pale blue-green glass filters light cleanly across the table. Filling each jar with casual garden wildflowers, such as purple larkspur, white daisies, and feathery cosmos, creates an approachable, freshly picked look. This design is exceptionally practical for active outdoor dining, summer patio tables, and country weddings because the wire carrier prevents top-heavy jars from tipping over in breezes.
To construct this centerpiece, obtain a vintage metal milk bottle caddy or chicken-wire carrier designed to hold three or four standard one-quart glass vessels. Insert three authentic aqua-tinted vintage mason jars into the wire compartments, verifying that each jar fits comfortably without scraping the metal dividers. Fill each glass jar halfway with room-temperature water mixed with floral preservative. Cut the stems of seasonal meadow wildflowers—including field daisies, blue cornflowers, queen anne’s lace, and feverfew—at varied heights, stripping away any foliage that falls below the waterline to maintain clean, odorless water. Place the longest stems in the central jar to establish peak height, while distributing fluffier, branching stems into the two flanking jars to create a cohesive horizontal canopy. Finish by tying a single strand of natural jute twine around the wire carrier handle.
Idea 6: Distressed White Enamelware Basin with Floating Blossoms
Execution Process
The distressed white enamelware basin centerpiece offers a minimalist, cottage-inspired water feature that pairs clean utility with organic floral softness. This concept centers on a shallow, vintage steel washbasin or milk pan finished in white porcelain enamel, ideally featuring subtle rim chipping or a navy-blue painted border. The broad, reflective water surface serves as an open liquid canvas where decapitated floral blooms and clean floating wax candles drift freely. Because the arrangement remains under four inches in vertical profile, it never obstructs cross-table sightlines, making it an ideal choice for lively, conversation-focused dinner parties. The crisp white porcelain finish highlights the rich colors of floating flower petals, creating a tranquil, spa-like centerpiece that feels effortlessly assembled yet visually deliberate.
Select an authentic vintage enamelware washbasin measuring approximately twelve to fourteen inches across, ensuring the steel body holds water without leaking through rust perforations. Place the empty basin directly in the center of the dining table upon a textured woven linen or burlap table runner to protect the tabletop surface. Fill the basin three-quarters full with tepid distilled water, keeping the water level steady to prevent movement when bumping the table. Using sharp floristry snips, cut the stems cleanly away from mature, fully opened garden blossoms—such as white gardenias, open cabbage roses, and flat dahlias—leaving only the flat flower heads. Gently place the blooms onto the water surface, arranging them in loose, asymmetrical clusters that leave open water exposed. Float three smooth white disc candles in the negative spaces between the petals, carefully lighting the dry wicks prior to seating guests.
Idea 7: Victorian Glass Cloche Over a Nest of Curiosities
Step-by-Step Guide
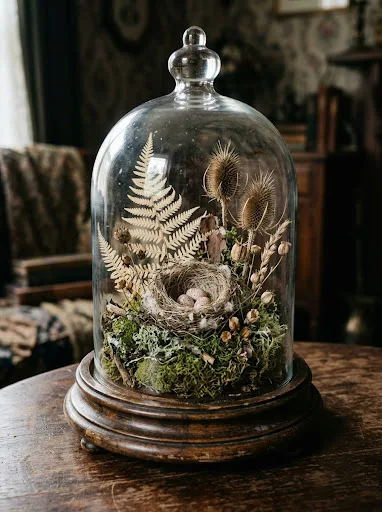
The Victorian glass cloche centerpiece channels nineteenth-century naturalist parlor style, turning the dining table into a museum-quality display of natural history. This design positions a heavy, mouth-blown clear glass bell dome over a collection of botanical and geological specimens arranged upon a turned wooden base or slate plate. Inside the protective glass dome, a miniature ecosystem unfolds, featuring dried mosses, polished river stones, quail eggs, dried mushrooms, and delicate dried ferns. The clear cloche dome magnifies internal details while shielding delicate specimens from table movement and drafts. Its vertical cloche silhouette introduces sophisticated height and clean architectural lines, serving as a captivating conversational focal point that suits curiosity-themed events, botanical gatherings, and refined fall decor.
Begin by selecting a smooth circular wooden plate or dark marble cheese slab to serve as the secure foundational platform for the installation. Cover the flat base with a dense layer of preserved sheet moss, reindeer lichen, and rich green mood moss, securing the moss lightly with small dabs of non-toxic craft glue. Arrange your curated curiosities within the moss bed, tucking in miniature dried woodland components such as a tiny natural bird nest, speckled decorative eggs, dried thistle pods, and tiny quartz crystal points. Insert two or three tall dried stems of preserved maidenhair fern or bleached botanical fronds vertically near the center to fill the dome interior height. Thoroughly clean both the interior and exterior surfaces of the glass cloche using glass cleaner and a microfiber towel to eliminate fingerprints, then carefully lower the glass dome over the base, seating the rim firmly into the wooden plate groove.
Idea 8: Repurposed Vintage Biscuit Tin with Wild Herb Greens
Setup Method
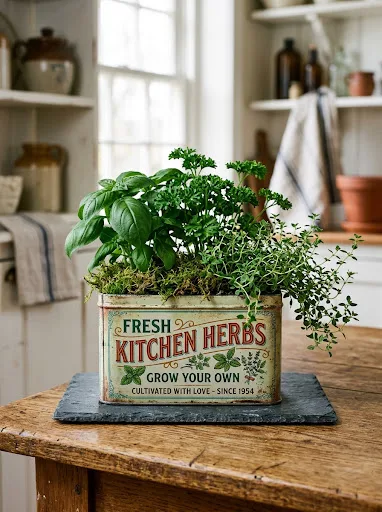
The repurposed vintage biscuit tin centerpiece blends nostalgic retro advertising art with the fresh aromas of culinary herb gardens. This concept features an authentic mid-century lithographed tin container—such as an embossed English tea caddy, vintage biscuit box, or retro confectionery tin—used as an unexpected planter. The weathered lithograph artwork on the tin introduces vibrant typography, historic color palettes, and charming nostalgic patterns into the dining room. Planting or arranging living aromatic herbs inside the tin releases subtle scents of rosemary, sage, and mint across the dining area, enhancing the meal atmosphere. The rigid rectangular or square tin frame grounds the centerpiece, contrasting pleasingly with the soft, overflowing foliage of kitchen garden herbs.
To execute this project, locate a rectangular vintage biscuit tin with intact exterior graphics, gently wiping the painted metal with a damp cloth to restore surface color. Because tin containers are susceptible to rust when exposed to moisture, place a thick plastic storage container or heavy-duty foil baking pan inside the tin to form a waterproof barrier. Place three to four potted living herbs—such as fragrant sweet basil, curly parsley, textured garden sage, and trailing lemon thyme—directly inside the lined interior cavity. Fill any gaps between the plastic nursery pots with damp Spanish moss or dark peat moss, concealing plastic rims beneath a continuous blanket of green moss. Mist the herbs with a fine spray bottle to keep foliage hydrated, placing the tin atop a slate cutting board to prevent metal condensation from marking your table.
Idea 9: Aged Terracotta Pots with Moss and Vintage Spoons
How to Make
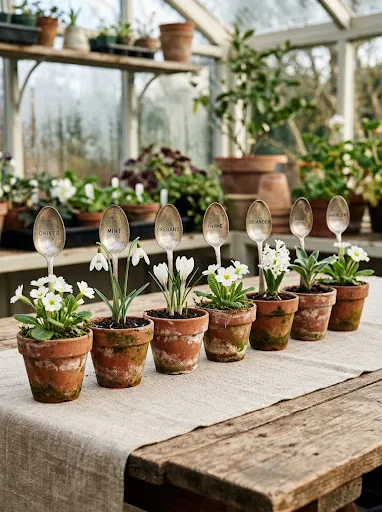
The aged terracotta centerpiece brings European conservatory and greenhouse aesthetics indoors through weathered pottery, living greenery, and antique silver flatware markers. This design features a linear row of small clay pots bearing white mineral salt deposits, velvety green moss, and weathered clay rims. Each pot houses a single structural botanical, such as a paperwhite bulb, miniature topiary, or plump succulent. Stamped antique silver teaspoons or mismatched silver forks are inserted vertically into the soil as decorative garden markers, adding metallic charm and whimsical craftsmanship. The warm, porous orange-brown terracotta tones anchor the table with earthen warmth, producing a grounded, botanical arrangement that complements garden parties, spring breakfasts, and relaxed rustic dinners.
Begin by aging three to five small terracotta pots; if working with new pots, brush the exteriors with plain buttermilk and garden soil, letting them sit in a shaded outdoor spot for two weeks to develop natural white salt patinas and green moss. Fill each dry pot two-thirds full with sterile potting soil, planting a miniature English ivy, blooming primrose, or paperwhite narcissus bulb firmly into the center. Pack living sheet moss around the soil surface to lock in soil moisture and create a neat, emerald-green base. Using antique silver-plated teaspoons from thrift stores, use a metal letter punch set to stamp table numbers, guest names, or herb titles into the spoon bowls with a brass hammer. Insert one stamped silver spoon vertically into the soil of each pot, and arrange the completed vessels along the center of your table atop a natural linen runner.
Idea 10: Romantic Milk Glass Compote with Blush Garden Roses
Execution Process
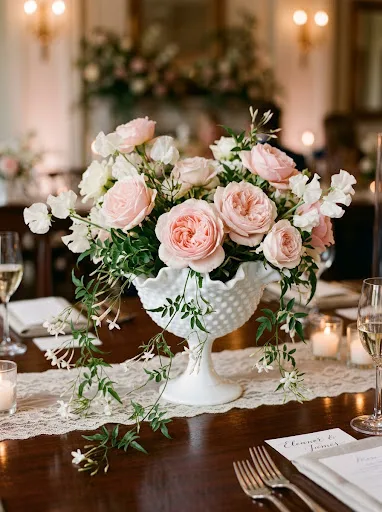
The romantic milk glass compote centerpiece exemplifies mid-century bridal styling, pairing opaque white molded glassware with soft, romantic floral textures. Milk glass, characterized by its distinctive creamy porcelain-like opacity and textured hobnail or lace-edge detailing, provides an elegant pedestal that elevates flowers gracefully. The elevated bowl of a footed compote lifts floral stems off the tabletop, creating visual lightness and allowing trailing greenery to drape toward the tablecloth. When filled with lush blush garden roses, ranunculus, white sweet peas, and cascading jasmine vine, this arrangement creates an opulent, rounded floral display. The clean, crisp white glass brightens dark wood tables and complements pastel color palettes, making it a classic selection for anniversary dinners, bridal luncheons, and vintage receptions.
Select an authentic vintage milk glass compote dish with a five-to-seven-inch bowl diameter, wiping the surface with mild soap and water to restore its creamy white luster. Cut a circular piece of dense green floral foam to fit the compote basin, soaking the foam in water before positioning it snugly inside the glass bowl. Secure the foam firmly using waterproof floral tape anchored beneath the rim in an X-pattern. Trim fresh blush garden roses and ranunculus stems to approximately five inches, stripping thorns and foliage, and insert blooms at forty-five-degree angles into the foam to build a low, lush dome. Tuck delicate stems of white sweet peas, spray roses, and sprigs of silvery dusty miller between the focal flowers to soften gaps and conceal foam edges. Allow long trails of variegated jasmine vine or maidenhair fern to spill over the ruffled milk glass rim, finishing with a balanced, graceful silhouette.
Common Beginner Mistakes and How to Avoid Them
Novice decorators commonly face structural and botanical setbacks when designing vintage centerpieces that can undermine the final display. The most critical mistake is failing to verify the water-tight integrity of aged containers. Antique silver teapots, weathered wooden boxes, and historic ironstone frequently feature invisible pinholes, degraded solder joints, or fine stress fractures that leak water directly onto fine wooden furniture. Always conduct a thirty-minute leak test on a dry kitchen counter, or insert a modern plastic bowl or waterproof liner inside the vessel to safeguard tabletops. Another frequent error is ignoring scale and guest sightlines. Creating oversized, towering floral arrangements that exceed twelve inches in height directly across dining spaces impedes natural eye contact and disrupts conversation. Maintain low-profile arrangements, or place taller elements on slender stems that allow clear sightlines underneath the flower canopy. Finally, beginners often overlook flower stem conditioning, sticking freshly cut garden flowers straight into stagnant water without prep. Stems placed in unfiltered antique vessels without floral food will wilt within hours; always trim stems at an angle under running water, use commercial floral preservative, and clean internal vessel walls to prevent bacterial bloom.
Practical Tips for Better Results
Achieving professional, magazine-quality vintage tabletop arrangements requires deliberate mechanical techniques and consistent compositional balance. Always employ mechanical floral supports, such as reusable brass pin frogs, chicken wire pillows, or water-soaked floral foam, rather than allowing stems to flop loosely against the vessel rim. Using a domed cage of coated green chicken wire inside wide bowls allows you to position stems at precise angles, creating natural, flowing silhouettes with minimal materials. When sourcing vintage vessels, prioritize pieces with authentic textural wear, such as mercury glass silvering loss, chipped enamel, and mineral-aged terracotta, as genuine patina provides far richer character than artificial distressing. When arranging tablescapes, follow the rule of odd numbers by grouping vessels in clusters of three or five to establish organic, natural eye movement across the space. Furthermore, always integrate variable heights: balance a wide, low-profile bowl with two slender brass candlesticks or flanking mini medicine bottles to produce an engaging horizontal landscape that draws the viewer’s eye along the length of the dining table.
Styling, Presentation, or Organization Ideas
Integrating vintage centerpieces into a broader dining room decor scheme requires careful spatial planning and thoughtful textile layering. Begin with foundation linens: lay down an unironed, natural washed-linen table runner, frayed-edge burlap strip, or vintage lace runner to anchor the visual footprint while protecting table surfaces from scratches. Frame your central vintage container with low-profile auxiliary accents, such as scattered brass tea light votives, unpolished river stones, seasonal miniature squash, or loose cuttings of olive branch greenery that bridge the space between the main vessel and place settings. When setting dinnerware, coordinate textures by pairing rustic centerpiece materials with complementary table accessories; for instance, pair an antique ironstone tureen with aged pewter flatware and textured linen napkins tied with rough jute twine. Distribute lighting deliberately across the table length rather than concentrating it in a single cluster, interspersing taper candles and votives to cast a flattering, even glow that highlights aged glass patinas and floral petals once the sun goes down.
Budget or Time Planning
Executing an elaborate vintage centerpiece collection on a realistic budget can be managed efficiently through smart sourcing habits and structured prep schedules. Avoid high-end boutique antique showrooms, which mark up historic vessels significantly. Instead, frequent local charity thrift stores, weekend estate sales, rural flea markets, and online community resale platforms where vintage mason jars, tarnished silverplate, and weathered wooden crates are routinely sold for nominal amounts. If planning wedding or event tablescapes, begin hunting for vessels four to six months in advance to assemble a diverse collection without paying emergency retail prices. From a time management perspective, organize floral assembly using a strict two-day timeline. Complete container cleaning, liner fitting, floral foam soaking, and chicken wire rigging forty-eight hours before your event. Source and condition your fresh botanical stems twenty-four hours in advance, allowing blooms to hydrate fully in a cool, dark room. Assemble the final floral arrangements the morning of the gathering, reserving the final hour before guest arrival exclusively for lighting wicks, filling water reservoirs, and positioning delicate perimeter greenery.
Creative Expansion and Advanced Inspiration
Once you master foundational vessel sourcing and floral arranging, explore advanced design techniques that push creative boundaries. Consider integrating living botanical systems, such as planting miniature cascading ferns, flowering mosses, and trailing string-of-pearls directly within antique silver gravy boats or footed sugar dishes, producing living heirloom centerpieces that thrive for months with minimal misting. Another striking technique is incorporating dramatic architectural elements, such as mounting tall vintage cast-iron balusters or salvaged porch spindles as candle pedestals, anchoring them into heavy zinc bases for elevated drama. You can also explore multi-sensory centerpiece additions by weaving fragrant, dried whole spices—such as star anise pods, dried blood orange wheels, and cinnamon bark bundles—into fresh eucalyptus garlands, infusing the room with warm, natural scent. For evening celebrations, wind miniature, micro-strand warm LED fairy lights beneath clear glass domes or through the internal ribs of wire milk crates, creating hidden illumination that casts complex historic silhouettes across your linens long after twilight fades.