Planning an outdoor celebration or indoor reception involves designing tablescapes that retain their structural beauty from the first guest arrival until the evening send-off. This comprehensive wedding reception…
Planning an outdoor celebration or indoor reception involves designing tablescapes that retain their structural beauty from the first guest arrival until the evening send-off. This comprehensive wedding reception tutorial explores ten innovative, non-wilting DIY wedding centerpieces designed to eliminate the logistical vulnerabilities of delicate cut blooms. Traditional cut flowers demand continuous water absorption, temperature regulation, and rapid morning-of styling to prevent petal droop, discolored foliage, and dehydration. By exploring durable materials like preserved florals, potted living greenery, sculptural architectural candle arrays, reflective glassware, and textured fruits, couples can craft lasting centerpieces days before the event. Readers will learn practical techniques for managing tablescape proportions, securing candle fixtures, integrating ambient LED illumination, and building cohesive, low-profile installations that keep guest sightlines open. These methods solve the common issue of mid-reception floral wilting caused by direct afternoon sun, warm venue lighting, or brisk outdoor breezes. Crafting your own non-wilting decorative arrangements also provides considerable cost control, allowing couples to direct event funds elsewhere while maintaining a sophisticated aesthetic. The upcoming sections provide clear supply lists, planning frameworks, ten step by step project plans, troubleshooting advice, and stylish presentation approaches for your wedding reception.
Why This Idea Is Trending or Useful
Durable, non-wilting centerpiece designs represent prominent trending ideas across visual wedding discovery feeds due to their dependable performance and modern design versatility. Modern wedding aesthetics increasingly favor sculptural decor, textural contrast, and functional elements over uniform, resource-intensive cut-flower mounds. Centerpieces constructed from preserved botanicals, living potted herbs, architectural glass, and wax-coated fruits maintain their form regardless of heat, wind, or dry indoor air. This practical approach offers substantial DIY appeal, allowing couples, family members, and wedding planners to assemble, pack, and transport tablescapes well before the ceremony. For beginners, non-wilting projects provide an accessible entry into event decor, removing the stress of cold-chain refrigeration, water transport, and precision flower cutting. These durable concepts also offer practical budget ideas, as living plants, vintage brass candleholders, glass hurricanes, and decorative stone pedestals can be reused in home decor or gifted to guests. Furthermore, eliminating single-use floral foam and discarded cut stems supports sustainable event practices, creating a refined, eco-conscious celebration.
Materials and Preparation
Achieving professional, balanced reception centerpieces requires systematic preparation, reliable tools, and deliberate material selection before table styling begins. Essential materials include glass hurricane chimneys, open-frame metal lanterns, poured pillar candles, preserved dried stems like bunny tails and bleached ruscus, potted topiary plants, and clear floral adhesive putty. Helpful assembly tools include sharp wire cutters, pruning shears, microfiber glass-cleaning cloths, a heavy-duty handheld clothing steamer for smoothing table linens, and felt surface pads for stone or metal vessels. Careful planning requires measuring your reception table dimensions and mapping out plate, flatware, and glassware placements to determine the safe decorative footprint. Clean all glassware with an equal mixture of distilled water and isopropyl alcohol to remove smudges, dust, and manufacturing residues before transport. If using living potted plants or herbs, hydrate them forty-eight hours in advance so the potting soil is moist but free of standing surface water that could soil linens. Organize centerpieces into numbered, compartmentalized plastic crates to streamline reception setup on the wedding day.
1. Architectural Brass Lantern and Pillar Tiers
Step-by-Step Guide
The architectural brass lantern centerpiece uses geometric metal frames, clear glass panes, and multi-height pillar candles to provide reliable warmth and structure without wilting. This design incorporates a trio of brushed-brass or antique-gold lanterns arranged in staggered heights, creating a focused visual anchor that suits round or rectangular banquet tables. The glass panels protect burning wicks from sudden outdoor drafts and venue air circulation, ensuring continuous illumination throughout the evening meal. Neutral ivory pillar candles offer a clean silhouette that matches both classic and modern reception aesthetics. The enclosed construction prevents wax spills on table runners and provides a durable focal point that looks polished in daylight and evening light. By surrounding the lantern base with a tidy ring of preserved seeded eucalyptus or dried ruscus, the display gains botanical softness while remaining completely heat-resistant.
To construct this centerpiece, select three rectangular glass-and-brass lanterns measuring twenty, thirty, and forty centimeters in height, cleaning every glass pane with a lint-free cloth. Attach self-adhesive felt pads to the four bottom corners of each lantern base to prevent metal edges from scratching polished wood or snagging linen tablecloths. Secure an unscented, high-density paraffin or soy pillar candle to the interior floor of each lantern using a quarter-sized dab of removable floral putty. Choose candle heights that leave at least ten centimeters of clearance beneath the lantern smoke vents to prevent soot accumulation during the evening. Arrange the lanterns in a tight triangular cluster at the center of the table, turning each frame slightly to create varied geometric facets. Finish the base by loosely draping a preserved, pliable dried Italian ruscus vine around the metal feet, nestling three small clear glass tea lights among the leaves.
2. Sculptural Dried Palm and Pampas Vessel
Execution Process
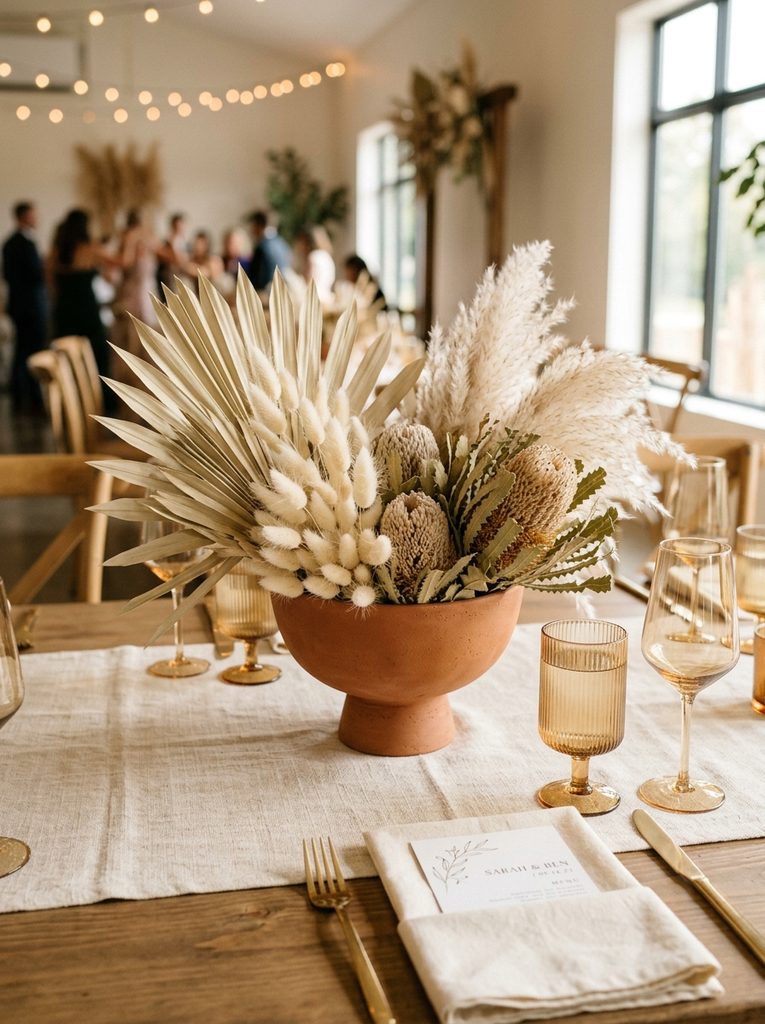
The sculptural dried palm and pampas vessel design combines dramatic textural foliage, neutral earth tones, and lasting botanical materials to build a striking, drought-tolerant centerpiece. This concept uses sun-bleached spear palms, fluffy mini pampas plumes, preserved bunny tails, and dried banksia pods arranged in a matte ceramic compote bowl. Natural cream, sand, and terracotta tones provide an organic bohemian aesthetic that suits rustic barn venues, industrial lofts, and arid garden settings. Because all botanical components are dried and preserved, this arrangement requires no water, floral foam, or refrigeration, allowing you to complete construction weeks ahead of the wedding. The distinct textures capture natural light softly, adding depth without visual clutter. The arrangement stays below eye level, letting seated guests converse across dining tables without looking around tall flower stems.
Begin by securing a block of dry floral clay or biodegradable dry arranging foam into the basin of an eight-inch matte unglazed ceramic compote using waterproof bowl tape. Trim the stems of three dried sun-bleached palm spears to varying lengths between fifteen and twenty-five centimeters, inserting them into the rear of the foam to form a fan-shaped backdrop. Cut ten stalks of preserved neutral bunny tails and five mini pampas plumes, placing them into the center of the base to create soft, feathery volume. Add two dried banksia pods or woody star flowers into the lower-middle section to create a grounded visual focus, angling them slightly downward toward the table surface. Fill any exposed foam gaps using small sprigs of dried flax pods, bleached linum, and preserved cream hydrangea florets. Mist the finished arrangement lightly with a pump-spray hair lacquer from thirty centimeters away to seal loose pampas fibers and prevent shedding during transport.
3. Submerged Greenery in Glass Water Columns
How to Make
The submerged greenery centerpiece uses clean water refraction, clear cylindrical glass vessels, and submerged botanical stems topped with floating wax discs to deliver a modern, non-wilting arrangement. This design encases hardy green cuttings, such as fresh sword fern fronds, curly willow branches, or preserved monstera leaves, beneath water within tall glass cylinders. Submerging the foliage slows moisture loss, keeping green leaves firm, bright, and fresh for hours without traditional vase arrangements. The water column acts as a natural lens, magnifying leaf textures and reflecting light across the table. The floating candle burns inside the top rim of the glass cylinder, protecting the flame from drafts and providing evening illumination. This streamlined setup suits modern minimalist weddings that prioritize clean geometric lines and simple, impactful focal points.
Assemble a set of three heavy-bottomed, clear glass cylinder vases measuring twenty, twenty-five, and thirty centimeters in height, cleaning both the interior and exterior glass surfaces. Secure a small lead fishing sinker or clear glass weight to the base of a sturdy fern frond or leafy ruscus stem using clear monofilament wire. Lower the weighted botanical stem into the cylinder, positioning the leaf so it sits naturally against the curved glass walls without bunching awkwardly. Slowly pour room-temperature distilled water into the cylinder, filling to within four centimeters of the top rim while using distilled water to eliminate cloudiness and air bubbles. Gently lower a three-inch white floating candle onto the water surface, keeping the top wick completely dry. Arrange the three cylinders in an asymmetrical cluster at the table center, leaving two centimeters of space between vases to prevent glass contact if tables shift.
4. Mediterranean Potted Olive Topiary Urns
Setup Method
The Mediterranean potted olive topiary urn brings living European garden character indoors through manicured, long-lasting trees planted in aged stone or ceramic pots. Rather than cut stems, this design uses living, rooted mini olive trees or dwarf myrtle shrubs that stay fresh throughout long receptions. The natural gray-green foliage and slender woody trunks offer a refined, timeless aesthetic that pairs naturally with linen runners, unglazed tableware, and tapered candles. Because the trees remain rooted in damp potting soil, there is zero risk of petal drop, browning margins, or dehydration during hot outdoor events. The compact leafy crowns add height while keeping the space around the trunk open, preserving clear visibility across the table for seated guests. After the wedding, these rooted olive trees can be planted in home gardens or gifted to wedding party members as lasting mementos.
Select healthy, rooted dwarf olive trees measuring thirty-five to forty centimeters in height with clean single central stems, potted in functional nursery containers. Repot each olive tree into an aged stone, weathered terracotta, or fluted ceramic urn measuring fifteen centimeters across, firming additional potting soil around the root mass. Cover the visible topsoil with a dense layer of preserved sheet moss or washed gray pea gravel, preventing soil debris from spilling onto table linens during transit. Place the potted urn directly in the center of the reception table on top of a wide natural linen runner. Flank the urn with four clear glass bud chimneys containing dripless ivory taper candles, spacing them along the runner to build balanced horizontal lines. Tie a thin strip of frayed-edge, hand-dyed silk ribbon around the base of the olive trunk, letting the tails drape naturally over the rim of the pot.
5. Antiqued Compote with Heirloom Orchard Fruits
Step-by-Step Guide
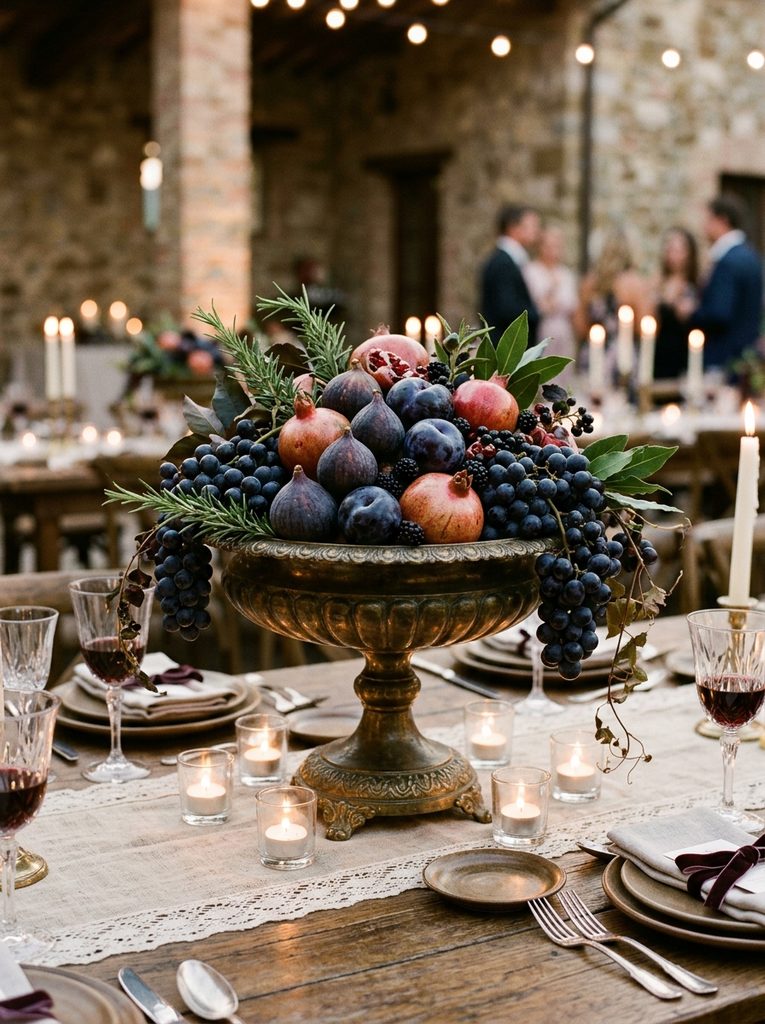
The antiqued compote orchard fruit centerpiece uses rich whole fruits, footed vintage compotes, and trailing foliage to evoke the timeless style of classical still-life paintings. This design fills footed vessels made of weathered brass, pewter, or matte stoneware with whole seasonal fruits like dark mission figs, blood oranges, black plums, and pomegranates. Elevating the fruit off the table surface in a pedestal compote creates vertical interest while preserving ample space for shared platters and glassware. The deep jewel tones of the fruit rinds introduce rich, natural color without requiring fresh floral stems. Whole, unpeeled fruits remain firm and attractive through long receptions, resisting heat, direct sun, and dry air without wilting. The matte skin of stone fruits absorbs and softens ambient candlelight, creating a warm, intimate atmosphere for evening dining.
Place an aged stone or footed metal compote bowl measuring twenty centimeters in diameter at the geometric center of each guest table. Line the base of the bowl with a clean sheet of greaseproof parchment paper, trimming the edges so the paper remains completely hidden beneath the rim. Place a dense cluster of dark purple grapes across the rim so that several grape tendrils spill down the side of the pedestal bowl. Stack firm whole fruits like black plums, seckel pears, and small pomegranates into the bowl, placing heavier pieces at the base and wedging smaller black figs into upper gaps to build an organic dome. Tuck small cuttings of woody rosemary or dusty bay laurel foliage into the outer fruit crevices, using the stems to hold loose fruit securely in place without external fasteners. Scatter three small glass tea-light cups around the base of the compote to illuminate the fruit colors as night arrives.
6. Monochromatic Potted Succulent Landscape Bowl
Execution Process
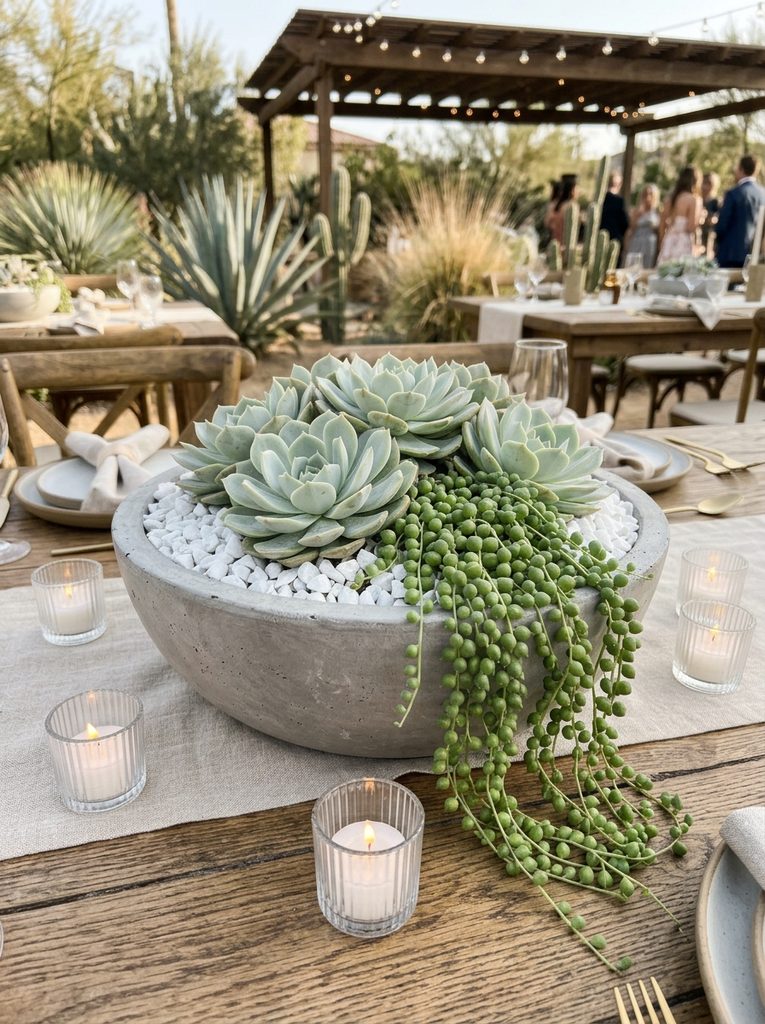
The monochromatic potted succulent bowl brings geometric structure, clean desert-inspired styling, and drought-tolerant performance to modern wedding tablescapes. This design features a wide, shallow ceramic or concrete bowl planted with an assortment of blue-green and sage succulents, including echeveria rosettes, string of pearls, and haworthia. The low-profile silhouette keeps guest sightlines completely open while providing a rich, living plant display that easily withstands high temperatures and direct sun. Succulents will not wilt, shed loose petals, or droop in outdoor summer weather, making them exceptionally reliable for warm-weather celebrations. The pale green and gray tones complement neutral table linens, textured ceramics, and raw wood banquet tables. After the reception, these living arrangements can be transitioned directly into home decor or distributed to key family members as permanent favors.
Obtain shallow circular planters made of unglazed matte concrete, brushed composite, or white ceramic, measuring roughly thirty centimeters wide and eight centimeters deep. Fill the planter with a lightweight succulent and cactus potting blend, packing the soil firmly to within two centimeters of the container rim. Plant five to seven healthy succulent rosettes in varying sizes, arranging the largest focal echeveria off-center and filling surrounding areas with compact stonecrop and trailing varieties. Spread a smooth, uniform layer of crushed white marble chips or fine pea gravel across the exposed soil, covering all dark potting mix to produce a crisp, modern finish. Set the completed succulent bowl on the center of the dining table, framing the planter with a loose circle of three ribbed glass tea lights to provide soft illumination across the geometric plant leaves.
7. Geometric Terrarium with Preserved Moss and Crystals
How to Make
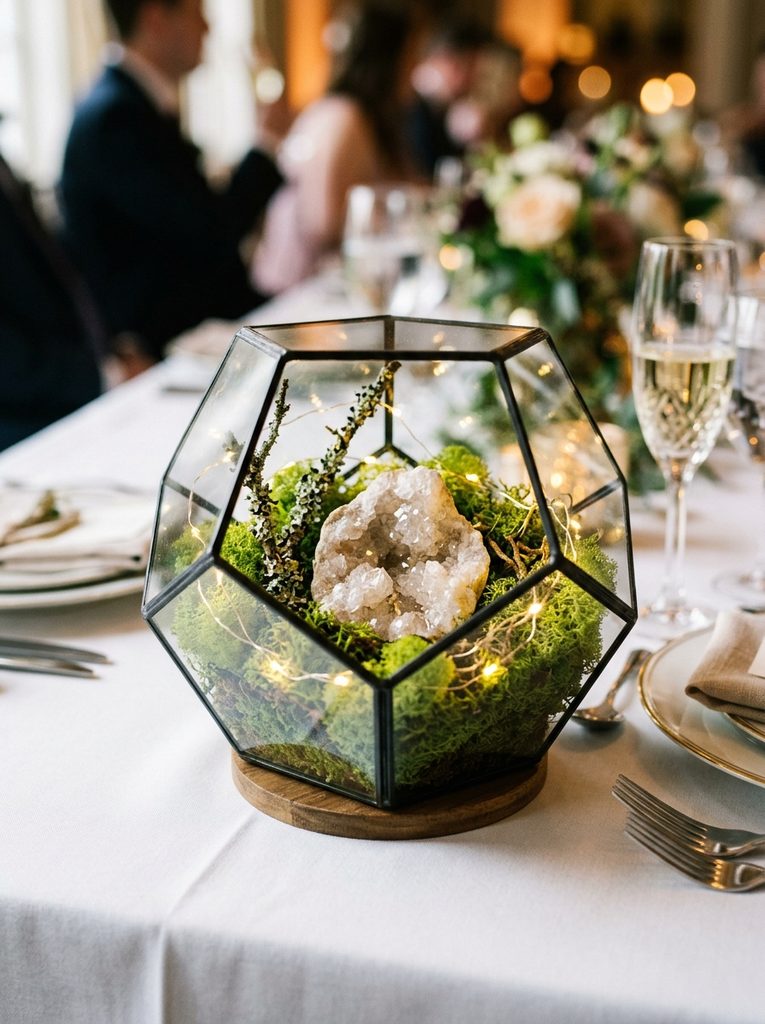
The geometric terrarium centerpiece pairs clean architectural metal lines with soft woodland moss and raw minerals, producing a contemporary, non-wilting tabletop feature. This design utilizes faceted geometric glass polyhedrons framed in black metal or brushed brass, filled with preserved emerald cushion moss, reindeer lichen, and natural quartz geodes. The glass panels protect delicate interior textures from drafts, keeping table linens clean and free of loose plant matter. The interplay between rough mineral facets, polished glass panes, and soft preserved moss provides visual depth that looks artistic in daylight. This self-contained setup is particularly effective for modern or industrial wedding venues, bridging clean geometric forms with organic woodland textures. Because all internal elements are preserved or mineral-based, these terrariums can be completed months in advance without maintenance.
Select an architectural geometric glass terrarium with black metal or polished brass solder seams, cleaning all glass facets with an alcohol cloth to ensure smudge-free transparency. Lay a base layer of fine horticultural charcoal and small river pebbles into the base of the container, creating a stable two-centimeter foundation for the internal arrangement. Place mounds of preserved emerald cushion moss and reindeer lichen across the pebble floor, pressing the moss masses together to hide gaps and create an undulating miniature landscape. Nestle a rough, natural quartz crystal or amethyst geode into the moss bed, positioning the mineral facet upward to catch ambient light through the glass walls. Wrap a slender string of warm-white micro LED wire lights through the moss and under the mineral specimen, hiding the compact battery pack neatly beneath the gravel base before closing the display vessel.
8. Driftwood Timber Candelabra with Taper Candles
Setup Method
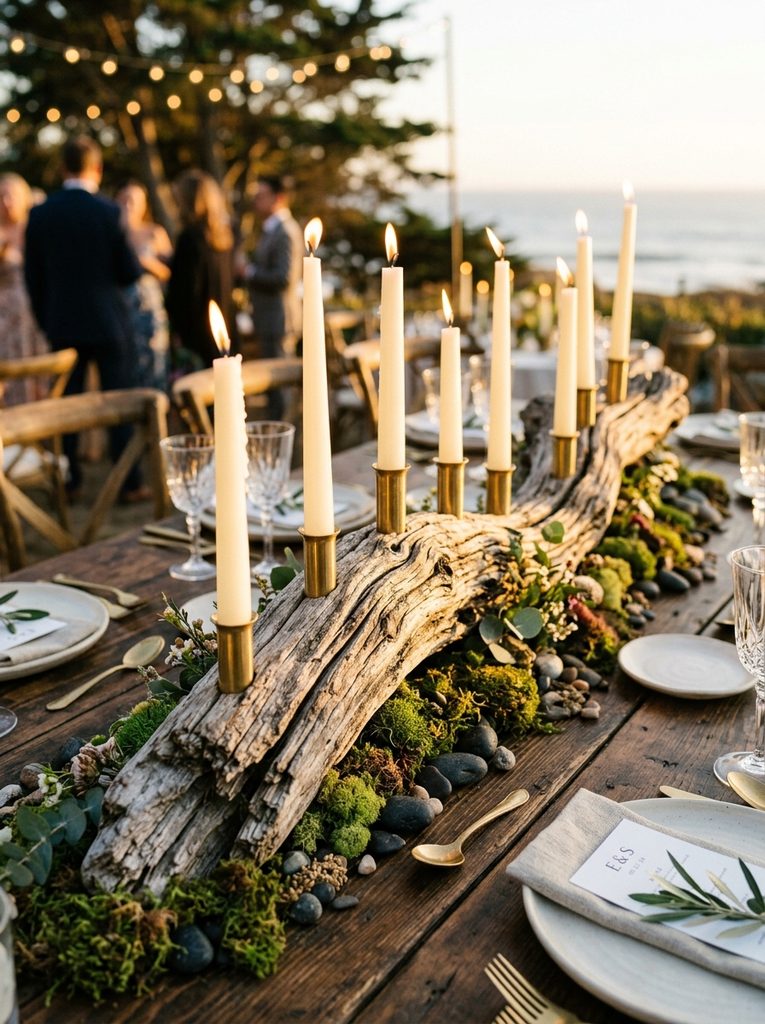
The driftwood timber candelabra uses weathered wood, natural grain patterns, and tall wax tapers to create an earthy, non-wilting centerpiece suited for rustic or coastal celebrations. This design features a cured piece of natural coastal driftwood, weathered grapevine wood, or fallen hardwood branch that rests flat down the center of the table. Boring vertical sockets into the crest of the timber allows slender wax taper candles to rise directly from the wood, contrasting tailored candle forms with raw bark textures. The horizontal layout anchors long banquet tables effectively without requiring bulky fabric runners or high flower arrangements. Wood centerpieces are sturdy and wind-resistant, staying in place on open garden lawns where lighter vessels could shift or tip. The natural timber tones pair beautifully with neutral linens, clear glassware, and polished metallic flatware.
Select pieces of cured, pest-free hardwood branches or grapevine wood measuring approximately sixty centimeters in length and eight centimeters in thickness, ensuring each piece rests completely flat on a table without rocking. Drill three to five vertical holes measuring two centimeters in diameter and three centimeters deep along the upper crest of the wood using a spade drill bit. Sand the bored openings smooth, then insert brass or copper candle cups into each drilled hole to catch melted wax and provide a safe fire barrier between flame and dry wood. Press standard dripless taper candles into the metal cups, twisting them firmly into position so that every candle stands vertical. Lay the finished wood sculpture along the center of the table, dressing the base by tucking preserved forest moss and small clusters of smooth dark river pebbles around the timber’s contact points.
9. Glass Bell Jar Cloche with Faux Botanical Specimen
Step-by-Step Guide
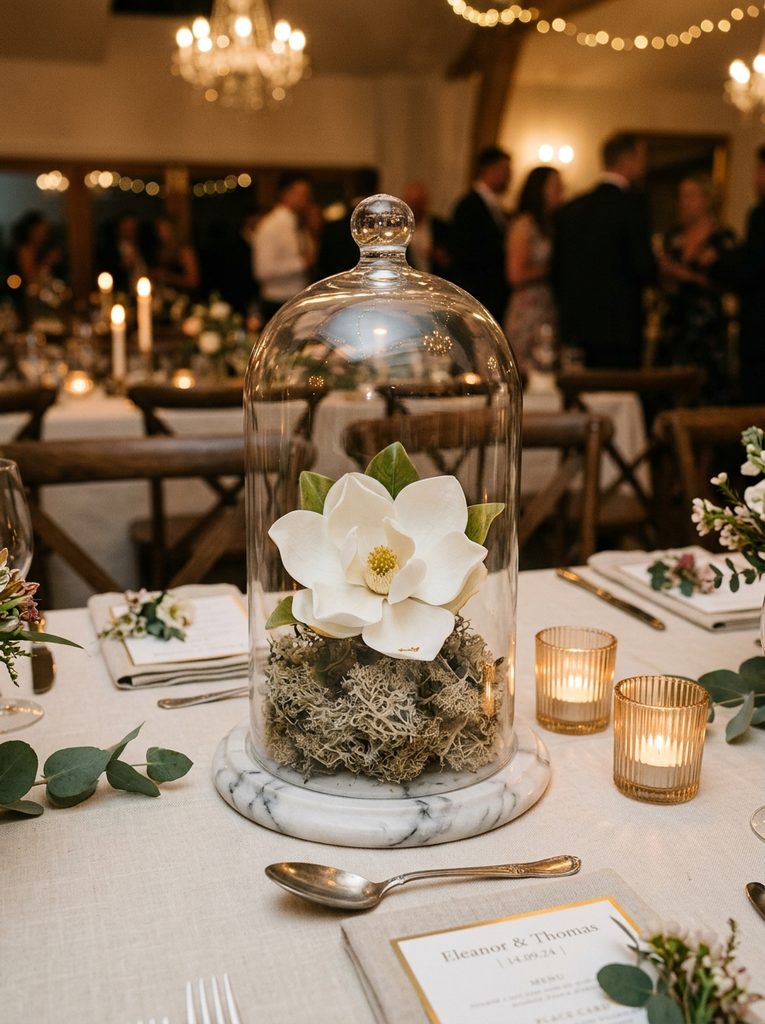
The glass bell jar cloche centerpiece uses Victorian curio aesthetics, clear dome enclosures, and high-end artificial botanical stems to create an elegant, protected display. This design encloses a realistic single faux stem, such as a white real-touch magnolia, velvet garden rose, or blooming ranunculus, beneath a glass bell jar set upon a turned wooden or marble pedestal. The glass dome protects delicate textile petals from dust, drafts, and handling, ensuring the arrangement looks pristine throughout the event. Modern real-touch botanicals mimic the exact petal texture, color gradation, and stem structure of living flowers without any wilting risks. The vertical cloche provides refined height while maintaining a compact table footprint, leaving ample room for dinnerware and glassware. This design offers an upscale, vintage aesthetic that works exceptionally well for classic indoor banquets, historic venues, and formal evening dinners.
Obtain a heavy glass bell jar cloche measuring thirty centimeters tall with a matching grooved circular marble or hardwood display base, cleaning the glass thoroughly inside and out. Secure a single high-quality real-touch botanical stem into the center of the base, using a drop of clear floral putty beneath the stem base to ensure the flower stands upright. Spread a thin layer of preserved reindeer moss or dried lichen over the base to cover the attachment point and provide an organic garden floor. Lower the glass cloche dome slowly over the botanical specimen, confirming that the glass rim sits flush inside the circular base groove without pinching petal tips. Position the completed cloche in the center of the table, grouping two small ribbed clear-glass votive cups on either side to provide soft accent lighting across the glass curves.
10. Floating Green Foliage Ring with Mirrored Base
Execution Process
The floating green foliage ring with a mirrored base uses reflective surfaces, low circular greenery wreaths, and centralized glass hurricane lighting to produce an expansive tablescape with zero floral droop. This design features a flat, circular preserved foliage wreath composed of preserved boxwood, seeded eucalyptus, and bay laurel encircling a central glass cylinder housing an ivory pillar candle. Placing the entire arrangement on a polished circular bevel-edged mirror tile doubles the visual impact, bouncing candlelight upward through the greenery and across glassware. The low wreath design keeps centerpieces below thirty centimeters, maintaining clear sightlines across round dining tables. Because the foliage consists of preserved or durable waxy greens, the wreath remains vibrant and intact through hot outdoor receptions without misting or water saucers. This versatile layout suits traditional ballrooms and modern outdoor venues alike.
Source thirty-centimeter circular bevel-edged glass mirror tiles, applying four self-adhesive rubber bumpers to the back of each mirror to protect tablecloths and prevent surface sliding. Form a circular foliage wreath by wiring preserved salal leaves, boxwood sprigs, and dried bay laurel stems onto an eight-inch wire wreath frame, overlapping the stems to hide the metal base. Center a heavy, clear glass hurricane chimney measuring twenty-five centimeters tall directly on the mirror, placing a four-inch-wide ivory wax pillar candle inside the cylinder. Lower the prepared foliage wreath over the glass chimney so it rests flat against the mirror surface, encircling the base of the hurricane cylinder. Tuck four miniature gold-dipped pinecones or faux pearl accents into the foliage at even intervals to introduce subtle decorative highlights around the candle base.
Common Beginner Mistakes and How to Avoid Them
Couples and decorators creating non-wilting DIY centerpieces often encounter common issues with table scale, open flame safety, glassware smudging, and uneven styling. A frequent mistake is selecting centerpiece elements that sit directly in guests’ natural eye level; decor between thirty-five and sixty centimeters tall often blocks conversation across the table. Keep designs low and horizontal, or use slender elevated supports that keep decorative elements well above eye level. Another issue is using unprotected taper candles outdoors, where drafts cause uneven burning, excess smoke, and hot wax spills across linens; always protect open flames inside tall glass hurricane sleeves or lanterns. Neglecting to test tablescapes with complete place settings can also crowd dining tables, leaving insufficient room for bread plates, wine glasses, and shared platters. Additionally, avoid handling clear glassware with bare hands during setup, as skin oils leave visible smudges that dull candlelight; always wear cotton gloves or use microfiber cloths during final placement.
Practical Tips for Better Results
Elevating non-wilting centerpieces from simple household items to cohesive, professional wedding decor relies on intentional color palettes, varied textures, and disciplined finishing techniques. Restrict your materials palette to three primary visual components, such as antique brass, soft preserved greens, and warm ivory wax, to keep reception tables looking intentional rather than cluttered. Mixing contrasting surface textures, like pairing rough terracotta pottery with smooth citrus rinds and polished glass, adds organic depth without requiring cut flowers. Test your reception lighting in the evening before the event to see how candle placement and LED accents reflect across glassware and illuminate guest faces. You can also attach adhesive felt pads to the bottom of heavy stone bases, rough pottery, and metal lanterns to prevent scratching wooden tables or tearing delicate linens during setup. For designs featuring live potted plants or topiaries, trim away yellowed or damaged leaves forty-eight hours in advance using sharp shears, misting foliage with clean water to remove dust before transport.
Styling, Presentation, or Organization Ideas
Organizing your reception tablescapes thoughtfully creates a cohesive aesthetic that complements your venue’s surroundings. Layer your table foundations by pairing textured linens like raw linen runners, crinkled cotton gauze, or woven mats with neutral napkins to build tactile depth. When working with long banquet tables, carry your design rhythm down the full length of the table by alternating primary centerpieces with smaller accent elements like glass tea lights, single fruit accents, and small stone coasters. For round guest tables, keep arrangements circular and self-contained, using triangular placement for three-piece lantern or pot clusters to ensure the centerpiece looks balanced from every chair. When styling outdoor buffets, cocktail bars, or guest book tables, adapt your centerpiece concepts into larger matching arrangements, such as using oversized topiary urns or substantial citrus garlands, to tie the whole space together. Photograph your completed sample table during daytime and twilight hours ahead of time, creating visual setup reference sheets for venue coordinators and helpers to follow during wedding-day staging.
Budget or Time Planning
Crafting non-wilting centerpieces provides an economical, schedule-friendly alternative to traditional cut flowers, giving couples control over costs and setup timelines. Sourcing living potted plants, preserved botanicals, seasonal orchard fruits, and reusable architectural lanterns costs a fraction of fresh cut blooms, while eliminating expensive refrigerated shipping and professional floral foam mechanics. To get the most from your budget, buy glass lanterns, compote bowls, and candle chimneys in bulk, reselling these durable pieces to future couples or incorporating them into your permanent home decor after the celebration. Plan your time effectively by completing the majority of centerpiece assembly days or weeks before the wedding ceremony; lanterns can be cleaned and candles installed well in advance. Living potted plants and succulent bowls can be potted and pruned up to two weeks prior to the event, needing only light watering before delivery. Reserve the final morning of the celebration for fast, simple tasks like placing whole fruit accents, wiping glass surfaces, and lighting candles, which reduces wedding-day setup stress and lets you enjoy the day.
Creative Expansion and Advanced Inspiration
Once you feel comfortable with fundamental non-wilting tablescapes, you can expand your creative repertoire by exploring advanced mixed-media installations, architectural variations, and seasonal themes. Try suspending lightweight geometric wire frames or hanging kokedama moss spheres above dining tables, pairing overhead botanical displays with clean, minimalist table surfaces below. You can also explore creative surface finishes, such as applying subtle variegated gold leafing along fruit edges or wrapping timber candle sculptures in woven split-cane accents to introduce fine artisan textures. Consider designing coordinated stationery elements, such as hand-calligraphed stone place tiles, botanical seed-paper menu cards, and wood-block table numbers that carry your materials palette across all paper goods. For autumn or winter celebrations, adapt these concepts by swapping bright summer citrus for rich persimmons, decorative squashes, bare sculptural branches, and dark beeswax candles. Keeping a detailed design binder filled with linen swatches, stone samples, vessel measurements, and lighting plans will guide your creative journey, turning simple alternative ideas into elegant, memorable reception decor for your celebration.