Curating refined wedding tablescapes relies heavily on intentional color selection, balanced proportions, and cohesive styling. White and ivory wedding centerpieces represent a classic approach that complements diverse venue architectural styles, from industrial lofts to traditional ballrooms. This comprehensive tutorial delivers ten distinctive, practical centerpiece concepts centered on a monochrome palette of warm ivory, soft cream, and crisp white. Readers will discover clear methods for assembling professional floral arrangements, selecting stable vessels, balancing textures, and incorporating ambient illumination. Designing your own reception tablescapes allows you to control the aesthetic quality while managing event expenses with precision. The monochrome theme provides practical benefits: it simplifies floral ordering, harmonizes effortlessly with varying banquet linens, and adapts naturally to seasonal shifts. Learning these construction principles will give you the confidence to execute full reception room setups without unexpected logistical hurdles. By following these step-by-step frameworks, wedding planners, hosts, and couples can transform raw botanical materials and glass accents into cohesive, photogenic centerpiece displays.
Why This Idea Is Trending or Useful
Monochromatic neutral palettes continue to dominate wedding design across visual discovery platforms due to their practical value and timeless appeal. White and ivory arrangements maintain high design relevance because they do not clash with venue architecture, existing wall tones, or diverse wedding party attire. In modern reception styling, couples prioritize a minimalist style that feels elevated, fresh, and intentionally curated rather than excessively layered. The DIY appeal of ivory and white decor is particularly strong: these tones are consistently stocked year-round across wholesale floral markets and home decor suppliers. Beginners find this palette exceptionally accessible because working within a single tonal family eliminates color-matching anxieties, allowing creators to focus entirely on texture, height variation, and structural balance. Additionally, neutral tablescapes reflect candlelight and ambient venue illumination evenly, enhancing room brightness without requiring complex lighting installations. This blend of simple sourcing, beginner-friendly assembly, and elevated aesthetic consistency makes white and ivory tabletop decor a dependable, practical choice for stylish event styling.
Materials and Preparation
Thorough planning and systematic preparation form the foundation of any successful event assembly project. The primary floral materials include hardy ivory garden roses, white spray roses, ivory ranunculus, white hydrangeas, lisianthus, and neutral filler accents such as bleached ruscus, white statice, or dried baby’s breath. Non-floral hardware requires heavy glass footed bowls, ribbed pillar cylinders, brass taper candleholders, matte ceramic compotes, florist tape, shears, floral frogs, and dry or wet floral foam bricks. Proper preparation begins forty-eight hours prior to assembly: hydrate fresh stems in sanitized buckets containing commercial flower food after trimming stems at a sharp forty-five-degree angle. Strip all submerged foliage to prevent bacterial growth and maintain clean vase water. For non-water arrangements involving dried or faux florals, organize structural stems by height and flower head diameter in advance. Always plan table layouts around sightline constraints, keeping vessels either below fourteen inches or elevated above twenty inches so seated guests can converse comfortably across dinner tables.
1. Footed Ceramic Compote Cloud
How to Create
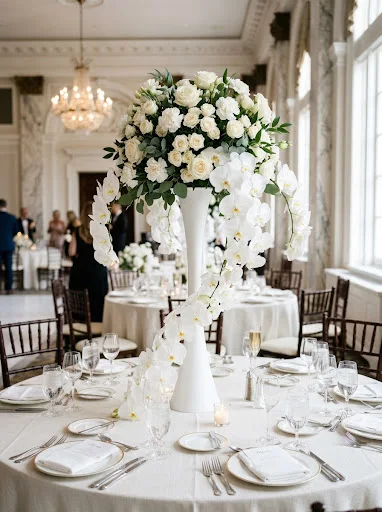
The footed ceramic compote cloud pairs a low, sculptural vessel with a dense, mounded floral silhouette. The structural foundation relies on an ivory or off-white matte ceramic compote bowl elevated on a modest three-inch pedestal stem. This vessel elevates the arrangement slightly off the table runner, creating an airy, light look that suits long banquet tables and round banquet rounds alike. The design focuses on overlapping ruffled white hydrangeas with reflexed ivory garden roses and cascading lisianthus stems, producing an organic, cloud-like mound. Because the profile remains broad and low, the arrangement stays well beneath eye level, supporting guest interaction across dinner tables. The soft matte texture of the ceramic vessel complements the delicate petal tissue, avoiding harsh reflective glares in evening event photography.
To begin assembly, secure a trimmed block of soaked floral foam inside the compote bowl, fastening it with a crisscross grid of green waterproof florist tape across the vessel rim. Insert three large white hydrangea heads at equal intervals around the perimeter, angling the woody stems downward so the outer florets drape gently past the ceramic edge. Next, place three fully bloomed ivory garden roses into the top center of the foam block, establishing the vertical height limit at approximately ten inches above the rim. Fill the intermediate gaps by angling ivory ranunculus, white carnations, and spray roses into the open foam areas, rotating the compote continuously to ensure uniform density from every viewing angle. Finish the base perimeter by inserting trailing stems of variegated ivory greenery or bleached Italian ruscus around the lower rim, softening the transition between the ceramic pedestal and the dining table surface.
2. Floating Ivory Rose Water Trio
Step-by-Step Guide
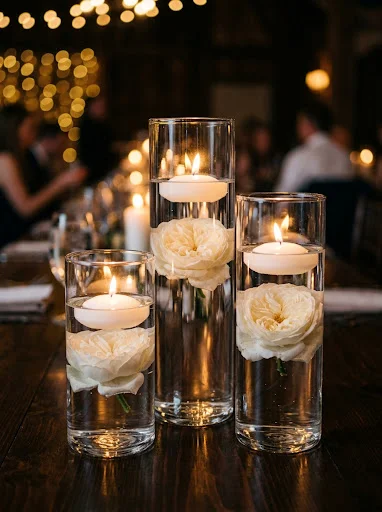
The floating rose water trio provides a modern, clean approach to reception styling using varied glassware heights and submerged negative space. This design features three clear glass cylinder vases of staggered heights, typically eight, ten, and twelve inches, arranged as an asymmetrical centerpiece cluster. Each cylinder is filled with crystal-clear water and capped with a single, wide-bloomed ivory garden rose or large chrysanthemum bloom that floats smoothly on the water’s surface. A floating wax disc candle sits suspended alongside or directly above the petals, casting a warm downward glow through the clear glass columns. This arrangement relies on negative space, highlighting the optical clarity of the water rather than dense, complex foliage. It offers a sophisticated, budget-friendly alternative to high-stem centerpieces, making it an excellent choice for modern ballroom weddings or contemporary industrial loft venues.
Begin by cleaning the three clear glass cylinders inside and out with warm water and isopropyl alcohol to remove interior dust and fingerprint smudges. Place the cylinders in a tight triangular formation at the center of the table, placing the twelve-inch cylinder toward the back and the eight-inch vase toward the primary viewing entrance. Fill each cylinder with room-temperature distilled water, leaving approximately one and a half inches of empty space below the upper glass rim. Select three premium ivory garden roses with wide, symmetrical petal formations, and slice the stems flush at the botanical base using a sharp craft knife, leaving no protruding stem weight that might tip the bloom sideways. Gently place one prepared rose bloom onto the water surface of each cylinder, allowing the outer guard petals to rest flat against the water tension. Float a single white circular wax disc candle beside or slightly above the petals, using a long lighter to ignite the wicks right before guest entry.
3. Cloche-Enclosed Bleached Botanical Meadow
Setup Method
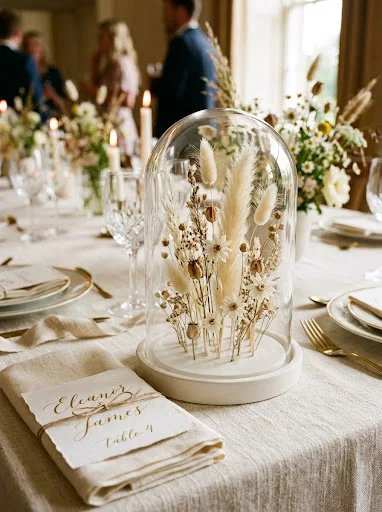
This arrangement utilizes tall glass bell jars, or cloches, set upon round ivory wooden or ceramic bases to enclose dry, sculptural floral elements. The enclosed display showcases an assortment of preserved ivory botanicals, such as bleached pampas fronds, ivory star flowers, dried white gomphrena, and skeleton leaves, arranged in a miniature, standing meadow format. The protective glass dome encloses the fragile dried elements, preventing damage from accidental breezes or guest contact while adding an elegant, curatorial presence to reception tables. The design pairs warm, textured ivory tones with transparent glass, producing a vintage look that works equally well for outdoor gatherings, rustic estate settings, and modern chic interiors. Because this design relies entirely on dried and preserved botanicals, it can be assembled weeks in advance, eliminating day-of floral hydration worries and simplifying reception setup timelines.
Start by preparing a three-inch circular wooden or ceramic base with an indented rim designed to seat a glass cloche securely. Affix a small, half-inch piece of non-hardening adhesive tack or a miniature floral pin frog directly to the center of the base plate. Take a miniature block of dry floral foam, press it down onto the pin frog, and trim the top edges into a gentle rounded dome. Insert tall sprigs of bleached wheat, ivory bunny tails, and dried ruscus into the center of the foam block, keeping the maximum height two inches shorter than the interior dome curve. Fill around the base with preserved white hydrangea florets, miniature star flowers, and ivory moss, pushing stems firmly into the foam until the mechanics are completely hidden. Carefully lower the polished glass cloche over the dried floral installation, pressing it down into the recessed groove of the base, and wipe the exterior glass clean with a microfiber cloth.
4. Cascading White Phalaenopsis Pillar
Execution Process
The cascading white phalaenopsis pillar creates a dramatic, vertical focal point that combines modern architectural height with fluid botanical lines. The centerpiece centers around a slender, matte white metal or ivory acrylic pedestal column, standing roughly twenty-four to thirty inches high. A lush, rounded base of ivory spray roses, carnations, and white stock flowers rests on the upper pedestal plate, from which two long, natural arches of white phalaenopsis orchids cascade downward toward the dinner table. This elevated structure lifts the bulk of the floral weight well above the table, providing unobstructed sightlines for seated guests. The pure white cascade brings dynamic movement to the table, creating an elegant, luxurious look suited for upscale formal receptions and modern ballroom spaces.
To construct this piece, secure an elevated floral dish or acrylic plate atop the metal pedestal using heavy-duty florists adhesive tape. Soak a standard rectangular block of floral foam thoroughly and secure it to the elevated plate using green waterproof tape. Establish the dense floral cap by inserting short, four-inch stems of white hydrangeas, white carnations, and ivory roses into the top and sides of the foam block, shaping a neat, semi-spherical dome. Once the core foam is concealed, select two natural arching stems of real or premium silk white phalaenopsis orchids with open, cascading blooms. Insert the base of one orchid stem into the front lower edge of the foam at a downward forty-five-degree angle, guiding the blossom cascade along the exterior of the pillar stand. Insert the second orchid branch into the opposite lower side at an offset height, creating an asymmetrical, trailing botanical trail that drapes toward the tablecloth surface.
5. Taper Trio and Ivory Petal Runner
How to Make
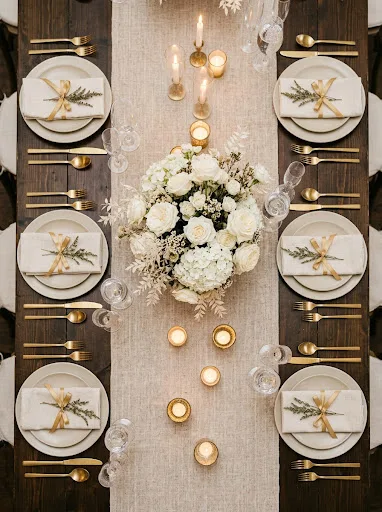
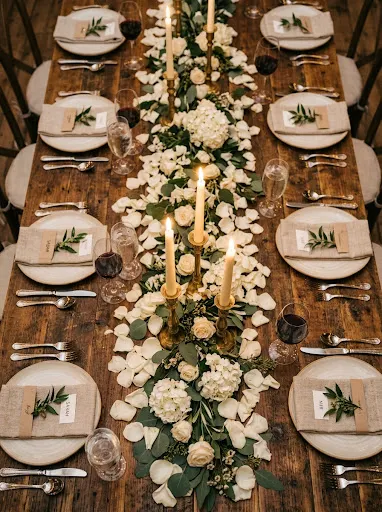
This low-profile runner design replaces traditional centralized vases with a relaxed, linear arrangement of brass taper holders and scattered ivory petals. The arrangement incorporates three to five solid brass or matte ivory candleholders varying between six and ten inches in height, spaced down the center of the table. A dense, four-inch-wide path of loose, deconstructed ivory rose petals and white hydrangea florets winds between the candle bases, creating a textured botanical garland without heavy floral foam. This minimalist layout highlights candle flame warmth, turning long banquet tables into welcoming, romantic spaces. The design works exceptionally well on bare wooden farm tables or soft ivory linen runners, combining simple assembly with an airy, organic tablescape aesthetic.
Begin by rolling out an unbleached linen or textured ivory cheesecloth runner along the center of the table, gently gathering the fabric to create soft, organic folds. Position three classic solid brass taper candleholders down the center of the runner, placing an eight-inch holder in the middle, framed by six-inch and ten-inch holders spaced twelve inches apart. Insert dripless, solid-core ivory wax taper candles into the brass cups, using small wax adhesive dots at the bases to ensure the candles stand straight. Deconstruct six to eight large ivory roses and two heads of white hydrangea into loose petals and small floret clusters. Scatter the petals in an even, undulating band down the middle of the fabric runner, banking the petals slightly thicker around the brass bases to hide wax catchers while leaving the outer linen borders exposed. Trim short, two-inch sprigs of bleached white Italian ruscus and tuck them beneath the petal mounds at intervals to provide subtle horizontal structure.
6. Geometric Ivory Lantern and Blossom Ring
Step-by-Step Guide
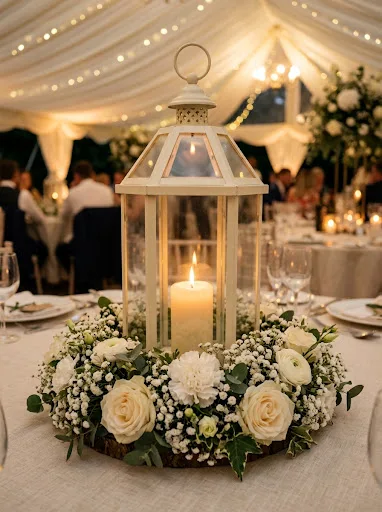
The geometric lantern and blossom ring combines clean industrial metal lines with soft floral textures. The centerpiece features a hexagonal or square ivory metal lantern with clear glass side panels, housing an interior pillar candle. Encircling the base of the lantern is a dense, low floral ring packed with white garden roses, ivory carnations, baby’s breath, and dried white botanicals. This design blends structured architecture with organic flora, grounding table decor on round banquet tables. The lantern offers reliable flame protection in drafty ballrooms, breezy tent receptions, or outdoor terrace spaces, while the surrounding floral wreath hides candle bases and adds rich volume to the table’s visual center.
Start by placing a twelve-inch hexagonal ivory lantern in the center of your workspace, and position a pre-molded, eight-inch plastic floral wreath ring around its base. Soak the oasis foam ring in treated water until fully saturated, and place it directly on a thin protective acrylic charger or plastic saucer plate to shield dining linens from water moisture. Insert a seven-inch ivory, battery-operated LED pillar candle or dripless wax pillar inside the glass lantern chamber, and latch the glass door securely. Begin populating the saturated foam ring by inserting short, two-inch stems of fluffy white baby’s breath and ivory carnations around the entire outer and inner circumferences to build a continuous, textured foundation. Intersperse ten to twelve open ivory garden roses and white spray roses into the filler foundation, angling the flower heads slightly outward to form a rounded floral cushion that frames the metal lantern.
7. Fluted White Ceramic Bud Vase Cluster
How to Create
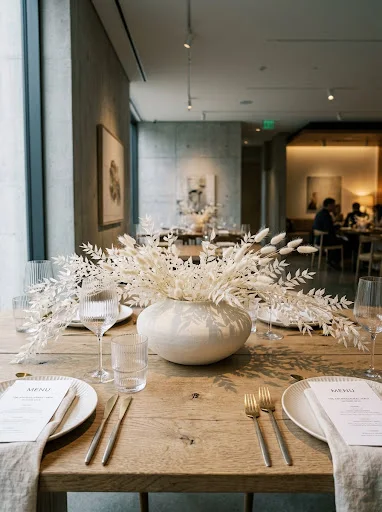
The fluted bud vase cluster is an accessible, modern centerpiece built by grouping five to seven small ceramic vessels. The vases feature varying heights between three and seven inches, showcasing ribbed, fluted, and smooth matte finishes across off-white, cream, and warm ivory tones. Rather than packing blooms into a single container, each individual bud vase displays only one to three carefully selected botanical stems, such as an ivory ranunculus, an arching sweet pea branch, or a single white rose blossom. This dispersed layout spreads visual interest across the center of the table, creating an airy, collected look that feels effortless and tailored. It suits intimate dinner gatherings, square tables, or long reception seating layouts, giving beginner creators an easy, approachable way to style wedding flowers without wrestling with complex foam foundations.
Select an assortment of five small, water-safe ceramic bud vases in ivory and white glazes, choosing varied shapes such as cylindrical, fluted teardrop, and spherical designs. Cluster the vases loosely in the center of the dining table within a twelve-inch circular footprint, placing the tallest seven-inch vase near the center and surrounding it with smaller vessels. Fill each bud vase with warm water mixed with commercial floral preservative up to two-thirds capacity. Trim botanical stems to varied lengths using floral shears, cutting each stem at an angle to maximize water intake. Place a single large ivory garden rose in the main central vase, cut so the head sits just two inches above the vase neck. In the surrounding smaller vases, insert airy single stems: two dancing stems of ivory sweet peas in one, a curving white ranunculus stem in another, a white lisianthus branch in the third, and a cluster of bleached ruscus in the last vessel, ensuring the natural curves point outward to create balanced visual movement.
8. Preserved Bleached Italian Ruscus Spray
Execution Process
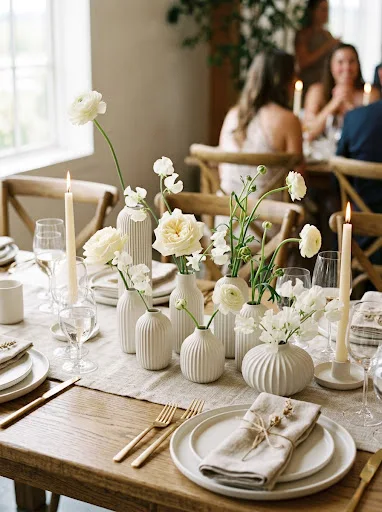
This design relies on monochromatic architectural foliage, featuring a generous, sprawling display of preserved bleached Italian ruscus and bleached eucalyptus. Arranged inside a low, heavy ceramic compote or urn, the ivory-toned foliage extends outward in an asymmetrical horizontal spray, creating dramatic movement without requiring multi-colored flowers. The stark white, dried foliage introduces a refined, sculptural aesthetic that fits minimalist, coastal, and avant-garde wedding settings. Because this centerpiece uses preserved, waterless stems, it remains unaffected by temperature drops, dry venue air, or intense summer heat. The bold shape offers a striking focal point, allowing event decorators to assemble long-lasting, reusable centerpieces that keep floral waste and day-of setup stress to a minimum.
Prepare a low, heavy ivory ceramic urn by inserting a round floral pin frog directly into the center of the container, securing it firmly with floral adhesive clay. Cut dried, bleached Italian ruscus branches into varying lengths ranging from six to eighteen inches. Press the thickest, longest ruscus branch firmly into the left side of the pin frog at an angled, nearly horizontal pitch, allowing the stem to extend eighteen inches across the tabletop. Anchor a shorter, twelve-inch branch on the right side at a steeper upward angle, creating an intentional, asymmetrical balance across the arrangement. Continue inserting preserved ruscus stems, bleached stoebe, and dried ivory bunny tails into the pin frog, working from the outside inward to build structural density at the center of the urn. Finish by pressing a dense cluster of preserved white hydrangea florets into the central core to conceal the pin frog, ensuring the final piece remains balanced and stable.
9. Inverted Bell Vase with White Hydrangea Hemisphere
Step-by-Step Guide
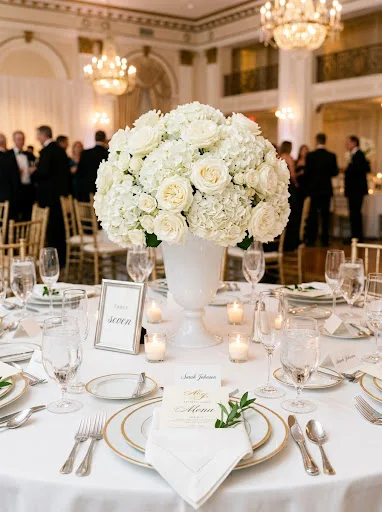
The inverted bell vase with a hydrangea hemisphere offers a clean, tailored centerpiece that suits formal, black-tie wedding receptions. This design pairs a clear or opaque milk-glass bell vase with a compact dome of white hydrangeas and ivory garden roses. The smooth curve of the vessel echoes the rounded floral sphere above, forming an hourglass-inspired silhouette. This structured, balanced arrangement provides neat visual boundaries that complement formal place settings, polished silver flatware, and crisp white tablecloths. By using voluminous hydrangea blooms as a natural structural armature, creators can lock secondary roses firmly in place without relying on floral foam, simplifying table production while supporting eco-conscious, foam-free floral design.
Thoroughly sanitize a clean, ten-inch inverted bell-shaped glass or white ceramic vase, filling it to three-quarters capacity with fresh water and flower food. Take clear waterproof floral tape and build a two-by-two grid across the circular opening of the vase, trimming the tape ends cleanly around the rim. Prepare three large, robust white hydrangea stems by stripping away all foliage, trimming the woody stems under water at a sharp angle, and splitting the bottom stem half an inch vertically to encourage water uptake. Insert the three hydrangea stems through the tape grid, resting the woody branch angles on the taped rim so the mophead blooms pack together to form a solid, rounded dome. Insert five to seven ivory garden roses directly through the hydrangea florets into the water below, using the dense petals to support the rose stems. The hydrangea florets act as a natural frog, holding the roses at varied angles across the rounded dome.
10. Monochromatic Ivory Candlestick Grove
How to Make
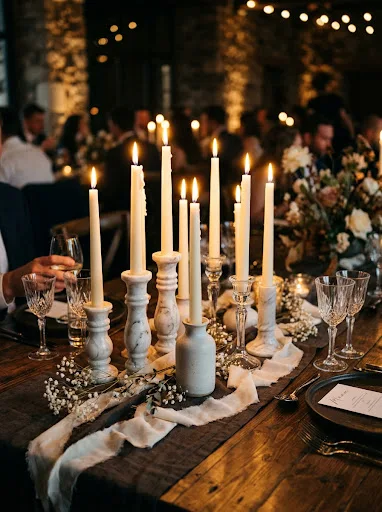
The ivory candlestick grove shifts the centerpiece focus from fresh florals to a luminous, multi-tiered display of classic candlelight. The installation uses eight to twelve slender ivory taper candles seated in an assortment of white ceramic, clear glass, and carved marble candleholders, grouped tightly down the center of the table. Surrounding the candle bases is a simple, dry scatter of ivory silk ribbon, bleached baby’s breath sprigs, and small white alabaster accent stones. This lighting-forward design turns the entire tablescape into a warm, glowing focal point, creating an inviting, romantic atmosphere as evening sets in. It is especially effective for winter weddings, evening receptions, or intimate historic dining rooms where warm candle flames reflect beautifully off polished architectural surfaces.
To set up the grove, select ten mixed candleholders crafted from white ceramic, honed marble, and clear glass, ranging in height from two to eight inches. Group the candleholders down the center third of the table, spacing the bases roughly two to three inches apart to prevent excess heat buildup between adjacent flames. Insert twelve-inch, dripless solid-wax ivory taper candles into each holder, warming the candle base slightly with a lighter to soften the wax before pressing it firmly into the socket for a secure, vertical hold. Once all tapers stand plumb, gently weave a two-inch-wide, frayed-edge ivory silk ribbon between the candle bases along the table, letting the ends drape naturally past the table edge. Tuck small sprigs of dried, bleached baby’s breath and smooth white marble pebbles into the ribbon folds, keeping all dried materials low and clear of the candle wicks to ensure safety during the event.
Common Beginner Mistakes and How to Avoid Them
Beginners working with ivory and white centerpieces often encounter common design and handling challenges that can compromise the clean aesthetic of their tablescapes. A frequent error is mixing conflicting undertones of white without a cohesive transition plan; pairing stark, blue-toned cool whites directly beside deep, yellow-cast ivories can make ivory elements look dusty or aged. To prevent this, layer transitional tones such as warm cream, unbleached linen, and soft beige to blend the palette naturally. Another common issue is water cloudiness in clear glassware; decaying leaves left submerged in vase water release bacteria, turning clear water murky within hours. Always strip every leaf below the vase waterline, and add a drop of commercial floral preservative to keep water transparent. Novice arrangers also tend to build arrangements too tall, blocking eye levels across dinner tables. Always measure finished heights, keeping low arrangements under fourteen inches and elevated stands above twenty-two inches to preserve open sightlines. Finally, neglecting candle safety in breezy venues can result in rapid, uneven dripping; always use dripless wax formulas and install clear glass hurricane cylinders around open flames whenever working in drafty reception halls.
Practical Tips for Better Results
Achieving professional, boutique-quality finishes on DIY centerpieces requires thoughtful floral conditioning and reliable assembly mechanics. When selecting ivory roses, purchase blooms three to four days before the wedding so they have adequate time to open from tight commercial buds into wide, romantic blooms. You can gently reflex outer rose petals by rolling them backward with your thumbs to increase blossom size and showcase softer interior color gradients. Always build a supportive structural grid across wide-mouthed vessels using clear waterproof floral tape or a coated metal floral pin frog anchored with floral clay, as loose stems will splay outward and collapse your design shape. To extend the vase life of thirsty blooms like hydrangeas, dip trimmed woody stems into powdered alum before placing them into water to keep moisture pathways open. For dried or preserved centerpieces, spray finished installations with an unscented aerosol floral sealant to minimize shedding and keep dried elements dust-free during transit. Taking the time to test-assemble a complete mock table setting weeks in advance ensures your stem counts, vessel choices, and candle selections coordinate harmoniously.
Styling, Presentation, or Organization Ideas
The presentation of your centerpieces depends heavily on how harmoniously they coordinate with the surrounding table linens, dinnerware, and stationery. Pairing white and ivory floral decor with textured linens—such as oatmeal linen runners, ivory crushed velvet, or crisp hemstitch cotton—adds tactile depth that keeps a neutral palette visually interesting. Enhance place settings by echoing centerpiece materials: pair matte ceramic compotes with cream ceramic chargers, or match clear glass cylinders with ribbed crystal wine stemware. Introduce subtle contrast through tableware, such as matte gold, brushed champagne, or antiqued silver flatware, to frame the soft ivory floral display. When laying out tables across a reception room, balance the space by alternating designs: place low ceramic compotes on half the tables and taller cylinder trios on the remaining tables to create dynamic height variation throughout the room. Keep paper menus and calligraphed place cards in matching ivory tones with clean black, taupe, or blind-embossed lettering, ensuring every detail across the table reflects a cohesive, intentional visual identity.
Budget or Time Planning
Designing and building your own wedding centerpieces can significantly reduce wedding floral expenses, provided you approach material sourcing and time management with a clear, realistic plan. Allocate approximately sixty percent of your decor budget to high-impact primary blooms, reserving forty percent for hardy structural fillers, vessels, and hardware. To keep costs low, purchase classic blooms like carnations, spray roses, and hydrangeas in bulk wholesale bundles, using premium garden roses or orchids sparingly as focal accents. Build a strict production timeline: source all vessels, candleholders, and hardware three months ahead; establish wholesale floral orders one month in advance; and take delivery of fresh botanicals three days before the ceremony. Dedicate two days before the wedding to hydrating stems, building structural tape grids, and arranging foundational greens. Complete delicate floral insertions the day prior to the celebration, storing finished arrangements in a cool, dark room away from direct sunlight and drafts. On the wedding morning, assign a dedicated team to place the prepared centerpieces, pour vase water, and position candle elements, avoiding rushed, last-minute table prep.
Creative Expansion and Advanced Inspiration
Once you feel comfortable with core centerpiece construction methods, explore advanced techniques to add personalized detail to your white and ivory reception decor. Try incorporating architectural fruit elements, such as pale green pears, white heirloom pumpkins, or ivory-dusted grapes, nestled among floral bases to build an artistic, still-life look reminiscent of classical Dutch paintings. Advanced floral arrangers can experiment with hanging installations, creating suspended floral meadows of bleached ruscus, white amaranthus, and hanging glass tea-light globes directly above bridal party tables. You can also weave miniature warm-white fairy lights or battery-operated submersible micro-LEDs into dense floral bases to provide a soft interior glow that illuminates arrangements from within. Another subtle, high-end technique involves infusing delicate, botanical linen sprays into textile runners or using scented botanical wax for table accents, adding an understated layer of fragrance to the dining experience. By exploring different textures, artistic materials, and lighting methods, you can create a memorable reception atmosphere that honors timeless wedding elegance through modern, handmade styling.