Natural botanical elements have become essential components in contemporary wedding design, offering rich visual texture, organic structure, and seasonal warmth across reception tables. This comprehensive guide explores practical…
Natural botanical elements have become essential components in contemporary wedding design, offering rich visual texture, organic structure, and seasonal warmth across reception tables. This comprehensive guide explores practical Pinterest ideas for assembling durable, elegant centerpieces centered on natural pinecones, evergreen foliage, and complementary rustic vessels. Readers will learn reliable assembly techniques, proper botanical cleaning methods, balanced proportions, and structural styling strategies tailored for both round banquet tables and long harvest layouts. Designing centerpieces around pinecones allows couples, event planners, and DIY enthusiasts to create rich, woodland-inspired aesthetics while bypassing the extreme expenses and wilting concerns common to all-floral arrangements. The step by step guidance provided throughout this tutorial addresses physical balance, guest sightline clearance, and structural durability, ensuring every arrangement remains intact and fresh throughout the reception. Whether preparing an intimate mountain lodge dinner, a winter ballroom celebration, or an outdoor autumnal banquet, pinecone-based centerpieces offer adaptable, timeless solutions. By understanding fundamental floral mechanics and botanical preservation, decorators can produce professional, cohesive table centerpieces that elevate event spaces without requiring advanced floristry training or costly specialty equipment.
Why Natural Conifer Elements Lead Modern Rustic Styling
Pinecones continue to dominate wedding decor inspiration boards because they provide genuine tactile depth, architectural geometry, and sustainable appeal that artificial props cannot replicate. Modern couples increasingly favor organic, earth-conscious celebrations, leading them toward woodland elements that evoke forest tranquility, seasonal transitions, and cozy intimacy. Conifers possess remarkable practical value; unlike delicate cut blooms that demand strict temperature control and constant water access, cured pinecones do not dehydrate, drop petals, or wilt under venue lighting. This inherent durability makes conifer centerpieces a beginner friendly choice that accommodates multi-day pre-assembly schedules, eliminating wedding-morning decor stress. The natural brown tones, geometric scales, and varied sizes of pinecones pair effortlessly with both rustic and modern design palettes, from forest greens and crisp whites to rich burgundies and metallic accents. In addition, pinecone centerpieces represent accessible budget ideas, as the foundational raw materials can often be ethically gathered, cleaned, and repurposed alongside affordable greenery. This blend of structural durability, sustainable sourcing, and understated rustic elegance ensures that pinecone decor remains a staple of modern wedding inspiration.
Workspace Preparation, Sanitation, and Material Planning
A successful DIY conifer centerpiece requires systematic preparation, sanitation, and tool staging before arranging individual elements. Gather foundational materials including sorted pinecones of varying species, fresh or preserved greenery sprigs, natural wood slices, glass vessels, LED or pillar candles, floral wire, and low-temperature hot glue. Essential tools include pruning shears, wire cutters, heat-resistant craft gloves, baking trays, parchment paper, and soft-bristled utility brushes. Before assembly begins, gathered wild pinecones must undergo a thorough heat-sanitation and drying process to eradicate lingering insects, remove internal moisture, and melt away sticky sap deposits. Arrange raw pinecones in a single layer on parchment-lined metal baking sheets and bake them in a standard oven at two hundred degrees Fahrenheit for two hours, watching carefully until all scales open fully. Once cooled, inspect each cone, brushing off loose debris and clipping jagged stalks with pruning shears. Planning considerations should account for guest dining comfort by calculating table dimensions to ensure centerpieces stay under fourteen inches or exceed twenty-four inches, maintaining clear sightlines across banquet tables.
1. Whitewashed Cones in Pedestal Compote Bowls
Step-by-Step Guide
The whitewashed conifer compote centerpiece blends traditional vintage elegance with frosty winter textures, creating a refined focal point suitable for formal banquet tables. The design concept pairs an elevated glass or ceramic compote bowl with frosted pinecones, creating the visual impression of a snow-dusted forest canopy. By lifting the main cluster three to five inches above table linens on a slender pedestal, this arrangement creates an airy, weightless profile while keeping the tabletop surface uncluttered. The muted white wash highlights the natural radial geometry of conifer scales, softening deep woody browns into pale winter hues that catch ambient venue lighting. Combining varied conifer species—such as broad ponderosa cones, elongated sugar pine varieties, and compact lodgepole cones—produces dimensional interest across the rounded silhouette. This design functions reliably on round guest tables, delivering balanced thirty-six-degree sightlines that look immaculate from every seat.
To assemble this centerpiece, prepare thirty cured conifer cones by brushing the outer scales with a diluted mixture of flat white latex paint and water, letting them dry fully on wax paper. Secure a rounded dome of dry floral styling foam into the basin of a six-inch footed compote dish using waterproof floral adhesive tape. Wrap the base of each pinecone with twenty-gauge green floral wire, twisting the wire ends into a three-inch rigid insertion pick beneath the core. Press the wired cones systematically into the floral foam dome, beginning along the outer rim and working inward in concentric rings until the foam surface is completely concealed. Tuck small sprigs of fresh silver dollar eucalyptus, frosted cedar fronds, and white dried helichrysum into the gaps between the scales to soften the transitions. Finish by misting the arrangement with an aerosol floral sealant to lock the textures in place and prevent paint shedding during transport.
2. Long Evergreen Garland with Embedded Cones and Pillar Candles
Execution Process
This design concept provides a continuous, sweeping centerpiece tailored specifically for long farm tables and banquet trestles, uniting organic greenery with structural cones. A lush garland made of mixed evergreen boughs—such as noble fir, white pine, and aromatic cedar—runs the length of the table, serving as a textured channel for conifer clusters. Symmetrical pairings of open pinecones sit nestled along the foliage spine, anchoring staggered glass hurricane cylinders containing ivory wax pillar candles. The interplay between fragrant needle textures, woody cone scales, and smooth glass creates a balanced sensory experience that enhances the reception dining atmosphere. The low, horizontal orientation leaves conversational sightlines unobstructed, encouraging relaxed, cross-table guest interaction throughout dinner service. The deep forest-green boughs emphasize the rich amber and umber tones of natural pine scales, delivering an authentic woodland setting that looks full and intentional.
Begin by laying a pre-wired six-foot cedar and fir garland directly down the center line of a long wooden harvest table, fluffing the branches outward to achieve an even twelve-inch width. Space three glass hurricane candle sleeves evenly down the garland spine, placing one at the center and the remaining two twenty-four inches toward the ends. Wire small clusters of three medium-sized scotch pinecones together using eighteen-gauge brown floral wire, leaving four-inch tails to twist securely into the central garland spine between candle stations. Insert stems of fresh seeded eucalyptus and dried magnolia leaves at forty-five-degree angles beneath the cones, creating an undulating green frame that conceals mechanical wires. Place eight-inch dripless ivory pillar candles inside each glass cylinder, securing the wax bases with adhesive floral clay to keep them plumb and stable. Distribute miniature hemlock cones along the outer foliage edges to finish the runner with fine, natural detail.
3. Birch Log Planter Trough with Conifer Clusters and Berries
How to Create
A natural birch log planter trough introduces rustic alpine charm, combining rough papery tree bark with dense clusters of pinecones and vibrant red winter berries. The design utilizes a hollowed-out horizontal birch branch or a rectangular bark-faced wooden trough as a low, supportive container that sits flat on the table. The pale, chalky bark of the birch contrasts sharply against the dark conifer scales and deep green fir clippings, creating dynamic woodland contrast. Clusters of bright red ilex or winterberry stems introduce crisp holiday color, making this an appealing project for late autumn and winter weddings. The linear, structured profile of the trough organizes wild forest botanicals into a tidy, manageable display that stays securely contained throughout dinner service. The sturdy wooden construction ensures exceptional physical stability, preventing accidental tipping on active family-style dining tables.
Select a twelve-inch horizontal half-log planter trough lined with a protective plastic moisture barrier, ensuring the base rests level on a flat workspace without rocking. Cut a brick of dry floral foam to fit snugly into the interior cavity, wedging scrap foam along the sides to secure the block firmly without glue. Using a low-temperature glue gun, affix five large, open pinecones down the center line of the foam block, tilting them at alternating angles to create an organic rhythm. Fill the surrounding areas by inserting four-inch clippings of fresh balsam fir and blue-berried juniper directly into the foam base, completely hiding the foam and plastic liner. Weave six stems of real or faux crimson winterberries through the conifer branches, allowing the berry tips to arch outward beyond the birch container rims. Inspect the arrangement from seated eye level, trimming any stray greenery stems that extend above ten inches to preserve open sightlines.
4. Floating Cone and Fresh Cranberry Glass Cylinder Trio
Setup Method
This modern design utilizes water-filled glass vessels, submerged conifer elements, and buoyant botanicals to create a luminous, light-bending centerpiece. The visual concept features a trio of varying-height glass cylinders filled with clear water, housing submerged pinecones, floating red cranberries, and floating wicks. The water magnifies the internal conifer structures, highlighting the layered geometry of the pinecone scales while preventing the natural sap from clouding the display. Floating berries and burning wicks sit atop the water column, throwing warm, flickering light across the glass surfaces and creating dynamic illumination across evening dinner settings. The vertical lines of the three cylinders draw the eye upward without creating a solid barrier across the table, maintaining an airy, modern design aesthetic. This self-contained setup minimizes water spill risks, stays fresh without refrigeration, and sets up rapidly during tight reception hall turnover windows.
Procure a set of three clean, heavy-bottomed glass cylinder vases measuring six, eight, and ten inches in height, wiping the interior glass with rubbing alcohol to eliminate fingerprints. Place two dense, heat-sanitized Austrian pinecones into the bottom of each vase, anchoring the bases with clear floral adhesive dots to prevent premature buoyancy before scales saturate. Fill each cylinder three-quarters full with room-temperature distilled water, pouring gently down the interior glass wall to avoid creating excess air bubbles on the submerged cone surfaces. Scatter a half-inch layer of fresh, washed cranberries across the water surface, creating a floating crimson ring that surrounds the center of the cylinder. Place a three-inch disc-shaped floating candle gently onto the water surface in each vase, ensuring the cotton wick stays completely dry. Group the three completed cylinders on a round mirror or polished slate base, lighting the wicks right before guest seating begins.
5. Elevated Brass Candelabra with Conifer Wreath Collars
Step-by-Step Guide
The elevated brass candelabra concept combines traditional grand ballroom formal styling with earthy, forest-floor textures, building dramatic vertical scale across reception spaces. An ornate three-arm or five-arm polished brass candelabra lifts glowing taper candles high above the dining field, providing vertical grandeur that fills lofty venue ceilings. Surrounding the base of the metal stem is a handcrafted circular conifer wreath collar composed of dense pinecones, boxwood sprigs, and small velvet ribbons. This layered balance between polished, warm metallic hardware and rugged woodland materials anchors the tall candelabra, preventing it from appearing top-heavy or stark against delicate table linens. The candle flames sit elevated well past eye level, ensuring cross-table conversation remains open while casting a flattering golden glow over the tablescape below. This design works exceptionally well in historic library spaces, stone lodges, and grand manor venues that benefit from rich vertical decoration.
Select a sturdy, sixteen-inch solid brass candelabra with a wide, weighted circular base, cleaning the surface with a soft microfiber cloth to remove dust. Construct a separate wreath collar using an eight-inch flat wire wreath ring, wrapping the wire with natural brown floral tape to create an adhesive-ready surface. Fasten twenty small-to-medium conifer cones around the ring frame using twenty-two-gauge floral craft wire, pulling the wire tight around the lower cone scales to lock them firmly in place. Hot-glue dense tufts of preserved boxwood clippings and small sprigs of rosemary into the voids between the cones, building a full, rounded floral base. Lower the finished conifer wreath collar over the central column of the candelabra so it rests flat on the brass pedestal base. Insert twelve-inch hand-dipped ivory taper candles into the brass sockets, using small rings of floral wax around the candle bases to hold every taper perfectly vertical.
6. Lantern Surrounds with Clustered Cones and Fairy Lights
How to Create
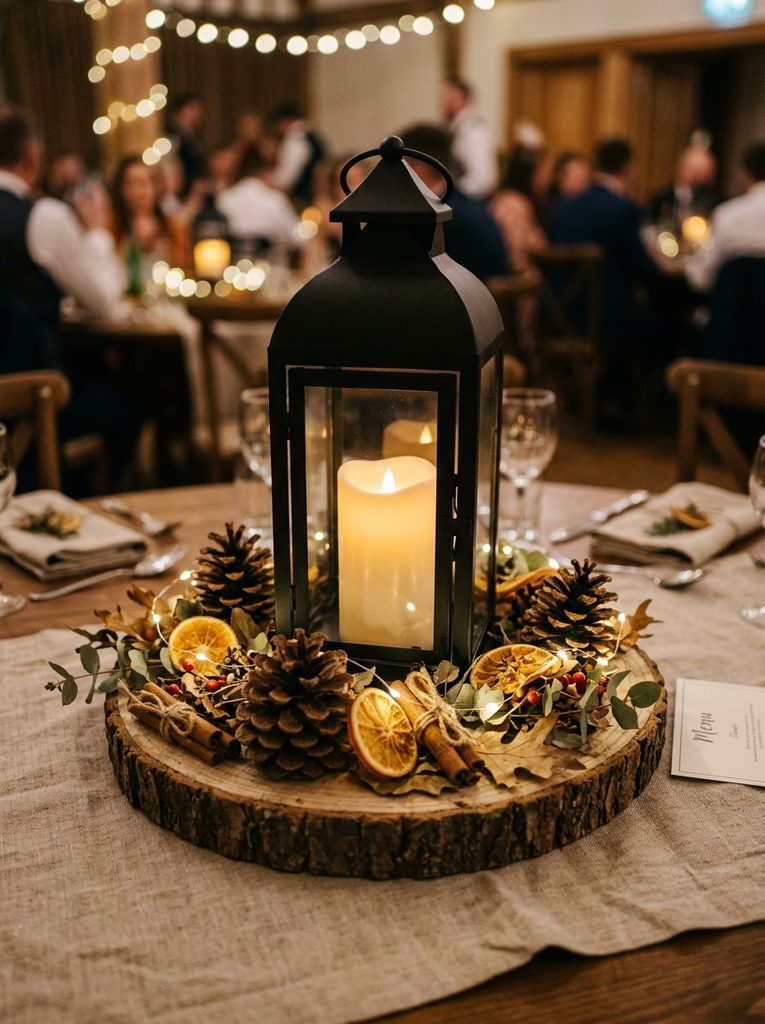
A matte black metal or distressed wooden lantern surrounded by clustered natural pinecones and micro-wire fairy lights offers an approachable, weather-resistant centerpiece option. The design centers on a classic four-sided lantern fitted with clear glass panes that house a battery-powered LED candle or a delicate bundle of warm-toned wire fairy lights. Encircling the lantern base is an organic halo of natural pinecones, dried seed pods, and fragrant cinnamon sticks, creating a cozy hearth-inspired presentation. The low-voltage lighting casts dynamic geometric shadows through the glass panes onto the surrounding conifer scales, highlighting their rough woody textures without open-flame hazards. Because this concept uses no fresh water or delicate cut flowers, it is exceptionally durable and resilient against wind drafts, making it an ideal choice for outdoor tent receptions, autumn barn gatherings, and breezy covered pavilions.
Choose an authentic twelve-inch matte black iron lantern with clear glass side panels, placing it squarely in the middle of a fifteen-inch natural wood charger plate. Place a reliable, timer-operated six-inch LED pillar candle inside the lantern compartment, checking battery function and setting the automatic illumination switch before latching the door shut. Arrange eight large, fully opened pinecones directly onto the charger plate surface surrounding the lantern base, pointing the conifer tips outward to create an organic radiating pattern. Weave a ten-foot strand of warm-white, copper-wire micro fairy lights through the surrounding conifer cluster, hiding the battery pack discreetly beneath the largest cone at the back of the display. Tuck small bundles of dried cinnamon sticks tied with jute twine and dried orange slices between the pinecones to add subtle seasonal aroma and warm, amber color accents to the finished arrangement.
7. Natural Tree Slice Pedestal with Pinecone Bud Vases
Execution Process
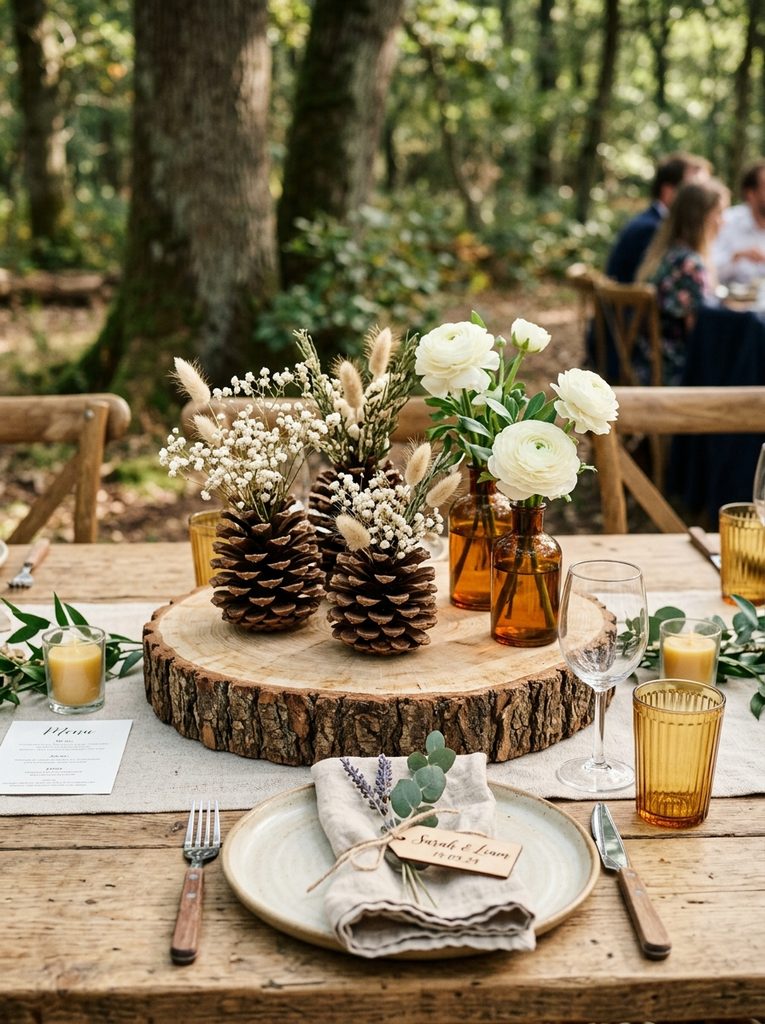
This design concept utilizes horizontal wood slices as rustic display risers, supporting a balanced collection of miniature pinecone bud vases and delicate botanical sprigs. A thick cross-section of sanded ash, oak, or cedar brings rich timber grain, bark-edged borders, and natural warmth directly to the table center. Resting atop the wooden riser are three or four large conifer cones that have been converted into small stem-holding vessels by removing top scales to receive dried botanicals. Surrounding these organic conifer holders are delicate ceramic or amber glass bud vases containing single focal blooms, such as anemones, hellebores, or dried baby’s breath. This arrangement provides tactile variety, pairing raw wood, geometric pine scales, smooth ceramics, and soft flower petals into a balanced, cohesive presentation. The modest vertical scale keeps the centerpiece low and intimate, making it a reliable option for casual, conversation-focused dinner celebrations.
Procure a level twelve-inch natural wood tree slice measuring one-and-a-half inches thick, brushing the bark edges clean and sealing the top grain with a clear matte water-based wood finish. Select three broad, flat-bottomed sugar pine or ponderosa cones that stand upright on their bases without wobbling or tilting. Using heavy-duty wire snips, remove the top six scale tiers from each cone, carving out a hollow central depression measuring one inch deep using a craft rotary tool or chisel. Press a small dab of floral putty into the hollowed cone cavities, inserting small sprigs of dried baby’s breath, bunny tails, and preserved cedar into the conifer stems. Position the modified pinecones across the wooden charger alongside two four-inch amber glass bud vases filled with fresh white ranunculus blooms. Scatter loose acorn caps and miniature hemlock cones around the wooden base to tie the different elements into a unified, woodland scene.
8. Cloche-Enclosed Pinecone and Moss Forest Terrarium
Setup Method
Enclosing a curated conifer arrangement beneath a crystalline glass cloche bell jar turns simple woodland materials into an elegant, museum-inspired display. The design features a smooth wooden or slate base supporting a miniature landscape of preserved forest moss, small polished river stones, and a single sculptural pinecone anchor. The curved glass dome magnifies internal details while protecting the delicate preserved elements from accidental bumps, beverage splashes, and dinner-table debris. Reflective highlights across the glass bell jar add an upscale, tailored finish that elevates humble forest materials into high-end reception decor. This self-contained presentation prevents loose organic matter from scattering across table linens, providing an orderly and low-maintenance option for polished indoor banquet halls. The quiet, terrarium-like presentation encourages seated guests to admire fine natural details up close throughout the meal.
Begin by selecting an eight-inch glass display cloche fitted with an accompanying circular walnut or slate base, cleaning both sides of the glass with an ammonia-free glass cleaner. Spread a generous layer of preserved green pillow moss and dark reindeer moss across the base plinth, securing the moss edges with discreet drops of hot craft adhesive. Select an exceptionally symmetrical six-inch conifer cone, checking that all scales are intact, and secure its base into the center of the moss plinth using a dab of floral adhesive. Surround the central cone with tiny tumbled river pebbles, miniature bleached pods, and a tiny sprig of dried fern frond to establish a natural woodland floor scene. Carefully lower the clean glass cloche over the assembled woodland scene, checking that no moss strands become trapped beneath the lower glass rim. Place the finished terrarium at the center of the guest table, surrounding the glass base with four small tea light votives to cast warm reflections across the dome.
9. Monochromatic Frosted Pinecone Bowl with Metallic Ornaments
How to Make
The monochromatic frosted conifer bowl offers a sleek, modern update on classic holiday elements, blending matte natural textures with metallic reflections. The core concept relies on a broad, low-profile ceramic or brushed-metal bowl filled with frosted white and silver pinecones, interspersed with smooth metallic ornament spheres. The uniform color palette—utilizing silver, champagne gold, matte white, and natural charcoal—creates an intentional minimalist style that feels sophisticated and calm. By pairing rough, textured pine scales with mirror-finish baubles, the centerpiece generates high visual contrast through texture rather than bold colors. The low, bowl-shaped silhouette prevents sightline obstructions across dining tables while providing an organized, contained presentation that catering staff can easily navigate during meal service. This concept fits smoothly into modern industrial venues, winter warehouse receptions, and contemporary loft weddings.
Select a low, wide-mouth bowl measuring ten inches in diameter and three inches deep, choosing a vessel crafted from brushed silver metal or matte white stoneware pottery. Spray twenty cured conifer cones with an aerosol frosted-glaze spray, following with a light dusting of ultra-fine silver mica powder while the clear binder remains tacky. Place three large eight-inch conifer cones into the bottom of the bowl to build an internal support structure that elevates smaller decorative items. Fill the surrounding cavities with the frosted cones, interspersing them with eight shatterproof glass or plastic metallic ornaments in mixed champagne and mercury-glass finishes. Weave a short strand of battery-operated micro-wire lights through the arrangement, tucking the battery housing beneath the bottom layer of cones. Inspect the top surface to ensure the arrangement forms an even, gentle dome that rises three inches above the bowl rim, providing a balanced, modern metallic display.
10. Gilded Cones in Geometric Glass Terrarium Prisms
Step-by-Step Guide
Gilded pinecones enclosed within modern geometric glass terrariums combine organic woodland shapes with crisp, contemporary architectural lines. The design centers on a multi-faceted brass or copper-framed glass terrarium prism resting flat upon table linens, housing an arrangement of metallic-leafed pinecones. Applying delicate gold or copper leafing to the edges of the conifer scales adds luxury to the rustic cones, catching and reflecting room lighting through the clear glass facets. The geometric metal framing introduces an industrial touch that keeps the centerpiece from feeling overly traditional, aligning with modern boho and urban minimalist wedding themes. The self-contained prism format keeps the design compact and secure, making it easy to assemble ahead of time, transport safely, and pack away after the reception ends.
Procure an eight-inch multifaceted geometric glass prism with a brass metal frame, checking that the glass facets are clean and the metal solder joints are sound. Prepare five cured conifer cones by brushing thin lines of metal leaf sizing adhesive along the outer scale tips, waiting fifteen minutes until the adhesive becomes tacky. Lay sheets of genuine or imitation gold leaf across the tacky edges, burnishing the foil gently with a soft dry brush before buffing away excess leaf flakes. Layer a shallow bed of dried eucalyptus leaves and white sand inside the bottom of the glass terrarium, smoothing the surface level with an angled spoon. Arrange the gold-leafed pinecones inside the prism opening, stacking them at varied angles to create an engaging arrangement within the glass facets. Place the completed geometric prism onto a neutral linen table runner, finishing the setup by placing two slender brass taper candleholders nearby.
Common Beginner Mistakes and How to Avoid Them
A frequent mistake in DIY pinecone centerpiece assembly is failing to sanitize and cure wild-gathered cones, leading to insects emerging or sticky sap leaking onto table linens during the event. Unprocessed pinecones often contain dormant bugs and sticky resin pockets that liquefy under warm reception room temperatures. Prevent this issue by baking all gathered cones on parchment-lined trays at two hundred degrees Fahrenheit for two hours, which opens closed scales, eliminates pests, and hardens sap into a stable glaze. Another common pitfall is over-decorating pinecones with thick synthetic glitter, heavy faux snow, or bright artificial craft paint, which obscures their natural conifer geometry and yields an artificial appearance. Maintain an upscale, timeless aesthetic by using light dry-brushing techniques, matte mineral washes, or subtle mica dustings that celebrate natural textures. Finally, decorators often build centerpieces that violate table ergonomics, creating bulky or tall barriers that block guest vision. Maintain clear sightlines by keeping low arrangements under fourteen inches or lifting floral elements above twenty-four inches on elevated pedestals, ensuring comfortable, unobstructed conversation for every seated guest.
Practical Tips for Better Styling and Finishing
Achieving professional, polished results with conifer centerpieces requires disciplined material grading, harmonious color palettes, and reliable mechanical assembly practices. When gathering or purchasing pinecones, sort your collection into three distinct size categories: large focal anchors, medium fillers, and miniature detail pieces, using this hierarchy to build balanced arrangements. When wiring cones into wreaths, garlands, or foam, always wrap floral wire around the bottom two scale rows where the woody core is thickest; this conceals the wire mechanics while securing the cone firmly against movement. Balance dark woody conifer tones by pairing them with varied fresh foliage textures, such as velvety dusty miller, fine cedar needles, and broad magnolia leaves, to keep arrangements from appearing dark or heavy. When incorporating candlelight, use dripless wax formulas or contained glass hurricane sleeves, keeping flame points a minimum of six inches away from dried botanicals to prevent fire hazards. Finally, photograph your prototype arrangement under dim evening lighting to verify how shadows fall across the scales before launching full-scale production for all tables.
Table Presentation, Proportions, and Spatial Coordination
Thoughtful placement of conifer centerpieces ensures that event tables remain functional, comfortable, and visually unified throughout the wedding reception. For sixty-inch round banquet tables, select circular centerpieces—such as compote dishes, cloche terrariums, or lantern clusters—that occupy a central twelve-to-sixteen-inch footprint, leaving ample room for glassware, bread plates, and silverware. For long farmhouse harvest tables, prioritize linear arrangements like continuous evergreen garlands or modular birch troughs, maintaining an eight-to-ten-inch central width to preserve dining space for family-style serving platters. Coordinate your conifer decor with surrounding table linens, pairing raw wood and deep green pine with textured linen runners, hemstitched cotton napkins, and matte black or antique brass flatware. Integrate ambient illumination thoughtfully by spacing clear glass tea lights or brass tapers symmetrically around the central conifer element, casting a warm glow that highlights the natural conifer textures. Ensuring that all decorative components remain balanced and secure guarantees that your tables look polished and inviting from the first cocktail through the end of the evening.
Budget Allocation and Production Timeline Planning
Executing a large-scale pinecone centerpiece project smoothly requires disciplined financial planning, realistic material sourcing, and an organized production timeline. Maximize your budget by ethically foraging fallen conifer cones in public pine forests or purchasing bulk boxes from commercial forestry suppliers, which significantly cuts per-table costs compared to fresh-cut floral stems. Allocate seventy percent of your table decor budget toward durable structural assets—such as heavy glass hurricanes, quality brass candelabras, and natural wood chargers—that can be repurposed or resold after the event. Establish a practical assembly schedule: gather, wash, and heat-sanitize all pinecones three to four months prior to the wedding date, storing the cured cones in breathable cardboard boxes lined with dry tissue paper. Build dry, non-perishable components—including wired cone clusters, whitewashed vessels, and cloche terrariums—four to six weeks before the wedding. Reserve the final forty-eight-hour window for cutting and incorporating fresh greenery boughs, ensuring your completed arrangements stay fragrant, vibrant, and ready for table installation.
Creative Expansions and Advanced Stylistic Variations
Once you have mastered foundational conifer assembly techniques, you can expand these principles into surrounding reception spaces to create a cohesive event atmosphere. Replicate the materials used on dining tables to design coordinated displays for escort card tables, welcome signage, and dessert stations, tying the entire venue together through repeated conifer textures. Integrate delicate calligraphed details by using small conifer scales as individual place card holders, securing name cards into natural scale crevices with tiny drops of craft glue. Advanced decorators can explore scent design by lightly infusing pinecones with pure essential oils—such as cedarwood, balsam fir, or sweet orange—several weeks before assembly, adding a subtle woodland fragrance that enhances the reception space. For dramatic evening affairs, conceal battery-operated micro-wire fairy lights within elevated conifer candelabras or along table garlands, creating an enchanting glow as overhead room lights dim for dancing. Exploring these versatile conifer design techniques allows couples to build an enduring, natural wedding atmosphere that feels rich, cohesive, and timeless.