Ribbon and bow accents have emerged as prominent architectural and stylistic elements in modern wedding design, providing tactile movement, vintage romance, and clean linear framing to tablescapes. Integrating…
Ribbon and bow accents have emerged as prominent architectural and stylistic elements in modern wedding design, providing tactile movement, vintage romance, and clean linear framing to tablescapes. Integrating tailored fabric ribbons into centerpiece displays bridges the gap between formal floral arrangements and expressive textile art. In this complete guide, readers will explore ten distinct wedding centerpiece concepts that feature ribbon and bow accents as core structural and aesthetic focal points. The tutorial outlines professional assembly workflows, examining how diverse textile weaves—such as raw silk habotai, heavy double-faced satin, airy cotton organdy, and rich velvet—interact with floral mechanics, glass vessels, and ambient candlelight. Decorators and couples will learn step-by-step techniques for constructing stable bow armatures, managing fabric drape, securing ribbon collars, and preventing water saturation during events. Beyond aesthetic concepts, this guide details practical procurement strategies, heat-sealing methods to stop fraying, and reliable scaling principles for large banquet halls. Mastering these textile techniques offers endless DIY inspiration, allowing event planners to turn simple spools of ribbon into high-end decorative focal points that elevate reception spaces with timeless charm.
Why This Idea Is Trending or Useful
Ribbon-embellished centerpieces dominate modern Pinterest ideas because they align directly with the resurgence of coquette, balletcore, and romantic neoclassical aesthetics in contemporary event design. Modern couples seek out innovative ways to soften rigid banquet geometries, and trailing ribbon tails introduce organic, flowing movement that mirrors bridal attire. On a practical level, ribbons provide an exceptionally cost-effective decorative tool for wedding receptions, allowing designers to expand the visual footprint of floral arrangements without purchasing expensive focal blooms. A single wide satin or velvet bow can anchor a minimalist arrangement, directing guest focus and establishing luxury without botanical density. For DIY decorators, working with ribbons offers a beginner friendly creative project that requires minimal equipment, zero specialized floristry machinery, and no hazardous chemical adhesives. High-quality ribbons are lightweight, easy to transport, and reusable across subsequent home decor and gifting needs. Furthermore, the immense variety of widths, textures, and colorways ensures ribbons complement diverse wedding motifs, transitioning from rustic garden gatherings to formal minimalist style ballroom receptions with seamless design relevance.
Materials and Preparation
Achieving crisp, showroom-quality ribbon centerpieces requires thorough material preparation and disciplined staging before setting foot in the venue. Sourcing the proper ribbon textiles is essential: double-faced satin offers clean reflective sheen, raw-edge silk brings airy bohemian movement, heavy velvet provides formal texture, and wired grosgrain supplies structured loops that hold their form under air conditioning drafts. Alongside ribbons, assemble heavy-duty textile shears with micro-serrated blades, a portable heat-sealing tool or butane lighter for synthetic edge sealing, waterproof green floral tape, thin 26-gauge paddle wire, and discreet clear adhesive glue dots. Structural bases range from pedestal compote bowls and clear glass hurricane cylinders to ceramic bud vases and raw timber risers. Thorough planning requires pre-cutting ribbon tails to uniform lengths forty-eight hours in advance, rolling them around cardboard tubes to prevent unsightly creases. Natural silk ribbons should be pressed using a low-temperature iron to remove shipping folds. Store all prepared ribbons inside dust-free plastic bins away from direct sunlight, ensuring all fabric accents remain clean and ready for rapid table installation.
Idea 1: Flowing Silk Streamer Compote Pedestal
Execution Process
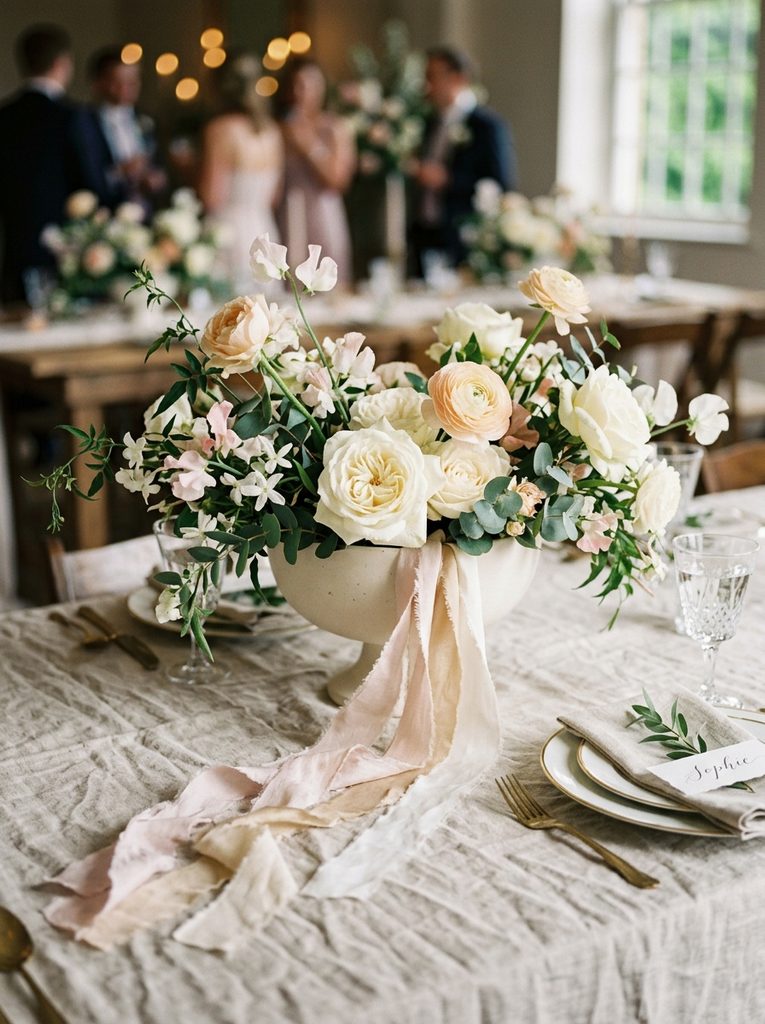
The low compote bowl with flowing raw-edge silk ribbons represents a timeless centerpiece design that emphasizes romantic fluidity and soft textural contrasts. In this arrangement, a ceramic or footed metal compote bowl supports a lush, low-profile botanical arrangement, while multiple lengths of fine-gauge raw silk cascade from beneath the floral lip directly onto the table linen. The soft, frayed edges of natural silk habotai move with gentle room airflow, creating a dynamic visual trail that draws the eye across the dining surface. The pale ivory, blush, or champagne fabric tails pool organically around the pedestal base, softening the hard contours of the vessel and connecting the centerpiece directly to the surrounding place settings.
To construct this centerpiece, secure a soaked brick of dense floral foam inside the footed compote bowl using cross-hatched strips of waterproof floral tape. Cut four sixty-inch lengths of two-inch-wide raw silk ribbon with sharp fabric shears, maintaining clean bias cuts along the ends to ensure an elegant drape. Cluster the ribbon strips together at their midpoint, binding them tightly with a five-inch length of green paddle wire to form a central anchoring loop. Insert this wire loop securely into the base of the floral foam along the vessel lip before placing any botanical stems, burying the mechanical connection beneath the rim. Arrange garden roses, ranunculus, and sweet peas above the foam, allowing the lowest foliage sprays to cover the wire anchor while permitting the long silk streamers to cascade uninterrupted over the table edge.
Idea 2: Tailored Velvet Tail Taper Sleeve
Step-by-Step Guide
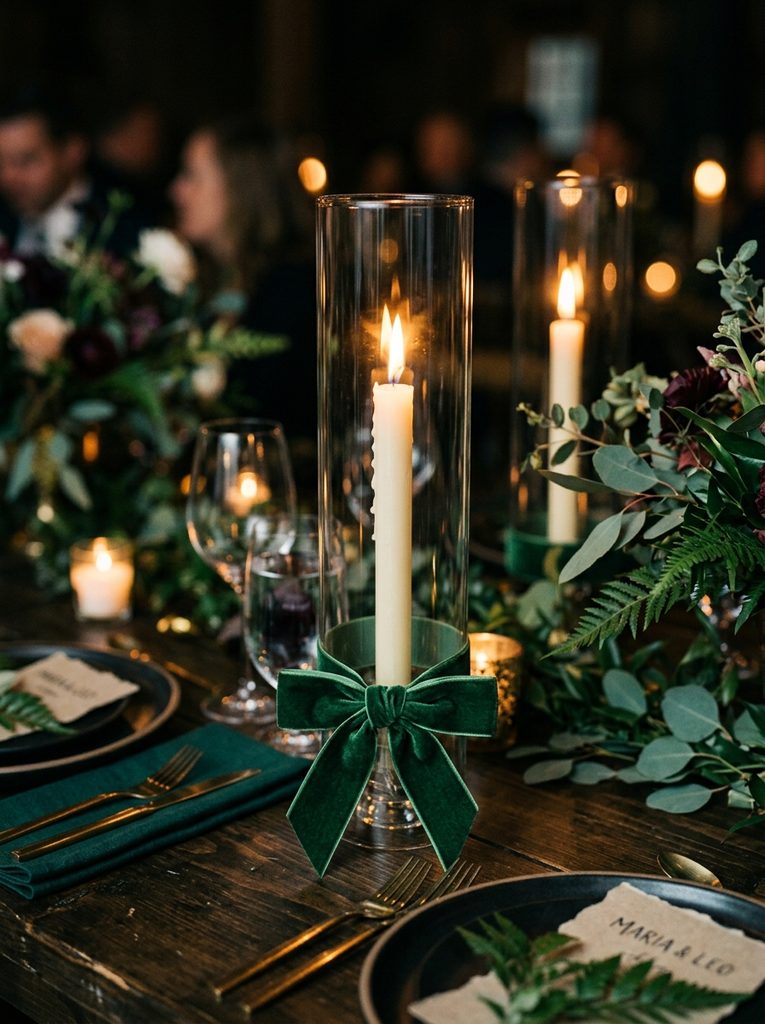
Introducing tailored velvet ribbon to tall taper candle groupings produces an intimate, old-world aesthetic that suits formal autumnal or winter celebrations. This concept features slender, dripless beeswax tapers housed inside tall glass hurricane chimneys, accented by structured, neat bows tied directly around the base of the glass cylinders. The dense, light-absorbing pile of velvet ribbon in shades of deep forest green, navy, or rich wine creates a striking visual anchor beneath the clear glass. By positioning the bow at the vessel perimeter rather than on the candle itself, the design maintains strict fire safety standards while adding a bespoke, tailored finish to linear table layouts.
Begin by cleaning the glass hurricane sleeves with an isopropyl alcohol wipe to remove grease, fingerprints, and dust spots that might cause ribbons to slip down the glass. Measure the outer circumference of the hurricane cylinder base, cutting a length of one-and-a-half-inch-wide plush velvet ribbon that accommodates the circumference plus twenty-four inches for the bow loops and tails. Wrap the velvet strip snugly around the lower two inches of the glass cylinder, securing the ribbon to the glass surface with two clear micro-glue dots placed at the sides to prevent downward slippage. Tie a classic symmetrical double-loop shoestring bow at the front, tightening the knot firmly while adjusting the loops to measure exactly three inches in width. Trim the tails at a clean forty-five-degree downward angle, finishing the edges with clear anti-fraying liquid to maintain crisp, tailored borders throughout the event.
Idea 3: Floating Satin Ribbon Glass Cylinder Trio
Setup Method
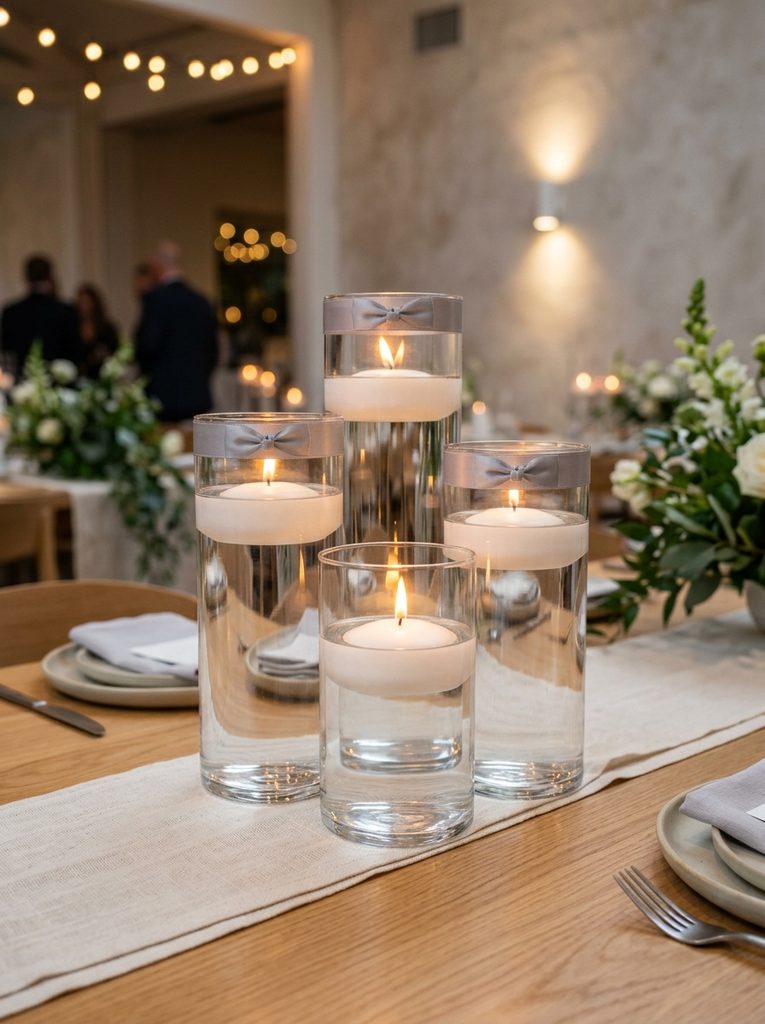
Minimalist weddings benefit significantly from modern designs that use water, glass reflections, and clean linear fabric bands to establish elegant centerpieces. This concept features a clustered trio of graduated glass cylinder vases filled with water and floating white candles, accented by single bands of double-faced satin ribbon wrapped flat around each container rim. Instead of traditional looping bows, each cylinder features a crisp, flat ribbon collar joined seamlessly with an invisible flush seam, finished with a single, slender knotted bow tail dropping vertically down the container wall. The glossy sheen of satin mirrors the reflective properties of water and glass, producing an uncluttered, modern design that flatters sleek ballroom tablescapes.
Select three heavy-base glass cylinder vases in standard graduated heights of six, nine, and twelve inches, cleaning the glass inside and out with a microfiber cloth. Measure the top rim circumference of each vase, cutting three strips of one-inch double-faced satin ribbon in soft dove gray, taupe, or crisp ivory, adding one extra inch for overlap. Apply an ultra-thin line of high-tack clear double-sided adhesive tape along the back of each ribbon strip, carefully mounting the satin flush with the upper exterior rim of each glass vessel. Create three separate micro-bows from quarter-inch satin cord, attaching one bow directly over the seam of each wide collar using a clear floral glue dot. Fill the cylinders with room-temperature distilled water up to one inch below the ribbon edge, ensuring no liquid touches the fabric, and place a three-inch floating disc candle gently onto the water surface.
Idea 4: Asymmetrical Chiffon Sash on White Ceramic Urn
How to Create
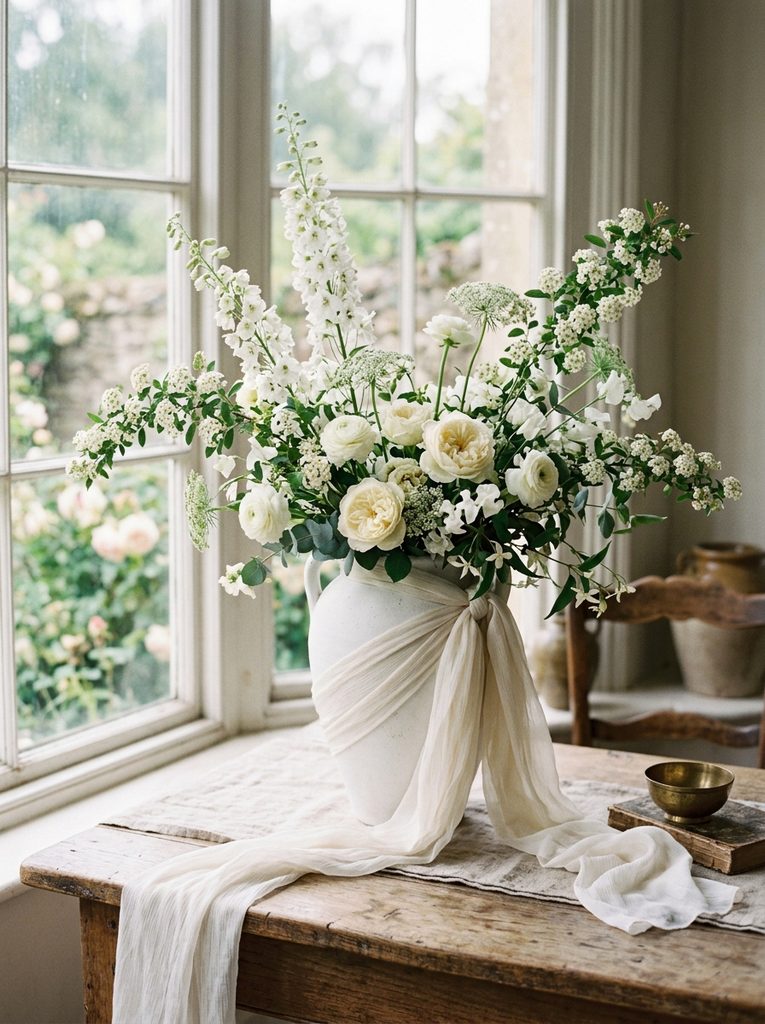
Asymmetrical styling brings an editorial, fine-art sensibility to wedding centerpieces, departing from rigid formal symmetry in favor of organic visual balance. This centerpiece utilizes a matte white ceramic garden urn filled with airy garden greenery and delicate blooms, encircled by an oversized, single-loop sash crafted from crinkled silk chiffon. The wide fabric sash wraps diagonally around the urn body, tying into a generous, off-center drape with long, unequal tails that sweep across one side of the table. The contrast between the chalky, matte ceramic vessel and the translucent, airy chiffon fabric introduces rich visual depth that feels relaxed, artistic, and modern.
To construct this asymmetrical design, place a plastic floral container fitted with a brass pin frog inside the white ceramic urn, filling it with water and floral preservative. Cut a three-yard continuous length of three-inch-wide hand-torn silk chiffon ribbon, leaving the natural raw feathered edges untouched to celebrate organic imperfections. Wrap the chiffon diagonally across the waist of the urn, passing one end through a single wide loop while leaving the companion side as an unlooped, flat structural wrap to establish asymmetry. Secure the central knot against the urn shoulder using a small piece of removable floral putty to prevent the silk from shifting under the weight of the tails. Arrange sweeping branches of spirea, white delphinium, and garden roses inside the vessel, orienting the tallest floral sprays toward the opposite side of the long ribbon drape to achieve balanced visual weight across the tablescape.
Idea 5: Layered Grosgrain Collar on Mirrored Plateau
Step-by-Step Construction
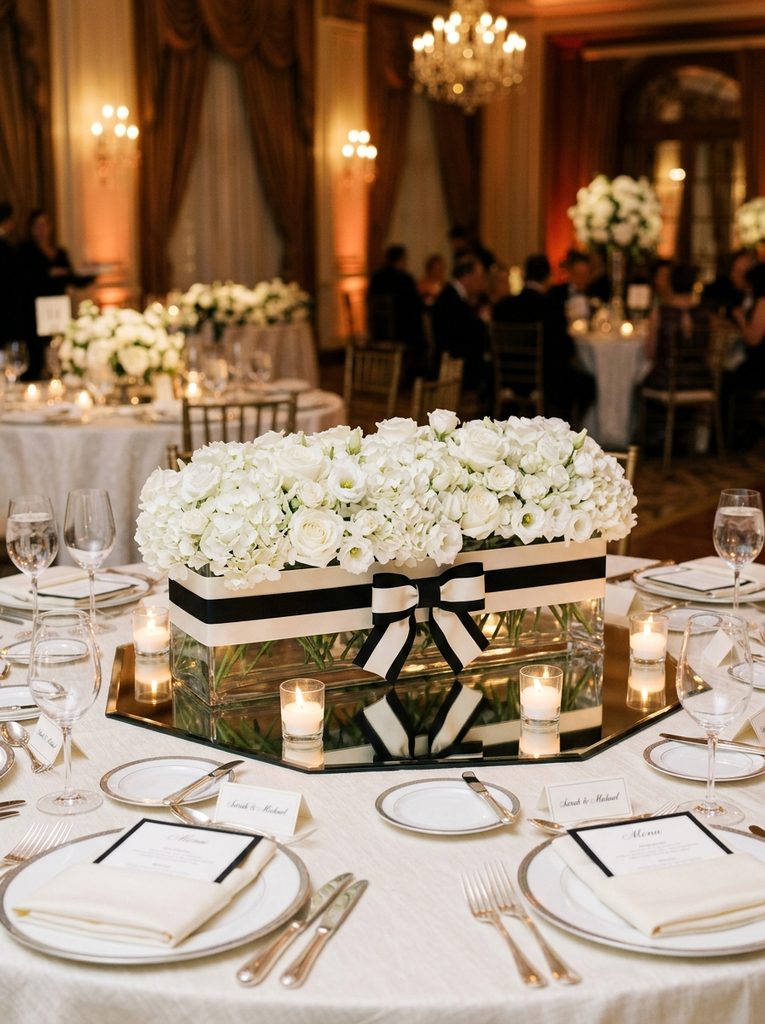
Layering contrasting ribbon materials produces architectural structure and graphic visual interest, making this concept well suited for contemporary reception tables. The design centers around a low, rectangular glass or ceramic trough vase positioned upon an octagonal beveled mirror plateau, surrounded by low votives. The trough vase is wrapped in two stacked tiers of grosgrain ribbon: a broad bottom layer in charcoal or black, topped by a narrower ivory grosgrain band featuring a tailored flat bow. The distinctive ribbed texture of grosgrain provides a firm, structured appearance that holds crisp right angles, creating a tailored, menswear-inspired design that complements clean modern typography on menu cards and table numbers.
Begin by measuring the perimeter of the rectangular low trough vase, wiping the exterior surface with glass cleaner to ensure full adhesive bonding. Cut a length of two-inch-wide black grosgrain ribbon to match the perimeter plus a half-inch overlap, followed by an identical length of one-inch-wide ivory grosgrain ribbon. Using permanent fabric adhesive tape, center the narrower ivory ribbon directly over the black ribbon base, pressing firmly with a roller to create a two-tone banded trim. Wrap this composite ribbon collar around the midpoint of the vessel, securing the back seam with industrial clear adhesive. Construct a flat tailored bow by folding a six-inch strip of ivory grosgrain into a loop, wrapping the center with a narrow band, and adhering it directly over the front of the collar with strong mounting dots. Fill the vase with floral foam and tightly massed white carnations or hydrangea, placing the completed vessel atop the mirrored plateau.
Idea 6: Woven Gingham Napkin Ring and Bud Vase Pair
Fabrication Method
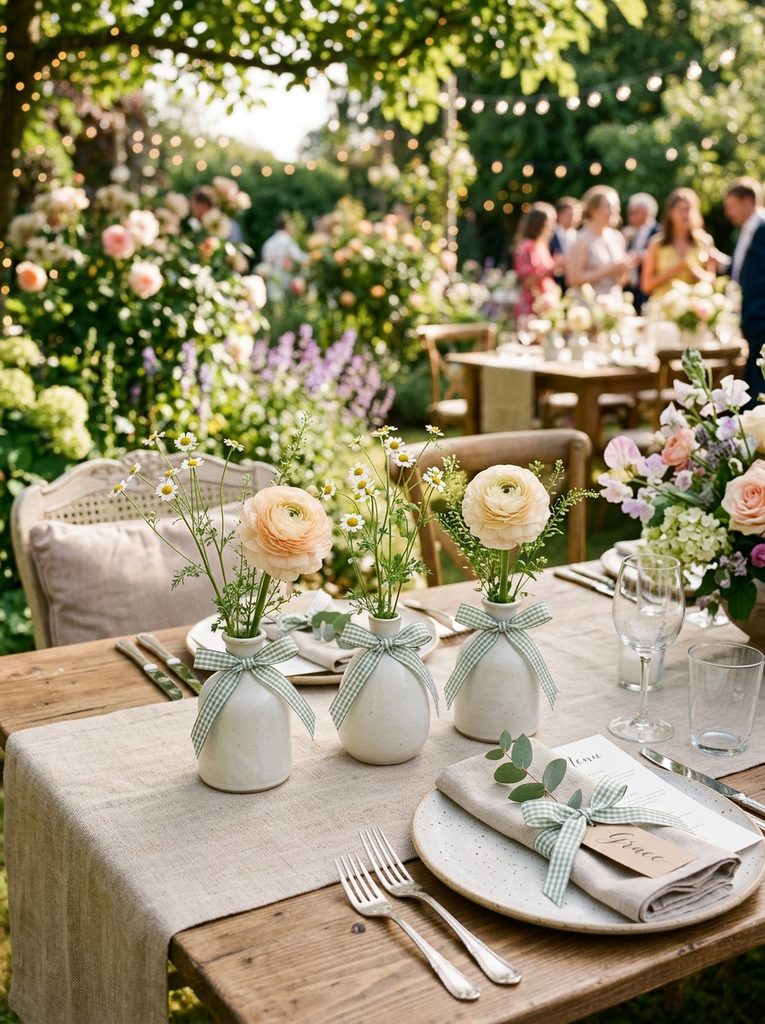
Casual garden weddings and relaxed outdoor farm receptions benefit from playful textile patterns that introduce cheerful visual energy into reception settings. This styling concept pairs miniature ceramic bud vases with custom fabric bows crafted from woven cotton gingham ribbon in soft sage, dusty blue, or warm buttercup yellow. Each bud vase features a delicate gingham bow tied snugly around its slender neck, accompanied by matching ribbon-tied napkin rings at surrounding place settings. The repetitive use of clean geometric checks provides visual continuity across the table, establishing an approachable, handmade aesthetic that feels curated without appearing overly formal or stiff.
Prepare a collection of three small ceramic bud vases of varying heights, ensuring each vessel neck has a slight lip to prevent the ribbon from sliding upward. Cut fifteen-inch lengths of three-quarter-inch wired cotton gingham ribbon, using pinking shears to cut the ends into zig-zag edges that resist fraying. Wrap the ribbon around the neck of each vase, tying a crisp double knot followed by a compact two-loop bow, adjusting the loops so they measure no larger than two inches across. The internal wire along the ribbon edges allows you to gently fluff the loops outward, creating dimensional volume that holds its shape outdoors against breezes. Fill each bud vase two-thirds full with fresh water, inserting a single focal stem such as a chamomile spray, ranunculus, or cosmos blossom, and arrange the trio centrally alongside coordinated gingham-tied place cards.
Idea 7: Cascade Organza Bow on Rustic Lantern Arch
Setup Method
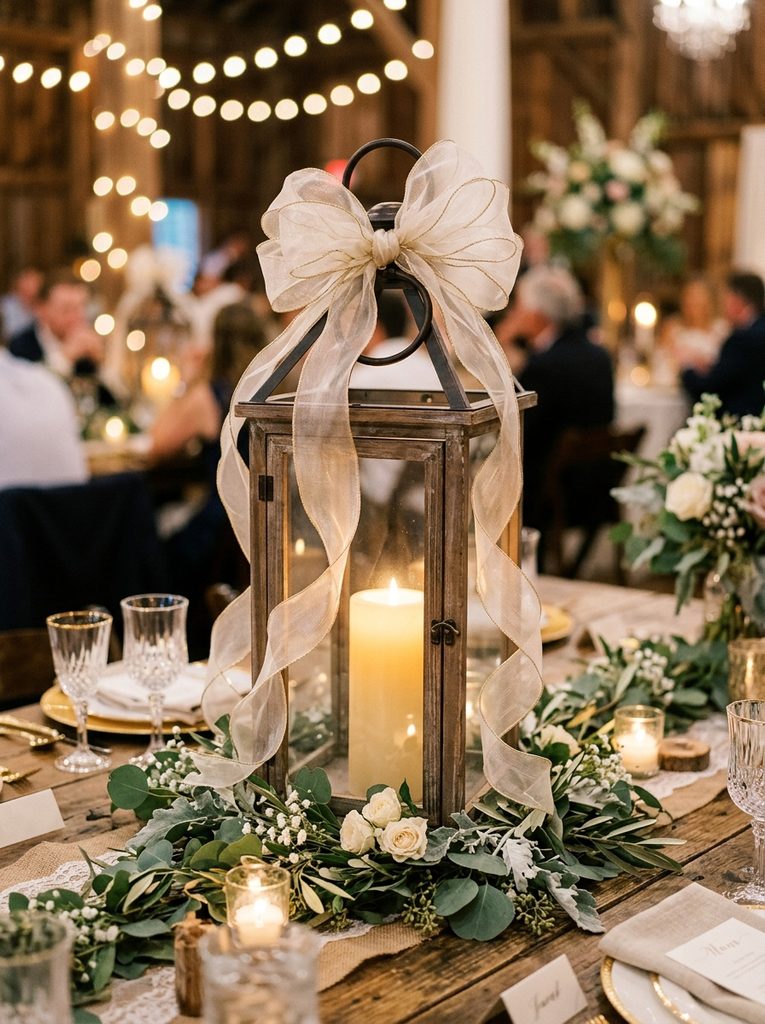
Wooden or wrought-iron lanterns provide height and rustic structural presence, which can be softened by integrating voluminous bows crafted from sheer organza. This concept features an open-frame timber lantern holding an enclosed LED pillar candle, crowned at its upper metal hanging ring with an expansive, multi-loop bow. Long organza streamers twist through the wooden corner posts of the lantern, trailing down to the table linen where loose greenery sprigs are clustered. The sheer, shimmering quality of organza allows ambient lantern light to pass through the loops, creating an airy, radiant crown that softens the architectural lantern frame without obscuring the interior glow.
Select a clean fourteen-inch timber lantern with glass panels, verifying that the top metal hanging loop is firmly fastened to the roof peak. Cut a four-yard length of two-and-a-half-inch-wide sheer wire-edged organza ribbon, reserving one twelve-inch strip for the center tie. Create a bow by folding the remaining organza back and forth into six overlapping eight-inch loops, gathering the layered center tightly between your thumb and forefinger. Wrap the twelve-inch tie strip around the gathered center, knotting it securely at the back while leaving the long tail ends free. Bind the bow firmly to the lantern hanging ring using thin floral wire passed through the back knot, trimming any excess wire cleanly. Gently pull the wire-edged organza loops in alternating directions to create a full spherical bow, and weave the trailing tails gracefully down the outer wooden posts of the lantern frame.
Idea 8: French Pleated Ribbon Rim on Pedestal Compote
Execution Process
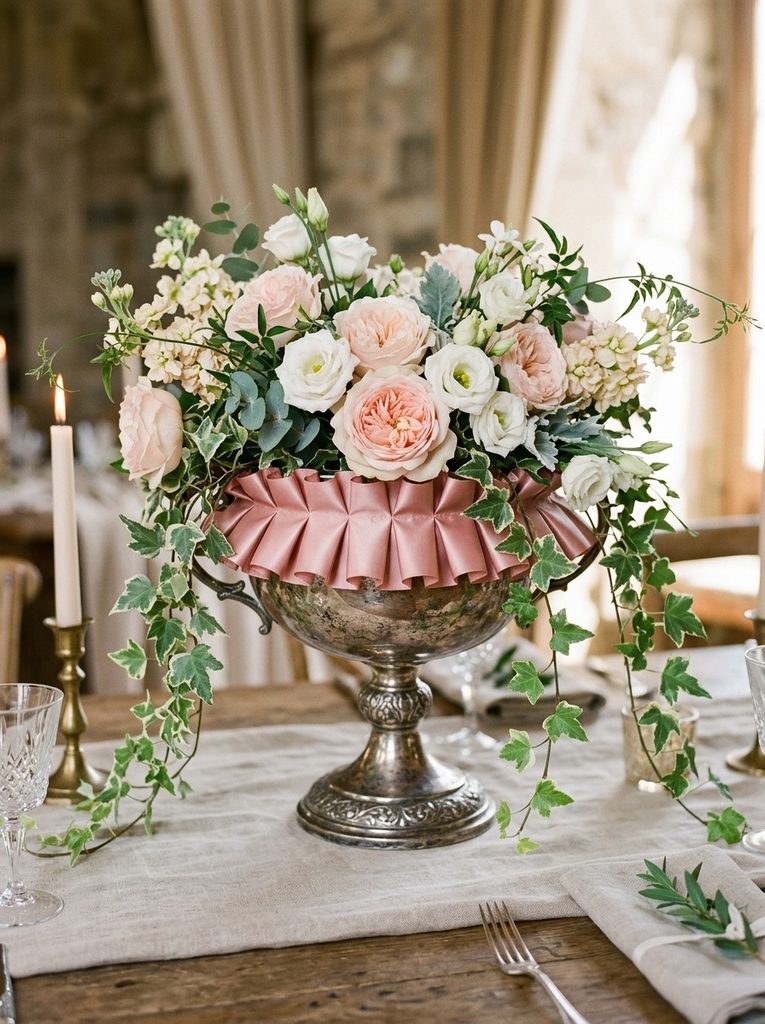
Drawing inspiration from classic French millinery and vintage couture dressmaking, the pleated ribbon collar adds rich decorative texture to elevated compote arrangements. This design features a two-inch band of pre-pleated satin or grosgrain ribbon wrapped around the entire outer circumference of a silver or pewter pedestal bowl. The rhythmic box pleats create a decorative collar that frames the underside of the floral display, echoing antique Victorian and French neoclassical styling. The structured fabric frame conceals mechanical foam lines and vessel rims while introducing a bespoke, handmade craftsmanship that stands out in formal ballroom spaces.
To build this pleated centerpiece base, source pre-pleated polyester or satin ribbon measuring two inches in width, or fold your own uniform half-inch box pleats using a steam iron and fabric starch. Measure the outer top circumference of the silver compote, cutting the pleated trim to fit with a one-inch overlap allowance at the back seam. Attach a continuous strip of high-strength, waterproof mounting tape along the exterior rim of the vessel, pressing the top edge of the pleated ribbon firmly against the adhesive to form a continuous ruffled collar around the bowl. Insert a pre-soaked floral foam dome into the vessel interior, securing it with clear floral tape. Assemble an array of classic garden roses, trailing ivy, and lisianthus blooms, allowing the lowest petal layers to rest against the upper edge of the pleated ribbon without crushing the delicate folds, creating a seamless transition from vessel to blossom.
Idea 9: Trailing Botanical Garland with Intermittent Bow Ties
How to Create
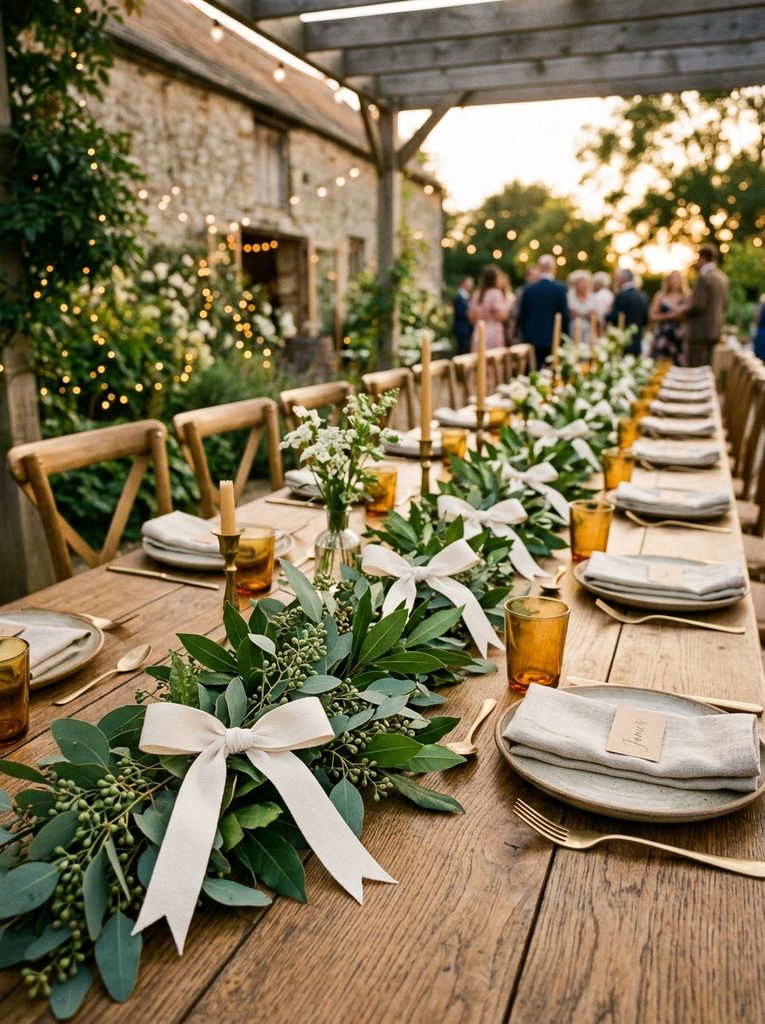
Banquet-style reception layouts utilizing long wooden harvest tables are ideal for running greenery garlands accented with small, tailored ribbon ties. This centerpiece concept features a continuous garland of seeded eucalyptus, bay laurel, and salal leaves running down the center spine of the table, punctuated at thirty-inch intervals by delicate hand-tied bows. Crafted from narrow half-inch cotton twill or linen ribbon, these minimalist bows break up long stretches of monotone green foliage with structured fabric accents. The narrow ribbon tails weave organically through the leaves, integrating textile warmth with fresh botanicals to form an inviting, cohesive table runner that keeps sightlines entirely open.
Begin by assembling or laying out a pre-made sixty-foot fresh greenery garland along the center of the long harvest table, ensuring the branches lay flat without obscuring dinner service settings. Cut ten thirty-inch lengths of half-inch-wide unbleached cotton twill or soft herringbone ribbon, using sharp thread snips to cut inverted V-shaped swallowtail notches into both ends. Identify natural focal points along the garland, such as stem overlap junctions or fruit clusters, and wrap a ribbon strip around the central garland stem at each marker. Tie a loose, relaxed shoestring bow, keeping the loops under two inches wide and pulling the tails downward so they trail flat along the wood grain between dinner settings. Check that each bow faces slightly upward toward approaching guests, creating a consistent rhythm of textile accents along the entire table length.
Idea 10: Slender Velvet Knot on Fluted Ceramic Bud Trio
Execution Process
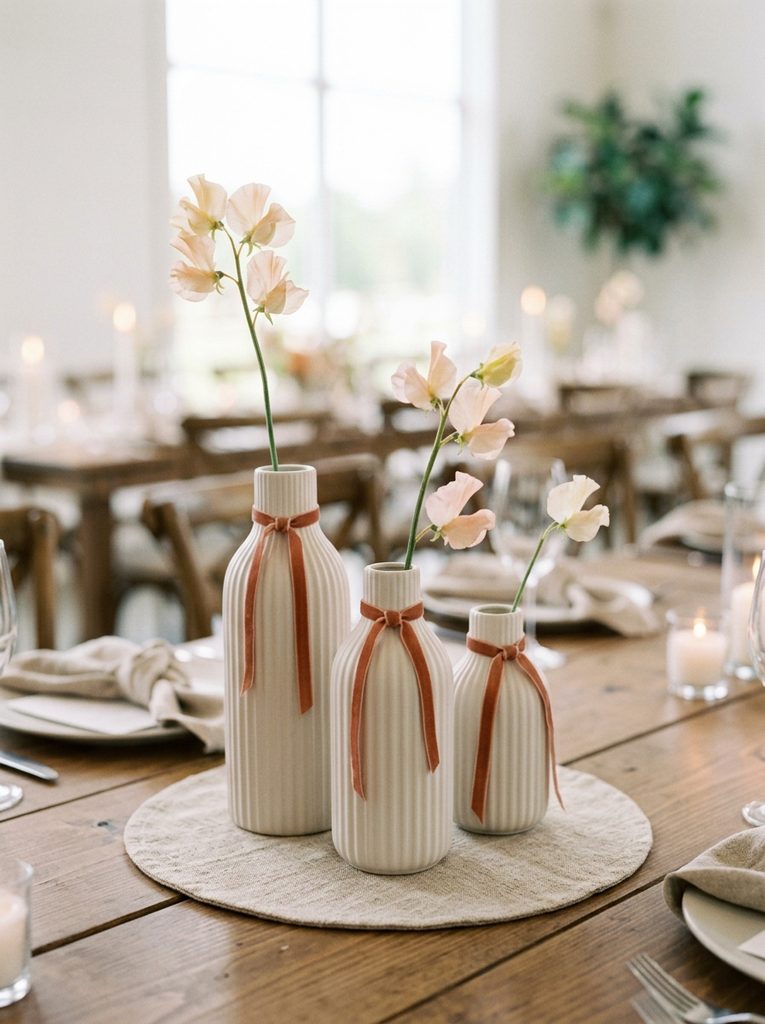
Embracing modern Scandinavian minimalism, this centerpiece concept emphasizes clean lines, balanced proportions, and subtle textile detailing. The arrangement utilizes three fluted off-white ceramic bud vases of different geometric heights grouped tightly together on a round linen coaster. Rather than elaborate multi-loop bows, each vase neck is wrapped with a single, slender quarter-inch velvet ribbon tied into a minimalist, single-knot drop. The simple fabric knot eliminates excessive frills, letting the quality of the velvet texture and the ceramic fluting speak for themselves. This understated aesthetic suits modern, uncluttered tablescapes where delicate single stems take precedence over dense arrangements.
Wipe the exteriors of three fluted matte ceramic bud vases to ensure the surfaces are clean and free of dust. Cut three twenty-inch lengths of premium single-faced velvet ribbon in an understated tone, such as slate gray, muted terracotta, or dusty olive. Wrap a ribbon length around the narrow neck of the tallest vase, crossing the ends in a simple flat knot without creating second loops, allowing the raw velvet tails to hang parallel down the face of the ceramic vessel. Repeat this knotting process across the two remaining shorter vases, trimming the tail lengths proportionally so they stop half an inch above each vessel base. Fill the vessels with water, placing an architectural botanical stem—such as a single anthurium, a Japanese sweet pea stem, or an open garden rose—into each vase, and position the vessels in a tight triangular grouping at the table center.
Common Beginner Mistakes and How to Avoid Them
The most critical mistake when crafting ribbon-embellished centerpieces is allowing fabric tails to contact standing water in vessels or wet floral foam. Natural silk, cotton, and velvet absorb water through capillary action; once a ribbon end touches moisture, water quickly travels up the fabric, creating unsightly stains, wilting loops, and water damage to linens. Always anchor ribbons above the water line, using waterproof barriers like florists tape or clear glue dots between moist mechanics and delicate textiles. Another common error is using cheap craft-grade satin ribbons with high static cling and stiff, fraying edges; these materials look harsh under venue lighting and resist natural draping. Invest in double-faced satin or real bias-cut silk, and treat synthetic cut ends with a precise flame-sealing technique to melt edge fibers cleanly. Finally, decorators often cut ribbon tails too short, making bows appear disproportionately bulky and stunted. Always cut streamers twenty to thirty percent longer than anticipated; long, flowing tails can easily be trimmed on-site to suit table scale, whereas short tails cannot be lengthened once cut.
Practical Tips for Better Results
Achieving professional, boutique-grade results with ribbon centerpieces requires mastering specific textile-finishing and handling techniques. Always cut ribbon ends on a sharp forty-five-degree bias or into a neat inverted V-notch using ultra-sharp fabric shears; dull paper scissors pinch threads and cause immediate fraying. When working with double-faced satin or wired grosgrain, use your thumb and forefinger to gently curve and shape the bow loops outward, creating dimensional volume that holds its form throughout the reception. To achieve consistent bow sizes across large banquet rooms with twenty or more tables, create a cardboard sizing template to measure loop widths and tail lengths before tying. If using sheer silk or chiffon ribbons, mist the cut streamers lightly with clean water from a fine aerosol bottle and allow them to air-dry flat while suspended; this relaxes packaging wrinkles without crushing delicate natural fabric textures. Finally, always transport pre-tied ribbons and bows flat inside shallow, lidded storage boxes separated by layers of acid-free tissue paper, protecting the pristine textiles from crushing, moisture, and dust during transit.
Styling, Presentation, or Organization Ideas
Successful centerpiece presentation relies on thoughtful coordination between ribbon accents, table linens, dinnerware, and ambient reception lighting. Match the visual weight of your ribbon material to your tabletop textiles: heavy velvet ribbons pair naturally with textured matte stoneware, raw wood, and rustic linen napkins, whereas delicate silk habotai and sheer organza complement polished porcelain, fine crystal, and smooth cotton sateen linens. When styling long rectangular banquet tables, establish visual rhythm by alternating bow orientations and ribbon tail directions across adjacent place settings, creating a dynamic, flowing line down the room. Use small ribbon remnants to tie folded paper menus or wrap individual bread bundles, carrying the centerpiece textile motif through every guest interaction. For evening receptions, position votive candles slightly behind ribbon-wrapped glass cylinders so that radiant light filters through translucent fabrics, highlighting weave textures and casting soft glows across the table. Keep overall centerpiece heights either below fourteen inches or above twenty-four inches, ensuring that lush bows and trailing streamers enhance the room without interrupting comfortable cross-table conversation among guests.
Budget or Time Planning
Disciplined budget management and systematic production timelines prevent last-minute stress while maximizing the financial advantages of DIY ribbon centerpieces. Sourcing ribbons by the bulk fifty-yard or one-hundred-yard spool from wholesale floral and textile distributors dramatically reduces per-yard expenses compared to purchasing small spools from retail craft shops. For an average reception requiring fifteen centerpieces, calculate ribbon needs by multiplying your target length per centerpiece by fifteen, adding twenty percent extra yardage for sizing adjustments, test ties, and cutting errors. Structure your preparation across three distinct phases: cut, seal, and iron all ribbon streamers three days before the event, storing the prepared bands in labeled trays categorized by table numbers. Spend the day before the wedding attaching dry ribbon collars to clean vessels and wiring bows for rapid floral insertion. On the event morning, focus exclusively on placing fresh floral arrangements, topping off water reservoirs, and positioning the pre-tied ribbon accents onto the vessels. This streamlined assembly-line system eliminates frantic hand-tying during venue setup hours, ensuring every tablescape looks polished, uniform, and structurally secure.
Creative Expansion and Advanced Inspiration
Once you master foundational bow tying, collar wrapping, and vessel anchoring, you can expand these techniques to craft comprehensive wedding installations. Consider scaling the compote ribbon concept into elevated floral chandeliers suspended above head tables, hanging wide, ten-foot silk streamers that cascade gracefully toward dining guests to create immersive aerial drama. Experiment with personalized textile touches by hand-stamping ribbons with custom wedding monograms, meaningful vows, or guest table assignments using gold foil heat-transfer pens or archival waterproof ink. Designers can also explore natural botanical dyeing, using avocado pits, marigolds, or indigo to create custom ombre gradations on raw silk ribbons that coordinate with seasonal floral varieties. You can also integrate fine heirloom textiles—such as antique lace ribbons from family heirlooms—into bridal sweetheart table centerpieces, weaving personal history into modern tablescapes. These advanced artistic expansions transform ordinary floral containers into bespoke, multi-layered design installations, creating memorable decorative accents that linger in guest memories long after the celebration concludes.