Tent wedding receptions have become a defining hallmark of modern outdoor celebrations, offering a versatile canvas that combines open-air natural scenery with protected shelter. This comprehensive guide outlines ten distinct tent wedding reception decor concepts designed to transform standard canvas and sailcloth structures into visually cohesive reception venues. Throughout this article, readers will learn how to balance overhead volume, ground-level furniture placement, and strategic illumination across various tent layouts. The advice covers essential architectural accents, suspended floral installations, fabric drapery methods, and customized tablescape presentations that accommodate changing natural daylight. Understanding how to decorate an outdoor temporary structure provides substantial practical benefits for couples, event stylists, and DIY planners. A properly styled tent manages acoustic echo, directs natural foot traffic, hides utilitarian metal support frames, and provides protection against shifting outdoor weather conditions. Mastering structural layout, scale, and decorative layering allows hosts to optimize open space without overcrowding tables or obstructing service lines. By evaluating these actionable concepts, planners can execute an elevated reception environment that reflects cohesive styling, structural balance, and welcoming visual warmth.
Why This Idea Is Trending or Useful
Outdoor marquee and sailcloth celebrations continue to dominate modern event boards due to their exceptional design flexibility and adaptability to diverse venues. A structured canopy provides a blank foundation that accommodates aesthetic themes ranging from clean modern design to rustic woodland gatherings. Beyond aesthetic appeal, tent receptions offer vital practical value by securing outdoor festivities against unpredictable wind, rain, and intense afternoon sun. This structure gives hosts control over the guest experience while preserving expansive views of estate lawns, vineyards, or private farm settings. For the creative planner, temporary shelters present immense DIY appeal because every structural element—from overhead crossbeams to central support poles—invites artistic treatment. Hanging floral arrangements, modular fabric panels, and suspended illumination fixtures can be customized to match specific color palettes. Novice decorators can achieve professional results through accessible, beginner friendly techniques such as low-profile greenery garlands, warm accent lighting, and modular furniture zoning. By focusing on intentional focal points rather than excessive ornamentation, planners establish a polished setting that feels customized, comfortable, and tailored to their venue.
Materials and Preparation
Executing a balanced tent decoration project requires comprehensive planning, accurate site measurements, and appropriate installation hardware before bringing decor on-site. The primary decorative materials include flame-retardant sheer chiffon or poly-voile fabrics, heavy-duty industrial zip ties, clear monofilament wire, adjustable C-clamps, and magnetic ceiling anchors designed specifically for aluminum framework. When planning overhead greenery, opt for resilient cut foliage like silver dollar eucalyptus, Italian ruscus, and salal, which withstand ambient temperatures without rapid wilting. Illumination setups require commercial-grade warm white Edison bulb festoon strands, heavy-duty exterior extension cords, and surge-protected power strips. Workspace preparation involves conducting an accurate site assessment to identify tent leg spacing, center pole heights, and access to dedicated electrical circuits. Measure the ground grade to anticipate table leveling requirements on grass or gravel surfaces. Group decorative hardware into categorized bins so that installation teams can quickly secure lighting lines, pole drapes, and hanging hoops. Preparing floor plans and timeline sheets in advance ensures the physical setup proceeds logically, safely, and on schedule.
Idea 1: Flowing Ceiling Fabric Canopy with Central Chandelier
Execution Process
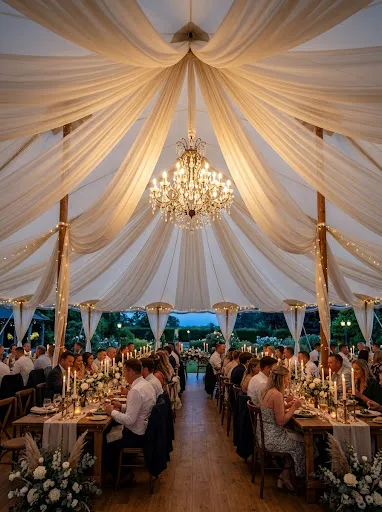
A draped ceiling canopy softens the utilitarian industrial framework of standard frame tents, introducing soft movement and luxurious scale to the overhead interior. This concept features continuous runs of lightweight sheer fabric gathered at the apex or center poles, cascading outward to the perimeter side beams in balanced, scalloped swags. Placing an oversized wrought-iron or beaded statement chandelier at the central junction introduces an eye-catching focal anchor that grounds the entire dining layout. The continuous radial drape directs the eye upward, highlighting ceiling height while maintaining an intimate, sheltered feel across dining tables below. Neutral fabrics such as warm ivory, soft alabaster, or subtle champagnes diffuse overhead light, creating a flattering ambient illumination across the entire reception floor. By concealing raw metal purlins and ceiling trusses, this treatment transforms a standard outdoor marquee into an elegant, formal hall suitable for seated multi-course dinner service and evening celebration.
To construct this draped ceiling, begin by measuring the distance from the central peak to the exterior perimeter wall beams, adding twenty percent extra fabric length to accommodate natural graceful swags. Secure a heavy-duty steel rigging ring or structural clamp to the primary center pole at the maximum ceiling height to serve as your central gathering point. Using sheer voile or flame-resistant chiffon cut into uniform panel widths, thread the top end of each fabric run through the central mounting ring, fastening them securely with industrial zip ties. Using an extension ladder or scissor lift, pull each fabric section outward toward the perimeter eaves, securing the fabric panels at equal intervals along the outer frame with heavy-duty white cable ties or pipe clamps. Once the fabric panels are fixed, suspend the central chandelier using a load-tested steel carabiner and safety chain attached directly to the primary structural tent framework. Conceal all exterior connection points, wires, and hardware clamps using tailored fabric cuffs or complementary greenery clusters.
Idea 2: Organic Greenery Wrapped Support Poles
Step-by-Step Guide
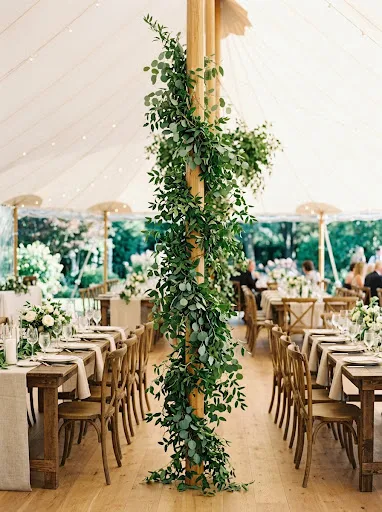
Transforming vertical structural uprights into natural botanical pillars integrates the outdoor landscape directly into the interior architecture of the reception tent. This design utilizes climbing spiral foliage to conceal functional wooden or aluminum center poles, making them appear as organic tree trunks supporting the canopy. By using mixed varieties of broad-leaf eucalyptus, southern smilax, and dark Italian ruscus, you produce varied dimensional textures with rich, authentic color depth. The upward spiral movement leads the eye from the flooring up toward the tent ceiling, balancing vertical space without encroaching upon active floor lanes. This organic application is particularly effective for sailcloth tents with round wooden poles or clear-span structures where metallic posts interrupt visual sightlines. The resulting look establishes a woodland garden atmosphere that pairs naturally with wooden cross-back chairs, neutral table linens, and textured earthen ceramics.
Begin pole coverage by cutting two-inch wire poultry netting or flexible plastic garden mesh into eight-inch-wide strips that match the full height of each vertical support post. Fasten the wire mesh securely around the upper, middle, and lower sections of the pole using industrial clear zip ties or heavy-duty ratcheting straps, ensuring the mesh framework sits taut against the post. Prepare foliage branches by trimming the stem ends at a sharp angle and bundling three to four stems together with green floral tape. Starting at the base of the pole, insert the stem ends upward through the wire mesh openings, securing individual bundles with dark green florist wire to establish an overlapping shingle effect. Continue working vertically toward the ceiling junction, alternating foliage varieties to distribute variegated leaf textures evenly along the entire height of the pole. Spray the installed greenery thoroughly with water using a clean misting bottle to maintain leaf hydration, and mist again before guest arrival to preserve freshness.
Idea 3: Suspended Floating Floral and Edison Bulb Hoops
How to Create
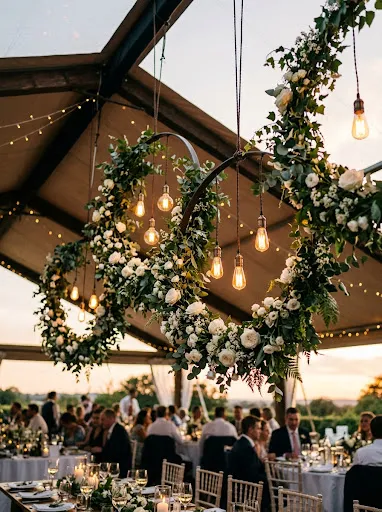
Suspended floral hoops provide a modern alternative to traditional tall table centerpieces, freeing valuable dining surface space for family-style food platters and drinkware. This concept uses lightweight circular metal or wooden frames suspended horizontally above key reception zones, including the head table and central dance floor. Each hoop is dressed with asymmetrical clusters of preserved blooms, flowing foliage, and exposed warm-filament Edison bulbs suspended through the open center. Suspending decorative weight overhead creates distinct visual intimacy within expansive high-peak tents without constructing physical dividing walls. The combination of raw metal, fresh botanicals, and glowing filament bulbs produces a sophisticated balance of industrial edge and botanical softness. Guests enjoy unobstructed sightlines across tables, fostering dynamic dinner conversation while enjoying the rich overhead styling.
To create these suspended installations, obtain lightweight structural hoops made from three-quarter-inch aluminum tubing or bent wood, ranging from three to five feet in diameter. Bind base layers of salal and silver dollar eucalyptus around two-thirds of the hoop circumference using green bind wire, leaving one-third of the frame exposed for a modern, asymmetrical finish. Insert secondary accent blooms, such as spray roses or dahlias, using hidden water-filled plastic floral tubes to keep stems hydrated throughout the event duration. Cut three equal lengths of clear aircraft cable or heavy monofilament wire rated for at least fifty pounds, attaching them equidistant around the hoop to balance the unit horizontally. Connect the three cables to a single central ceiling clamp secured to the tent roof truss. Drop an outdoor-rated pendant cord through the center of the hoop, screw in a vintage amber-glow Edison bulb, and adjust the suspension height to hang at least seven feet above the finished floor level.
Idea 4: Warm Festoon Light Canopy with Paper Lanterns
Setup Method
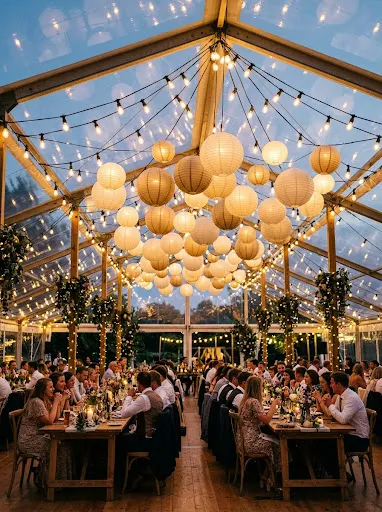
An overhead festoon canopy combined with floating paper lanterns creates a celebratory festival atmosphere, providing both primary ambient illumination and soft decorative texture. This design spans parallel runs of warm white string lights across the width of the tent, punctuated by hanging round paper and nylon lanterns in varying diameters and subtle neutral tones. The repetitive geometric grid of lights defines the ceiling plane, lowering visual ceiling height and generating a cozy, welcoming environment as natural daylight fades. Incorporating lanterns in shades of cream, warm taupe, and soft white adds daylight interest before the bulb filaments become visible at dusk. This approach is highly effective for casual lawn weddings, coastal sailcloth setups, and budget-conscious gatherings, delivering broad visual impact across wide square footage using straightforward, repeatable components.
Begin installation by charting the lighting layout, calculating the required linear footage of commercial festoon cord to run parallel lines spaced four to six feet apart across the tent rafters. Secure the initial socket cord to the outer tent eave using heavy-duty rubberized cable clamps, drawing the line taut across to the opposite beam before securing it with secondary tension ties. Once the electrical lines are anchored, assemble collapsible paper lanterns in diameters of eight, twelve, and sixteen inches, inserting internal wire expanders to establish rigid, round spheres. Fasten each lantern to the festoon cord at irregular intervals using clear monofilament wire, centering select lanterns directly over light sockets to catch soft internal illumination. Test the entire lighting system using an inline dimmer switch to verify that voltage is distributed evenly and light levels can be adjusted easily as natural evening light transitions to darkness.
Idea 5: Cohesive Wooden Farm Tables with Continuous Greenery Runners
How to Make
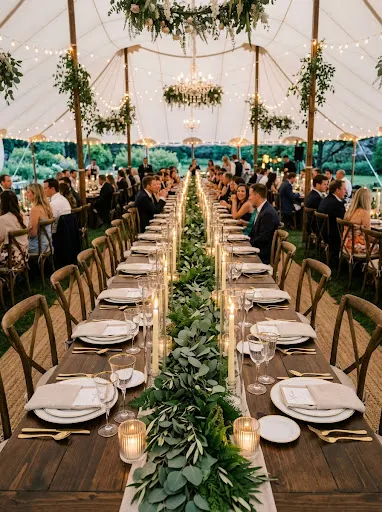
Continuous farm table layouts establish an inviting communal dining aesthetic, drawing the eye down long lines that celebrate connection and shared celebration. This concept pairs exposed natural pine or dark walnut dining tables with unbroken foliage runners that stretch from end to end, cascading gently over each table edge onto the floor. Interspersed within the foliage are varied groupings of ribbed glass votives, tall taper candles encased in safety glass hurricanes, and low-profile ceramic compotes filled with seasonal fruit or delicate blooms. Eliminating traditional polyester table drapes highlights the rich wood grain, bringing grounded warmth that balances the white vinyl or canvas walls of the reception tent. This horizontal layout organizes the interior space logically, establishing clear walkways between dining sections and providing a clean, photogenic setting for dinner service.
Begin assembling this tablescape by arranging solid wood farm tables end-to-end in long continuous rows, leaving a minimum of five feet between parallel rows to maintain comfortable guest and service clearance. Clean and dry the tabletop surface, then lay a sixteen-inch-wide runner of washed raw-edge cheesecloth or crushed linen down the center axis to establish a textured base. Lay flat, sturdy branches of salal and broad-leaf leatherleaf down the fabric centerline, working from both table ends inward toward the middle to create balanced symmetry. Layer pliable stems of silver dollar eucalyptus and Italian ruscus over the foundation greens to build volume, securing stems with discreet green wire where necessary. Place glass hurricane sleeves with dripless ivory taper candles at eighteen-inch intervals within the greenery spine, ensuring glass chimneys extend at least two inches above the candle wicks for safety. Complete the display by nesting glass tea light votives into small foliage pockets along the runner.
Idea 6: Outdoor Lounge Vignette with Rattan and Velvet Textures
Execution Process
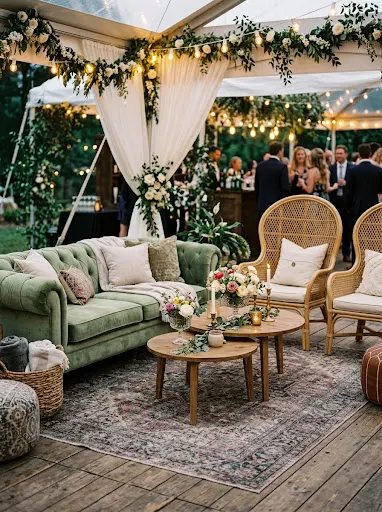
An outdoor lounge vignette introduces residential comfort into the tent environment, providing guests with a dedicated social gathering zone away from active dining tables. This styling concept uses residential furnishings, including woven rattan accent chairs, curved velvet sofas, distressed low-pile rugs, and nested wooden coffee tables. Positioned near the bar or bordering the dance floor, a thoughtfully styled lounge zone breaks up the repetitive rhythm of formal banquet seating, giving the tent layout dimension and approachable luxury. Selecting tactile upholstery fabrics like sage velvet, natural linen, and warm leather produces an elevated living room aesthetic that invites guests to relax comfortably during band breaks. The layered textures soften the hard flooring or lawn turf underneath, transforming an open corner of the tent into a dedicated conversation area.
Establish the lounge perimeter by laying down a large, flat-weave foundational area rug measuring at least eight by ten feet to define the seating footprint within the tent floor plan. Position a primary three-seater sofa along the rear edge facing inward toward the center of the reception, anchoring the visual weight of the arrangement. Flank the primary sofa with two contrasting accent chairs, such as woven rattan barrel chairs or mid-century timber armchairs, leaving accessible forty-inch gaps to allow effortless guest entry. Place a set of nested round coffee tables in the center of the furniture grouping, keeping tabletops clear for cocktail glassware and small plates. Layer accent cushions in varied complementary textiles, balancing smooth matte velvet with textured boucle, and drape a soft knit throw blanket over one arm of the sofa. Complete the vignette by placing a low ceramic bowl of fresh fruit, structural florals, and battery-operated pillar candles on the coffee table.
Idea 7: Monochromatic White Draped Entrance Tunnel
Step-by-Step Guide
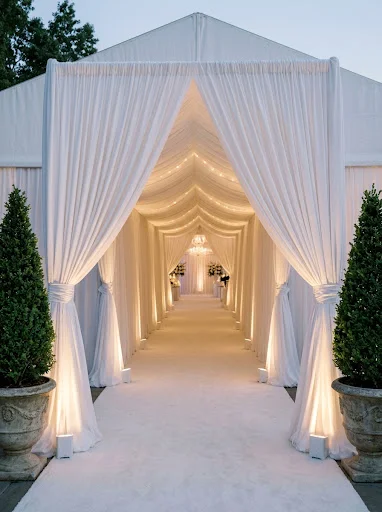
The reception entrance shapes the initial guest experience, transitioning attendees from the natural outdoor surroundings into the curated reception space. A monochromatic white draped entrance tunnel frames this arrival through gathered white drapes, anchored by potted seasonal trees and subtle floor-level warm illumination. The intentional narrowing of the entry creates anticipation, shielding the wider dining room from view until visitors pass through the opening. Fabric panels pulled back with tailored ties frame the entrance opening cleanly, while potted boxwoods, ficus, or olive trees provide structural greenery that ties the outdoor landscape to the interior design. This architectural feature also serves a functional role by blocking sudden exterior wind gusts from disturbing table settings, candles, and printed menus inside the main space.
To construct this tailored entrance, erect a twelve-foot metal frame canopy directly adjacent to the main tent opening, ensuring roof lines overlap cleanly to prevent rain drips along the transition. Install horizontal drapery rods along the side beams of the entry frame using pipe clamps, threading continuous runs of opaque white polyester drape fabric onto the supports. Pull the fabric panels outward and secure them to the vertical corner legs using wide fabric ties or satin ribbons, shaping symmetrical parted entryway curtains. Position four large ceramic or stone planters containing pruned topiary trees on both sides of the walkway, securing the containers with hidden sandbags inside the pots to withstand breeze. Run exterior-rated LED uplights behind the potted trees, pointing the beams upward into the foliage branches to project warm shadows against the draped walls. Lay down a durable sisal or woven seagrass aisle runner across the entrance threshold, anchoring the edges with flat carpet tape to ensure a secure walking surface.
Idea 8: Dramatic Backlit Monogram Bar Wall
Setup Method
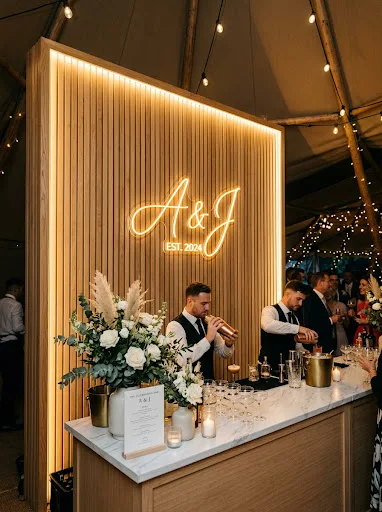
The reception bar serves as one of the most consistently visited social hubs during an evening wedding, making it an ideal candidate for customized architectural treatment. This concept installs a freestanding decorative backdrop wall behind the beverage service station, constructed from vertical natural wood slats or boxwood foliage panels. Centered against this textured wall is a customized script monogram or warm neon signage, backlit by concealed LED strip lighting that washes illumination across the bar surface. Anchoring the bar area with a structural backdrop hides unsightly beverage coolers, ice storage tubs, and recycling bins, preserving a clean aesthetic. The illuminated backdrop creates an intuitive focal point for guests entering the tent, easing congestion by directing traffic naturally toward beverage stations.
Begin assembly by placing a freestanding eight-foot-wide by eight-foot-tall wooden or aluminum pipe-and-base framework behind the designated beverage bar tables. Mount pre-assembled vertical slatted timber panels or dense artificial boxwood foliage mats onto the framework using heavy-duty black cable ties, ensuring no gaps reveal the structural base. Mount your custom laser-cut wooden monogram or warm LED neon sign to the center of the wall using clear wire or hidden screw hooks through the slats. Install an adhesive-backed channel of warm white architectural LED strip lighting along the upper back rim of the wall, directing light downward to wash across the surface without shining directly into guests’ eyes. Position the front service bar eighteen inches forward from the back wall, keeping surfaces tidy by using closed storage under front bar skirts. Finish the presentation by placing small floral arrangements and matching acrylic cocktail menus on the bar corners.
Idea 9: Mirrored Floating Candle Centerpieces on Round Tables
How to Make
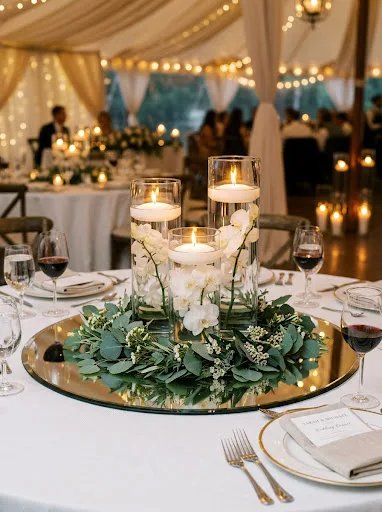
Mirrored floating candle centerpieces maximize evening reflection, multiplying light throughout the tent to create a luminous, romantic dining space. This design places a large beveled circular mirror flat in the center of round dining tables, serving as a reflective tray for varying heights of clear glass cylinder vases. Each cylinder is filled with crystal-clear water and topped with a thick, long-burning white floating candle, accompanied by submerged orchid sprays or delicate floral stems anchored at the bottom. Surrounding the glass cylinders are low, gathered wreaths of silver dollar eucalyptus, dark salal, and loose garden roses that soften the hard edges of the mirror glass. As darkness falls outside the tent, the flickering candle flames reflect off both the water surfaces and the mirror bases, casting a warm glow that dances across sheer ceiling drapes and interior tent walls without requiring complex electrical work.
Begin building each centerpiece by cleaning a twelve-inch or fourteen-inch beveled glass mirror disc with alcohol cleaner to remove dust and fingerprints, then center it on the ironed tablecloth. Select a trio of clear glass cylinder vases measuring six, nine, and twelve inches in height, positioning them closely together in a staggered triangular cluster directly on the mirror. Submerge clean floral stems, such as white dendrobium orchids or calla lilies, inside the cylinders, weighting the stems at the base with transparent floral anchors or smooth river pebbles. Pour distilled water into each vase, filling to within two inches of the top rim to prevent surface tension spills during table movement. Gently place a three-inch disc floating candle on the water surface of each cylinder, checking that wicks remain dry before ignition. Complete the centerpiece by arranging a flexible greenery garland tightly around the exterior base of the mirror, tucking loose seasonal flower heads into the foliage to conceal the bottom edge of the glass.
Idea 10: Suspended Ladder Chandelier with Trailing Florals
Execution Process
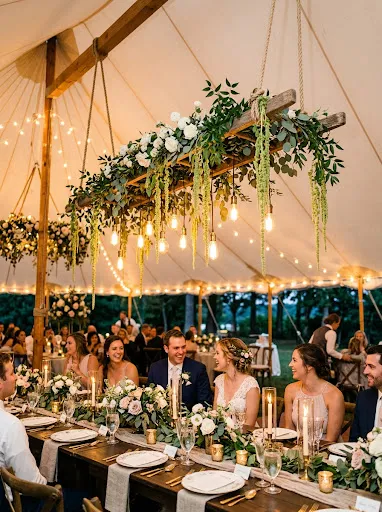
A suspended wooden ladder chandelier combines rustic timber textures with delicate trailing florals, introducing a balanced focal feature over the head table or central dance floor. This concept suspends a vintage wooden orchard ladder or sanded timber frame horizontally from the tent ceiling rafters using heavy natural rope or matte black chains. Dressed with climbing greenery, hanging amaranthus, and down-facing pendant lights, the installation functions as a hanging garden that bridges the gap between high peaks and dining tables. The linear profile of the ladder mirrors long rectangular banquet tables below, creating visual harmony across the floor plan. The trailing botanical stems draw the eye downward, creating an intimate canopy over the wedding party that frames photography without blocking sightlines across the room.
To assemble this hanging feature, select a clean, structural wooden ladder measuring between six and eight feet in length, verifying that all rungs and joints are structurally sound. Drill heavy-duty forged steel eye bolts into the four outer corners of the ladder rails, securing the threads underneath with locking nuts and washers. Attach four equal lengths of load-tested black wire rope or decorative manila-sheathed steel cable to the eye bolts using screw-locking carabiners. Secure the upper cable ends to the primary aluminum tent truss using rated structural beam clamps, adjusting cable lengths to level the ladder precisely seven and a half feet above the floor. Weave long stems of Italian ruscus and eucalyptus along the ladder rungs using dark bind wire, allowing green trails to hang twelve to eighteen inches below the frame. Integrate cascading white hanging amaranthus and clustered roses along the perimeter, finishing by wrapping an outdoor light strand or pendant cords along the rungs.
Common Beginner Mistakes and How to Avoid Them
Novice planners often make structural and environmental errors when decorating an outdoor tent that compromise design integrity and guest comfort. The most common mistake is failing to calculate the decorative weight capacity of the tent frame. Overloading ceiling purlins with saturated floral foam, heavy timber props, and unverified light fixtures creates dangerous sag and structural risks. Avoid this by consulting your tent rental provider to establish specific ceiling load ratings, using lightweight dry floral arrangements or hollow props where possible. Another frequent error is overlooking wind dynamics when setting up table decor. Lightweight paper menu cards, tall unsecured feather centerpieces, and unweighted table runners are easily displaced by breezes passing through open sidewalls. Prevent this by anchoring paper elements beneath weighted flatware, using sturdy glass hurricanes around candles, and securing linen runners with hidden floral pins. Finally, many decorators overlook electrical planning, daisy-chaining multiple high-draw lighting fixtures into standard household extension cords. This practice frequently trips breakers during receptions. Calculate overall wattage requirements early, distribute loads across dedicated circuits, and run heavy-duty, outdoor-rated grounded cords along perimeter walls to maintain reliable, safe power.
Practical Tips for Better Results
Achieving professional, polished tent styling requires meticulous attention to detail and deliberate finishing touches that conceal mechanical mechanics. Always use specialized hardware designed for event production, such as aluminum frame clamps and magnetic hooks, rather than improvised tape or light-duty wire that risks failing mid-event. When working with overhead fabric drapes, install panels with roughly twenty percent more slack than the measured distance between attachment points; this ensures generous, flowing folds rather than stiff, overstretched bands. For candle styling inside tents, check municipal open-flame regulations and prioritize tall glass hurricane chimneys that rise at least two inches above the open flame. This precaution shields candles from breezes, reduces fire risk, and prevents wax splatter onto tablecloths. To maintain fresh florals in open-air tents during warm weather, keep cut stems in deep water buckets inside air-conditioned rooms or shaded staging tents until two hours before guest arrival. Misting foliage surfaces with an anti-transpirant floral spray reduces moisture loss, keeping leaves crisp and vibrant through prolonged exposure to outdoor breezes.
Styling, Presentation, or Organization Ideas
Organizing a tent reception layout requires thoughtful spatial planning that balances aesthetics with efficient foot traffic flow throughout the celebration. Establish distinct functional zones—such as dining tables, dance floor, bar, and lounge—using varying decorative elements and lighting intensities to define each space naturally. Position the bar station away from the main tent entry to prevent guest bottlenecks upon arrival, creating wide walkways of at least six feet to keep lines moving smoothly. Style the perimeter walls by mixing solid canvas panels on the service side with clear panoramic window walls facing scenic vistas, maximizing daytime views while shielding kitchen staging. Frame the dance floor by hanging statement lighting installations directly overhead, which defines the gathering space without requiring physical floor dividers. For dinner service, arrange round tables around the perimeter and long wooden banquet tables through the center, introducing varied visual geometry across the room. Maintain consistent styling by repeating unifying materials—such as matching brushed brass candle holders, consistent linen textures, and cohesive botanical accents—across every functional zone of the reception.
Budget or Time Planning
Executing an elevated tent reception within budget requires smart resource allocation, strategic staging, and organized production schedules. Focus your decor investments where they will have the greatest visual impact: eye-level centerpieces and primary focal backdrops, such as the sweetheart table and central bar, receive the most attention from guests and photographers. Instead of draping an entire tent ceiling—a labor-intensive effort that drives up rental costs—concentrate fabric panels above the central dance floor or head table to create focal interest at a fraction of the expense. Source long-lasting greenery varieties in bulk, such as salal and ruscus, to build full tablescapes without the high cost of premium out-of-season blooms. When planning your setup timeline, allocate an entire dedicated day prior to the wedding for structural installations, including tent erection, flooring placement, lighting runs, and overhead drapery rigging. Schedule delicate tasks, including floral placement, linen steaming, and stationery styling, for the morning of the event to protect materials from overnight moisture and outdoor humidity. Establishing a detailed multi-day timeline ensures your setup crew works systematically and safely without rushing during final pre-wedding hours.
Creative Expansion and Advanced Inspiration
Couples and designers seeking to elevate classic tent decor can explore innovative lighting techniques and structural installations that transform the event as night falls. Consider using intelligent architectural projection mapping across the interior ceiling canopy, projecting subtle moving branch patterns, gentle cloud sweeps, or celestial starscapes across the canvas fabric. Another striking idea is incorporating a full clear-span glass-style ceiling, suspending a living aerial garden of suspended smilax and hanging wisteria directly beneath the transparent roof to frame views of the evening sky. For a fresh take on reception layout, replace traditional rectangular stages with a circular, centrally located dance floor surrounded by curved banquette lounges, creating an intimate setting that brings energy to the heart of the space. You can also incorporate multi-sensory elements by tucking fragrant herbs like rosemary, lavender, and flowering mint into table foliage, infusing the space with fresh garden scents. Merging bold structural additions with refined design details elevates the temporary canvas tent into an immersive, memorable environment that celebrates the beauty of its natural surroundings.