Vintage brass centerpieces introduce enduring metallic warmth, historical depth, and elevated elegance to wedding reception tablescapes across diverse venue styles. Curating authentic brass accents allows event hosts to blend historic vessels with delicate floral arrangements, ambient candlelight, and rich textural fabrics into unified focal points. This comprehensive guide outlines ten structured vintage wedding brass centerpiece ideas, ranging from clustered candlestick runners and antique chalices to footed compotes, tea urns, and glass-paneled brass lanterns. Readers will discover clear floristry mechanics, metal stabilization techniques, candle safety protocols, and spatial balance methods required to construct professional-grade arrangements. Crafting custom brass displays grants decorators complete control over color palettes, historical aesthetics, and budget allocations without sacrificing refined luxury. In addition to technical assembly steps, this tutorial details essential waterproofing systems, budget timelines, and tablescape organization practices suitable for round, rectangular, and family-style banquet tables. Mastering these practical crafting methods equips decorators with useful design skills that transition effortlessly from celebratory receptions into permanent residential home decor and seasonal interior styling. By utilizing accessible materials like floral pin frogs, chicken wire armatures, and secondhand vessels, makers of any skill level can produce gallery-worthy tabletop features.
Why This Idea Is Trending or Useful
Aged brass elements continue to dominate digital inspiration boards and modern Pinterest ideas because they deliver warm visual weight and versatile styling across diverse wedding themes. Modern couples frequently move away from high-gloss commercial metals, seeking patinated surfaces that evoke storytelling, warmth, and nostalgic romance. The practical value of vintage brass centerpieces lies in their structural adaptability; warm golden tones harmonize naturally with crisp minimalist style dinnerware, unbleached linen runners, and rich botanical greenery. As an engaging DIY creative project, assembling tabletop arrangements from secondhand or reclaimed metalware eliminates the rigid uniformity of mass-rented event packages while celebrating artisanal character. Because vintage brass styling embraces asymmetrical botanical silhouettes, varied heights, and organic sprawl rather than strict geometric precision, the process serves as an exceptionally beginner friendly entry point to event decorating. Furthermore, curating brass vessels from thrift shops, estate sales, and flea markets provides smart budget ideas, allowing hosts to achieve a high-end aesthetic at a fraction of standard floristry costs. Repurposing these completed floral vessels as long-term home decor accents or gifting them to wedding party members ensures meaningful memories that endure well past the wedding day.
Materials and Preparation
Thorough planning and disciplined supply acquisition form the foundation of stable, visually balanced vintage brass centerpieces. The primary structural components center on genuine aged brass containers: collect slender candlestick holders, footed compote bowls, etched Moroccan trays, ornate chalices, and vintage tea service carafes. Essential hardware and floristry tools include coated green chicken wire, brass pin frogs, floral adhesive clay, waterproof clear tape, heavy-duty bypass pruning shears, and microfiber polishing cloths. Depending on the chosen concept, gather supporting decorative elements such as dripless taper candles, museum wax putty, unbleached cheesecloth, and textured linen runners. For floral-focused ideas, source durable greenery like seeded eucalyptus and olive branches alongside sturdy blooms including garden roses, ranunculus, lisianthus, and dried seed pods. Preparation begins by thoroughly inspecting, cleaning, and testing all vintage brass vessels for watertight integrity at least twenty-four hours before assembly. Line corroded or porous antique metal containers with clear plastic cups to protect table linens from tarnishing leaks, and trim botanical stems diagonally before hydrating them in nutrient-treated water overnight. Measure venue table dimensions to ensure planned arrangements preserve clear sightlines for seated guests.
1. Clustered Antique Brass Candlestick Runner with Dripless Tapers
Step-by-Step Guide
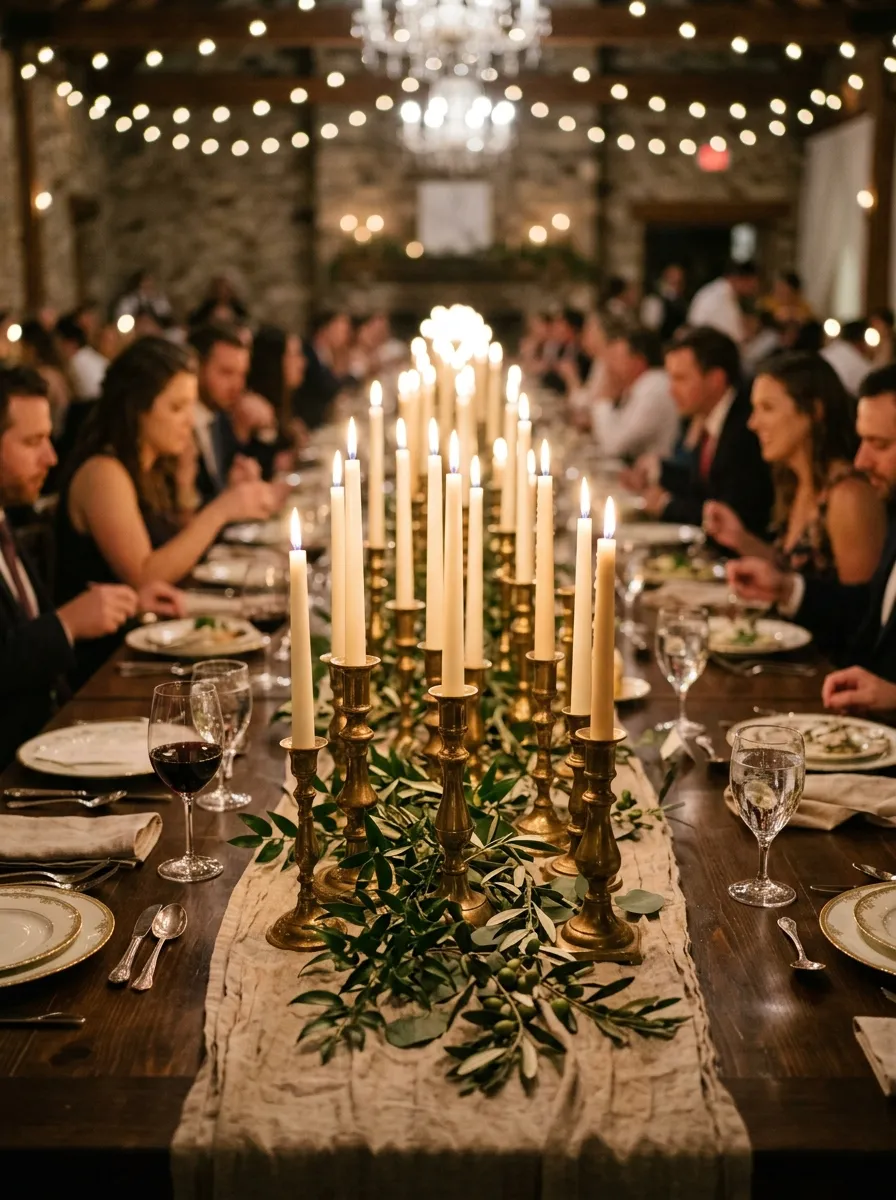
The clustered brass candlestick runner provides an undulating line of warm illumination that emphasizes vertical rhythm and historic metalwork down long banquet tables. This design groups mismatched vintage solid brass candlesticks of varying heights, from four to twelve inches, interspersed along the spine of the table. The varied patinas, ranging from bright brushed gold to deep oxidized bronze, catch flickering light to create a layered, radiant glow across dinnerware. Pairing these vertical metal spires with ivory or beeswax taper candles introduces classic elegance that avoids blocking cross-table conversation. The slender footprint of individual candlestick bases preserves essential space on dining tables for shared platters, wine bottles, and glassware. This timeless setup coordinates effortlessly with rustic farm tables, historic estate ballrooms, and outdoor tented dinners, providing an enduring atmosphere that transitions seamlessly from daylight to evening celebrations.
To construct this centerpiece, source seven to nine vintage brass candlesticks per eight-foot banquet table, wiping each base with a microfiber cloth to remove loose surface dirt while preserving the natural patina. Lay an unbleached linen runner down the center of the table, grouping the candlesticks in staggered clusters of three, five, and seven along the textile. Secure ten-inch or twelve-inch dripless taper candles into the brass sockets, pressing small pea-sized balls of museum wax putty into the bottom of each cup to lock the candles vertically plumb. Weave loose, flexible sprigs of fresh Italian ruscus and olive branches around the bases of the candlesticks, ensuring no green leaves brush against the top wax rims. Light the candles shortly before guest arrival, confirming that ambient venue air currents from open windows or ceiling fans do not cause wax dripping across the table linens.
2. Weathered Brass Pedestal Compote with Sprawling Garden Florals
Execution Process
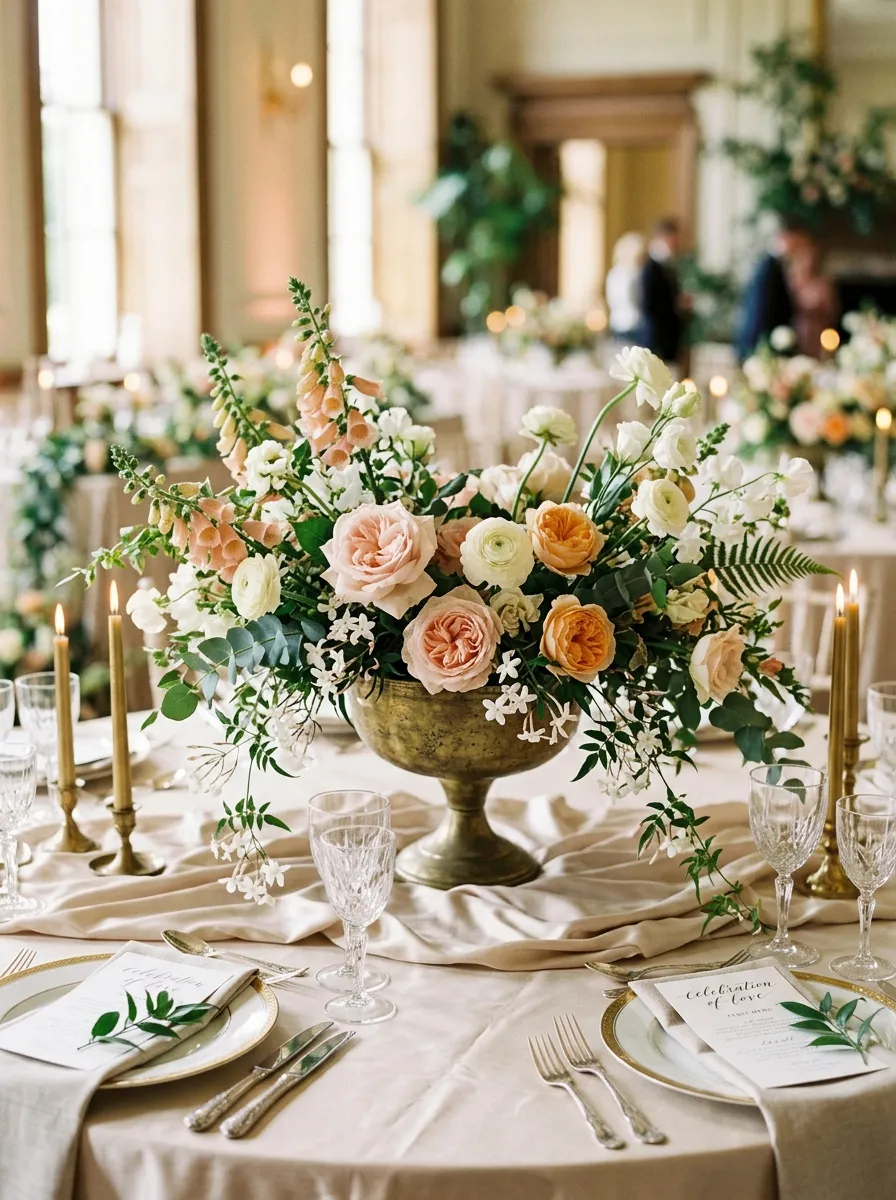
The elevated brass compote bowl serves as a classical centerpiece anchor, introducing balanced sculptural height, historic metallic sheen, and romantic floristry to round dining tables. The shallow footed bowl lifts floral blooms slightly above the linen plane, creating an open stage where delicate garden roses and trailing vines drape naturally over the metal rim. The reflective surface of the weathered brass basin mirrors the soft hues of blush, apricot, and cream petals, amplifying the perceived volume of the floral display. By allowing woody branches and stems to follow their natural curves, this design captures the relaxed atmosphere of historic English courtyards. The low pedestal stem ensures sightlines across round banquet tables remain unobstructed, promoting comfortable guest engagement during meal service. This design suits formal ballroom settings and garden terrace receptions, delivering visual elegance through balanced proportions and lush, multi-layered petals.
Begin by selecting an eight-inch diameter footed brass compote bowl, inspecting the interior for solder cracks or corrosion. Insert a clear plastic liner into the basin to prevent chemical reactions between the metal and the floral water, securing a small brass pin frog to the bottom using waterproof floral adhesive clay. Cut a square of coated chicken wire, form it into a loose dome over the pin frog, and tape the perimeter securely to the brass rim using clear waterproof tape. Fill the bowl three-quarters full with fresh water mixed with commercial flower food. Insert stems of seeded eucalyptus and trailing jasmine vines into the wire grid at sharp downward angles, concealing the taped rim. Place six focal garden roses at varied lengths into the central core, interspersing airy stems of white ranunculus, peach foxglove, and delicate sweet peas to complete a balanced three-hundred-and-sixty-degree arrangement.
3. Vintage Brass Tea Urn with Cascading Foliage and Lilacs
How to Create
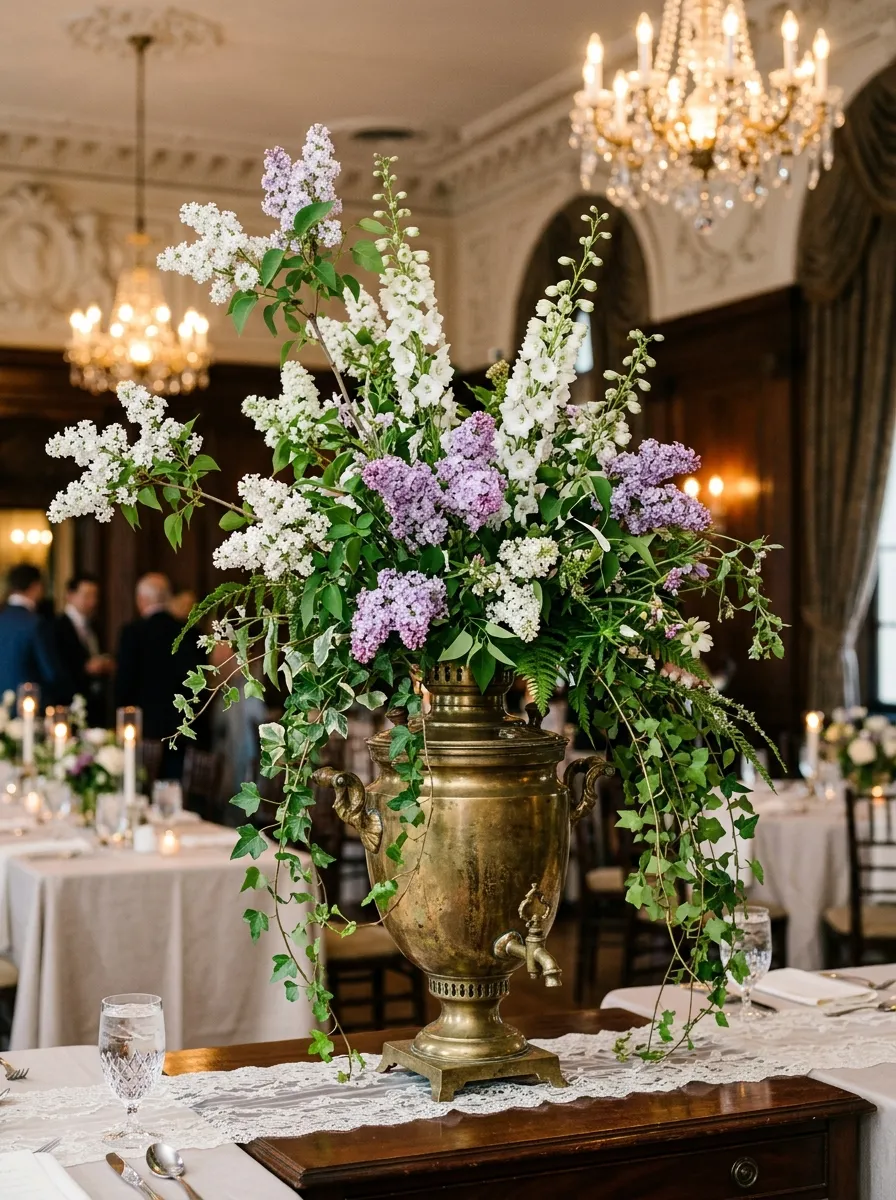
Repurposing authentic vintage brass tea urns, coffee pots, or samovars brings antique tea-room whimsy and stately metallic presence to wedding reception styling. The tall, curvilinear body of an authentic brass urn provides significant visual weight, showcasing historical craftsmanship like scrolling handles, cast spigots, and decorative finials. Filling this substantial vessel with lush, long-stemmed branch floristry creates an exuberant silhouette that draws the eye upward toward high venue ceilings. The warm metallic reflections of the urn balance the soft textures of spring lilacs, arching spirea branches, and trailing English ivy. This tall, dramatic arrangement serves as an exceptional focal point for grand entry tables, escort card stations, or central dining tables in spacious historic venues. Its self-contained format simplifies venue setup while offering a distinct historical statement that stands out from conventional glassware.
Select a vintage brass tea urn measuring twelve to sixteen inches in height, cleaning the exterior gently with mild soapy water to remove dust without stripping its historic tarnish. Place clean river stones inside the bottom of the urn to create a heavy center of gravity, preventing top-heavy arrangements from tipping. Insert a tall plastic floral container filled with water and preservative into the top cavity, ensuring the container sits flush with the urn opening. Cut four to five arching branches of fresh white or lavender lilacs, placing their woody stems deep into the container so they cross at the base for stability. Intersperse tall stems of white delphinium and snapdragons to build vertical height, allowing trailing ivy vines to drape gracefully over the metal spigot and handles. Check the balance from all angles to ensure the arrangement remains stable and symmetrical.
4. Geometric Brass Lanterns with Preserved Woodland Moss and LEDs
Step-by-Step Guide
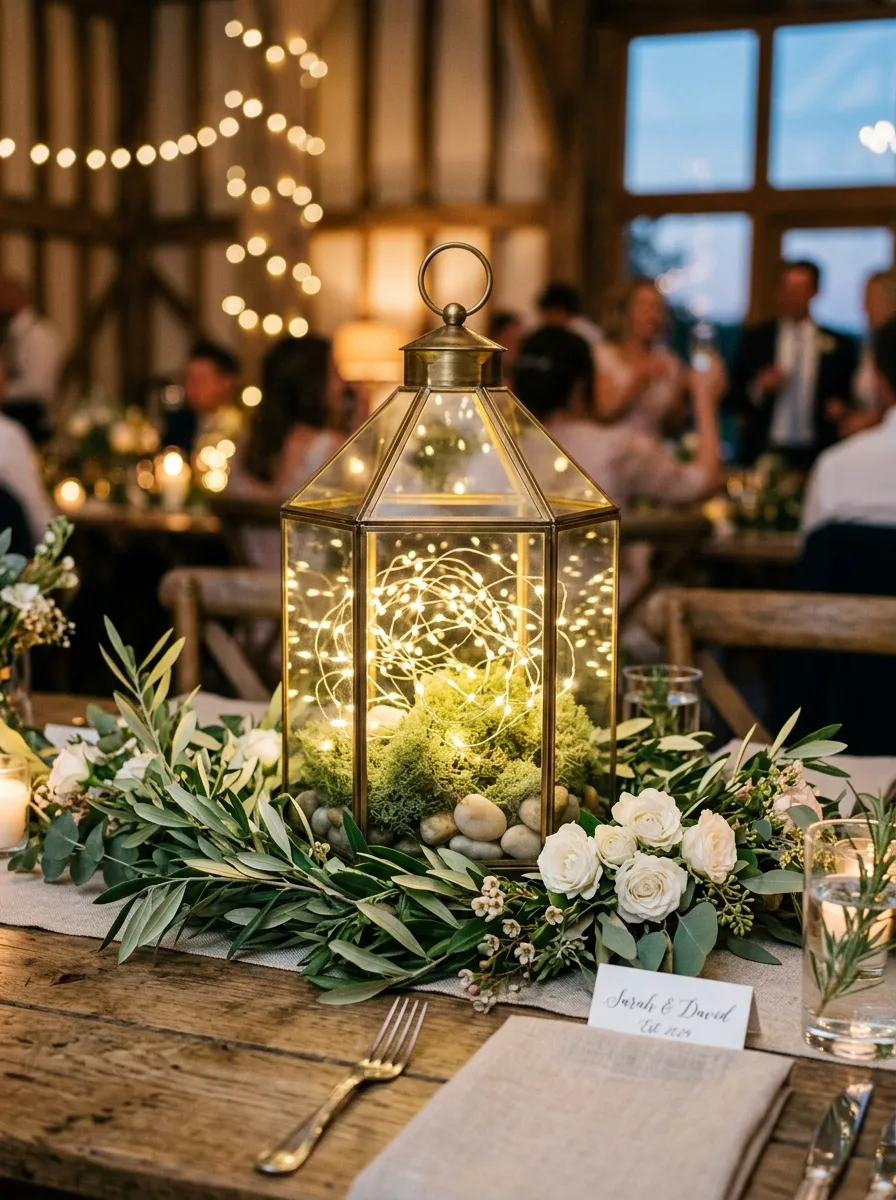
Modern geometric brass lanterns combine clean architectural lines with vintage metallic framing, producing contemporary warmth across banquet tables. This centerpiece incorporates multifaceted hexagonal or rectangular glass-paneled brass lanterns, housing a combination of warm micro LED string lights and preserved natural botanicals. The warm-white diodes filter through the glass and brass framework, casting intricate geometric shadows across the table linen as ambient venue lighting dims. Rather than relying on traditional wax candles, utilizing enclosed battery-operated copper lights eliminates fire risks, complying with historic venue regulations. Surrounding the base of the lantern with loose preserved moss and seasonal florals softens the angular metal frame, creating a balanced harmony between architectural minimalism and organic texture. This durable, contained design remains stable during dynamic dinner service, making it an excellent choice for family-style dining tables.
Begin by cleaning the glass panes of a twelve-inch vintage brass lantern with a streak-free vinegar solution to ensure high optical clarity. Fasten the compact battery pack of a warm-white micro LED copper light strand to the interior ceiling of the lantern using clear mounting putty, keeping the power switch accessible. Line the floor of the lantern with a layer of dried reindeer moss and preserved sheet moss, tucking the thin copper wire loosely throughout the greenery to distribute light points evenly. Carefully place three smooth, pale river stones among the moss to anchor the wiring, and close the hinged brass door securely. Position the completed lantern in the center of the reception table atop a neutral fabric runner. Arrange a loose crescent wreath of fresh olive foliage and white spray roses around the exterior base of the lantern to integrate the display into the dining environment.
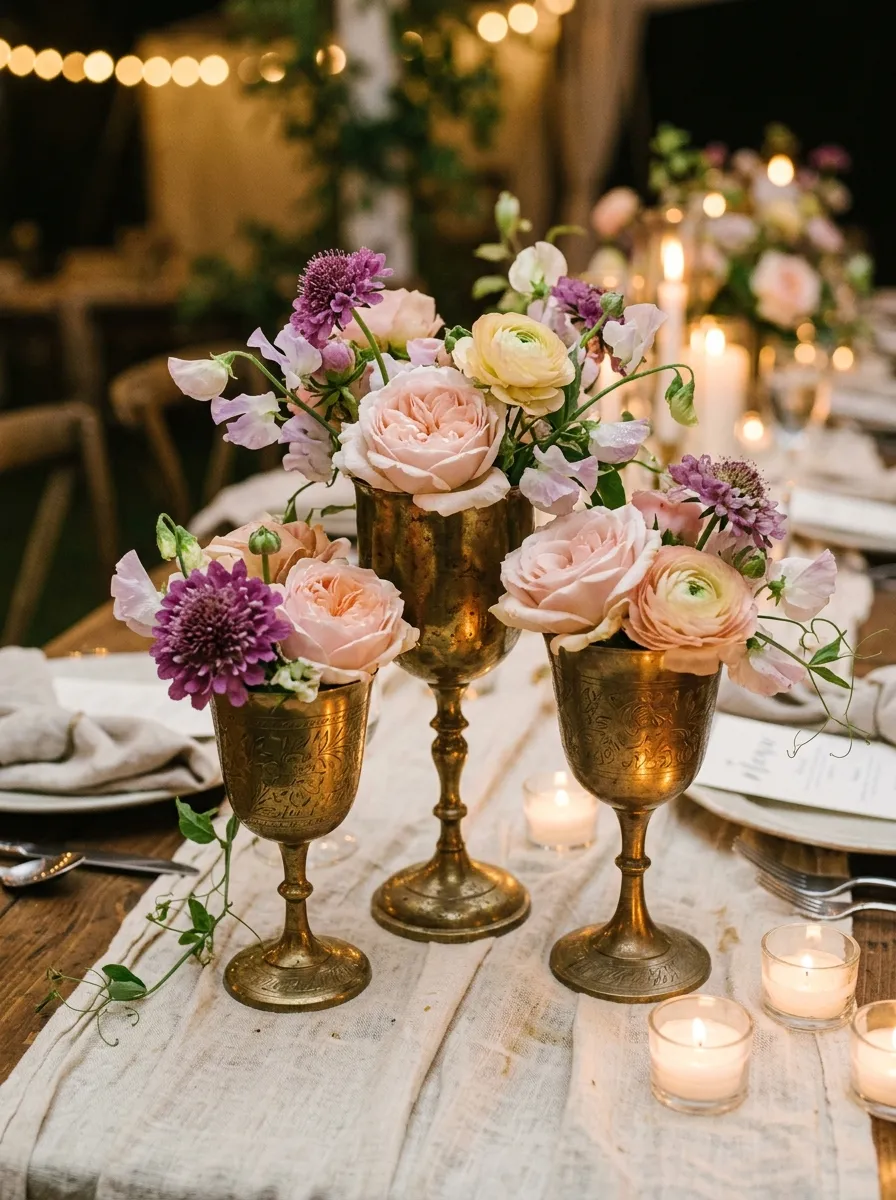
5. Mismatched Brass Goblets with Petite Garden Floral Nests
Execution Process
Curating mismatched vintage brass goblets, wine chalices, and cordial cups creates an informal, artistic tablescape filled with varied metallic silhouettes. The reflective golden surfaces catch ambient candlelight, adding scattered points of warmth across dining tables while concealing floral mechanics within the opaque metal cups. Grouping brass goblets in trios or quartets of varying heights down the table produces an undulating visual rhythm that breaks away from rigid commercial centerpiece sets. Rather than assembling a single massive arrangement, this design celebrates delicate, small-scale botanical compositions, allowing guests to appreciate the unique engravings and stem contours of each historic cup. The petite footprint leaves ample table space for dinner plates, wine glasses, and shared banquet platters. This versatile format is well-suited to intimate estate receptions, vineyard gatherings, and bohemian outdoor weddings that favor curated, personal styling.
Gather three to four mismatched vintage brass goblets per table, verifying that each piece stands level on its base. Clean the interiors thoroughly, inserting a small, trimmed plastic water tube or flexible liner cup into each goblet to protect the interior metal from acidic water corrosion. Fill each liner cup with nutrient-treated water. Cut stems of focal flowers—such as blush garden roses, deep plum scabiosa, and buttercup ranunculus—to short lengths of three to five inches. Insert one or two primary blooms into each goblet, allowing the petal heads to rest gently on the metal rim. Tuck small sprigs of trailing sweet peas, delicate astrantia, and maidenhair fern around the focal blooms to soften the brass lip. Arrange the completed goblets in a tight cluster in the center of the table, interspersing small clear glass tealight holders between them to highlight the etched metal surfaces.
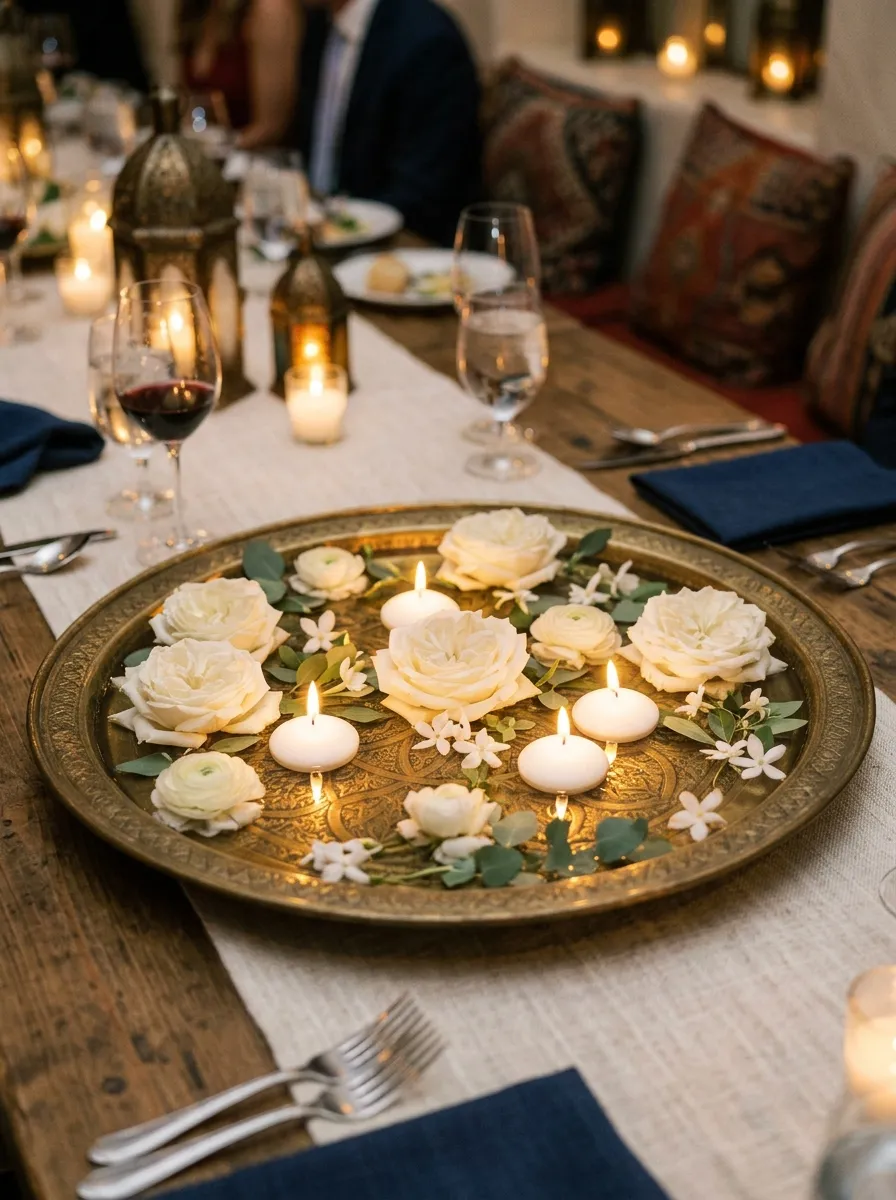
6. Etched Moroccan Brass Tray with Floating Water and Florals
How to Create
Circular etched brass trays introduce rich multicultural craftsmanship, geometric engraving, and expansive low-profile elegance to reception tablescapes. Originating from historic North African and Middle Eastern artisan traditions, these wide, shallow metal trays catch light across intricate hand-hammered relief patterns. Filling the tray with a shallow layer of water transforms the metallic surface into a reflective reflecting pool that mirrors floating botanical blooms and flickering candles. The low profile preserves completely unobstructed sightlines across banquet tables, allowing guests to converse naturally without ducking around tall floral arrangements. The water acts as a built-in safety barrier, cooling the candles and eliminating open-flame fire risks from falling wax drips. This design works exceptionally well for bohemian, Mediterranean, or modern eclectic wedding themes, providing an opulent focal point that occupies significant visual space without creating physical clutter.
Select a circular vintage etched brass tray measuring twelve to sixteen inches in diameter, ensuring the base is completely flat and watertight. Clean the engraved surface with a damp cloth, applying a dab of metal polish to high-relief points to enhance light refraction while leaving dark oxidation inside the recessed patterns. Position the tray in the exact center of the dining table over a protective cloth runner. Pour distilled water slowly into the tray until the liquid reaches a depth of half an inch, taking care not to overflow the lip. Trim the stems of four fresh, fully opened garden roses or camellia blooms flush to their green bases, setting the flower heads gently onto the water surface so they float freely. Symmetrically position three smooth, three-inch ivory floating disc candles between the blooms. Light the wicks shortly before guest arrival to establish an immediate, shimmering centerpiece glow.
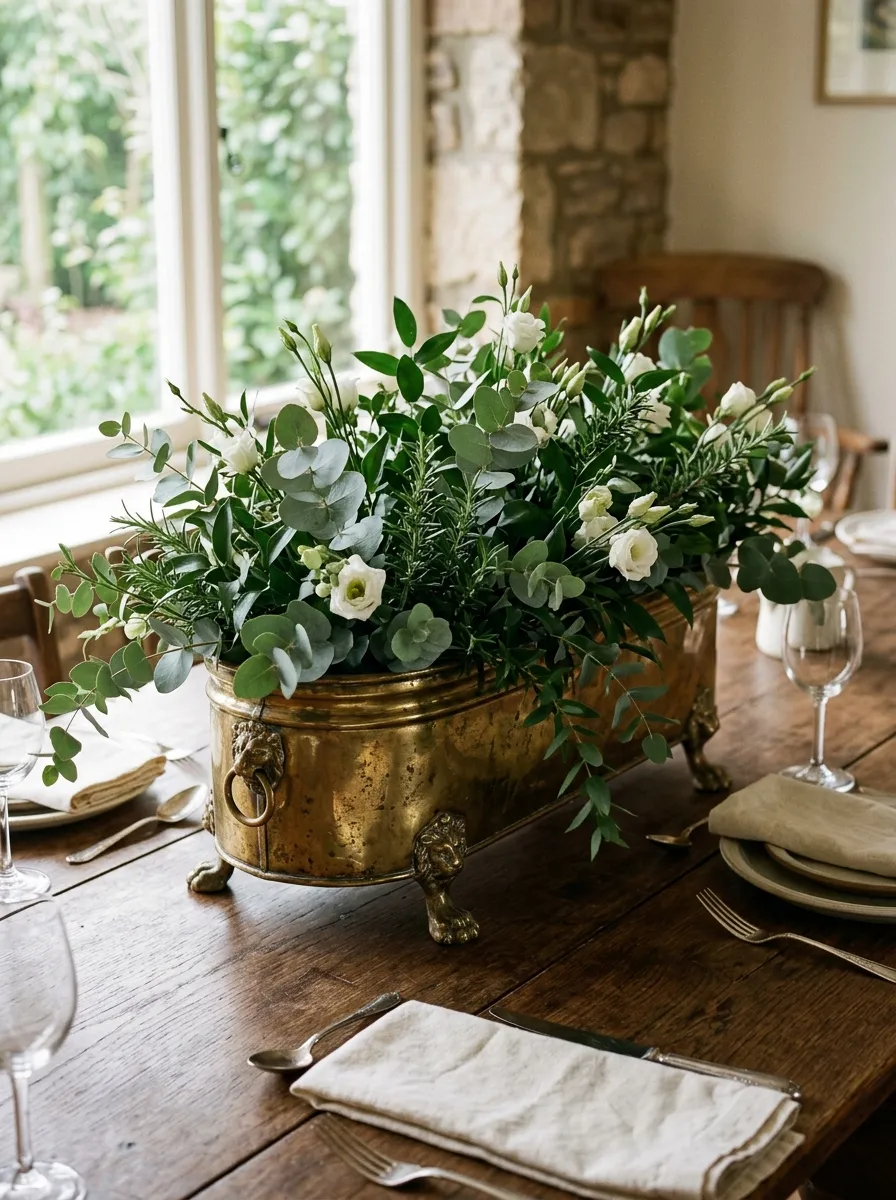
7. Repurposed Brass Musical Horn with Dried Botanical Spilth
Step-by-Step Guide
Historic brass musical instruments—such as vintage trumpets, bugles, and French horns—introduce dramatic sculptural curves, artistic whimsy, and musical heritage to wedding decor. The warm, flared bell of an authentic brass horn provides an unexpected container opening, allowing textured florals to spill outward across the table. The aged patina of unlacquered brass displays rich golden and olive undertones, providing an earthy metallic foundation that complements dried botanicals and textured grasses. Positioning the horn resting horizontally along a table runner creates an engaging linear centerpiece that draws the eye across the dining surface. Pairing this sculptural metal instrument with everlasting elements like pampas grass, dried bunny tails, and preserved seed heads celebrates bohemian craftsmanship and historic artistry. This design serves as a memorable conversation starter, ideal for creative couples, vintage theater venues, and autumnal celebrations.
Source an authentic vintage brass bugle or small trumpet showing natural surface aging, wiping the exterior with a dry cloth to clear dust. Wrap a piece of lead fishing sinker wire in soft cloth and place it inside the small mouthpiece tubing to weight the base, ensuring the instrument rests horizontally on the table without rolling. Insert a cylindrical plastic water vial or a small block of dry floral foam into the wide bell opening of the horn, securing it with a dab of removable floral putty. Begin building the floral spilth by inserting plumes of bleached mini pampas grass, dried wheat stems, and preserved bunny tails into the bell, angling the stems so they fan outward onto the table runner. Intersperse focal elements, such as dried terracotta strawflowers, preserved cream roses, and dried seed pods, to create an abundant display emerging from the instrument.
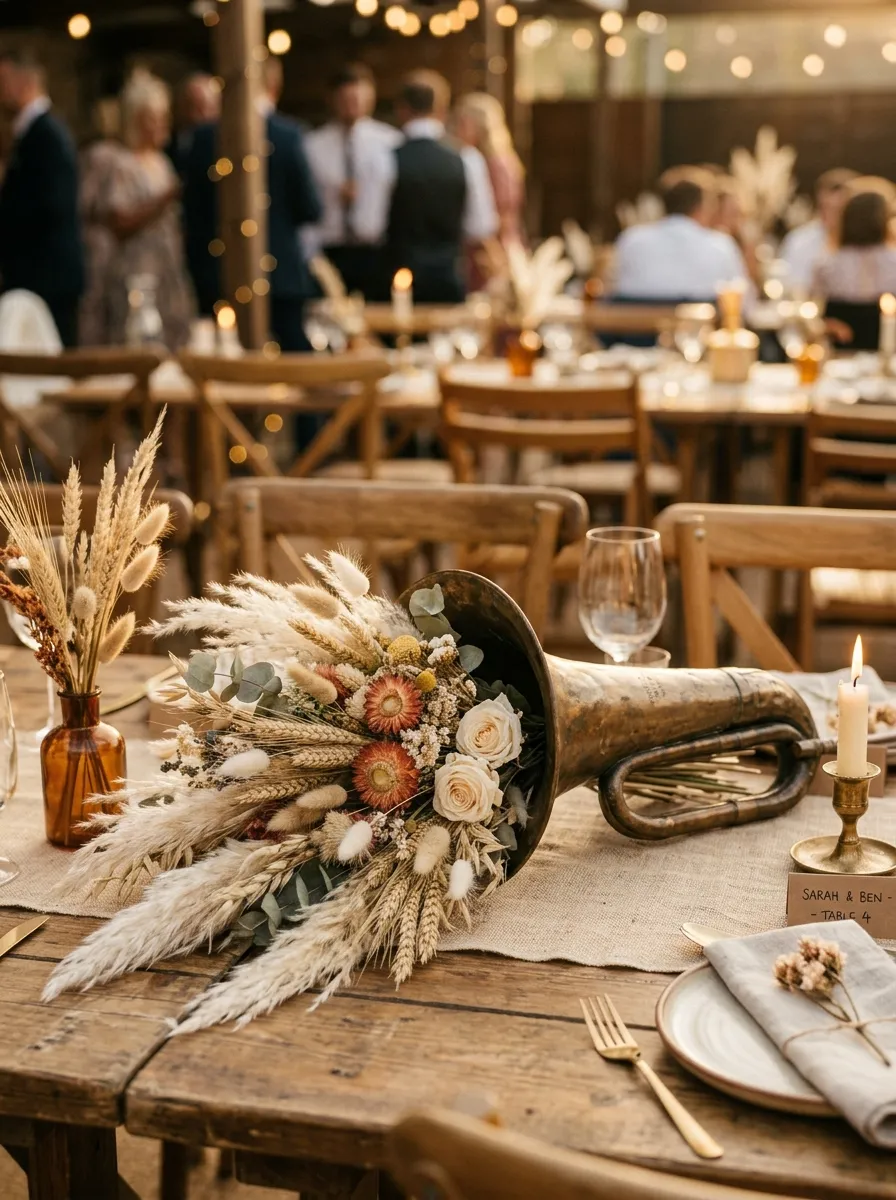
8. Vintage Footed Brass Planter with Overflowing Fresh Greenery
Execution Process
Heavy, footed brass planters and coal scuttles from early twentieth-century households provide substantial volume, antique utility, and rustic warmth for wedding table displays. These elongated or oval troughs feature thick cast handles, paw feet, and hammered side walls that bring grounded elegance to dining tables. Filling a vintage planter with a lush variety of fresh, overflowing greenery transforms the container into a living botanical runner that looks freshly gathered from a historic estate greenhouse. The deep golden-brown patina of the planter provides a dark, rich backdrop that enhances the vibrant shades of silver dollar eucalyptus, rosemary, and trailing ivy. This contained design is exceptionally well-suited for long wooden farmhouse tables, filling the center of the table without requiring dozens of fragile individual bud vases. The heavy metal base ensures absolute stability, preventing accidental tipping during meal service.
Begin by selecting an oval footed brass planter measuring twelve to fifteen inches in length, wiping the interior clean of old soil remnants. Line the interior basin with a heavy-duty plastic liner to ensure complete water retention, trimming the plastic flush with the upper brass rim. Cut blocks of fresh floral foam to fit the trough snugly, soaking them in preservative-treated water before placing them inside the lined planter. Insert long, arching stems of silver dollar eucalyptus, Italian ruscus, and fragrant rosemary along the perimeter of the foam, pushing the woody stems one inch deep at downward angles to conceal the container rim. Intersperse stems of white lisianthus, spray roses, and green trick dianthus across the top plane at staggered heights to introduce varied floral textures. Place the finished planter in the center of the table, allowing the trailing greenery to rest naturally against the table linen.
9. Slender Brass Chamberstick Trio with Trailing Smilax
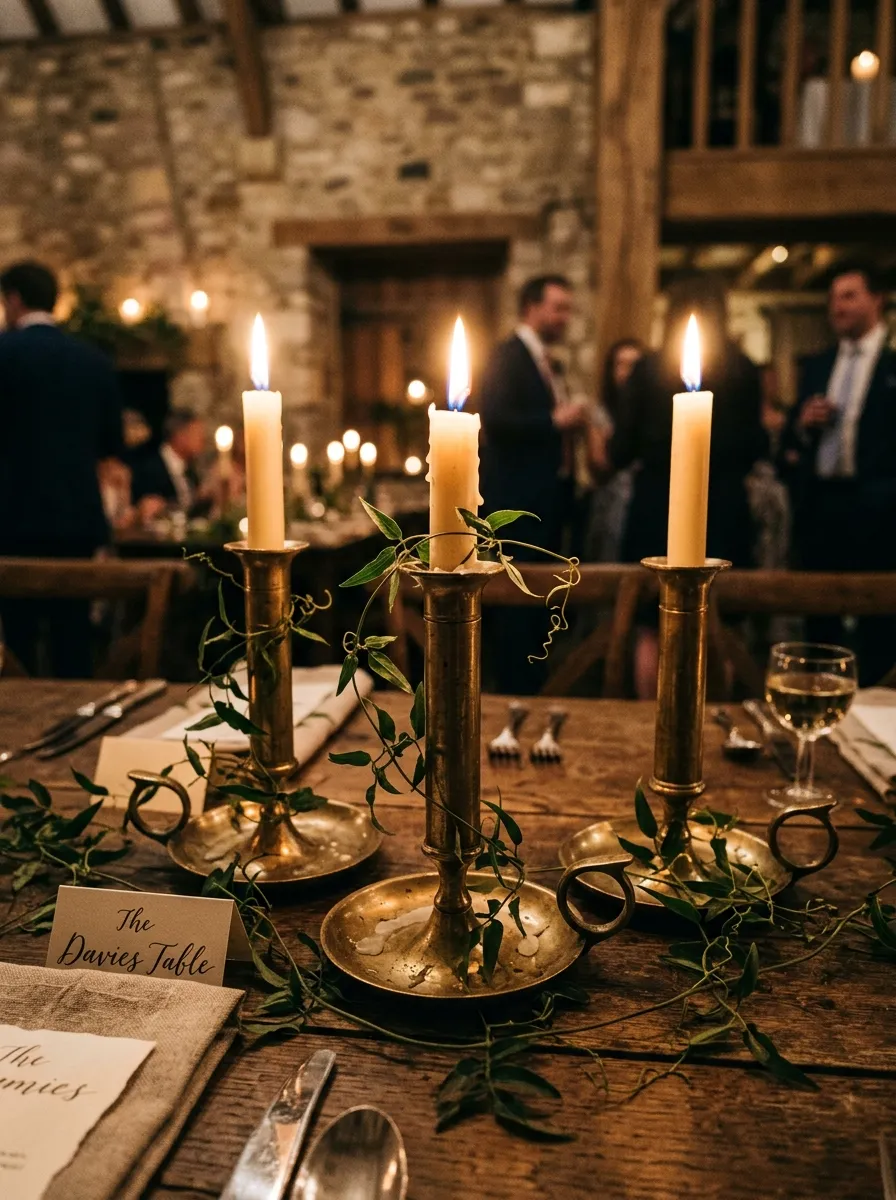
How to Create
The traditional brass chamberstick, characterized by its wide drip saucer and curved finger loop, brings cozy historic charm and intimate candlelight to wedding tablescapes. Using these low, saucered candlestick holders introduces authentic domestic warmth reminiscent of eighteenth-century parlors. The wide drip trays catch any accidental wax runs, protecting fine rental linens and wooden tables from heat damage. Pairing three chambersticks of varying saucer circumferences down the center of the table creates a balanced grouping that stays close to the tabletop plane. Intertwining delicate, thin-leafed greenery like southern smilax or asparagus fern around the saucer bases softens the metallic edges while preserving visibility. The warm candlelight reflects off the curved brass saucers, casting a soft glow that enhances relaxed dinner conversation. This approach is well suited for historic inn receptions, intimate barn gatherings, and candlelit winter weddings.
Select three authentic vintage brass chambersticks featuring wide circular saucers and classic finger loop handles, polishing the interior saucers lightly with a soft cloth to maximize light reflection. Position the three chambersticks along the center of an eight-foot dining table, spacing them roughly eighteen inches apart. Secure eight-inch cream beeswax taper candles into the brass sockets, using a drop of melted wax or a dot of museum putty inside each cup to ensure the tapers stand straight. Gently wrap long, delicate strands of fresh southern smilax or asparagus fern around the bases of the chambersticks, weaving the thin vines around the finger loops while keeping the foliage flat inside the drip saucers. Confirm that all botanical stems remain several inches below the candle wicks. Light the candles shortly before guests are seated, creating an intimate, historic glow down the table.
10. Tiered Brass Etagere with Petite Florals and Macarons
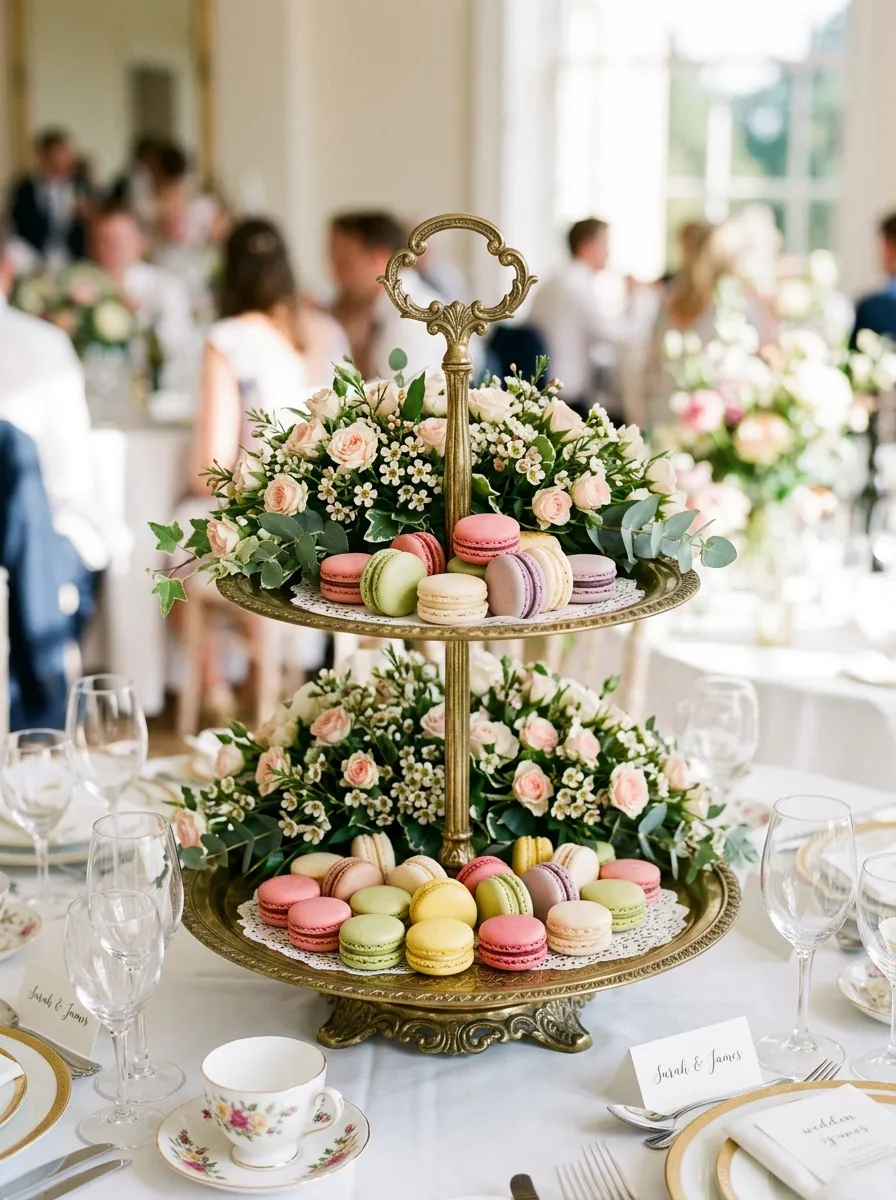
Step-by-Step Guide
Multi-tiered brass etageres and afternoon tea stands introduce elegant vertical height, layered presentation, and interactive dessert styling to reception dining tables. Utilizing a two-tiered or three-tiered brass stand with polished rims and decorative scrollwork draws the eye upward, maximizing decorative volume within a compact tabletop footprint. This versatile design combines miniature botanical arrangements with delicate edible treats, such as French macarons, pastel meringues, or candied fruit. Alternating floral clusters with gourmet confections turns the centerpiece into an interactive focal point that delights guests throughout dinner and dessert service. The warm brass framework provides a structured metal skeleton that pairs beautifully with fine china, crystal stemware, and silver flatware. This centerpiece is well suited for daytime garden receptions, bridal shower brunches, and formal evening weddings that embrace playful sophistication.
Select a two-tiered vintage brass dessert stand measuring twelve to fourteen inches in height, verifying that the central threaded rod is securely tightened and the tiers sit level. Clean both brass trays thoroughly with food-safe soap and water, letting the metal dry completely. Place small, shallow plastic saucers fitted with soaked floral foam onto the rear half of each tier, securing the dishes with removable floral clay. Insert short stems of miniature blush spray roses, delicate white waxflower, and trailing ivy into the foam, creating compact, mounded floral half-wreaths that frame the central brass pillar. On the front open half of each brass tray, arrange pastel French macarons in coordinated shades of rose, pistachio, and vanilla, placing them directly onto small rounds of food-safe parchment paper to protect the brass. Position the tiered stand in the center of the table, ensuring the confections face forward toward seated guests.
Common Beginner Mistakes and How to Avoid Them
The most critical mistake in vintage brass centerpiece construction involves failing to verify the watertight integrity of aged metal vessels before placing them on reception tables. Historic brass pieces often feature hairline fractures, loose solder seams, or porous joints that weep water, causing permanent moisture rings and tarnish stains on rental linens and fine wooden banquet tables. Prevent this by testing every brass container with water for twenty-four hours prior to the event, using heavy plastic liners, secondary glass vessels, or floral cups inside containers that fail the test. Another frequent error is using over-polished, aggressively buffed brass that looks harsh and reflective under venue lighting; preserve the authentic character of vintage brass by cleaning pieces with gentle soap rather than harsh chemical polishes that remove centuries of natural patina. Beginners also frequently neglect candle stability, resulting in crooked tapers that drip hot wax across tables or tip over when guests bump the furniture. Always secure taper candles into brass sockets using heat-resistant museum wax putty, verifying that every candle stands vertically plumb before lighting. Finally, avoid using excessively tall, dense floral arrangements that block cross-table sightlines; keep central floral masses either below fourteen inches or above twenty-four inches to preserve effortless conversation across the table.
Practical Tips for Better Results
Achieving professional, gallery-grade results with vintage brass centerpieces relies on disciplined preparatory techniques and careful metal maintenance. Always cut flower stems at a sharp forty-five-degree angle using bypass floral shears rather than dull household scissors, which crush vascular plant tissues and restrict water uptake. When working with unlacquered brass, handle the metal using clean cotton gloves during setup to prevent natural skin oils from leaving dark, oxidizing fingerprints on the polished surfaces. To prevent wax cleanup headaches after the event, spray the interiors of brass candlestick cups lightly with vegetable oil cooking spray before inserting tapers; this allows cooled wax drips to slide out effortlessly during teardown. If sourcing seasonal flowers from home gardens or local flower farms, harvest stems in the cool early morning hours when moisture levels are highest, allowing them to hydrate in deep water buckets in a dark, climate-controlled room for twelve hours before arranging. Finally, use low-temperature hot glue or removable floral adhesive clay to anchor internal mechanics securely within brass vessels, ensuring that arrangements remain stable during transportation and dinner service.
Styling, Presentation, or Organization Ideas
Integrating vintage brass centerpieces into a cohesive wedding reception design requires thoughtful coordination with surrounding dinnerware, linens, and ambient lighting. Pair warm brass metals with natural textile textures, such as crinkled cheesecloth, washed Belgian linen, or crushed velvet runners that catch and soften metallic reflections. Coordinate metallic finishes across the entire tablescape; pair aged brass centerpieces with brushed gold flatware, gold-rimmed glassware, and vintage amber or green water goblets to build a harmonious color palette. When decorating long banquet tables, alternate between tall focal designs—such as brass candlesticks or tea urns—and low horizontal elements like etched Moroccan trays to create an undulating, dynamic visual skyline down the room. Ensure central floral clusters stay within appropriate height parameters, leaving ample breathing room around place settings for bread baskets, water carafes, and wine glasses. Complete the historic presentation by tucking small botanical sprigs—such as fragrant rosemary, olive leaves, or miniature spray roses—into folded linen napkins alongside calligraphed cardstock menus at every individual place setting.
Budget or Time Planning
Executing a full suite of vintage brass centerpieces across ten to twenty reception tables requires structured budget planning and organized production timelines. Sourcing authentic vintage brass gradually through estate sales, flea markets, thrift shops, and rural antique malls over six to twelve months yields substantial cost savings compared to purchasing expensive retail reproductions or hiring high-end rental agencies. Procure foundational floristry supplies, such as floral tape, chicken wire, and bulk dripless taper candles, through wholesale floral distributors to secure volume discounts. Structure your centerpiece production across three organized operational days: reserve the first day for cleaning, waterproofing, and inspecting all vintage brass vessels; dedicate the second day to trimming, conditioning, and hydrating fresh botanical stock; and utilize the final morning or afternoon before the wedding for arrangement assembly. Store completed arrangements in a cool, dark room held around sixty degrees Fahrenheit, misting blooms lightly and checking water levels daily. On the morning of the wedding, designate two helpers equipped with watering cans and floral shears to transport the arrangements to the venue and execute final on-site touch-ups before guest arrival.
Creative Expansion and Advanced Inspiration
Once you have mastered foundational vintage brass floristry mechanics, explore creative variations to expand your decorative theme across the entire venue space. Translate signature centerpiece motifs into complementary peripheral displays, such as dressing welcome tables, guestbook stations, and dessert buffets with smaller matching brass bud vases and framed family photographs. Transform outdoor ceremony spaces by lining the central aisle with oversized brass floor lanterns or hanging weathered brass incense burners filled with cascading greenery from shepherd hooks. Consider crafting personalized guest favors that harmonize with your centerpiece style, such as gifting miniature brass bottle openers, customized brass keychains, or small potted succulents in mini brass votive cups. You can also weave personal family history into your reception decor by incorporating heirloom brass candlesticks, vintage brass bells, or classic pocket watches into the base of your centerpiece displays. Following the wedding celebration, these durable vintage brass vessels can be seamlessly integrated into residential home decor, serving as functional planters, mantelpiece accents, and bookends that preserve cherished memories of your special day for years to come.