Ornament wedding centerpieces have established themselves as an innovative design movement within modern event styling, offering a vibrant alternative to conventional floral arrangements. This comprehensive tutorial explores ten distinct ornament centerpiece concepts, breaking down the exact mechanics, material pairings, and assembly techniques required to create high-impact reception tablescapes. Readers will discover how to source reflective baubles, balance varied geometric finishes, incorporate ambient illumination, and anchor modular elements to build cohesive tablescapes. Handcrafting these tabletop focal points provides an approachable method for achieving a personalized aesthetic while exercising complete control over event budgets and timelines. Reinterpreting decorative spheres transforms everyday seasonal ornaments into sculptural works of art that complement romantic, contemporary, and industrial venue aesthetics alike. Mastering these structural design principles enables couples and stylists to produce stable displays that remain immaculate throughout long celebrations. By following systematic steps for surface layering, color zoning, and foundation stabilization, anyone can execute polished DIY wedding centerpieces with complete technical precision.
Why This Idea Is Trending or Useful
The surge in popularity of ornament wedding centerpieces across modern Pinterest boards stems from their exceptional durability, visual luminosity, and budget-friendly accessibility. Traditional cut blooms frequently wilt under dry banquet hall air conditioning, require constant hydration, and introduce unpredictable vendor delivery timelines. Spherical ornaments, by contrast, maintain their structural form indefinitely, completely eliminating the risk of midday drooping or temperature degradation. Their reflective coatings bounce surrounding candlelight dynamically, amplifying ambient light across dining spaces without requiring costly professional uplighting systems. From a DIY perspective, these designs offer unmatched accessibility for beginners because they bypass delicate floristry wiring and perishable foam hydration techniques. Ornaments can be gathered across varied seasons, color-matched to exact stationery palettes, and assembled weeks ahead of the wedding date. Furthermore, repurposing baubles post-celebration into seasonal home decor or gifting them to departing guests establishes these projects as sustainable, high-utility options that eliminate post-event floral waste.
Materials and Preparation
Achieving an upscale, balanced finish when building ornament centerpieces requires deliberate material procurement and thorough workspace preparation. Essential foundational hardware includes heavy-gauge glass cylinders, fluted pedestals, shallow compote dishes, wire cloches, and natural wooden slices. Decorative elements range from shatterproof acrylic baubles in matte, mercury, gloss, and velvet textures to micro-wire fairy lights, satin ribbons, botanical greenery, and floral adhesive strips. Preparation begins by wiping all glassware with an equal-parts white vinegar and distilled water mixture, drying the surfaces with lint-free microfiber towels to remove manufacturing dust and fingerprints. Sort ornaments by diameter, finish, and hue into divided plastic bins, removing attached hanging cords or metal crowns depending on the structural needs of each design. Test all battery-operated micro-LED light strands prior to assembly, verifying battery life and securing power packs with double-sided mounting foam. Establishing an organized assembly-line space ensures each table arrangement maintains balanced visual proportions and uniform stem heights before event deployment.
1. Cascading Mercury Glass Bauble Compote
Step-by-Step Guide
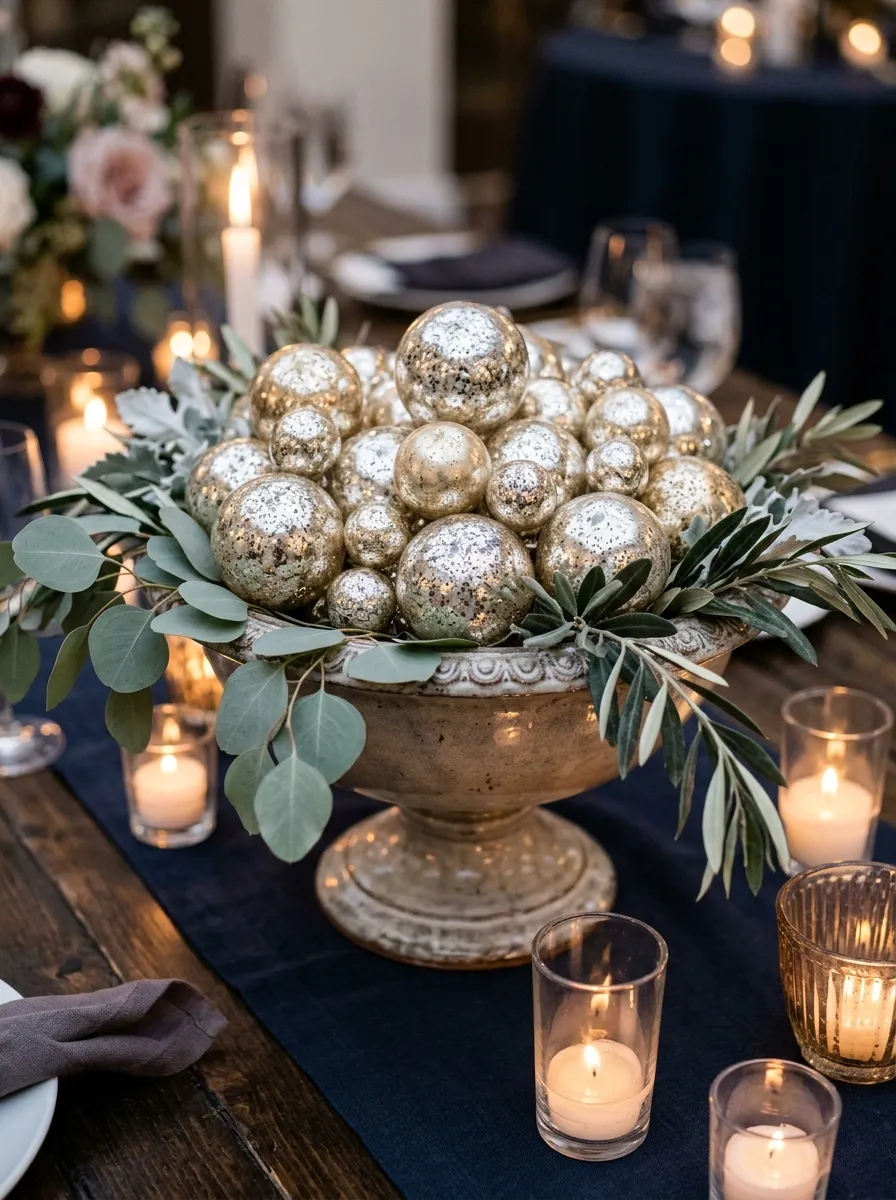
The cascading mercury glass bauble compote pairs vintage antiqued silver spheres with elevated pedestal vessels to establish an architectural focal point. The core concept centers on varying sphere diameters, ranging from miniature one-inch rounds to statement three-inch baubles, clustered tightly inside a footed ceramic or glass compote. By combining heavily speckled mercury glass with subtle champagne tones, this centerpiece reflects ambient room illumination while avoiding the uniform shine of plastic finishes. The elevated bowl silhouette lifts the textural density several inches above the tabletop, creating visual lightness that leaves room for shared family-style dining platters. Lush sprays of dried silver dollar eucalyptus and frosted olive foliage spill naturally over the vessel rim, softening the hard contours of the glass spheres. This design brings balanced elegance to historic ballrooms, moody winter gatherings, and modern romantic winery receptions.
Begin by selecting an eight-inch diameter footed compote bowl with a weighted base to ensure tabletop stability. Place a four-inch disc of dense gray floristry foam into the bottom of the vessel, securing the base using waterproof floral tape pulled across the rim in an X-pattern. Insert six-inch stems of fresh or preserved silver dollar eucalyptus horizontally along the bowl edge, creating an asymmetrical greenery ring that cascades over the front rim. Coat the bottom cap of three large mercury glass ornaments with clear silicone craft adhesive, pressing them firmly into the central foam base to serve as structural anchors. Fill the intermediate voids by clustering medium and miniature baubles, gluing adjoining spheres together using discreet drops of clear low-temperature craft adhesive. Ensure no mechanical tape or foam remains visible, then nestle three slender glass votive holders around the compote base to reflect flickering candlelight off the mercury glass facets.
2. Minimalist Glass Cylinder Floating Bauble Trio
Execution Process
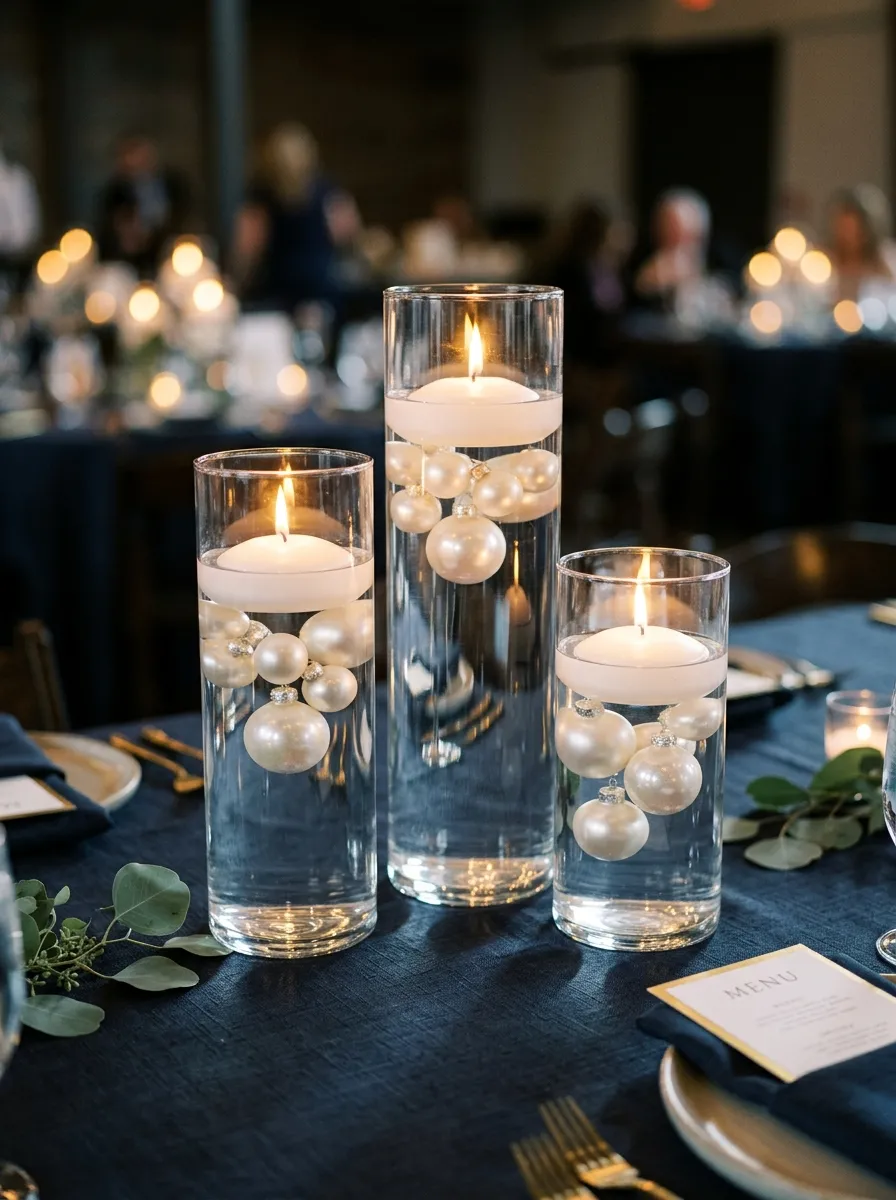
The minimalist glass cylinder floating bauble trio relies on clean vertical lines, fluid transparency, and light refraction to establish a contemporary aesthetic. This concept arranges three clear borosilicate glass cylinders of staggered heights—typically twelve, nine, and six inches—placed close together in a balanced triangular layout. Rather than filling the entire column, a curated selection of pearlescent white and soft ivory baubles floats gracefully near the top waterline, held below smooth paraffin floating wax discs. The submerged water column acts as an optical amplifier, bouncing light downward through the vessels and onto dark banquet linens. This vertical orientation preserves horizontal dining room across compact tables, keeping guest sightlines open and unobstructed. The understated silhouette fits naturally into contemporary art museums, urban loft celebrations, and minimalist style evening receptions.
Thoroughly clean the three glass cylinders with isopropyl alcohol, allowing the glass to dry completely before positioning them in the table center. Place three small metallic baubles into the base of each cylinder, filling the interior voids with clean, polished white river pebbles to weight the containers securely. Slowly pour room-temperature distilled water into each vase using a narrow-spout watering can, filling the vessels to three inches below their top rims to prevent splashing. Gently place two pearl-finish floating ornaments onto the water surface, letting them settle naturally around the perimeter. Top each cylinder with a three-inch circular floating white wax candle, ensuring the cotton wicks remain completely dry during placement. Arrange the cylinders with the tallest vessel centered toward the back, lighting the floating wicks twenty minutes prior to room entry using a long-reach butane lighter.
3. Frosted Velvet Globe and Cedar Wreath Nest
Setup Method
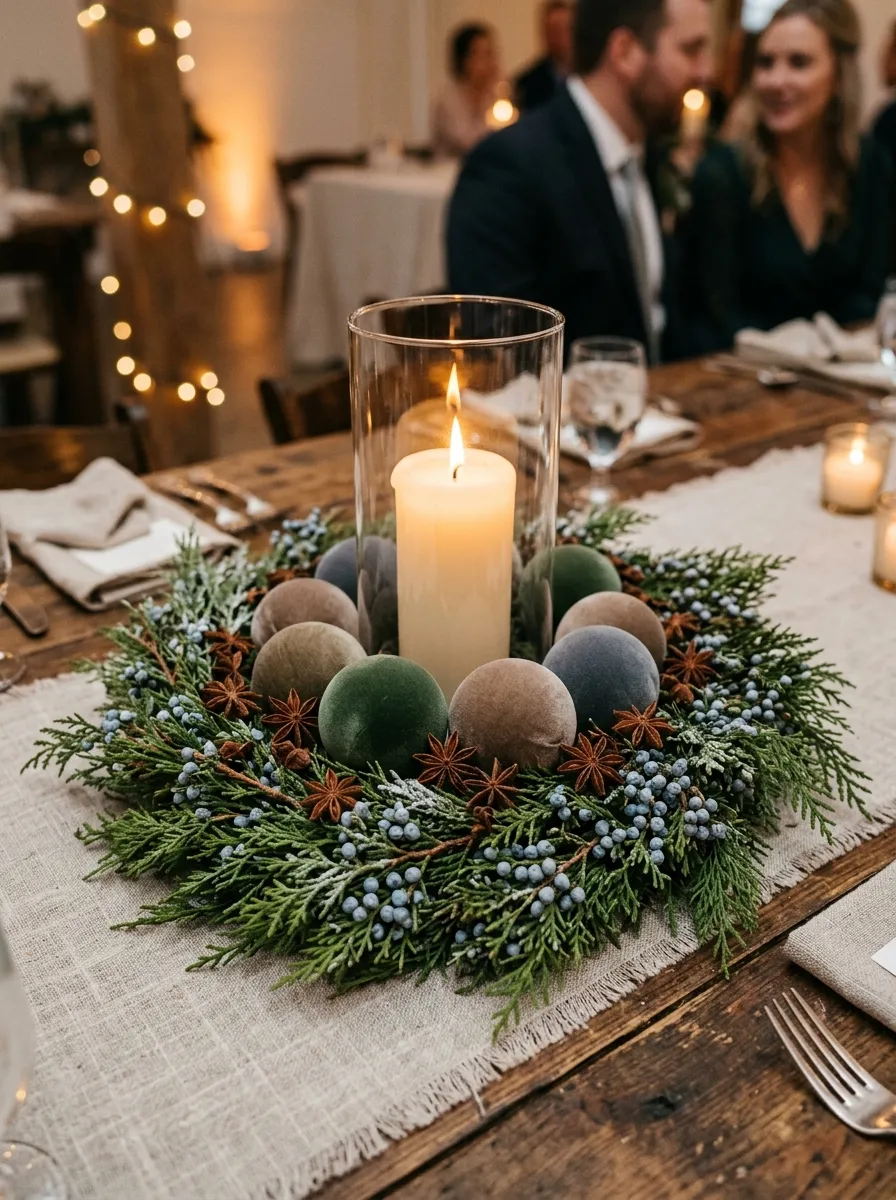
The frosted velvet globe and cedar wreath nest combines tactile luxury with fragrant woodland foliage, providing an organic centerpiece for cooler celebrations. This design features an assortment of hand-flocked velvet ornaments in muted forest green, warm taupe, and slate gray nestled inside a dense ring of fresh evergreen boughs. The matte, light-absorbing quality of velvet fabric offers a deliberate visual contrast against the glossy foliage of noble fir and cedar needles. By resting directly on the tabletop without an elevated pedestal, the low-profile circular wreath preserves direct sightlines across banquet seating. The rich tactile surfaces evoke comforting woodland themes while maintaining a polished, cohesive color palette suitable for modern celebrations. This layout functions exceptionally well in mountain lodge venues, winter estate dinners, and rustic outdoor farm receptions.
Source a ten-inch circular wire wreath frame, securing freshly trimmed eight-inch boughs of western red cedar and blue-berried juniper around the frame with dark green paddle wire. Lay the completed botanical wreath flat in the center of the dining table over a raw-edged oatmeal linen runner. Position a large seven-inch glass hurricane sleeve directly into the inner void of the cedar wreath, placing a non-drip ivory pillar candle inside the glass column. Select twelve shatterproof velvet-flocked ornaments in coordinating earthy tones, removing their metal hanging loops with needle-nose pliers. Nestle the velvet spheres in clusters of three around the interior rim of the cedar foliage, securing their bases to the woody branch intersections with clear floral adhesive dots. Scatter whole star anise pods and miniature larch pinecones between the velvet globes to reinforce the organic forest floor aesthetic.
4. Architectural Cloche Encased Luminous Sphere Terrascape
How to Create
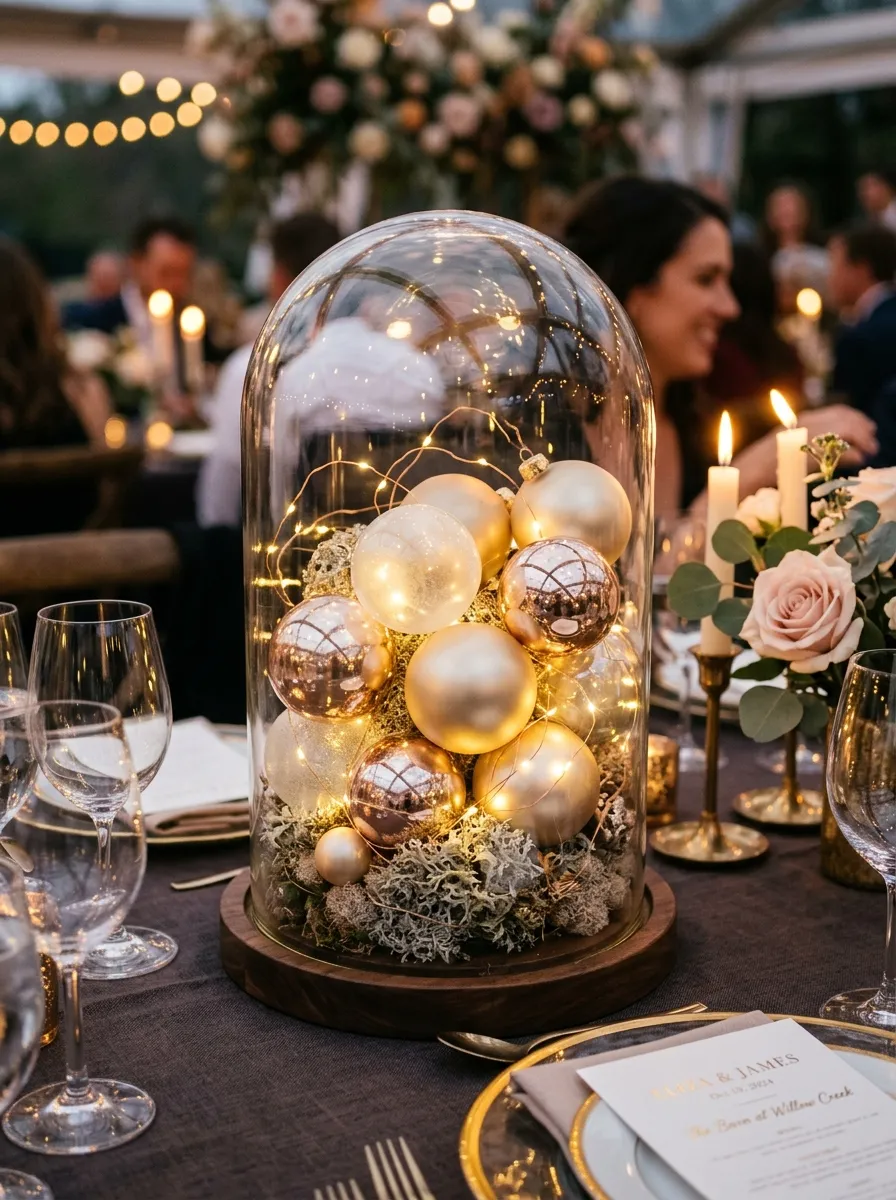
The architectural cloche encased luminous sphere terrascape transforms traditional ornamental baubles into museum-style curiosities under smooth glass domes. This concept centers on a tall, bell-shaped glass cloche set over a turned timber or dark slate pedestal base, enclosing an internal cluster of metallic and translucent glass globes. Integrated micro-wire copper fairy lights wind between the spheres, casting geometric reflections outward through the curved cloche walls. The glass dome protects the interior arrangement from outdoor breezes and accidental guest contact, preserving the placement of every delicate element throughout dinner service. The contained silhouette introduces controlled vertical height, making it an ideal statement piece for circular dining tables, welcome tables, and intimate lounge configurations. The balance between industrial glass, warm copper wire, and organic stone makes it a versatile choice across diverse themes.
Begin with a twelve-inch tall clear glass cloche featuring a grooved circular walnut base. Apply a strip of heavy-duty double-sided foam tape to the underside of a flat micro-LED battery pack, adhering it firmly within the recessed center of the wooden base. Arrange five varying two-inch to three-inch shatterproof baubles in champagne gold, mirrored rose gold, and frosted glass around the concealed power module. Carefully uncoil a six-foot strand of warm-white copper fairy wire, weaving the glowing diodes between and behind the ornamental spheres to ensure three-dimensional light distribution. Add preserved gray-green lichen and delicate sprigs of dried baby’s breath into the lower crevices to conceal all exposed plastic wiring. Carefully clean the inside of the glass bell jar with an anti-static cloth, then lower it over the arrangement into the perimeter groove of the wooden base.
5. Industrial Geometric Wire Lantern with Shatterproof Baubles
Step-by-Step Guide
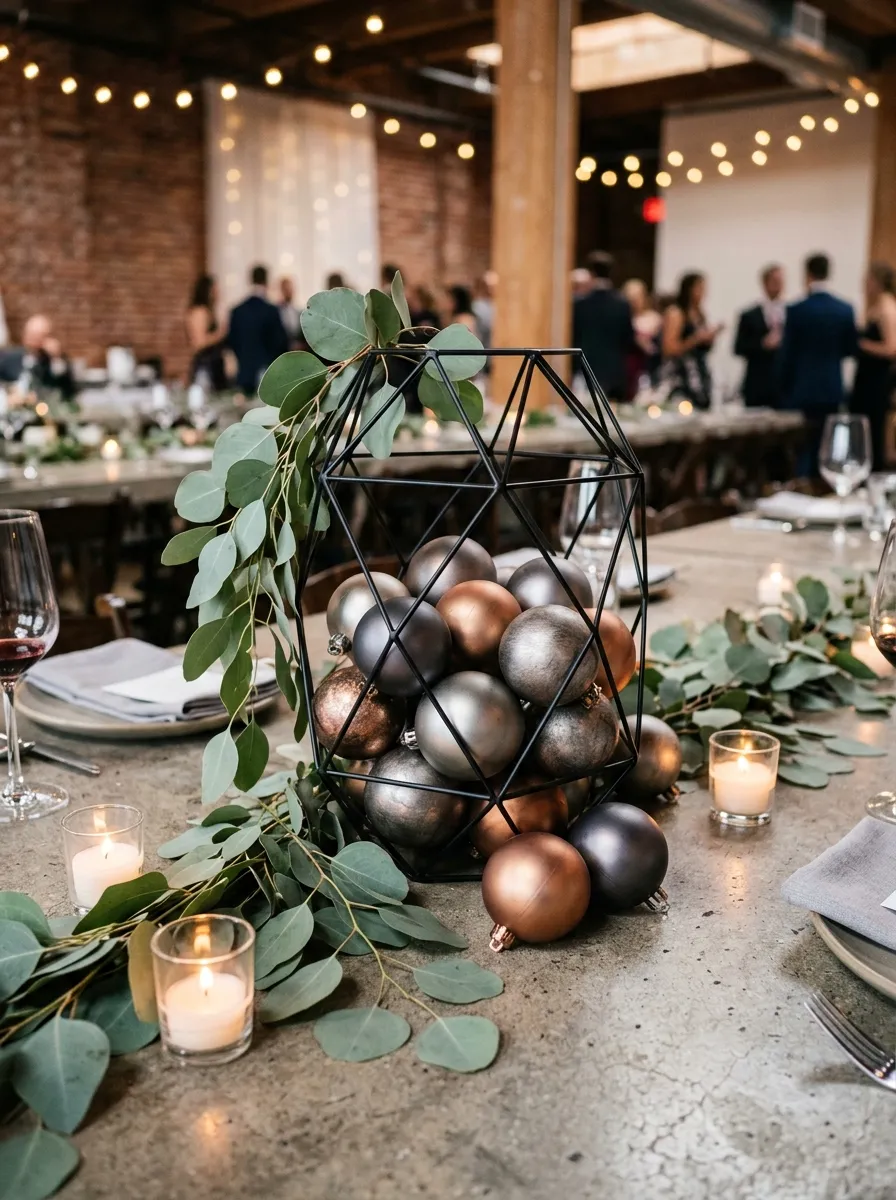
The industrial geometric wire lantern brings sharp angular lines and structured metalwork to the reception table, balancing modern geometry with curved spheres. This design utilizes open-frame multifaceted iron or brass wire lantern cages, loosely filled with shatterproof metallic ornaments in monochromatic shades of charcoal, brushed copper, and deep bronze. Because the geometric lantern features open faces without glass panes, it allows for creative overflow, with larger baubles resting securely inside while smaller globes spill outward onto the table runner. The interplay of straight metal edges and rounded spheres produces a graphic aesthetic that complements urban industrial aesthetics and minimalist modern weddings. The durable materials make this centerpiece exceptionally resilient, easy to pack, and quick to set up across dozens of guest tables.
Select a twelve-inch tall multifaceted geometric prism lantern constructed from welded matte-black steel wire. Cut a five-inch circle of stiff black felt, placing it inside the lower lantern floor to prevent metal ornament caps from rattling against the tabletop during service. Fill the lantern base with six three-inch shatterproof ornaments in satin charcoal and brushed pewter, arranging them tightly so their hanging necks point toward the center. Layer four two-inch copper baubles into the upper gaps, letting one sphere protrude slightly through an open triangular side pane to break the rigid geometric boundary. Trail a three-foot garland of silver-dollar eucalyptus around the exterior base of the lantern, allowing the leafy stems to weave through the lower wire struts. Tuck three small glass tea light cups containing clean-burning soy candles alongside the metal corners to illuminate the metallic surfaces.
6. Monochromatic Pearl Ornament Pyramid on Mirrored Riser
Setup Method
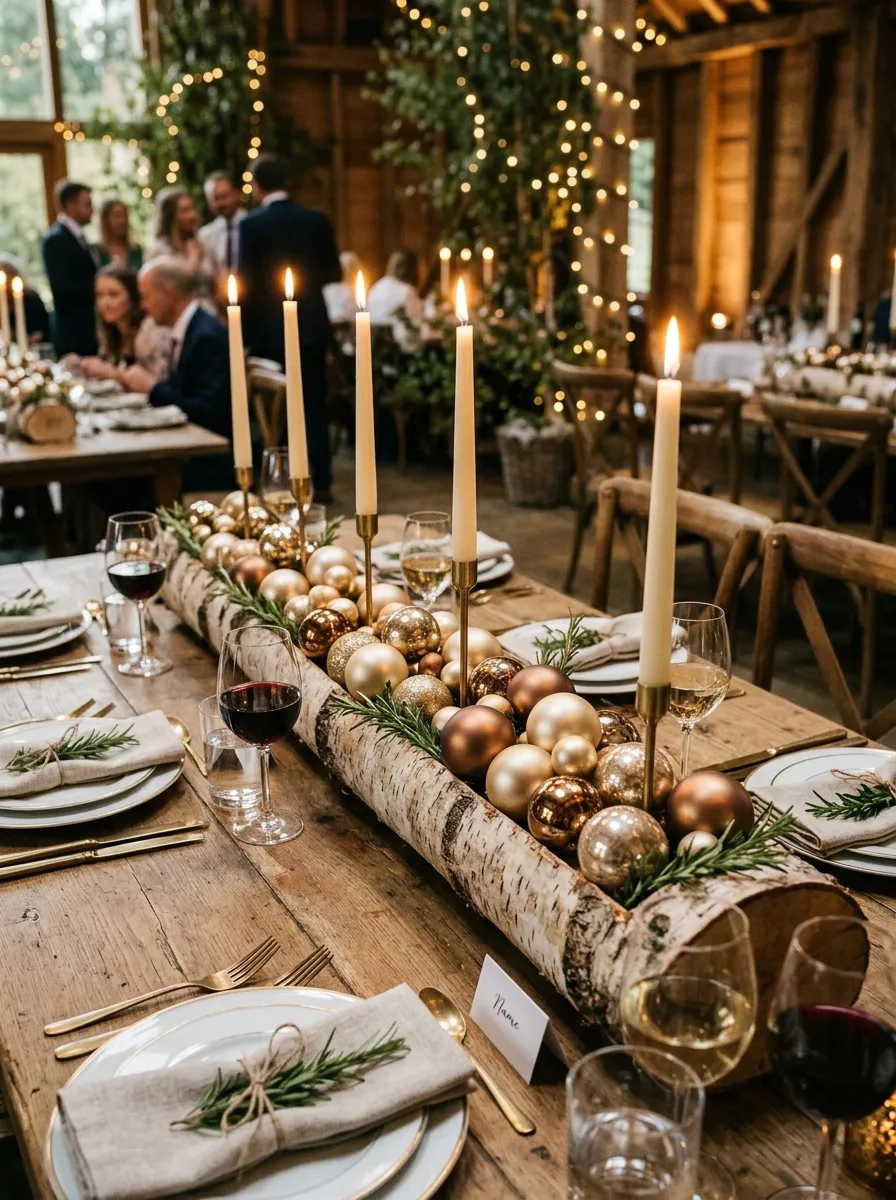
The monochromatic pearl ornament pyramid emphasizes clean geometric symmetry and classic glamour through a structured, multi-tiered display. This concept groups high-gloss pearl, frosted iridescent, and satin white glass spheres into a conical pyramid set atop a circular beveled mirror tray. The clean ivory surfaces create a sense of order and calm, while the mirrored base bounces light upward into the lower tiers of the pyramid. The absence of contrasting colors focuses guest attention on the subtle variations in surface sheen, from high-shine porcelain glazes to soft, powdery matte finishes. This design functions exceptionally well in classic ballroom venues, historic private estates, and luxury formal celebrations where refined, timeless styling is preferred over rustic details.
Clean a twelve-inch circular beveled mirror tray with glass polish, placing it flat on the center of the reception table over an ivory damask tablecloth. Coat the flat base of a nine-inch dense polystyrene cone with industrial multi-surface craft glue, pressing it firmly into the center of the mirror tray to cure for fifteen minutes. Starting at the bottom edge, apply low-temperature craft hot glue to the caps of two-inch pearlescent white glass baubles, adhering them in a continuous, tight ring around the cone base. Progress upward in concentric horizontal rings, decreasing ornament sizes to 1.5 inches for the midsection and one inch for the upper peak to maintain proportional balance. Fill small micro-gaps between the spheres with genuine freshwater pearls or tiny white glass beads applied with precision tweezers. Polish the completed spherical facade with a dry microfiber cloth to remove adhesive strings and dust before lighting surrounding table tapers.
7. Natural Birch Branch Trough Filled with Metallic Spheres
How to Create
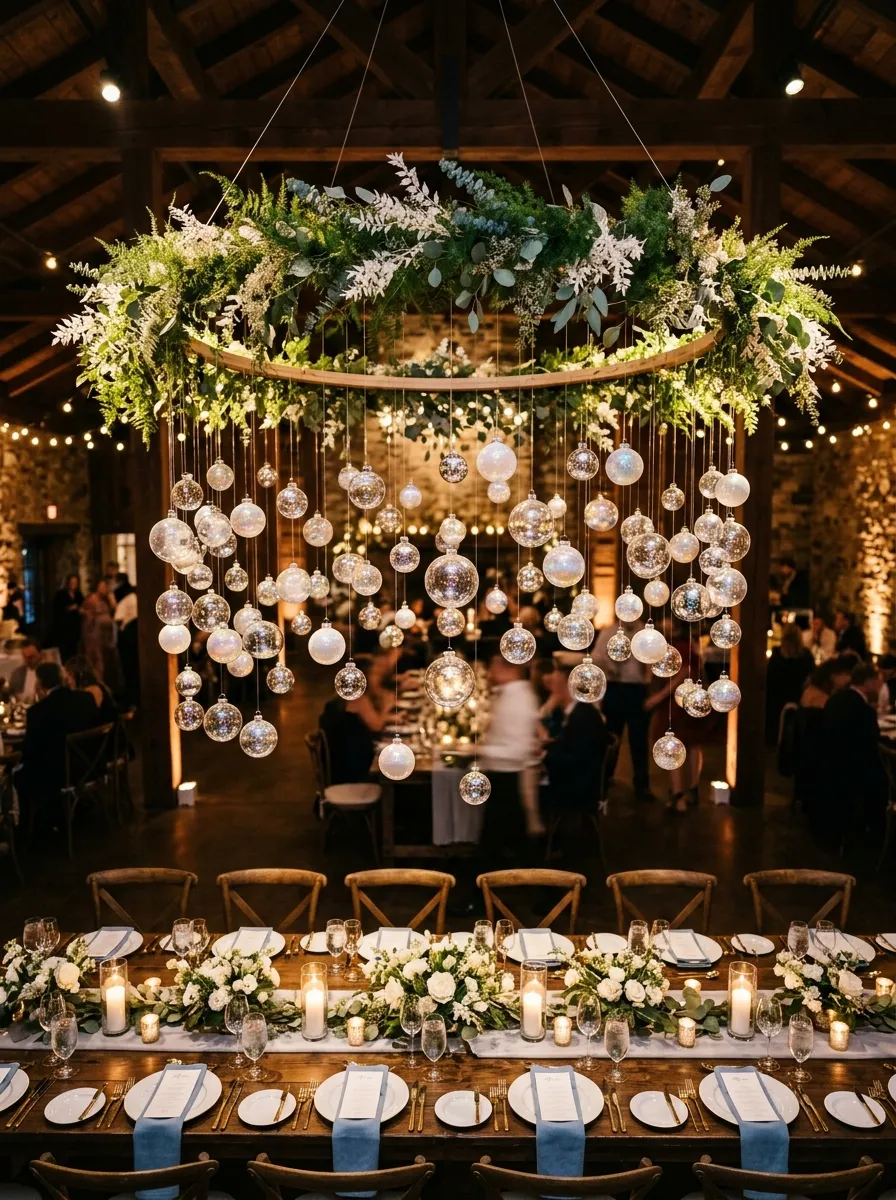
The natural birch branch trough centerpiece uses raw organic textures to ground reflective metallic baubles, creating a balanced rustic-contemporary table runner. This design repurposes hollowed-out paper birch tree logs or rectangular cedar troughs as long, linear vessels designed specifically for farm-style banquet tables. The stark white bark and rough fissures of the birch log contrast cleanly against smooth, reflective ornaments in shades of champagne, pale gold, and burnished bronze. Because the wooden trough maintains a low profile down the table center, it allows for uninterrupted eye contact and easy sharing across narrow tables. This design brings cozy woodland warmth to vineyard receptions, barn celebrations, and autumn outdoor gatherings.
Source a kiln-dried white paper birch log trough measuring approximately thirty inches long, four inches wide, and three inches deep, ensuring the base is planed flat for stability. Lay a continuous sheet of thin silicone protective liner inside the wooden channel to prevent wood sap from transferring to decorative elements. Arrange seven tall, slender brass candle spikes evenly along the trough floor, pressing twelve-inch dripless ivory taper candles firmly onto the metal pins. Fill the remaining trough volume with an assortment of two-inch and 1.5-inch shatterproof ornaments in champagne gold and pale copper, packing them tightly around the taper candle bases to hold the wax upright. Weave dried trailing rosemary sprigs and preserved flat moss into the narrow crevices between the baubles to create an organic, finished look. Verify that all botanical elements sit at least three inches below the candle wicks before lighting.
8. Whimsical Suspended Ornament Chandelier over Table Settings
Execution Process
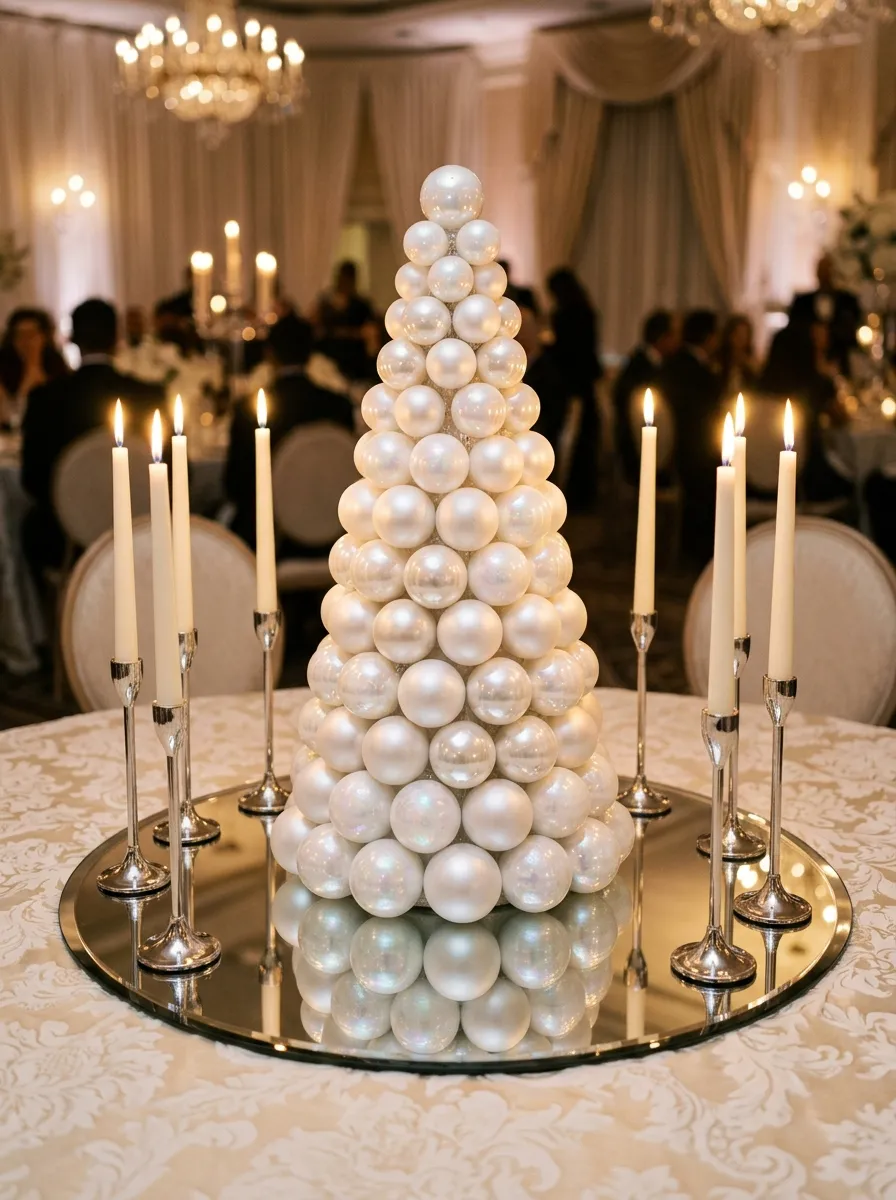
The suspended ornament chandelier lifts table decor off the dining linen entirely, creating an immersive aerial installation that leaves banquet surfaces completely clear for family-style catering. This concept suspends a lightweight circular timber or metal hoop directly above the guest table, from which dozens of translucent and mirrored glass ornaments dangle at varied lengths using clear monofilament line. The floating spheres drift gently with ambient room currents, catching overhead chandeliers and pin-spot event lighting to create an enchanting canopy over the dining party. This aerial approach is particularly effective in venues with tall, soaring ceilings—such as industrial warehouses, historic armories, and rustic wooden barns—where traditional low centerpieces can feel visually lost in the space.
Begin by procuring a thirty-inch natural timber embroidery hoop or lightweight aluminum wreath frame, outfitting the rim with four evenly spaced eyelet screws along the top edge. Connect four high-tensile steel aircraft cables to the eyelets, gathering them into a central carabiner clip secured to overhead venue rigging points via rated drop-lines. Cut fifty lengths of eight-pound monofilament fishing line ranging from twelve to thirty-six inches, tying one end of each line securely to the metal crown of an ornament. Select a mix of clear glass baubles, metallic silver rounds, and iridescent spheres, alternating line lengths systematically to produce an organic, staggered cloud formation beneath the suspended hoop. Weave preserved asparagus fern fronds and trailing smilax vines around the upper rim of the hoop to conceal all knots and hanging hardware, ensuring the lowest hanging ornament remains at least twenty-four inches above the table plane.
9. Antiqued Pedestal Bowl with Velvet Baubles and Pomegranates
Step-by-Step Guide
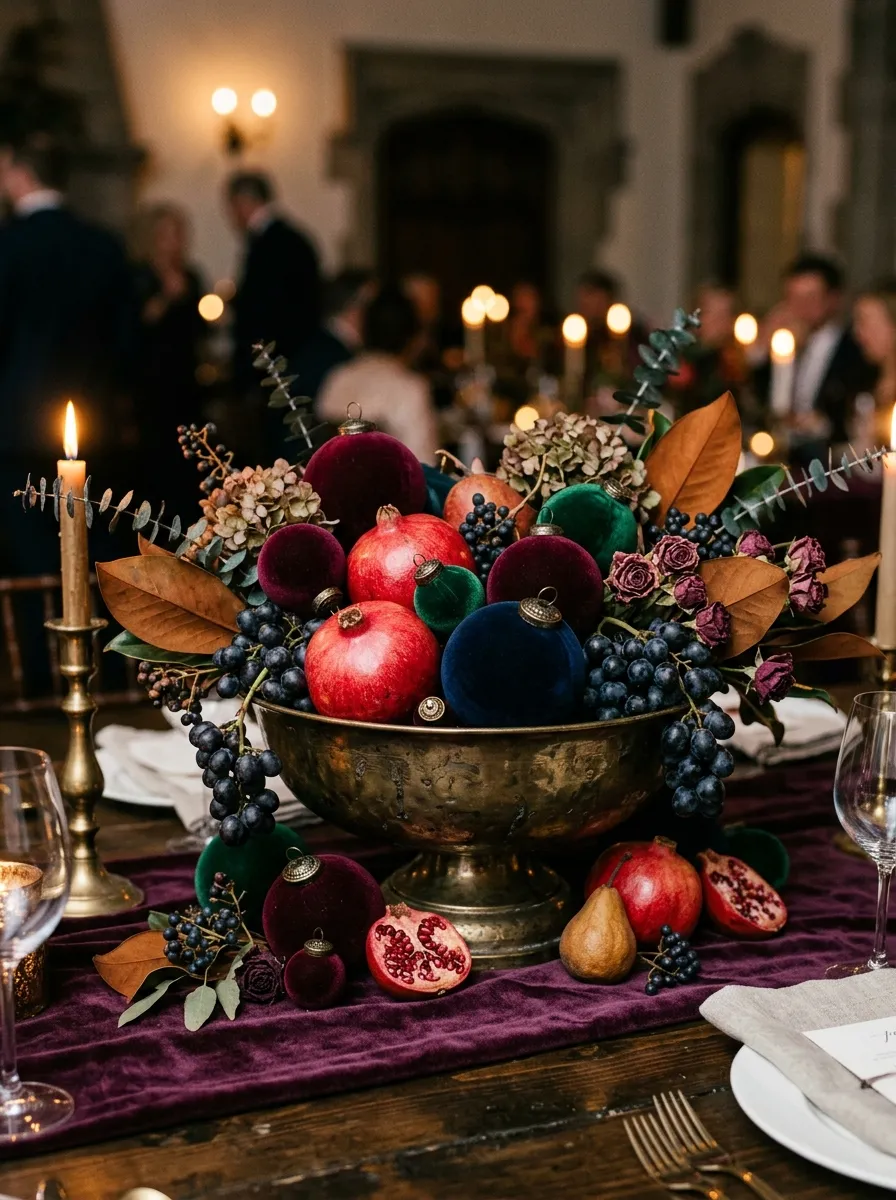
The antiqued pedestal bowl arrangement pairs opulent textile textures with whole seasonal fruits to establish an abundant tablescape inspired by classical Dutch still-life paintings. This design utilizes a wide, shallow pedestal bowl finished in dark tarnished brass or weathered pewter, filled with rich velvet-flocked ornaments and real whole pomegranates, dark figs, and cluster grapes. The contrast between plush jewel-toned velvet—such as deep burgundy, plum, and emerald—and the waxy, natural skins of fresh fruit creates a sensory, layered centerpiece. The wide, low footprint anchors the table without demanding excessive vertical room, making it well-suited for round banquet layouts and intimate autumn or winter dinners. The blend of handcrafted materials and organic fruit brings an old-world charm that feels timeless and refined.
Position an eleven-inch diameter cast-iron or antique brass compote bowl in the center of the reception table over a deep plum velvet runner. Place a circular non-slip rubber grip mat into the bowl interior to prevent hard objects from shifting during dining movement. Arrange three whole, polished red pomegranates in an off-center triangular cluster inside the bowl, tilting their natural crowns outward toward the rim. Fill the remaining space with seven three-inch velvet-flocked ornaments in coordinating jewel tones of wine, forest green, and midnight navy, pressing the soft spheres snugly against the fruit surfaces. Tuck small clusters of black seedless grapes over the bowl edge, allowing the natural fruit vines to trail gracefully toward the tabletop. Intersperse small dried magnolia leaves with velvet-brown undersides throughout the arrangement to bridge the gap between fresh fruit and velvet finishes.
10. Floating Mirrored Sphere Reflection Basin
Setup Method
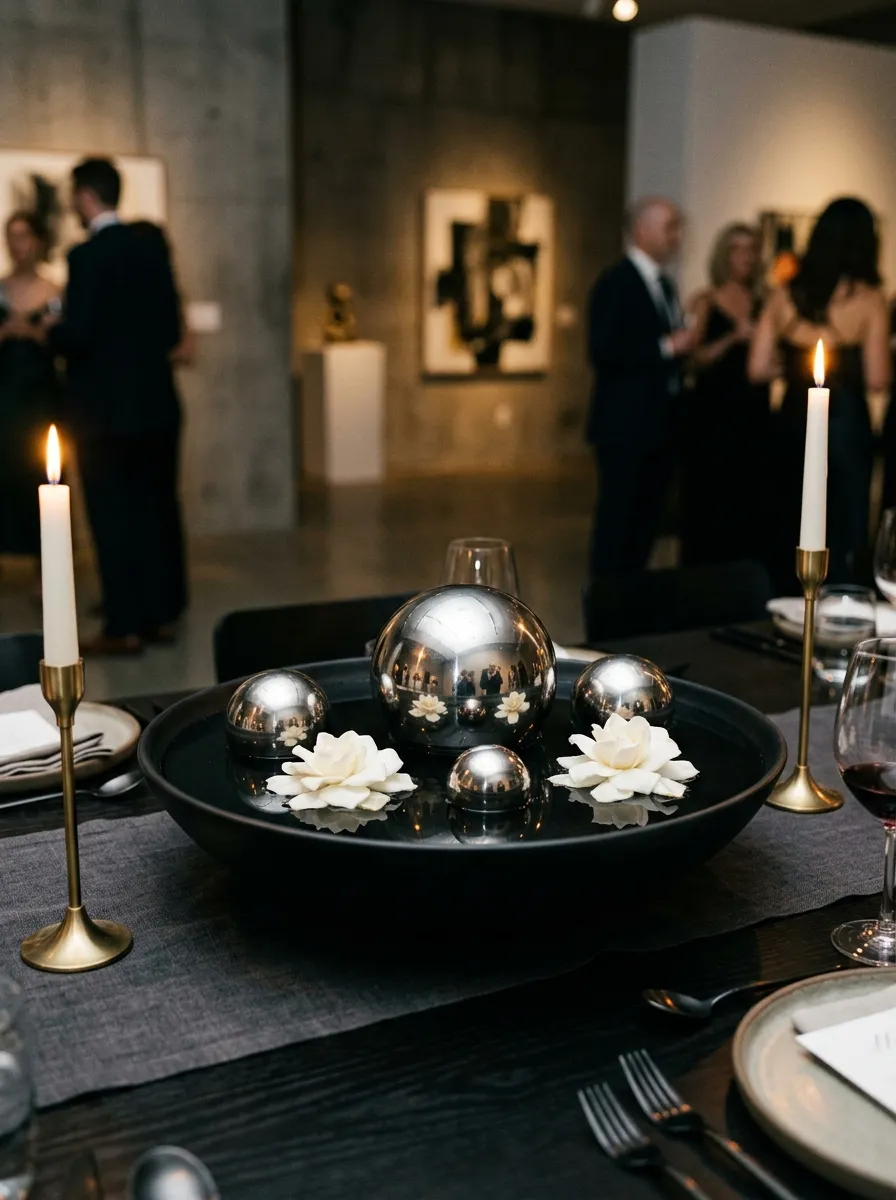
The floating mirrored sphere reflection basin explores water surface physics and light reflection to create a clean, modern tablescape. A wide, shallow ceramic or natural stone bowl is filled to the brim with dark, tinted water, upon which specialized seamless stainless-steel gazing spheres float effortlessly. The metallic globes mirror the entire room, capturing the warm glow of nearby taper candles and venue chandeliers on their curved liquid-metal surfaces. By keeping the botanical footprint minimal and relying primarily on smooth stone, water, and polished metal, this centerpiece delivers an uncluttered, modern presence. It is particularly well-suited for minimalist celebrations, evening art gallery weddings, and outdoor terrace dinners where clean surfaces and subtle water movement elevate the setting.
Select a wide, fourteen-inch shallow ceramic basin with a matte-black glazed interior and a flat, leak-proof base. Place the basin firmly in the center of the dining table, verifying that the tabletop is level using a compact pocket spirit level. Pour room-temperature water into the basin until the liquid reaches half an inch below the upper rim, adding three drops of liquid black floral dye to create a deep, dark reflective pool. Gently place three hollow, high-polish stainless-steel gazing spheres measuring four, three, and two inches onto the surface, allowing them to drift into a natural, asymmetric grouping. Float two large, pristine white gardenia blooms or open water lilies beside the mirrored spheres, allowing the fresh white petals to stand out against the dark water. Arrange four slender brass taper holders around the basin perimeter to cast flickering light reflections across the floating metallic spheres.
Common Beginner Mistakes and How to Avoid Them
The most widespread mistake when designing DIY ornament centerpieces is relying solely on glossy plastic holiday baubles, which can easily look like casual holiday decor rather than refined wedding design. To prevent an overly festive or cheap appearance, mix varied finishes—such as velvet-flocked, antiqued mercury glass, frosted, and satin surfaces—within a controlled color palette of three complementary tones. Another frequent error is failing to properly anchor loose spheres, resulting in centerpieces that shift or roll across the table when guests bump the furniture. Always stabilize base layers using hidden gray floral foam, clear silicone adhesives, or adhesive floral putty dots to keep every element securely in place. Beginners also often overlook table sightlines, piling ornaments into bulky towers that block across-the-table conversation. Keep arrangements either below the fourteen-inch eye-level threshold or elevate them above twenty-four inches on slender pedestals or suspended ceiling rigs. Finally, using heavy open flames directly alongside untreated acrylic or plastic ornaments presents a serious fire hazard; always enclose burning candle wicks inside protective glass hurricane chimneys that rise at least two inches above the open flame.
Practical Tips for Better Results
To achieve clean, professional results in your wedding centerpieces, focus on layering textures to create depth without relying on expensive fresh floral stems. Combine contrasting materials—such as rough wood bark, plush velvet spheres, waxy magnolia foliage, and reflective mercury glass—to create a balanced composition that captures light from all angles. When using fairy lights, choose warm-white micro-LEDs on thin copper or silver wire rather than cool-toned white bulbs, as warmer light flattering dining complexions and enhances gold and jewel tones. Remove all factory-stamped metal hanging caps from ornaments unless they are specifically needed for attachment, rotating the spheres so that glue marks and unfinished seams face toward the interior of the vessel. If your design incorporates fresh greenery alongside baubles, use water tubes on botanical stems to keep leaves crisp throughout long wedding celebrations without introducing loose water into the display. Finally, step back and view each centerpiece from seated eye level on all four sides during construction to ensure the arrangement looks balanced and complete from every guest’s perspective.
Styling, Presentation, or Organization Ideas
Styling your finished centerpieces effectively requires treating the entire tabletop surface as a single visual canvas. Frame your vessels with contrasting fabric runners—such as raw-edged silk chiffon, heavy woven linen, or crushed velvet—to anchor the centerpiece against the table surface and tie the look into the broader room decor. Pair central ornament bowls with varied accent lighting, arranging clear glass tea lights, fluted votives, and tall taper candles at alternating heights to create a warm, multidimensional glow across the table. Coordinate table paper goods, such as menus, table numbers, and place cards, with the centerpiece finishes by incorporating metallic wax seals, foil-stamped typography, or deckled-edge cotton cardstock. When decorating long banquet tables, repeat your centerpiece motif every four feet, filling the spaces between with low greenery garlands or small clusters of baubles to maintain visual continuity down the line. Finally, carry your centerpiece materials into surrounding venue spaces—such as the escort card display, lounge tables, and bar top—to weave a cohesive design narrative throughout the entire event space.
Budget or Time Planning
Creating your own ornament centerpieces offers significant savings compared to traditional wedding floristry, provided materials are sourced strategically and assembly timelines are managed with care. To maximize budget efficiency, purchase ornaments during post-holiday clearance sales or through wholesale commercial suppliers, securing cases of shatterproof and glass baubles at a fraction of retail prices. Sourcing foundational vessels—such as glass cylinders, pedestal bowls, and metal wire lanterns—from bulk event rental companies or secondhand wedding marketplaces significantly lowers your upfront hardware investment. Establish a structured production schedule: clean glassware, sort ornament bins, and pre-wire hanging elements four to six weeks prior to the wedding date, storing pre-assembled components in sturdy, labeled plastic storage totes away from direct sunlight. If incorporating fresh greenery or fruit accents, schedule that final layer of assembly for thirty-six hours before the ceremony to maintain fresh botanicals. Working in focused, assembly-line stages—such as prepping vessels, securing structural bases, and placing spheres—streamlines the crafting process, saving valuable hours during the final days of wedding preparation.
Creative Expansion and Advanced Inspiration
Once the foundational assembly techniques are mastered, crafters can explore advanced customizations to elevate their ornament wedding centerpieces further. Consider applying custom surface finishes, using water-based gold leaf sizing and loose variegated metal leaf sheets to transform simple glass globes into bespoke, hand-gilded art objects. Advanced makers can also explore custom calligraphy, using fine-tipped enamel paint pens to hand-letter guest names, table numbers, or romantic literary quotes directly onto matte-finish baubles, turning centerpieces into interactive takeaway favors. You can also experiment with suspended branch installations, wiring sandblasted manzanita branches or bleached birch limbs above the tables to hang delicate glass baubles and trailing crystal garlands from high-tensile aircraft cables. Post-event, centerpieces can be repurposed into holiday mantelpiece displays, seasonal door wreaths, or memory-box keepsakes, preserving the joy of your celebration for years to come. These creative adaptations transform everyday decorative items into meaningful, enduring reminders of your wedding celebration.