The wedding reception welcome table functions as the initial focal point where guests transition from the ceremony space into the celebratory evening atmosphere. In contemporary event design, this dedicated station establishes the aesthetic tone, communicates essential event details, and offers functional direction for attendees entering the venue. Readers will explore ten refined decorative concepts complete with technical construction methods, layout formulas, material pairings, and purposeful styling techniques. Mastering the architectural balance of this entrance feature ensures that elements such as guestbooks, card containers, ambient illumination, and floral arrangements assemble into an organized, cohesive vignette. Beyond pure visual impact, a thoughtfully composed entryway table provides practical direction by directing guest movement, managing gift drop-offs safely, and answering common spatial questions immediately upon arrival. The compact layout of a tabletop display makes it an achievable, highly rewarding project that transforms basic event furniture into an elegant decorative asset without requiring extensive construction timelines or specialized staging rentals. This comprehensive tutorial delivers actionable, field-tested guidance to construct durable, balanced, and memorable welcome table installations suited for modern wedding events.
Why This Idea Is Trending or Useful
Modern Pinterest inspiration places great emphasis on personal, immersive entryways because couples recognize that the entrance sequence defines the guest experience. The rise of intentional modern design and understated minimalist style has elevated the welcome table from an informal drop spot to a deliberate design statement. From a functional standpoint, an organized welcome table reduces reception congestion by consolidating the guestbook, escort cards, seating charts, and gift collections into a single, intuitive checkpoint. The DIY appeal of this feature is significant, as sourcing vessels, fabricating signs, and assembling tabletop flora allows couples to manifest creative ideas while controlling overall event budgets. Beginners appreciate this format because arranging a single tabletop requires less floral volume and lower labor overhead than large-scale ceiling or backdrop installations. Furthermore, welcome table elements easily transition into lasting home decor keepsakes, allowing custom trays, signage frames, and candle holders to find secondary life in domestic interiors after the celebration concludes.
Materials and Preparation
Executing a structurally sound, visually balanced welcome table requires gathering dependable materials tailored to withstand guest interaction and indoor or outdoor ambient conditions. Foundational hardware includes a sturdy wooden console or draped banquet table measuring between four and six feet in length, accompanied by secure floor weights if placed in breezy open-air foyers. Select neutral textiles such as textured linen, raw-edged gauze, or velvet runners to define the central surface plane while establishing tactile depth. Essential decor materials comprise assorted clear glass cylinder vases, heavy ceramic compotes, led pillar candles, acrylic or wood signage boards, liquid chalk or vinyl lettering, floral tape, foam bricks, and double-sided adhesive dots. Preparation requires measuring the designated reception entryway space to verify guest traffic clearances of at least four feet around all perimeter edges. Clean every glass vessel thoroughly using microfiber cloths to remove manufacturing film and fingerprints before staging. Sketch an initial floor plan identifying electrical outlets or battery provisions to guarantee consistent, uninterrupted illumination throughout the entire reception timeline.
1. Minimalist Monochromatic Acrylic Station
Setup Method
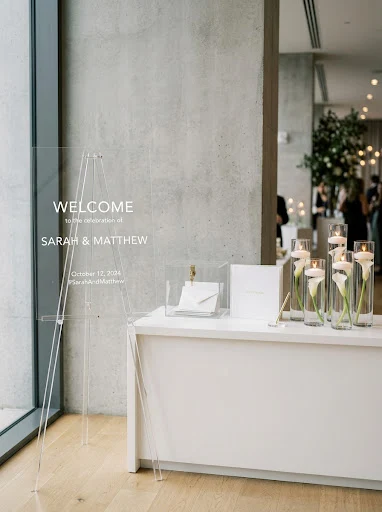
The minimalist monochromatic acrylic welcome station utilizes ultra-clean transparent components paired with crisp neutral typography to cultivate a sophisticated modern aesthetic. The architectural principle relies on spatial negative space, allowing the clean lines of clear lucite easels, clear card boxes, and translucent signage to blend seamlessly into architectural venue walls. To avoid a sterile presentation, the cool geometric surfaces are balanced against warm organic accents such as single-stem ivory calla lilies and pale beige ceramic pedestals. The signage features sharp sans-serif lettering applied in clean matte white vinyl, ensuring optimal legibility against any structural backdrop. By omitting dense, sprawling floral installations, this design honors refined minimalism where every single object carries intentional geometric weight and utilitarian purpose. This approach provides an approachable, highly practical framework for couples seeking an uncluttered entrance that aligns with modern art gallery, industrial loft, or urban boutique hotel wedding receptions.
Begin construction by positioning a smooth four-foot white laminate console or draped ivory pedestal table against a neutral architectural surface. Center a 24-by-36-inch cast-acrylic welcome board upon an acrylic floor easel adjacent to the left corner of the table, orienting the sign at a fifteen-degree angle toward arriving foot traffic. On the table surface, place an eighteen-inch matte ceramic tray on the right side to establish a contained perimeter for a clear slotted acrylic card box secured with a miniature brushed brass padlock. Run a single structural line of five varied-height glass cylinder vases containing submerged white blossoms along the back boundary of the table, spacing them precisely three inches apart. Insert ivory floating candles across the water surfaces, checking that wick heights remain uniform. Place an ultra-thin linen guestbook directly in the center foreground alongside an acrylic pen stand, securing the pen with a matching metallic tether to maintain neatness.
2. Terracotta and Dried Botanical Gathering
How to Make
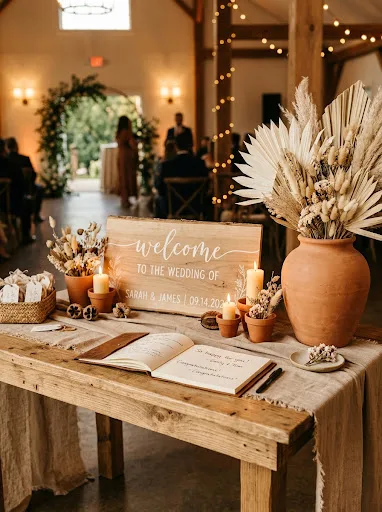
The terracotta and dried botanical concept relies on warm earth tones, tactile pottery, and resilient dried floral components to produce an inviting, organic reception entryway. This design concept celebrates natural textures by integrating sun-baked terracotta clay vessels, unbleached linen fabric runners, and architectural dried flora such as sun palms, pampas grass, and bleached ruscus. The color palette centers around warm rust, dusty ochre, soft taupe, and raw sand, making it exceptionally suited for autumn gatherings, desert venues, or rustic converted barn locations. Because the floral elements are completely dehydrated, the entire installation can be assembled days in advance without any risk of wilting, making it a stress-free DIY endeavor for couples coordinating their own reception setup. The raw, matte finish of the clay containers absorbs light, offering a gentle, grounded contrast to high-gloss reception decor while projecting timeless artisanal craftsmanship that invites guests to linger and sign the register.
Lay an unhemmed sand-toned linen runner down the center of an exposed wooden harvest table, intentionally creating gentle undulating folds along the edges to introduce soft visual texture. Position a large twenty-inch terracotta urn on the rear left corner of the table, inserting trimmed bleached palm spears, beige pampas plumes, and dried bunny tails into dry structural floral foam wedged tightly inside the vessel. On the opposing right side, set a horizontally framed birchwood welcome sign inscribed with warm white paint, resting the frame against a low, weighted clay brick to prevent accidental tipping. Down the central runner, cluster three short terracotta pots of descending sizes, each filled with smooth river stones and topped with ivory beeswax pillar candles of staggered heights. Lay a genuine leather-bound guest ledger open in the front center zone, flanking it with a small shallow terracotta dish containing matte black rollerball pens for guest signatures.
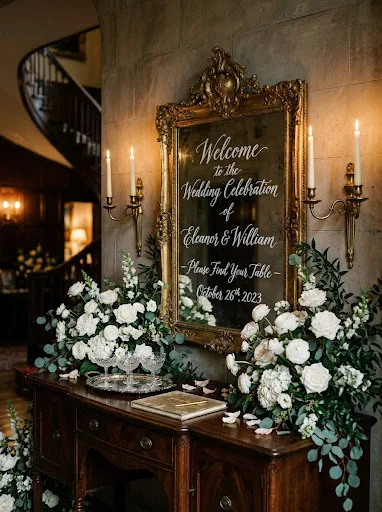
3. Romantic Vintage Gilded Mirror Entrance
Execution Process
The vintage gilded mirror installation introduces timeless antique grandeur by using ornate metallic framing and lavish romantic floral groupings as the reception’s greeting focal point. The central design anchor is a restored baroque-style wall or floor mirror, whose reflective surface amplifies venue ambient lighting while serving as the canvas for handwritten calligraphic welcome phrasing. Framing the reflective glass with asymmetrical groupings of garden roses, trailing ivy, and ranunculus creates an atmosphere of historic estate elegance. This arrangement relies on the interplay of reflective metallic surfaces, aged brass patina, and soft layered botanical forms, turning a simple entrance station into a popular photo opportunity for guests. The deep detailing of the scrollwork frame provides visual weight, allowing the tabletop beneath to remain balanced with delicate taper candles and subtle, low-profile decorative accessories that preserve sightlines toward the mirror text.
Position an ornate antique gold-framed mirror measuring at least thirty inches wide upon a heavy, dark mahogany entrance console, securing the upper frame to the wall using discreet safety tension straps. Use an oil-based white fine-point paint pen to write the couple’s names, event date, and welcome message directly onto the top-center quadrant of the glass pane, using a laser level to ensure perfectly horizontal typographic lines. Secure two heavy brass double-sconces or cluster three pairs of antique solid-brass candleholders bearing ivory taper candles across both sides of the console table, protecting the surface with small, invisible drip catchers placed under each candle base. Construct two low-profile floral arrangements in shallow oblong plastic dishes using wet floral foam, building out lush foundations of eucalyptus, white garden roses, and spray carnations. Seat these arrangements directly at the base of the mirror frame to conceal the mounting hardware while creating a natural organic threshold across the back table plane.
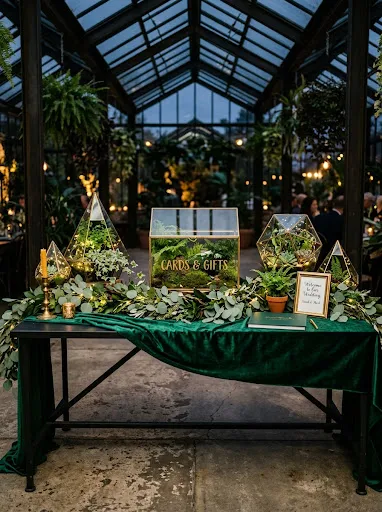
4. Modern Botanical Glasshouse Display
Step-by-Step Guide
The botanical glasshouse display draws inspiration from traditional conservatory architecture, highlighting living lush greenery, clear geometric glass terrariums, and luminous micro-string lighting. This design concept favors botanical abundance over floral color, relying on varied leaf shapes, heights, and shades of emerald, moss, and sage to establish an organic visual tapestry. Architectural glass-and-brass geometric terrariums serve as both functional decorative containers and protective enclosures for candles or card envelopes, maintaining structural organization across the surface plane. This aesthetic suits modern greenhouse venues, industrial warehouse spaces, and outdoor garden terraces where couples want the welcome table to blend harmoniously into the surrounding plant landscape. The absence of cut perishable blooms maximizes durability against climate variations while delivering a fresh, verdant atmosphere that feels vibrant, clean, and effortlessly sophisticated from cocktail hour through the late-night departure.
Begin by rolling out a deep hunter-green velvet runner across a five-foot matte black metal console, allowing eight inches of textile to drape evenly over both terminal ends. Anchor the center rear with a house-shaped brass-and-glass wedding card terrarium fitted with an upward-swinging hinged roof, padding the interior floor with a thin layer of preserved reindeer moss to cushion falling envelopes. Flank the central terrarium with four geometric multifaceted glass cloches, housing varied potted house plants including maidenhair ferns, trailing string of pearls, and miniature calatheas within simple ceramic pots hidden by moss. Weave a dense garland of fresh silver dollar eucalyptus and Italian ruscus around the base of every glass structure across the entire length of the table. Weave two warm-white micro-LED copper fairy light strands through the botanical foliage, hiding the battery switches discreetly underneath the fabric folds of the velvet runner to produce an uninterrupted, luminous green landscape.
5. Coastal Driftwood and Sea Glass Welcome
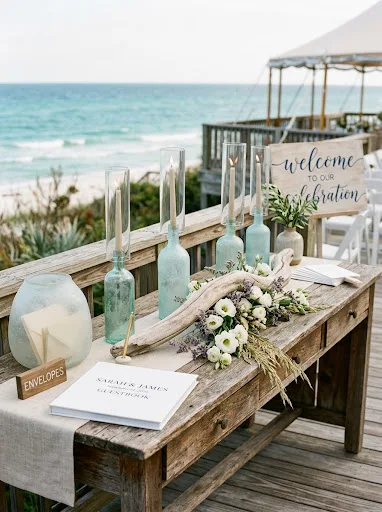
How to Make
The coastal driftwood and sea glass welcome station evokes relaxed nautical elegance without resorting to kitschy thematic motifs, prioritizing weathered textures, sea glass tones, and windswept florals. The design concept pairs ocean-tumbled wooden structural branches with translucent ocean-blue and frosted seafoam glassware, capturing the tranquil palette of coastal shorelines. Clean linen runners mimic sandy tidal shores, while soft off-white taper candles enclosed within tall wind-resistant hurricane chimneys guarantee functional lighting against ocean breezes. This layout provides an ideal entrance feature for beachfront resorts, cliffside lawns, or coastal yacht clubs, establishing a breezy yet refined ambiance that instantly relaxes arriving guests. By using durable natural elements alongside weighted glass decor, this setup effectively addresses the logistical challenges of outdoor shoreline environments while maintaining high-end visual continuity and practical event hospitality.
Set up an unpainted weathered cedar table or a sand-colored linen-draped surface positioned securely away from direct wind tunnels near the reception entry patio. Lay down a wide, smooth-tumbled piece of bleached coastal driftwood measuring roughly three feet in length diagonally across the back third of the tabletop to form an organic structural shelf. Thread soft stems of sea lavender, white lisianthus, and coastal sea oats beneath the natural arches of the wood branch, anchoring the stem ends in water-filled floral tubes hidden under the driftwood contours. Arrange six frosted seafoam and pale aqua recycled-glass bottles of varying dimensions around the wood, using them to hold slim linen-colored taper candles shielded by tall cylindrical glass wind guards. Place a square matte-white wooden guestbook printed with navy typography at the center front, styling the left corner with an oversized frosted glass vessel designated for gift cards and well-wishes.
6. Industrial Chic Wire and Edison Bulb Station
Execution Process
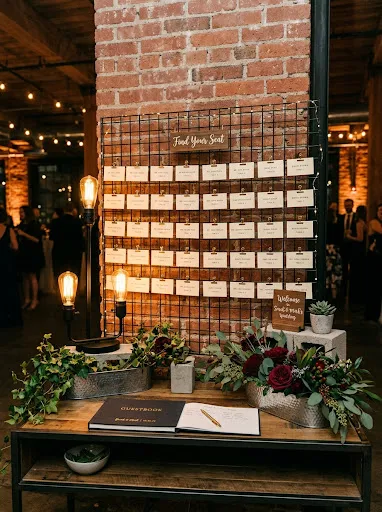
The industrial chic wire and Edison bulb station uses architectural metal profiles, structural grid framing, and warm filament lighting to forge a bold contemporary focal point. This concept thrives on high structural contrast, pairing matte black iron hardware with the warm, nostalgic glow of exposed carbon-filament bulbs and raw concrete finishes. Suspended wire mesh panels or black wire desktop easels hold escort cards or welcome signage with miniature brass binder clips, turning administrative event organization into an engaging decorative display. The aesthetic aligns effortlessly with converted textile mills, urban brick spaces, and contemporary industrial lofts, celebrating structural elements rather than concealing them beneath layers of drapery. The strong verticality of the wire frameworks draws eyes upward, effectively balancing high ceilings and substantial architectural proportions while keeping the physical tabletop surface free for guestbook signing and gift handling.
Assemble an eight-foot freestanding black iron backdrop stand directly behind a four-foot raw steel or reclaimed wood console table, hanging a customized metal mesh grid panel securely in the center. Use small brass bulldog clips to mount guest seating cards in alphabetical order across the upper rows of the wire grid, leaving the lower section open to showcase a suspended neon or laser-cut acrylic welcome plaque. On the tabletop, place two substantial cast-concrete blocks on opposing sides, using them as sculptural bookends to anchor stacks of architectural books or hardbound photo guestbooks. Integrate three matte-black desktop task lamps fitted with amber-tinted dimmable vintage Edison loop-filament bulbs, positioning them to shine indirect, glare-free light across the guest signature ledger. Intersperse the base with miniature hammered metal troughs holding deep green trailing ivy and black baccara roses, softening the metal framework while preserving the sharp industrial edge.
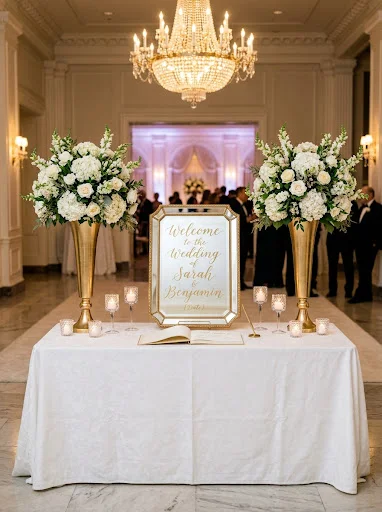
7. Classic White and Gold Grand Estate Entrance
Setup Method
The classic white and gold estate entrance represents timeless formal bridal decor, employing symmetrical balance, polished metallic accents, and pristine monochromatic floral arrangements. This architectural layout is rooted in traditional design rules, featuring identical floral vessels flanking a central decorative element to evoke immediate order and sophistication. The color system uses pure white blooms, rich foliage greens, and reflective polished gold, creating an upscale visual impact that enhances formal ballrooms, private country clubs, or historic historic manors. Elevated urns lift grand floral arrangements above the eye line of seated or standing guests, preventing the display from obstructing foot traffic while keeping the tabletop clear for practical use. This regal approach communicates prestige and exceptional hospitality, reassuring guests of an orderly, beautifully planned evening from the moment they cross the reception threshold.
Position a five-foot white wooden console table covered in a floor-length tailored white damask tablecloth in the reception foyer, ensuring all hem edges hang exactly one inch above the finished floor. Place two identical twenty-four-inch polished gold trumpet vases at the far left and right rear corners of the table surface, anchoring each base with internal lead weights for stability. Fill each vase with a high-density, rounded floral arrangement composed of white hydrangeas, cream garden roses, white snapdragons, and glossy lemon leaf greenery conditioned with floral preservation mist. Between the twin urns, position a custom-framed bevel-edge mirror displaying the evening itinerary printed in reflective gold leaf calligraphy across its center. Array an even line of eight crystal glass votive holders containing slow-burning tea lights across the front perimeter, framing an ivory silk-bound guestbook accompanied by a heavyweight gold rollerball pen seated in a matching weighted brass receptacle.
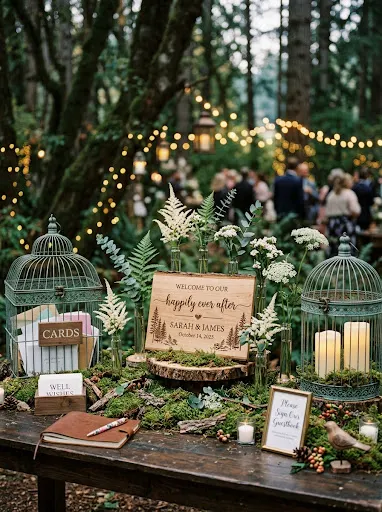
8. Whimsical Fairytale Moss and Woodland Display
Step-by-Step Guide
The whimsical fairytale woodland display transforms the reception entrance into an enchanted natural grove through organic wood contours, live moss beds, and woodland botanicals. This design concept abandons rigid geometric symmetry in favor of fluid, asymmetrical pathways that guide the eye across various botanical discoveries. Rich emerald sheet moss, preserved pillow moss, natural tree rounds, and delicate woodland flowers like hellebores, astilbe, and ferns create a rich forest floor texture across the table surface. This aesthetic is tailored for outdoor woodland receptions, botanical gardens, and cozy rustic settings, creating an intimate, magical atmosphere that invites playful exploration. Incorporating natural wooden bark textures alongside delicate, micro-illumination elements generates a warm storybook ambiance that captivates attendees and serves as a distinctive decorative signature for couples who cherish outdoor, woodland landscapes.
Begin by covering a rustic dark timber table with a protective waterproof plastic sheet, layering a continuous blanket of preserved emerald sheet moss directly over the liner to conceal the synthetic base. Build three vertical tiers on the left side of the table using stacked cross-cut tree rounds of varying diameters, ensuring each platform sits completely level to avoid wobbling. Display the reception welcome message on a custom pyrography wood slice perched on the highest wooden tier, supported by an unseen miniature wooden folding easel behind it. Intersperse small glass vial flower spikes directly into the moss layer across the table, filling each vial with water and single stems of white astilbe, purple hellebores, and maidenhair fern fronds to appear as though growing straight out of the moss. Place two antiqued verdigris-finish metal wire birdcages on the table surface, filling one with wedding card envelopes and the other with a warm cluster of flickering flameless candles.
9. Modern Bohemian Macramé and Rattan Station
How to Make
The modern bohemian welcome station combines warm artisanal textile craft, woven wicker structures, and sun-bleached neutral tones to create an inviting, relaxed atmosphere. The aesthetic centers around woven rattan display stands, hand-knotted macramé accents, and light-toned bentwood furniture, offering rich surface texture without relying on harsh color contrasts. A gentle palette of oat, ivory, bleached straw, and warm clay unifies the disparate artisan materials into a cohesive decorative framework. This design concept thrives in open-air garden settings, relaxed beach clubs, and contemporary bohemian venues where couples value handcrafted tactile artistry and welcoming warmth. The organic woven construction offers an accessible path for DIY couples to integrate handcrafted textile pieces into their event, resulting in a stylish reception checkpoint that doubles as a memorable, picture-perfect design feature.
Set a light-toned natural rattan side table or bentwood console against a neutral outdoor partition or a suspended cotton macramé hanging backdrop. Place an arched woven rattan frame holding a printed linen welcome fabric panel toward the rear center of the table, weighting the frame base from behind with a concealed canvas sandbag. Along the right side, position an open-weave wicker laundry or storage basket lined with a structured calico bag, attaching a laser-cut wooden label identifying the basket as the secure depository for cards and small gift parcels. Drape a loose, hand-woven macramé runner diagonally over the left front corner of the table, setting an artisanal unglazed pottery vase filled with dried palm spears and bleached pampas fronds atop the textile fringe. Position a debossed recycled-paper guestbook flat on the table, offering guests an earthy wooden twig-style ballpoint pen held neatly within a small turned-wood bowl.
10. Moody Celestial Midnight and Starfall Display

Execution Process
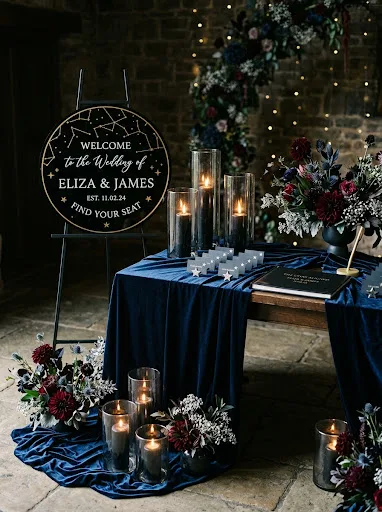
The moody celestial midnight display channels after-dark drama by pairing deep midnight tones, dark romantic florals, and sparkling stellar illumination. This concept turns away from conventional white wedding themes, using rich backgrounds of indigo, ink-black, or deep celestial blue accented with reflective silver and gold metallic accents. Hand-painted acrylic signs featuring gold leaf star maps and celestial constellations catch directional light, acting as luminous decorative anchors across the entrance layout. The floral palette incorporates dramatic, deep-toned blooms including deep black calla lilies, dark burgundy dahlias, and blue thistle, interspersed with starry sprays of gypsophila. This installation suits evening urban ceremonies, winter receptions, and planetarium venues, creating an immersive, dramatic entry that prepares guests for an energetic night of celebration beneath celestial design details.
Drape a five-foot entrance table in deep midnight-blue velvet, allowing the rich fabric to pool slightly on the venue floor for a decadent, draped finish. Position a circular black-acrylic welcome disc decorated with shimmering metallic gold star constellations and modern white lettering on an angled black metal display easel at the center back. Flank the circular sign with two dark smoky-gray glass hurricane lanterns containing tall black pillar candles, ensuring the glass chimneys are tall enough to shelter the flames safely from passing movement. Intersperse clusters of silver-sprayed baby’s breath, dark burgundy ranunculus, and blue eryngium thistle along the base of the sign using low black ceramic floral boats filled with wet foam. Distribute twelve mirror-finish silver star-shaped place-card holders across the table surface to display guest instructions, finishing the arrangement with a black leather guestbook paired with an opaque metallic gold ink pen for striking signatures.
Common Beginner Mistakes and How to Avoid Them
A frequent mistake made by beginners designing welcome tables is failing to account for physical foot traffic flow, placing wide tables directly in tight doorway passages. This positioning causes immediate spatial bottlenecks as guests stop to sign books or drop gifts, blocking other attendees from entering the reception room. Prevent this issue by maintaining a four-foot clearance around the station and orienting the table angled slightly outward into open foyer space. Another common design error is clustering decorative objects of identical heights, creating an uninspired, flat horizontal visual line across the table surface. Build dynamic visual interest by varying object heights across three clear levels: tall elements at the back, medium items in the midground, and flat ledgers in the foreground. Additionally, couples often neglect functional visibility, using dim ambient accent lighting that makes reading and writing difficult for older guests. Test illumination levels beforehand, incorporating bright, discreet LED spotlights or functional task lamps focused on guestbooks and card drop slots so guests can write and interact without struggling in the dark.
Practical Tips for Better Results
Achieving a polished, professional entrance display requires strict attention to material resilience, functional usability, and concealed mechanics. Always prioritize heavy, weighted display stands, secure easels, and heavy vessels; passing guest bags, coats, and unexpected outdoor wind gusts can quickly knock over lightweight frames and loose papers. When crafting custom signage, use high-contrast color pairings such as opaque white lettering on dark wood or dark acrylic to ensure effortless legibility from several paces away. Anchor runners, ribbons, and surface floral dishes to tabletops using removable museum wax or double-sided silicone mounting putty, preventing accidental shifts during hours of guest interactions. If open-flame wax candles are prohibited by venue fire codes, source realistic silicone-dipped LED candles with moving wick effects, grouping them in glass hurricanes to maintain an authentic warm glow. Finally, prepare a dedicated guestbook utility caddy underneath the table containing replacement pens, extra guestbook pages, clear adhesive tape, and paper towel packs to manage quick repairs seamlessly during the event without disrupting the aesthetic presentation.
Styling, Presentation, or Organization Ideas
Elevate the reception entrance from a simple utility desk to an integrated decorative installation by extending design elements beyond the tabletop plane. Hang sweeping overhead floral boughs, paper lanterns, or customized fabric banners directly above the table to frame the area and draw arriving eyes toward the station. You can also anchor the lower perimeter by clustering varying sizes of floor lanterns, galvanized vintage crates, or potted structural plants around the table legs, effectively concealing utility cords while building rich visual depth from the ground upward. When organizing the tabletop layout, separate functional tasks into distinct zones to prevent clutter during peak arrival times. Position the card box and gift drop area on the far left, reserve the center for the primary welcome message and floral centerpiece, and designate the right side for the guestbook and pen station. This linear workflow guides guests through reading, depositing gifts, and signing sequentially, preventing awkward delays and keeping the display orderly throughout the entire cocktail hour.
Budget or Time Planning
Creating an impressive reception welcome table does not require an enormous financial investment if you plan purchases systematically and source materials with an eye toward future utility. Save significantly on decor expenses by selecting decorative items that transition easily into post-wedding home decor, such as entryway mirrors, ceramic planters, functional storage trays, and metal lanterns. Rather than ordering large, bespoke floral arrangements, craft your own tabletop botanical accents using inexpensive loose greenery branches like salal, ruscus, and eucalyptus, adding just a few premium focal blooms into concealed water vials for maximum visual impact at minimal cost. Allocate your planning and preparation schedule across a manageable four-week timeline: finalize signage graphics and lettering during week one, gather hardware, lighting, and textiles in week two, conduct a full tabletop mock assembly in week three, and pack everything into labeled storage bins by week four. On the wedding day, assign a trusted friend or coordinator thirty minutes to position the pre-assembled components, ensuring everything is staged and lit well before the first guests arrive.
Creative Expansion and Advanced Inspiration
Once you master the fundamentals of balanced tabletop layout, you can expand the welcome table concept into interactive, experiential guest arrival hubs. Transform traditional guestbooks into engaging multimedia stations by integrating instant-print analog film cameras, custom metallic ink stamps, and adhesive photo pockets directly into the tabletop arrangement. For evening receptions, add modern interactive tech by embedding discreet, elegant QR codes into framed signage, allowing guests to upload smartphone ceremony photos directly to a live digital reception gallery. You can also adapt these ten decorative concepts for other celebration milestones, scaling the styling formulas to adorn bridal shower gift stations, anniversary dessert displays, or milestone birthday check-ins. Introducing elevated sensory details—such as scented linen mists, discreet ambient background acoustics, or specialty welcome beverage trays placed alongside greeting signs—turns a static visual display into a memorable, multi-sensory reception experience that sets a joyful, hospitality-driven tone for the celebration ahead.