Wine bottles provide an adaptable foundation for event decor, serving as structured glass vessels that anchor dining layouts and floral arrangements. Upcycling glass bottles allows hosts to create…
Wine bottles provide an adaptable foundation for event decor, serving as structured glass vessels that anchor dining layouts and floral arrangements. Upcycling glass bottles allows hosts to create balanced centerpieces that support various aesthetic themes, from rustic barn receptions to modern minimalist celebrations. This complete guide provides step-by-step instructions for preparing, decorating, and styling glass bottles into elevated decorative focal points for reception tables. Readers will learn practical surface treatments, secure floral assembly methods, dynamic lighting applications, and structural cluster styling techniques. Repurposing wine bottles reduces wedding decor expenditures while maintaining a unified, professional appearance across all guest tables. Standardized glass dimensions ensure consistency across multiple reception tables, while variations in paint finishes, twine wraps, metallic foils, and greenery inserts offer complete creative freedom. By exploring structured decorative methods, planners and couples gain the confidence needed to produce reliable, handmade table focal points without relying on expensive professional rental services. The following concepts demonstrate how simple upcycled glass vessels integrate with candles, fresh foliage, and textured craft elements to create visually compelling reception tablescapes.
Why This Trend Dominates Event Decor
The popularity of wine bottle centerpieces on modern inspiration boards stems from their blend of resourcefulness, clean lines, and structural versatility. Modern wedding styling prioritizes sustainable, personalized elements that eliminate single-use plastics without sacrificing elevated event design. Glass wine bottles are readily accessible through personal collection, local venues, or community sourcing, making them an approachable DIY option for novice decorators. Their vertical height creates natural visual interest on dining tables, drawing the eye upward while keeping the horizontal footprint compact enough for place settings and dinnerware. This proportional balance accommodates both expansive banquet layouts and intimate round reception tables without obstructing guest views across the room. Furthermore, glass surfaces readily accept diverse artistic treatments, including chalk-style paint, metallic leafing, twine cordage, and translucent frosted coatings. Whether a planner aims for an organic countryside aesthetic, a structured industrial look, or an understated contemporary layout, repurposed bottles adapt seamlessly. The design flexibility, combined with minimal raw material costs, makes this upcycled decor strategy a staple for planners seeking striking visual impact within realistic event budgets.
Materials and Structural Preparation
Creating consistent, high-end centerpieces requires methodical preparation of the raw glass components alongside standard crafting supplies. Planners need clean glass bottles, non-toxic adhesive remover, warm soaking water, baking soda, heavy-duty utility razor blades, and micro-grit sandpaper. Secondary decorative materials include multi-surface matte spray paints, liquid acrylics, natural jute twine, heavy cardstock for table markers, floral wire, pruning shears, and battery-operated warm micro lights. Workspace preparation is essential for maintaining uniform quality across dozens of identical centerpieces. Establish a dedicated cleaning station equipped with a deep plastic tub to soak glass vessels, allowing labels and water-soluble adhesives to soften fully before scraping. Use a razor scraper at a forty-five-degree angle to lift stubborn paper remnants without scratching the underlying glass. Wipe down every bottle with isopropyl alcohol to remove lingering hand oils and residue, ensuring paints and liquid adhesives bond securely. Calculate table layouts in advance to determine exact bottle quantities, factoring in extra backup units for testing paint coats or unexpected glass breakage during transport and assembly.
Idea 1: Frosted Amber Botanical Solitaires
Step-by-Step Guide
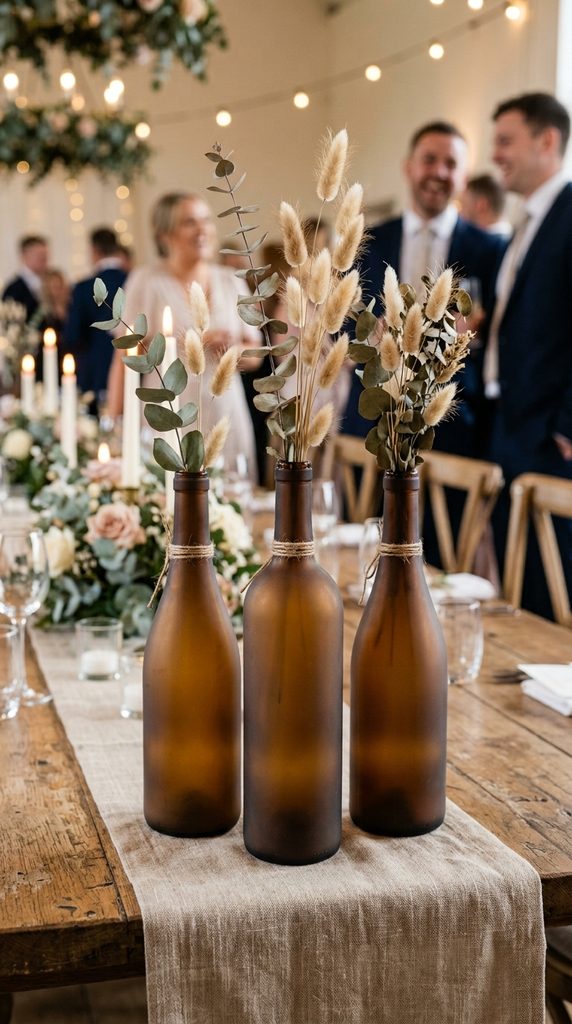
Amber glass bottles introduce warm, diffused undertones that balance neutral reception linens, providing an organic anchor for single-stem floral arrangements. This minimalist style highlights singular, architectural botanical elements such as dried eucalyptus sprigs, bleached bunny tails, or fresh protea blooms. The amber tint moderates interior light, subtly obscuring water lines and submerged stem ends to preserve clean visual lines on the tabletop. Frosted surface finishes diffuse overhead venue chandeliers, casting soft, non-reflective shadows across tablecloths. Arranging three amber bottles of slightly varying neck heights creates an asymmetric visual cluster that draws the eye across the horizontal space. This concept suits rustic barn venues, modern desert settings, and autumnal gatherings where earthy tones establish a cohesive ambiance. The structural simplicity allows guests to converse across the table without sightline blockages, bridging practical dinner seating with intentional artistic styling. The uniform amber glass coordinates effortlessly with brass flatware, raw linen napkins, and naked wood farm tables, establishing a polished foundation across all guest tables.
Begin by sourcing uniform twenty-four-ounce amber glass bottles, ensuring all factory print and adhesive residues are thoroughly cleared using warm water and adhesive solvent. Clean the exterior surfaces with an alcohol wipe, then place the bottles upside down on wooden dowels anchored in cardboard to allow complete exterior access. Apply two light, sweeping coats of translucent sea-glass frost spray paint from an even distance of twelve inches, resting ten minutes between applications to prevent paint drips. Once fully cured after twenty-four hours, trim fresh silver dollar eucalyptus branches so the lowest foliage clears the bottle mouth by two inches. Insert a single floral tube filled with fresh water into the neck if using living botanicals, or place dried floral sprigs directly into the dry vessel. Position the finished bottles in odd-numbered clusters along the center of long farmhouse tables, weaving a loose silk runner around the bases to soften hard structural edges.
Idea 2: Metallic Gold Dipped Ombre Towers
How to Make
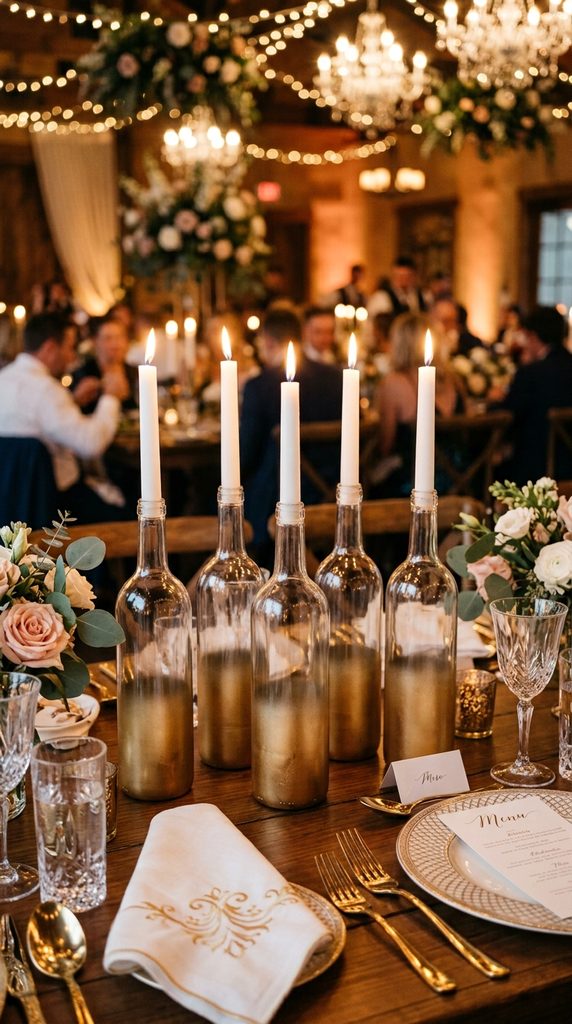
Metallic accents elevate everyday glass vessels into radiant, contemporary decorative assets that capture evening ambient lighting. The gold-dipped ombre technique balances clean, unpainted transparent glass with opulent, reflective metallic leafing or paint. This approach creates a two-tone gradient that begins as an opaque reflective base and transitions upward into translucent glass toward the bottle shoulder. When reception venues dim their architectural lighting for evening activities, these metallic bases catch low table candlelight, casting shimmering patterns across dinnerware and table numbers. The sharp contrast between metallic finishes and clear glass modernizes traditional ballroom settings, adding structural formality without requiring expensive floral installations. Using bottles with elongated necks accentuates verticality, allowing planners to anchor high table numbers or taper candles safely above food displays. This aesthetic complements classic white-and-greenery palettes, modern monochrome styling, or black-tie decor schemes that prioritize reflective metallic elements alongside crisp pressed textiles.
To execute the metallic ombre effect, collect twenty to thirty clear Bordeaux-style wine bottles, verifying that the glass is free of structural chips or microcracks. Thoroughly wash the exterior with degreasing soap, dry completely with lint-free microfiber towels, and measure three inches up from the bottle base using light chalk marks. Wrap the upper neck loosely in protective craft paper, securing it with low-tack painter’s tape to shield the mouth from stray paint particles. Holding a premium metallic gold multi-surface enamel paint twelve inches away, spray the bottom base with two solid, opaque coats, gradually tilting the can upward to disperse a soft, misty gradient across the midsection. Allow the enamel to cure for forty-eight hours in a dust-free, well-ventilated staging area before handling. Complete the centerpiece by sliding a twenty-millimeter pure beeswax taper candle into the mouth, securing the base firmly with a few drops of melted wax to guarantee upright stability throughout the event.
Idea 3: Textured Jute and White Lace Sleeves
Execution Process
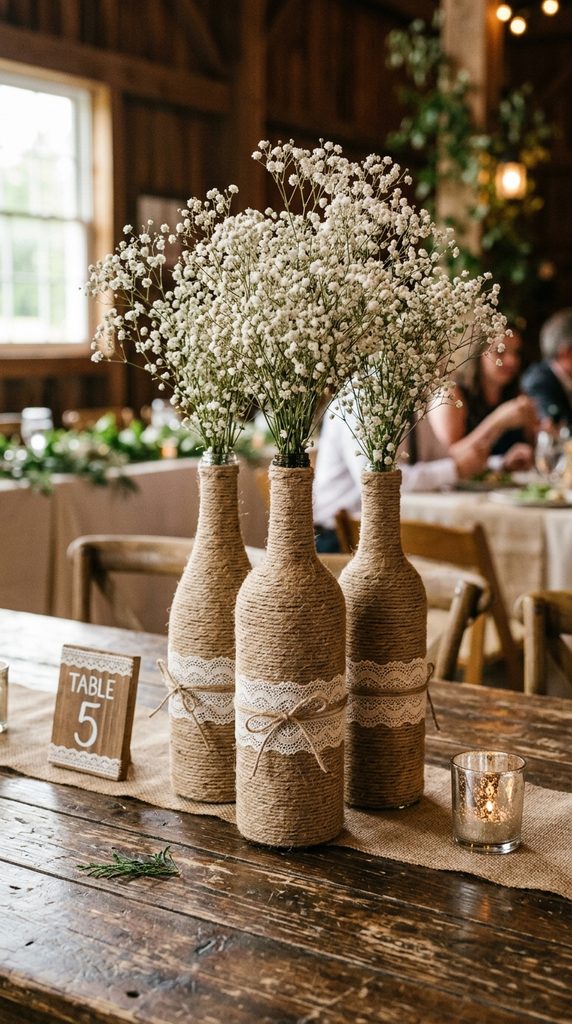
Rustic wedding decor benefits from contrasting, tactile materials, and wrapping smooth glass in rough fibers delivers timeless charm. This design pairs raw, natural jute cordage with delicate white floral lace ribbon, establishing a farmhouse aesthetic grounded in vintage handicraft. The dense wrapping conceals the interior of standard green or clear glass bottles, enabling decorators to mix and match irregular bottle silhouettes without producing a mismatched visual effect. The matte texture of jute absorbs harsh flashes from wedding photography, preventing unwanted glare across table settings while adding organic depth to white tablecloths. When combined with light-toned blooms such as baby’s breath, white garden roses, or chamomile daisies, the brown fiber offers an earthy backdrop that makes delicate flower petals pop. This handcrafted design suits vineyard pavilions, garden receptions, and restored barn environments where warm, natural materials echo architectural timber and open outdoor landscapes.
Commence construction by cleaning your assortment of salvaged bottles, selecting vessels with straight cylindrical midsections that accept flat wraps without bubbling or slipping. Secure the initial end of a two-millimeter natural jute spool at the bottle base using a precise bead of industrial high-temperature hot glue. Wind the cord tightly around the glass exterior, pressing each successive row firmly against the preceding loop to eliminate any visible glass gaps beneath. Continue winding the cord upward until reaching the shoulder taper, cutting the twine and securing the final end with an unobtrusive dab of adhesive on the back-facing side. Wrap a two-inch-wide band of white floral cotton lace around the center circumference of the jute-covered cylinder, adhering the overlapping ends with fabric glue. Fill the vessel with clean water and insert a tight, rounded bouquet of dried white gypsophila, trimming the stems so the blossom canopy rests just three inches above the bottle opening.
Idea 4: Matte Blackboard Table Number Pedestals
How to Create
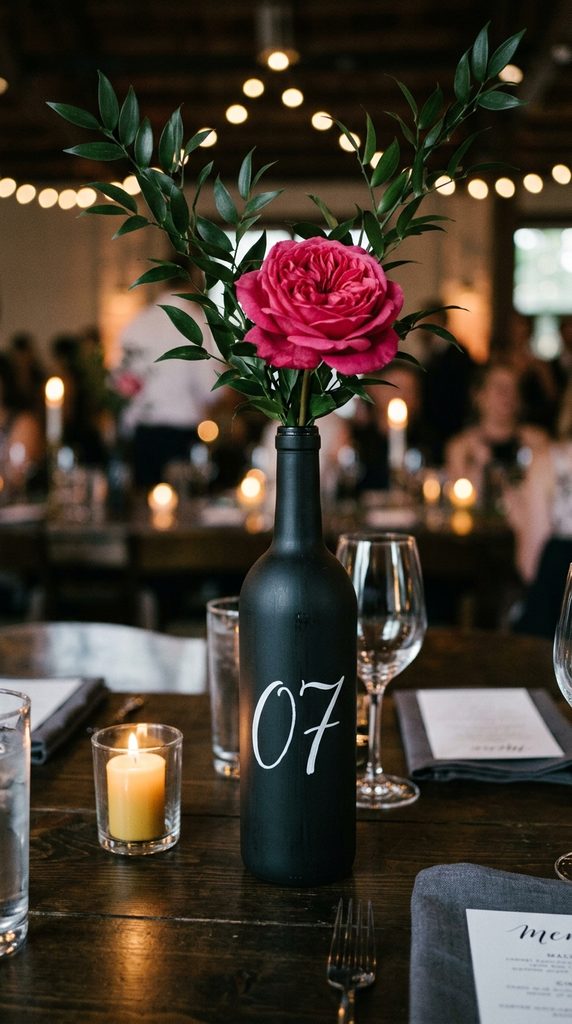
Combining table identification with decorative floral vessels reduces tabletop clutter while maintaining clear structural navigation for banquet service staff. Matte chalkboard paint transforms utilitarian glass into functional, writable pedestals that display table numerals, personalized dinner menus, or seating directions. The non-reflective, deep-matte surface establishes an architectural silhouette that looks crisp against pastel runners and natural floral foliage. This multi-purpose centerpiece solution is valuable for high-density banquet seating where space for separate table frames, floral arrangements, and condiments is limited. Chalk-painted glass harmonizes with industrial, rustic, and modern minimalist reception styles, depending on whether the lettering is penned in precise geometric fonts or organic hand-lettered calligraphy. The dark background emphasizes vibrant floral colors, allowing pink peonies, yellow sunflowers, or deep red ranunculus to stand out vividly against the matte dark base.
Prepare twenty uniform wine bottles by removing paper labels and wiping the surfaces clean with acetone to ensure flawless paint adhesion. In a ventilated workspace, spray each bottle with an oil-based primer specifically formulated for smooth glass surfaces, allowing it to dry for four hours. Follow the primer with three ultra-thin coats of premium matte chalkboard spray paint, applying each layer horizontally across the surface and waiting twenty minutes between passes to eliminate paint runs. After curing for twenty-four hours, condition the painted finish by rubbing the flat side of a white chalk stick over the entire surface, then buffing it clean with a dry rag. Use a fine-tip liquid chalk paint marker and an acrylic typography stencil to render crisp, centered table numerals on the front face of each bottle. Insert a single stem of bright pink garden rose alongside two sprigs of dark Italian ruscus into the neck, providing a balanced botanical cap to the structural marker.
Idea 5: Submerged Micro-LED Luminous Columns
Setup Method
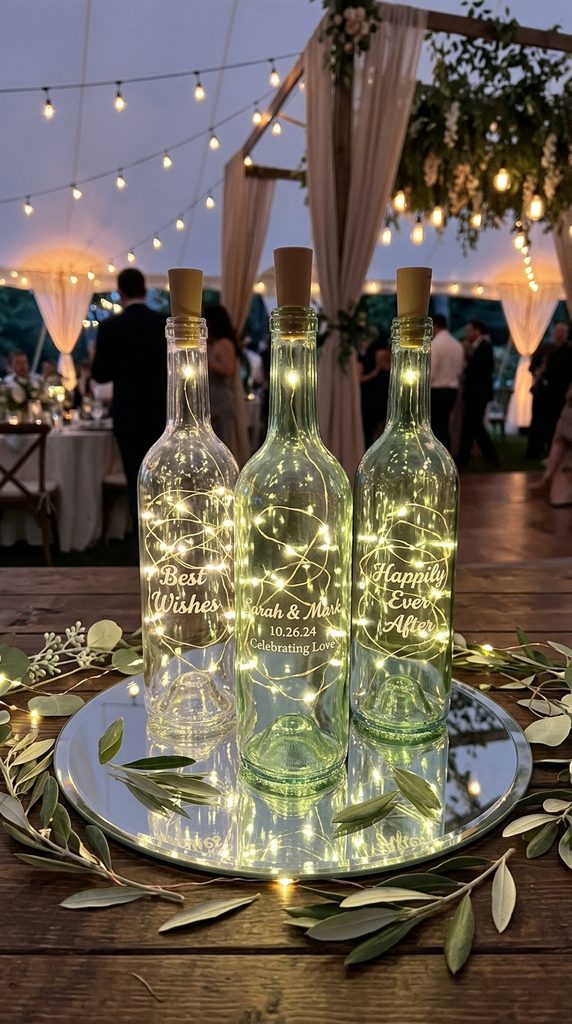
Internal illumination turns standard wine bottles into radiant light columns that bring warmth to evening receptions without the fire risks of open tapers. By threading battery-operated micro-LED copper fairy lights directly into clear or colored glass, decorators create luminous table anchors that produce a soft, 360-degree ambient glow. The glass walls refract point-source lighting, casting delicate geometric patterns across neighboring plates, crystal glassware, and polished cutlery. This approach shines in dimly lit indoor banquet spaces, tented nighttime receptions, and historic ballrooms where open flame permits are restricted by venue regulations. The lights operate independently of external power outlets, hiding battery packs cleanly within faux cork stoppers seated at the bottle mouth. Paired with polished mirrors or metallic charger plates, these radiant towers amplify ambient light levels, generating a romantic and welcoming dinner setting.
Select pristine clear or soft green claret bottles, thoroughly cleaning the interiors with hot soapy water, shaking dry, and allowing internal condensation to evaporate completely. Obtain specialized micro-LED fairy light strands built directly into tapered silicone cork battery stoppers, testing each unit before installation to verify battery life and light output. Carefully feed the flexible silver or copper wire downward into the bottle mouth, allowing the wire to bunch organically throughout the base, center, and shoulder areas. Seat the cork stopper flush inside the bottle opening, ensuring the tiny operational power toggle switch remains accessible at the top rim. Place three illuminated bottles upon a round, beveled-edge glass mirror platter at the center of each table, surrounding the glass bases with scattered, loose olive leaf foliage. Activate the warm-white LEDs approximately thirty minutes before guest arrival, ensuring bright, consistent illumination that lasts throughout the dinner and evening dancing.
Idea 6: Terracotta Clay Ceramic Texture Finishes
How to Make
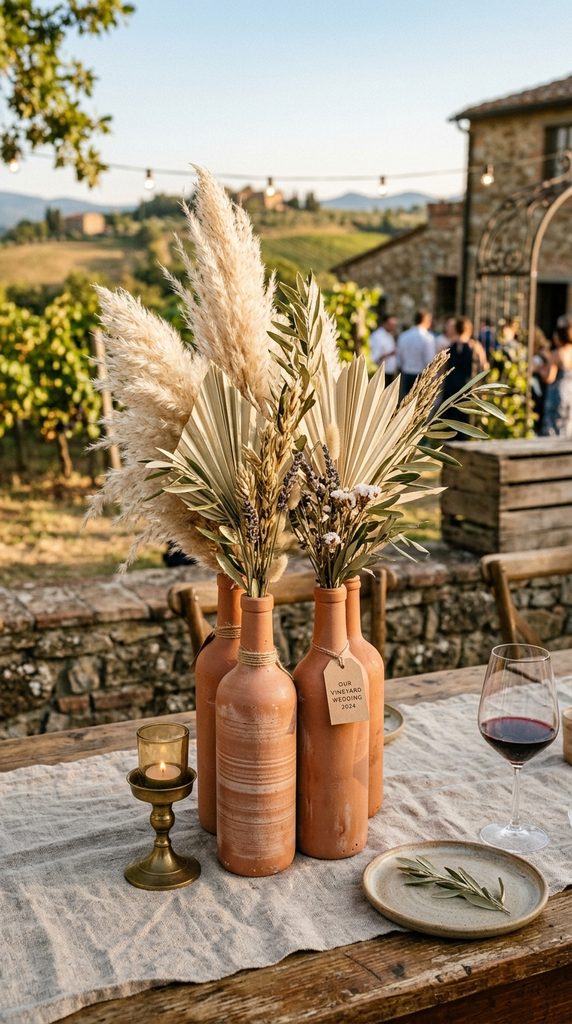
Faux terracotta and ceramic surface treatments bring the tactile beauty of handcrafted pottery to affordable upcycled glass vessels. By blending water-based acrylic paint with fine baking soda, crafters can produce a textured, stone-like slip that clings to non-porous glass surfaces. This treatment conceals the commercial silhouette of standard wine bottles, transforming them into sculptural, artisanal vessels reminiscent of ancient Mediterranean clay jugs. The soft, mineral-rich appearance fits organic wedding themes, bohemian celebrations, and minimalist gatherings dominated by neutral palettes, dried botanicals, and textured linen table runners. The matte ceramic finish absorbs harsh camera flashes and ambient glare, projecting an understated, high-end feel that rivals costly boutique ceramics. Layering varied bottle shapes—such as long-necked Riesling and wide-bellied Burgundy bottles—under a uniform terracotta finish produces a curated art-studio aesthetic across reception banquet tables.
Gather twenty-four empty wine bottles with varied heights and base diameters, cleaning them thoroughly and stripping all surface oils using white vinegar. In an open plastic bowl, combine one cup of warm beige or terracotta acrylic craft paint with two tablespoons of sifted baking powder, whisking until a creamy, slightly aerated paste forms. Using a wide, flat-bristled utility brush, apply the paint mixture to the glass with short, horizontal sweeping strokes, deliberately leaving textural ridges across the surface to mimic hand-thrown pottery. Apply a second uniform coat after the first layer dries completely, confirming full opacity and checking that no original green or clear glass shines through. Once dry, protect the chalky finish from accidental water droplets by applying a light coat of matte clear acrylic sealant. Style each completed ceramic vessel with three dried, architectural stems of bleached pampas grass or architectural dried palm spears, requiring no water while ensuring a stable, mess-free arrangement.
Idea 7: Emerald Moss and Twined Floating Trio
Step-by-Step Guide
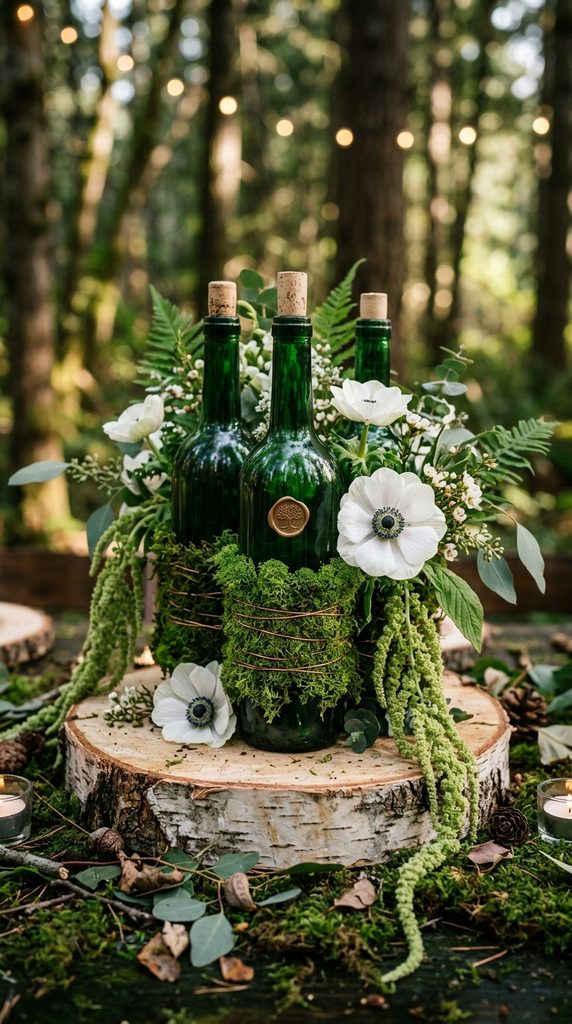
Woodland, forest, and botanical garden weddings benefit from centerpieces that weave raw organic mosses with rich forest-green glass silhouettes. Using deep emerald and olive wine bottles creates an earthy foundation that mirrors lush outdoor environments, blending the centerpieces into natural backdrops. Wrapping the lower third of emerald bottles with preserved sheet moss, bound in place by fine copper wire, introduces an authentic, living tactile element to the design. This living wrap establishes a multi-layered transition from tabletop wood grains to the polished, reflective glass above. The deep green glass adds visual weight to centerpieces, grounding the table visually without requiring bulky ceramic planters or broad wooden planter boxes. This arrangement complements organic styling details such as hand-deckled paper menus, sliced timber chargers, and unstructured floral displays that evoke a romantic woodland floor.
Collect deep emerald green wine bottles, cleaning them to remove all grease while preserving any smooth surface clarity. Lay preserved green sheet moss flat on a clean workbench, slicing it into rectangular strips measuring three inches wide by ten inches long using utility scissors. Wrap one moss strip around the bottom perimeter of each green bottle, misting the moss lightly with clean water to make the fibers pliable. Wind twenty-gauge bare copper wire around the moss wrap five times, twisting the wire ends firmly at the rear with needle-nose pliers and tucking the wire tail flush underneath the wrap. Stand three moss-wrapped bottles in a tight triangular formation atop an untreated cross-cut birch wood slab at the center of the reception table. Fill each bottle neck with fresh water, sliding three stems of white anemones and hanging amaranthus into the mouths so the dark blossoms trail gracefully down the glass.
Idea 8: White Enamel High-Gloss Porcelain Simplicity
Execution Process
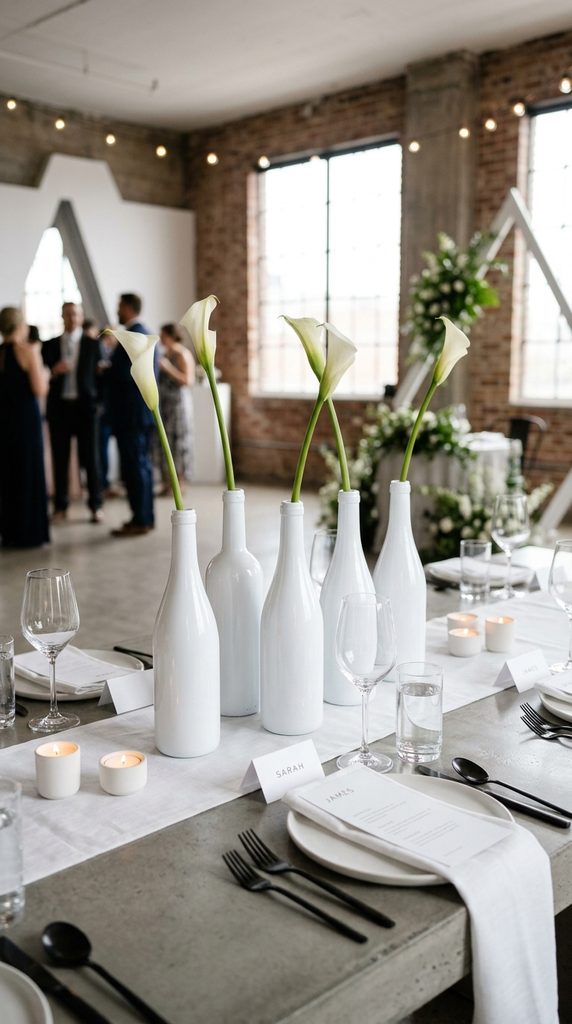
High-gloss white enamel treatments produce a sleek, contemporary aesthetic that mimics mid-century modern milk glass or fine glazed porcelain. This design coats the interior surface of clear glass bottles, leaving the exterior glass smooth, glossy, and easy to clean. By keeping the paint on the inside, the bottle retains its natural exterior sheen while hiding internal stem ends, floral foam, or submerged wires. The brilliant white color palette pairs seamlessly with formal monochrome events, contemporary urban lofts, and classic ballroom receptions focused on crisp lines and refined simplicity. When grouped in clusters of three to five, these brilliant white pillars create a stark, stylish backdrop that makes monochromatic foliage or deep crimson flowers stand out dramatically. The clean exterior finish resists scuffs during packing and transport, streamlining pre-event staging for wedding coordinators and rental teams.
Secure clear, smooth-surfaced Bordeaux wine bottles, checking the glass walls to ensure there are no internal water drops or dust particles. Pour two ounces of high-gloss white indoor enamel or acrylic pouring paint directly through a clean plastic funnel into the dry bottle opening. Slowly rotate and tilt the bottle horizontally, turning the glass until the paint coats every square millimeter of the internal surface up to the interior rim. Place the bottle upside down on an elevated plastic drying grid suspended over disposable paper trays, allowing excess paint to drain out for two hours. Let the internal paint dry for five full days in a warm environment until the coating hardens completely. Cut structural white calla lilies to varied heights, inserting a single stem into each painted bottle mouth to craft an architectural, ultra-modern centerpiece grouping for banquet tables.
Idea 9: Mirrored Silver Mercury Glass Alchemy
How to Create
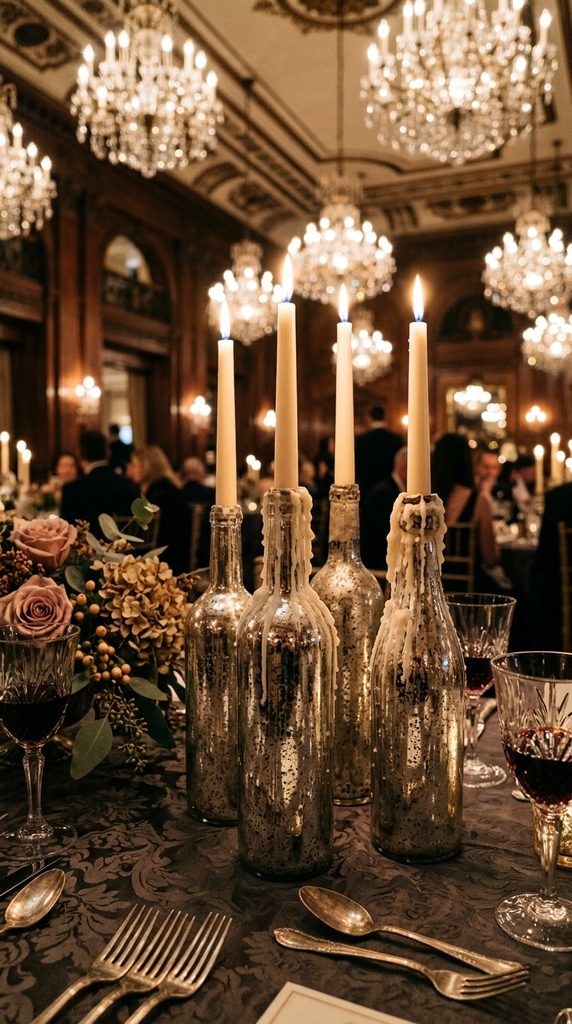
Mercury glass finishes add vintage luxury to wedding tables, evoking antique heirlooms with speckled, reflective silver patinas. This finish uses a water-and-mirror-paint misting process on the interior of clear glass bottles, creating a distressed metallic layer that mimics vintage mirrors. The speckled silver surface reflects dancing candlelight, casting intricate points of light across evening dinner settings. This styling approach shines in historic mansions, antique-styled garden tents, and romantic vintage-themed celebrations where soft, diffused lighting is paramount. The metallic pattern masks water lines and interior stem supports, combining decorative beauty with functional display capability. By catching and bending surrounding ambient light, mercury glass centerpieces add visual depth to crowded reception spaces, balancing vintage character with practical dining functionality.
Acquire clear glass wine bottles with distinct shapes, washing the interiors with warm soapy water and letting them dry completely. Prepare a spray bottle filled with a balanced mixture of fifty percent white vinegar and fifty percent clean tap water. Lightly spray three mists of the vinegar solution into the bottle interior, immediately following with two quick bursts of specialized mirror-finish chrome spray paint directly through the neck. Swirl the liquids around the interior to distribute the broken, bead-like metallic pattern, then pour any excess paint onto a paper towel. As the acidic vinegar evaporates, it breaks apart the metallic paint layer, leaving behind an authentic speckled mercury glass finish across the interior walls. Insert a standard twelve-inch ivory taper candle into the mouth, letting dripped beeswax accumulate naturally around the rim to enhance the antique, time-worn character.
Idea 10: Taper Candelabra Drip Glass Cascades
Setup Method
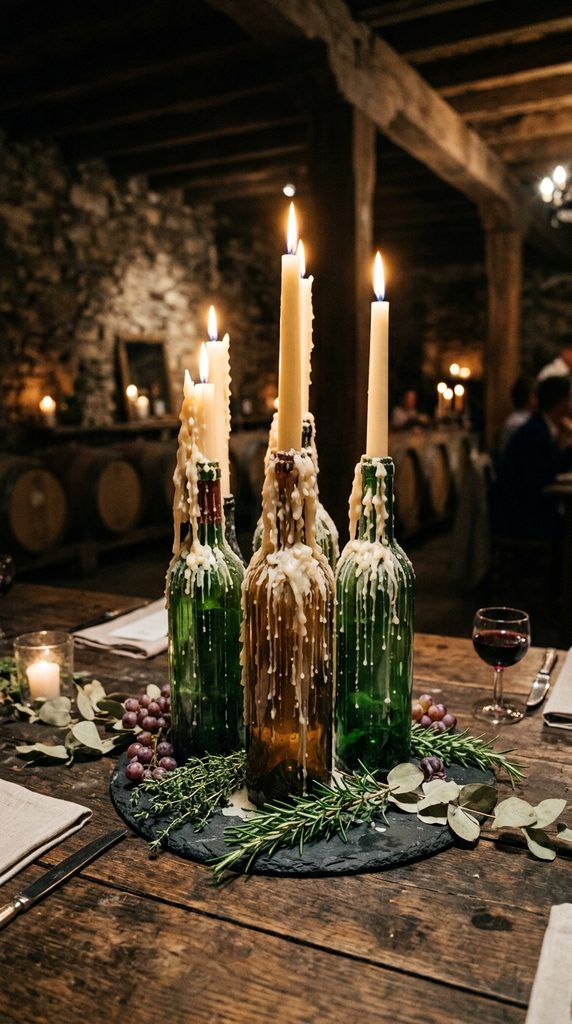
Transforming wine bottles into traditional wax-drip candelabras provides kinetic decorative drama that evolves across the reception dinner. As taper candles burn down through the evening, molten wax trickles down the bottle shoulders, building layered, sculptural patterns on the glass surface. This dynamic centerpiece serves as functional evening lighting while delivering romantic, old-world visual charm. The natural wax flow creates a relaxed, celebratory atmosphere, fitting vineyard cellars, historic estates, and bohemian outdoor dinner parties. Using assorted bottle colors—such as amber, deep green, and clear glass—allows the white or colored wax drips to build rich, three-dimensional textures on the tabletop. The tall tapers keep open flames safe from guest arm movements, elevating the light source to cast a warm, flattering glow over dinner conversations.
Select heavy-bottomed wine bottles, cleaning them to remove labels while leaving the exterior surface unpainted and free of chemical sealants so the wax bonds properly. Slide an eight-to-ten-inch, high-quality wax taper candle into each bottle mouth, trimming the candle base with a utility knife if the diameter is too large for a snug fit. Anchor the candle base firmly by dripping three drops of hot liquid wax inside the inner lip before seating the candle stick down into the opening. Light the candles two hours before the reception begins in a draft-free room to establish the initial wax flow down the bottle neck and shoulders. Position the bottles on protective slate coasters or broad ceramic plates to prevent running wax from damaging rented venue table linens. Surround the base of the bottle with a loose wreath of fresh rosemary sprigs and olive branches to complete the organic tablescape.
Common Beginner Mistakes and How to Avoid Them
The most frequent mistake DIY decorators encounter is insufficient surface preparation, which leads to peeling paint, bubbling adhesives, and uneven wraps. Craft paints will not bond securely to glass that retains factory wax coatings, paper residues, or natural hand oils. Always scrub soaked bottles with a sharp razor blade, followed by a thorough wipe-down with isopropyl alcohol, before applying paint or hot glue. Another common design misstep is creating tall, top-heavy floral arrangements that topple over when guests bump banquet tables. Centerpieces must maintain a low center of gravity; weight bottle bases with dry sand, fine quartz gravel, or floral marbles before inserting tall botanical stems or taper candles. Using the wrong adhesives also causes wraps to detach; school glues and basic craft tapes loosen quickly under venue humidity or air conditioning. Use high-temperature glue sticks, industrial spray adhesives, or multi-surface solvent paints designed specifically for smooth, non-porous glass surfaces. Finally, test your lighting and candle fits well before the event; taper candles vary slightly in base diameter, requiring shaving or floral clay anchors to stay safe, secure, and upright throughout the celebration.
Practical Tips for Elevated Decor Execution
Achieving a clean, high-end look across dozens of handmade wine bottle centerpieces requires standardized assembly methods and disciplined material choices. Group your glass bottles in odd-numbered clusters of three or five to produce visually dynamic, asymmetrical compositions that feel curated rather than stiff. Use bottles of varying heights—such as tall, slender German white wine shapes alongside stocky, rounded Burgundy styles—to create an engaging vertical rhythm across the table. When painting glass, apply multiple light, sweeping coats rather than a single heavy coat, which prevents paint runs, drips, and extended drying times. Work in a temperature-controlled, dust-free environment, shielding freshly painted vessels from falling dust, hair, or outdoor debris. Assemble a compact emergency repair kit for the wedding day, complete with extra hot glue sticks, spare pre-cut candles, a sharp razor knife, floral tape, and backup painted bottles. Packing your finished centerpieces in segmented cardboard wine cases ensures safe, organized transit to the reception venue, preventing friction scratches, glass chips, and broken necks along the way.
Styling, Layout, and Table Presentation
Presenting wine bottle centerpieces effectively depends on the overall layout and geometry of your reception dining tables. Long banquet-style tables look best with linear, repeating arrangements where bottles are staggered along a fabric table runner with fresh, loose greenery. Intertwine fresh smilax, silver dollar eucalyptus, or Italian ruscus around the bottle bases to soften the hard glass edges and connect individual bottles into a unified tablescape. For traditional round tables, position bottle clusters directly in the center atop a raised wooden charger, slate slab, or circular glass mirror to establish a clear focal point. Vary the height of accents within each cluster, placing taller taper candles or towering branches at the center and tapering down to smaller votives or low-profile floral accents near the rim. Balance your tall glass centerpieces with low-profile tea lights in cast-glass holders to disperse light at both tabletop and eye levels. Ensure the overall diameter of the center arrangement leaves adequate clearance for water goblets, shared bread baskets, formal flatware, and printed paper menus.
Budget Considerations and Production Timelines
Sourcing wine bottles early is the most practical way to minimize decor expenses while assembling a complete inventory for large wedding guest counts. Partner with local restaurants, boutique wine bars, wedding venues, or friends months in advance to collect clean, unchipped bottles without purchasing expensive commercial craft glass. Establish a clear, structured production timeline, beginning label removal and glass degreasing eight to ten weeks prior to the wedding date to avoid last-minute crafting stress. Paint, wrap, and seal your bottles during a dedicated multi-day assembly session four to six weeks before the celebration, giving all surface finishes ample time to cure completely. Order battery-powered micro lights, taper candles, natural twine spools, and dried florals in bulk from wholesale craft suppliers to secure volume discounts. Fresh botanicals should only be sourced and trimmed forty-eight hours before the reception, with stems held in clean, cool water until final table placement. Storing finished, dry decor components in organized, labeled cardboard dividers keeps your workflow smooth and guarantees that venue styling on the morning of the wedding remains calm, efficient, and orderly.
Creative Expansions and Advanced Variations
Experienced crafters can elevate basic wine bottle centerpieces by integrating architectural techniques, custom shapes, and advanced glassworking methods. Consider using an electric bottle-scoring tool to cleanly remove the bottom inch of glass, transforming vessels into open storm lanterns that shield tabletop pillar candles from drafts. Experiment with hydro-dipping enamel paints in water baths to produce bespoke, marbled patterns that mirror natural stone, agate, or dynamic water textures across the glass body. Pair glass etching creams with intricate vinyl stencils to frost custom monograms, venue crests, or wedding dates directly into the glass face, turning table centerpieces into memorable keepsake gifts for family and close friends. You can also connect bottles into continuous overhead floral runners using heavy industrial macramé knots or suspended wrought-iron floral chandeliers, lifting decor off the tables to maximize dining space below. As seasons shift, swap out internal elements—sliding slender dried wheat stalks into amber vessels for autumn events, or filling clear bottles with fragrant evergreen sprigs and winter berries for cozy holiday receptions. Upcycled glass offers a versatile, durable foundation that adapts to any stylistic ambition with endless creative potential.