Rustic vintage centerpiece styling remains a premier design choice for modern wedding banquets, bringing authentic warmth, historical texture, and natural charm to dining tables. By combining reclaimed timber,…
Rustic vintage centerpiece styling remains a premier design choice for modern wedding banquets, bringing authentic warmth, historical texture, and natural charm to dining tables. By combining reclaimed timber, antique glassware, weathered metals, and seasonal botanicals, decorators can establish an intimate tablescape that balances classic elegance with organic countryside simplicity. This detailed tutorial outlines practical construction methods, structural balancing principles, and preservation techniques to help couples and planners build balanced, long-lasting floral installations. Readers will learn how to source durable vintage containers, prepare watertight internal floral mechanics, balance tall and low focal points, and incorporate safe evening illumination. Choosing a rustic vintage theme offers substantial practical value by allowing decorators to repurpose authentic architectural remnants, vintage household items, and gathered natural elements without high rental expenses. These design strategies suit varied celebration venues, from restored countryside barns and open-air farm fields to historic estates and industrial garden lofts. By understanding how aged wood, muted metallics, and fresh floral foliage interact under venue lighting, makers can create professional-grade handmade centerpieces with structural confidence. The ten ideas outlined below provide clear, actionable guidance to craft dependable, visually striking table decorations for any wedding celebration.
Why Reclaimed Vintage Accents Lead Modern Celebration Design
Rustic vintage styling continues to dominate wedding inspiration boards because it provides authentic warmth and enduring decorative versatility that standard event rentals cannot duplicate. Contemporary event design places a premium on sustainable materials, encouraging planners to celebrate the natural grain of weathered wood, the weathered patina of antique vessels, and seasonal blooms. These tactile elements provide welcoming visual balance in expansive celebration spaces, counteracting cold industrial lines and breaking up broad expanses of plain banquet linens. From a practical DIY perspective, rustic vintage arrangements provide an accessible entry point for beginners because organic, free-form florals naturally accommodate slight asymmetries and relaxed placements. Repurposing antique containers reduces dependence on single-use plastic decors, lowering event waste while yielding personalized table layouts with authentic heirloom appeal. Furthermore, these arrangements accommodate realistic celebration budgets, allowing makers to source items gradually from architectural salvage yards, family collections, and estate auctions. Whether styling an intimate family celebration or an expansive seated dinner, rustic vintage table accents establish an inviting atmosphere that keeps guests visually engaged while maintaining reliable functionality.
Sourcing Materials, Specialized Tools, and Tabletop Preparation
Assembling sturdy, elevated rustic centerpieces requires gathering proper floral mechanics, protective base materials, and reliable crafting equipment before arranging botanicals. Essential base materials include reclaimed wooden crates, antique glass vessels, metal troughs, coated chicken wire, heavy-duty waterproof tape, floral foam blocks, and bypass pruning shears. Because vintage vessels, weathered wood boxes, and antique metals often feature hairline fissures or unsealed joints, leak prevention is critical for protecting banquet furniture and event linens. Always inspect vintage containers by filling them with water and placing them on absorbent craft paper for twelve hours to detect slow seepage. Line permeable containers with heavy-duty vinyl pond liners, clear acrylic dishes, or fitted plastic florist trays before introducing water reservoirs or saturated floral foam. Stabilize lightweight containers with washed river gravel or smooth lead fishing sinkers to establish a low center of gravity that prevents tipping during lively banquets. Finally, establish a dedicated floral workstation equipped with clean buckets, water conditioning packets, and sharp utility snips, ensuring every stem is cut, hydrated, and anchored with precision.
Idea 1: Reclaimed Timber Slices with Clustered Antique Medicine Bottles
Step-by-Step Guide
Cross-cut timber slices combined with assorted amber medicine bottles create a low-profile rustic focal point that celebrates natural woodland textures. The flat wooden slice provides an organic pedestal that protects banquet linens while grouping multiple small glass vessels into an organized, unified composition. Using amber, cobalt, and clear vintage apothecary bottles introduces varied glass patinas that catch ambient dinner light, casting warm jewel tones across the tabletop. By using individual narrow-neck bottles instead of a single large vase, decorators can arrange single botanical stems into an airy, architectural display that maintains open sightlines across the dining space. This concept works well for long harvest tables and circular banquet layouts, providing a flexible footprint that accommodates wine glasses, flatware, and shared platters without crowding. The contrast between rough tree bark, smooth glass, and delicate blooms creates visual depth, grounding modern celebrations in authentic forest textures.
Begin by acquiring kiln-dried hardwood tree slices measuring ten to twelve inches in diameter and two inches in thickness, ensuring the bark rim remains firmly attached. Sand the upper timber face with fine sandpaper to eliminate rough splinters, applying a matte clear sealant to safeguard the wood from water stains. Clean six assorted antique medicine bottles in varying heights, washing out historical residue with warm soapy water and drying the glass thoroughly. Place the wooden charger in the center of the dining table and arrange the bottles in an asymmetric cluster of odd numbers, securing each base with a pea-sized dot of removable floral putty. Fill each bottle two-thirds full with fresh water treated with liquid floral preservative using a narrow-spout squeeze bottle. Insert single architectural stems—such as white ranunculus, feverfew daisies, and delicate sprigs of plumosa fern—into the bottles, varying the heights between four and eight inches to produce a layered, cascading botanical rhythm.
Idea 2: Distressed Farmhouse Lanterns with Encircled Seeded Eucalyptus Wreaths
Execution Process
Weathered wooden and metal lanterns surrounded by lush rings of fresh seeded eucalyptus provide romantic evening illumination anchored by traditional farm architecture. The lantern’s vertical height establishes visual authority in high-ceilinged reception venues, drawing the eye upward while keeping the functional flame shielded safely behind glass panels. Encircling the lantern base with a dense botanical wreath softens hard metal and glass angles, creating a lush transition down to the linen surface. This dual-purpose design functions as an ambient lighting source and a floral centerpiece, making it an efficient option for evening celebrations. The combination of warm pillar candlelight and silvery-green eucalyptus leaves produces an inviting aesthetic that complements classic barn venues, vineyard pavilions, and countryside garden tents. Its balanced structure keeps the arrangement stable against venue breezes, ensuring an enduring centerpiece that remains pristine from the initial cocktail hour through the late-night dancing.
Select a twelve-to-sixteen-inch distressed wood or burnished iron lantern featuring intact glass side panels and a vented metal roof. Clean the interior glass panes with vinegar to remove smudges, placing a three-by-six-inch unscented ivory pillar candle firmly in the center. Secure the candle base to the lantern floor using double-sided candle adhesive tabs to prevent slipping during transport. Build the floral base by shaping a twelve-inch circular wreath frame from fresh salal leaves, silver dollar eucalyptus, and textured seeded eucalyptus sprigs bound with green floral paddle wire. Nestle the prepared greenery wreath directly onto the tabletop, ensuring the foliage branches outward in a natural, unforced circle. Carefully lower the prepared lantern into the hollow center of the greenery ring, checking that the foliage leaves a one-inch safety margin around the lantern’s metal vents. Light the pillar candle using a long-reach fireplace lighter thirty minutes before guest seating, establishing a safe, warm focal point across the banquet room.
Idea 3: Weathered White-Washed Wood Troughs with Spilling Field Flora
How to Make
Elongated wooden troughs finished with a distressed white-wash treatment provide continuous linear floral coverage designed specifically for expansive rectangular banquet tables. The horizontal lines of the wooden box mimic historic farm animal feeders, grounding the dining space in traditional agricultural craftsmanship. The distressed white finish brightens dark venue interiors, providing a neutral backdrop that highlights vibrant floral colors like peach garden roses, cornflowers, and wild chamomile. By running flowers continuously down the length of the box, decorators create a cohesive runner effect that eliminates the need for multiple disconnected bud vases. This style allows blooms and textured greens to spill naturally over the wooden lip, softening the straight wooden edges with soft botanical movement. The substantial base provides stability, making it resilient against table bumps while maintaining a low profile that allows uninterrupted conversation across banquet tables.
Construct or source a narrow rectangular pine planter box measuring twenty-four inches long, five inches wide, and four inches deep. Apply a chalky white acrylic paint thinned with equal parts water, immediately wiping back the excess with a dry rag to expose natural wood grain beneath. Line the interior cavity with heavy plastic sheeting, tacking the edges neatly two inches below the outer rim using a staple gun to guarantee a watertight seal. Soak two bricks of floral foam in preservative-treated water until fully saturated, placing them snugly inside the lined wooden channel. Trim sturdy stems of Italian ruscus, leatherleaf fern, and olive branches, inserting them horizontally into the foam perimeter to create a trailing greenery base that masks the box edges. Fill the central foam block with clusters of white lisianthus, soft peach spray roses, and pale blue delphinium tips, placing the blooms at staggered angles to mimic a natural countryside wildflower field.
Idea 4: Antique Enamelware Pitchers with Bundled Cottage Garden Blooms
How to Create
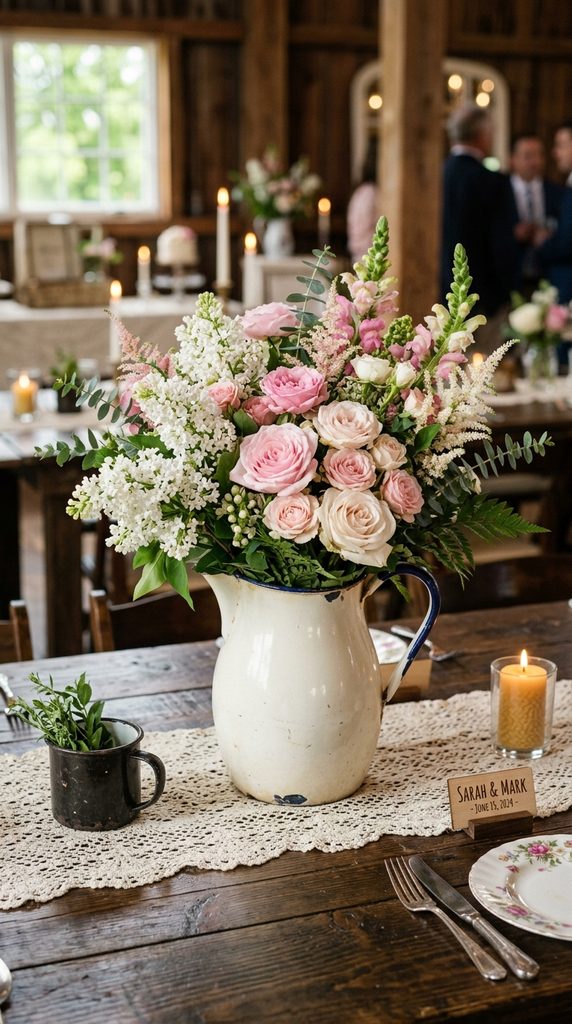
Vintage porcelain enamel pitchers showcase historic domestic utility, offering durable floral vessels with subtle chipping, exposed steel edges, and soft gloss surfaces. Typically found in pale white, cream, or soft gray with contrasting dark rims, these functional vessels introduce relaxed cottage garden charm to wedding tables. The sturdy curved handle and broad pouring spout provide asymmetrical lines that encourage loose, hand-gathered floral styling rather than stiff, formal arrangements. Enamelware is completely shatterproof, making it a reliable option for breezy outdoor tents, hilltop venues, and remote locations where fragile glassware risks accidental damage. The upright silhouette lifts blooms off the dining table, saving surface space for multi-course meal services, condiments, and wine coolers. When filled with loose field flowers, these pitchers evoke the feeling of freshly cut blossoms brought in from an old country garden, adding authentic historic hospitality to dinner tables.
Acquire vintage enamelware pitchers measuring eight to ten inches in height, checking the interior bottom to confirm there are no through-holes or deep rusted punctures. Wash the interior surface thoroughly with warm soapy water and wipe the exterior enamel with a soft microfiber cloth to bring out its natural sheen. Fill the pitcher halfway with lukewarm water mixed with commercial floral nutrients, inserting a small ball of coated chicken wire into the neck to keep stems in place. Begin building the arrangement with woody branches of white lilac, snowball viburnum, or flowering dogwood, anchoring the stems against the pouring spout. Intersperse tall stems of pink garden roses, snapdragons, and white astilbe, cutting each stem at a sharp forty-five-degree angle before placing it in the water. Finish the presentation by turning the pitcher so its curved metal handle faces outward toward the table entry, creating an inviting, asymmetric focal point for seated guests.
Idea 5: Vintage Mason Jar Trios with Burlap Bands and Delicate Lace
Setup Method
Grouping three varied-height glass mason jars wrapped in textured burlap and lace creates a classic rustic centerpiece built on layered textiles and vintage glass. The embossed lettering and pale aqua or clear tones of vintage canning jars introduce historic kitchen charm that balances relaxed farmhouse styling. Wrapping the glass cylinders in raw woven jute burlap paired with fine cotton lace creates a tactile contrast that absorbs ambient light, eliminating harsh camera reflections. Arranging the jars in a tight triangular grouping ensures the centerpiece looks balanced from every chair around circular banquet tables. This approach allows decorators to separate floral varieties by vessel, displaying dedicated stems of gypsophila, garden roses, and wild greens across the three jars. The small footprint leaves plenty of space for banquet essentials, making it an adaptable choice for intimate venues with compact table settings.
Gather three vintage glass canning jars in graduated half-pint, pint, and quart sizes, cleaning the glass with warm soapy water until completely clear. Cut three-inch-wide strips of natural brown jute burlap, wrapping them snugly around the center of each jar and securing the ends with hot glue. Wrap a two-inch-wide strip of white floral lace over the burlap band, centering the lace and securing it with an unobtrusive dab of adhesive on the back side. Fill each jar with room-temperature water mixed with floral food, adjusting the volume to hide internal stems beneath the textile wrap. Fill the tallest quart jar with fresh baby’s breath and white larkspur, the medium pint jar with blush garden roses and eucalyptus, and the small half-pint jar with miniature chamomile blooms. Cluster the three finished jars closely atop a round cross-cut timber base, angling the neat seam of each textile band toward the center of the display.
Idea 6: Aged Galvanized Metal Buckets with Fresh Orchard Greens and Fruit
Step-by-Step Guide
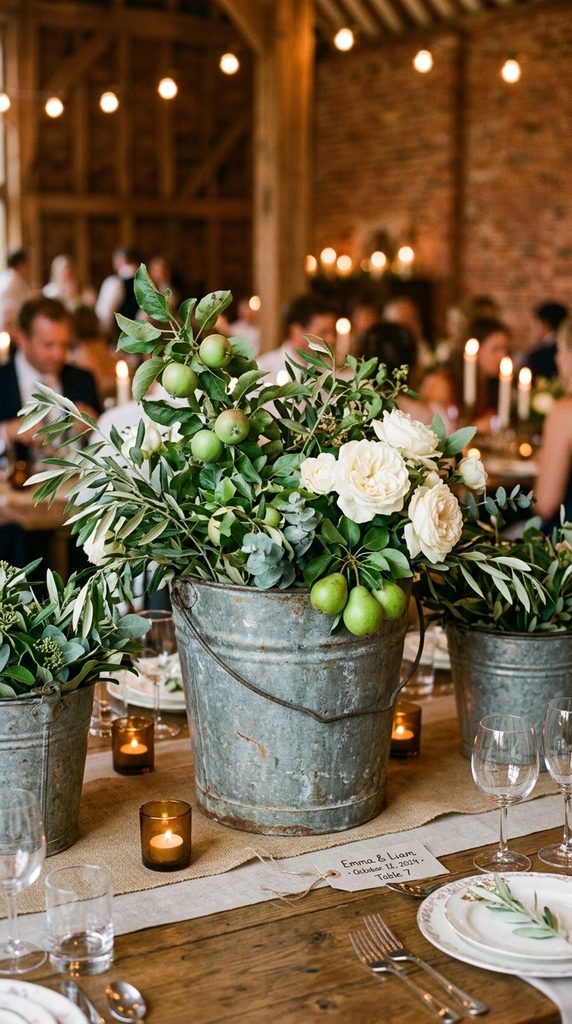
Weathered galvanized zinc buckets introduce industrial agricultural character to rustic celebrations, featuring matte gray patinas, rolled steel rims, and wire bail handles. The cool metallic tones of zinc create an earthy contrast against saturated foliage, bright citrus, or orchard branches, bridging vintage hardware with fresh harvest bounty. Incorporating real orchard fruits—such as green pears, small apples, or unripe figs—alongside cut florals adds organic texture, honoring traditional harvest celebrations. The broad base of galvanized containers provides dependable stability, keeping tall, leafy branches secure against wind gusts during open-air celebrations. This centerpiece style suits modern farm gatherings, renovated mill spaces, and outdoor vineyard dinners where metal architectural elements echo the surrounding landscape. The muted zinc finish absorbs direct sunlight and evening illumination, creating an understated metallic anchor that lets floral colors stand out cleanly.
Locate vintage galvanized zinc pails measuring six to eight inches high, inspecting the bottom seams for rust holes and sealing any questionable joints with silicone. Place a snug plastic bucket liner inside the metal container to isolate the water reservoir from the zinc, preventing metal ions from shortening flower lifespans. Form a sturdy wire grid across the plastic liner’s rim using waterproof green floral tape, anchoring the grid points securely around the exterior lip. Fill the container with cool water and build a leafy base using cut branches of olive, myrtle, and fruiting apple boughs pushed deep into the grid. Insert sturdy wooden florist picks into the bases of fresh green pears, inserting the fruit picks along the rim so the pears rest among the lower leaves. Fill the remaining space with ivory garden roses and white ranunculus, keeping the final arrangement compact and rounded to balance the heavy metal base.
Idea 7: Stacked Antique Hardcover Books with Spilling Floral Teacups
Execution Process
Stacking vintage cloth-bound books topped with a delicate floral bone china teacup creates an imaginative centerpiece that balances literary history with soft vintage romance. The aged paper edges, embossed spines, and faded covers of antique books introduce warm paper tones and physical height without requiring heavy timber or metal bases. Placing a fine china teacup filled with delicate blooms atop the books adds an unexpected contrast between dense paper volumes and translucent porcelain. This design suits garden pavilion weddings, historic library receptions, and cozy afternoon tea celebrations, encouraging guests to look closely at vintage titles and hand-painted china patterns. The tiered stack elevates petite floral blossoms to eye level, providing decorative impact while using fewer cut stems. Sourcing mixed book colors—such as muted sage, gold, and dusty rose—allows decorators to customize table colors while preserving authentic vintage character.
Collect three complementary vintage hardcover books of graduated sizes, wiping the dust jackets clean with a dry brush and confirming the bindings are sturdy. Stack the three volumes flat in the center of the table, placing the largest book on the bottom and angling the top two volumes slightly to create an open, stepped spiral. Tie the paper stack with three passes of natural jute twine or frayed silk ribbon, knotting the cord neatly across the top book’s cover. Select a vintage bone china teacup and saucer, placing a disc of double-sided museum putty beneath the saucer to anchor it securely to the top book. Place a small, soaked piece of floral foam inside the teacup cavity, securing the foam with crossed strips of thin floral tape. Insert miniature spray rosebuds, sweet peas, and tiny sprigs of trailing English ivy into the foam, allowing the delicate vine ends to spill gracefully over the porcelain rim and onto the stacked pages below.
Idea 8: Repurposed Vintage Wooden Berry Baskets with Woodland Mosses
How to Make
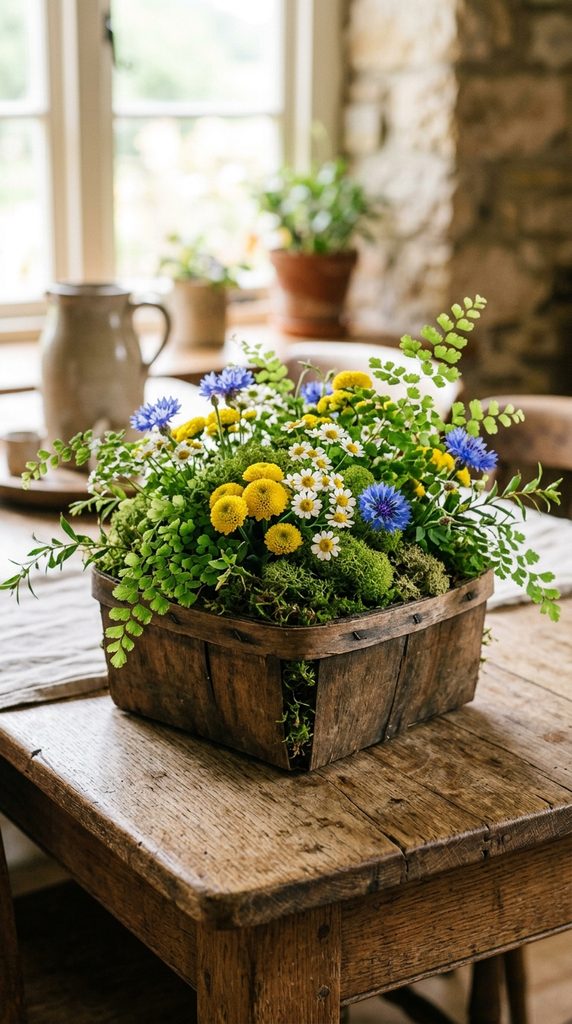
Woven wooden berry baskets and antique slatted produce containers bring an authentic farmers market aesthetic to rustic wedding tables. The thin, bentwood slats and wire staples showcase historic farm packaging, providing an airy container that highlights rustic textures. Filling the slatted base with rich preserved sheet moss creates a green carpet that conceals internal mechanics while bringing earthy woodland charm to the tabletop. The open wood slats allow glimpses of green moss beneath the rim, creating depth that solid ceramic or glass vases cannot match. This lightweight, low-profile design ensures that floral displays do not obstruct conversation, making it a functional option for family-style banquet tables laden with platters. Paired with soft wildflowers and textured seed pods, berry baskets offer a relaxed aesthetic that suits orchard weddings, forest celebrations, and casual daytime receptions.
Source square antique bentwood berry baskets measuring five to six inches across, checking that the slatted wooden walls and metal corner staples remain intact. Cut a square piece of heavy-gauge plastic lining to fit inside the basket, trimming the plastic flush with the top wood rim to keep mechanics hidden. Cut a small block of saturated floral foam to fit the lined interior, pressing the foam down until it sits one inch below the container’s top edge. Cover the exposed top and sides of the foam with damp sheet moss, pinning the moss in place using U-shaped wire floral pins. Insert short stems of yellow button pompons, white feverfew, and blue cornflowers through the moss layer into the underlying foam base. Intersperse small sprigs of maidenhair fern and dried seed pods throughout the flowers, creating a textured woodland arrangement that looks freshly gathered from the forest floor.
Idea 9: Ornate Cast Iron Urns with Wild Trailing Greenery Cascades
How to Create
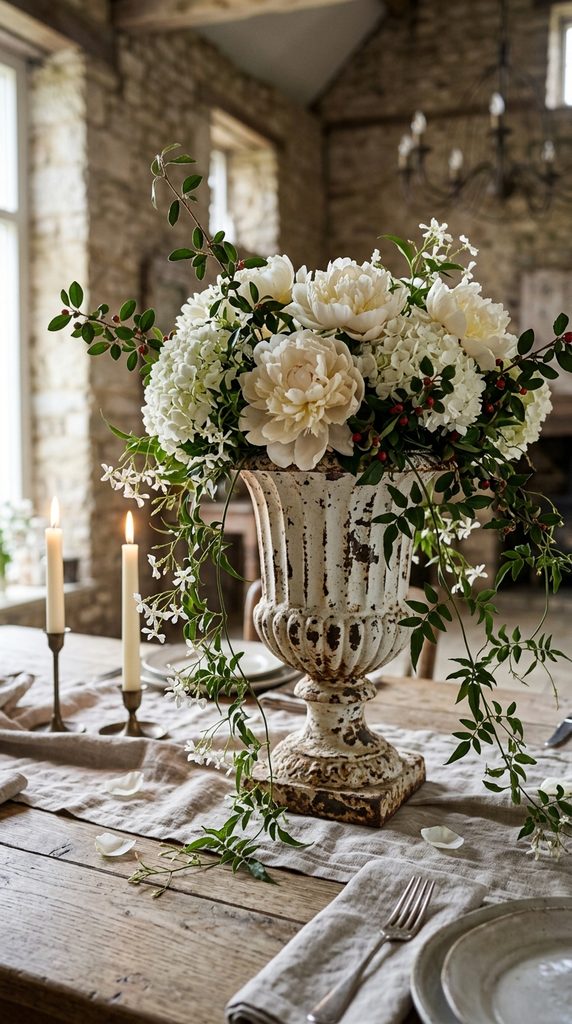
Aged cast iron garden urns featuring weathered patinas and architectural fluting bring classical romance and antique weight to rustic wedding tables. The heavy iron construction provides an enduring anchor that supports expansive floral installations without tipping, making it ideal for tall, dramatic floral styling. The fluted pedestal base lifts arrangements three to five inches above the linen, creating an elegant silhouette that bridges formal garden design with rustic country themes. The distressed finish—often showing traces of peeling white paint or rusted metal undertones—adds authentic age that balances manicured venues with organic materials. Designing floral displays that cascade down the curved iron bowl creates fluid, living movement that softens the rigid metal container. This style suits historic stone barns, estate courtyard dinners, and grand rustic ballrooms where substantial architecture requires floral arrangements with equivalent visual presence.
Acquire miniature cast iron garden urns with bowl diameters between six and eight inches, ensuring the pedestal bases sit flat and stable. Wash the interior cavity to remove loose rust, coating the inside surfaces with a quick-drying rust-inhibiting clear primer to protect against metal discoloration. Insert a heavy-duty plastic florist bowl liner into the urn, securing a saturated cone of floral foam into the liner using waterproof anchor tape. Begin shaping the cascading greenery by inserting long, arching branches of weeping cotoneaster, jasmine vine, and Italian ruscus deep into the outer foam edges. Direct the trailing vines downward so they wrap around the fluted pedestal and brush the tabletop linen. Insert focal flowers—such as white hydrangeas, garden roses, and open cream peonies—into the top of the foam, clustering the largest blooms near the rim to balance the long, cascading foliage below.
Idea 10: Weathered Antique Apple Crates with Cascading Botanicals
Setup Method
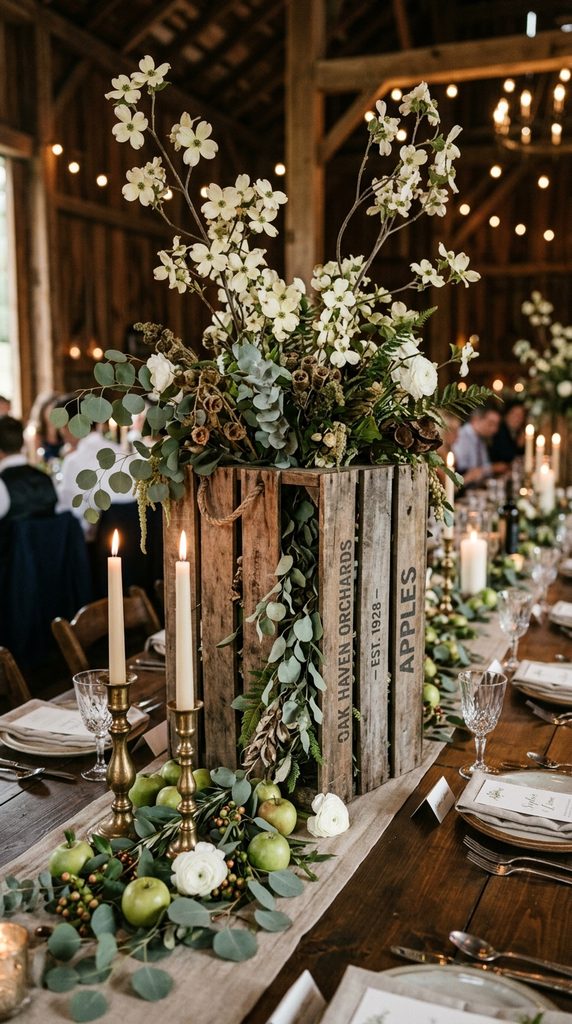
Reclaimed slatted wooden apple crates provide broad agricultural architecture that anchors large centerpiece groupings across expansive banquet layouts. The weathered pine slats, vintage orchard stencil markings, and wire reinforcements introduce authentic orchard history to rustic celebrations. These large wooden structures function as elevated display stages on tables, creating varied vertical levels that accommodate secondary decor like brass candlesticks, small bud vases, and scattered fresh fruits. Using an apple crate as the central table anchor eliminates the need for expensive rental risers while establishing a warm farm aesthetic across the banquet room. The rustic wood finish complements unpressed linen runners, stoneware dinner plates, and matte black flatware, helping you design an artisanal, farm-to-table celebration. Its open structure allows greenery to spill naturally through the wood slats, creating an organic tablescape that looks integrated with the surrounding celebration space.
Acquire authentic wooden orchard fruit crates featuring clear historic brand stamps, sanding away loose wood splinters and vacuuming out interior corner dust. Set the crate horizontally or on its side in the center of the banquet table, confirming the base rests flat without rocking. Place two heavy glass jar vases filled with water inside the crate, wrapping chicken wire collars around the jar mouths to secure branch stems. Insert tall branches of flowering quince, forsythia, or budding dogwood into the internal vases, allowing the branches to emerge upward through the open wood slats. Weave long garlands of fresh silver dollar eucalyptus and smilax vine across the top surface of the crate, letting the leaves drape down the sides to soften the straight timber edges. Complete the display by placing two antique brass candlestick holders with ivory taper candles on the crate top, surrounding the candle bases with scattered fresh green apples.
Common Sourcing and Assembly Pitfalls to Avoid
A frequent misstep when building rustic vintage centerpieces is overlooking proper leak protection for antique vessels, resulting in water damage to venue tables and fine linens. Weathered wood boxes, vintage tin buckets, and antique ceramics often feature hidden fissures, loose joinery, or pinhole rust that leaks water slowly over several hours. Prevent unexpected spills by testing every container with water overnight, or use fitted plastic florist liners to isolate moisture from the vessel body. Another design error is building top-heavy arrangements that block guest sightlines or topple over when banquet tables are bumped. Centerpieces should stay below fourteen inches for easy dinner conversation, or rise cleanly above twenty-four inches on narrow pedestals to keep eye lines clear. Decorators also sometimes mix too many conflicting rustic elements together, such as combining burlap, raw bark, shiny brass, and chipped enamel on a single table. Maintain design focus by choosing two primary textures—such as reclaimed wood and clear vintage glass—to preserve an intentional, cohesive look across the banquet room. Finally, avoid using unprotected open flames in rustic wood or greenery displays; always place pillar candles inside glass hurricane shades or use high-quality battery-operated lights to ensure safety.
Practical Floristry Techniques for Long-Lasting Displays
Achieving a fresh, professional look across handmade rustic wedding centerpieces requires disciplined flower processing and solid mechanical construction. Always trim cut flower stems at a sharp forty-five-degree angle under cool water using bypass shears, which prevents air bubbles from blocking water uptake through the stems. Remove all lower leaves that would otherwise sit below the water line, as decomposing foliage breeds bacteria that clogs stem vessels and shortens bloom life. When arranging in wide containers like wooden troughs or cast iron urns, use coated chicken wire formed into a supportive internal dome rather than relying on floral foam alone. This wire grid holds heavy, woody branches securely while allowing flowers to draw fresh water directly from the reservoir. Mix floral nutrient packets accurately according to manufacturer water ratios; improper concentrations can burn tender petals or cause stems to droop prematurely. Keep finished centerpieces in a cool, dark room away from direct sunlight, heating vents, and ripening fruit until the final table placement, ensuring blooms stay vibrant and crisp throughout the celebration.
Table Styling, Visual Proportions, and Venue Harmony
Elevating rustic vintage centerpieces from simple craft arrangements to sophisticated event designs requires intentional table styling and spatial awareness. Consider the dimensions and geometry of your dining tables when selecting centerpiece shapes: long banquet tables need linear designs like wood troughs or repeating bottle clusters, while round tables look best with balanced circular designs like lanterns or urns. Pair textured, matte containers like galvanized buckets and reclaimed timber with smooth, high-grade linens like hemstitched cotton or raw silk to create an intentional contrast between rustic and refined textures. Maintain visual rhythm down long tables by varying the heights of secondary items, pairing tall wooden lanterns with low, scattered votives in clear glass cups. Place decor elements thoughtfully relative to place settings, ensuring adequate clearance for water goblets, wine glasses, bread plates, and printed menu cards. Finally, coordinate the metal and wood finishes of your centerpieces with the venue’s architectural features, matching dark timber ceiling beams with warm wooden chargers to create a cohesive celebration environment.
Strategic Budget Management and Sourcing Timelines
Creating memorable rustic centerpieces on a realistic budget requires early planning, resourceful sourcing, and structured assembly timelines. Begin collecting antique bottles, vintage books, and wooden crates six to nine months before the wedding date by browsing local flea markets, estate sales, and online community marketplaces. Sourcing items gradually in mixed lots reduces per-unit costs compared to buying matching vintage items from specialty decor stores. Build a structured production timeline: clean, test, and line all vintage containers four weeks before the event, storing the dry materials in labeled, stackable plastic bins to streamline venue transport. Order bulk fresh florals and greenery from wholesale flower markets to arrive three days before the celebration, giving tight buds adequate time to open fully in conditioned water. Assemble non-perishable bases and greenery frameworks forty-eight hours ahead of the event, inserting fresh focal flowers twenty-four hours before the ceremony to guarantee peak bloom quality. Assign a trusted helper to check water levels with a narrow-spout watering kettle on the morning of the wedding, ensuring every table display remains hydrated, upright, and ready for guests.
Creative Design Expansions and Seasonal Styling
Experienced decorators can expand upon standard rustic vintage centerpieces by exploring creative lighting, mixed botanical pairings, and seasonal design accents. Experiment with integrating warm micro-LED fairy lights beneath sheer table runners or woven within wooden crates, creating an ambient glow that accents textural wood grain. Incorporate local seasonal agriculture into your floral bases, tucking small pumpkins and dried wheat into autumn displays, or using fresh citrus, peaches, and garden herbs for summer celebrations. Consider suspending lightweight rustic elements—such as vintage wooden ladders or weathered timber branches—from overhead venue beams, using clear wire to create a floating botanical canopy above dining tables. You can also personalize individual table centerpieces by attaching handwritten calligraphed table numbers to vintage glass bottles with wax seals or rustic twine. As seasons shift, update core container collections by swapping soft spring peonies for textural dried seed pods, ornamental grasses, or winter evergreens accented with wild berries. The adaptability of rustic vintage decor ensures these authentic pieces can be repurposed for future home entertaining, family gatherings, and milestone celebrations for years to come.