10 DIY Wedding Centerpiece Ideas You Can Reuse as Home Decor
Designing memorable wedding reception tables requires an intentional approach to styling, structural balance, and long-term utility. Repurposing event elements into daily interior accents has become a premier styling…
Designing memorable wedding reception tables requires an intentional approach to styling, structural balance, and long-term utility. Repurposing event elements into daily interior accents has become a premier styling choice, offering a functional alternative to single-use event items. This comprehensive tutorial provides actionable guidance, step by step construction methods, and design strategies to help decorators create professional-grade tabletop displays that transition into everyday living spaces. Readers will explore ten distinct multi-functional centerpiece concepts, material selection standards, structural assembly techniques, and styling guidelines suited for diverse interior layouts. Beyond their visual aesthetic, multi-purpose centerpieces provide remarkable practical value by eliminating post-event waste and providing functional keepsakes from the celebration. Working with living plants, durable ceramic vessels, stone trays, and architectural glass cloches allows decorators to build cohesive wedding tablescapes that seamlessly fit domestic bookshelves, coffee tables, and dining credenzas later. Through clear preparation instructions, budget ideas, and sustainable assembly practices, you will learn how to build cohesive, long-lasting table arrangements that capture modern design principles with absolute technical confidence.
Why This Idea Is Trending or Useful
Multi-functional event elements consistently dominate modern Pinterest ideas because contemporary couples actively prioritize sustainable event management, investment value, and intentional interior styling over single-use disposable decor. Designing centerpieces with dual functionality delivers immense practical value by extending the lifespan of decorative purchases well beyond the reception evening. From a design perspective, artisanal items like glazed terracotta pots, ribbed glassware, and brass lanterns naturally harmonize with residential aesthetics, transitioning smoothly into living rooms, patios, and home offices. For those pursuing a DIY approach, these centerpieces present an accessible, beginner friendly creative project that eliminates the time-sensitive pressure of working exclusively with delicate, perishable cut flowers. Utilizing enduring materials—such as potted botanicals, preserved foliage, and sculptural vessels—ensures the decorative elements remain pristine throughout the wedding without wilting or leaking. This combination of budget-conscious practicality, low waste, and enduring aesthetic sophistication ensures that reusable centerpieces remain a leading trend in contemporary celebration styling.
Materials and Preparation
Assembling durable, reusable centerpieces requires purposeful materials, reliable tools, and systematic workspace organization before assembly begins. Essential supplies include permanent vessels such as footed ceramic compotes, fluted glass hurricanes, geometric brass lanterns, and natural marble trays, alongside resilient botanicals like potted ferns, living succulents, and preserved branches. Gathering proper tools ensures efficient execution: equip your workstation with bypass garden pruners, heavy-duty wire snips, floral putty, surface-safe adhesive dots, microfiber cloths, and clean potting soil or decorative drainage gravel. Prior to styling, process all permanent items by removing retail stickers, washing glass and ceramic surfaces with warm water, and drying them thoroughly with lint-free towels. Inspect living plants for damaged leaves, repotting them into uniform decorative planters with proper interior drainage liners to prevent water leaks onto event linens. Planning considerations should factor in table width, transportation crate sizing, and post-event distribution systems to keep items intact during transit. Preparing your materials methodically guarantees that every display remains structurally stable, balanced, and visually refined throughout the entire event.
Idea 1: Potted Maidenhair Fern in Footed Terracotta
Step-by-Step Guide
The potted maidenhair fern in a footed terracotta bowl brings botanical delicacy and classical European garden romance to wedding reception tables. This concept features healthy, lace-like fronds of living maidenhair fern planted inside an aged, footed earthenware compote, creating an airy silhouette that cascades gently over the rim. The natural porosity and warm tone of the terracotta vessel ground the fine botanical foliage, offering an organic warmth that complements rustic, bohemian, or outdoor garden celebrations. When brought home after the event, this living arrangement thrives on bathroom vanities, shaded kitchen windowsills, or covered patio tables where humidity is present. The elevated footed base lifts the foliage above dining flatware, preserving clear views for seated guests while adding architectural height.
To assemble this living arrangement, select an eight-inch footed terracotta compote and insert a flexible plastic saucer inside the base to catch drainage moisture. Add a one-inch layer of horticultural charcoal and coarse pebbles into the saucer bottom to ensure healthy drainage for the plant roots. Gently unpot a vigorous six-inch maidenhair fern, loosening outer roots with your fingertips before setting the root ball squarely in the center of the compote. Fill the perimeter gaps with a moisture-retentive potting mix composed of peat moss and perlite, pressing the soil down firmly until it rests one inch below the rim. Top the soil surface with clean, damp green sheet moss to conceal the dirt and lock in moisture. Place the compote in the center of the table surrounded by ribbed glass tealight holders, transferring the plant directly into a bright, indirect home light location after the wedding.
Idea 2: Architectural Glass Cloche with Living Succulents
How to Create
The architectural glass cloche with living succulents introduces a vintage botanical display that showcases miniature desert flora under protective glass domes. This design features an arrangement of varied echeveria and haworthia succulents set upon a natural turned-wood or slate coaster, topped with a tall, clear glass bell jar. The thick, geometric leaves of the succulents provide sculptural interest, while the glass cloche refracts ambient room lighting to create an intimate greenhouse feel. This clean, self-contained centerpiece eliminates water leakage risks on fine reception tablecloths. Following the celebration, the cloche transitions effortlessly into home decor, serving as a terrarium accent for office desks, fireplace mantels, or bedroom bookshelves.
Begin construction by choosing an eight-inch circular base made of natural slate or turned beechwood, applying small felt furniture pads to the underside to protect tabletop surfaces. Cut a circle of heavy plastic liner slightly smaller than the base perimeter, securing it in the center with a dab of floral putty. Arrange three contrasting living succulents—such as pale jade echeveria and striped haworthia—onto the liner, surrounding their root plugs with a balanced mix of succulent potting soil and coarse pumice. Cover the exposed soil completely with smooth, polished river pebbles or white quartz chips to create a clean surface layer. Clean the inner and outer surfaces of the glass bell jar with glass cleaner and a microfiber cloth to eliminate smudges. Lower the glass cloche carefully over the succulents, checking that the rim sits flush against the base, and mist the plants lightly once a month during home use.
Idea 3: Geometric Brass Lantern with LED Pillar
Execution Process
The geometric brass lantern centerpiece pairs clean metallic lines with soft, glowing illumination, creating a dependable focal point for industrial and modern venues. This concept utilizes a faceted, glass-paneled brass lantern holding an ivory pillar candle, surrounded at the base by loose, asymmetric sprigs of preserved olive leaves and eucalyptus. The warm metallic frame provides structure that balances the wild, flowing botanical elements on banquet tables. By utilizing a quality battery-operated LED pillar candle with an integrated timer, the display eliminates open-flame fire risks and messy wax drips on rented linens. After the reception, these versatile lanterns function as outdoor patio lighting, entryway console lanterns, or cozy fireside floor accents.
To build this modern centerpiece, clean the clear glass panes of a twelve-inch hexagonal brass lantern using an alcohol-soaked lint-free cloth to remove dust and fingerprints. Place a three-inch by six-inch ivory wax-coated LED pillar candle in the center of the lantern interior, securing its base with a flat piece of removable mounting putty to prevent shifting during transit. Prepare small botanical bundles by cutting three five-inch sprigs of preserved silver dollar eucalyptus and natural olive branch, securing the stem bases together with thin green florist wire. Attach one foliage spray to the top exterior hinge of the lantern using wire, letting the leaves drape along the brass frame. Form a loose crescent wreath around the outside base using remaining preserved foliage, nestling the lantern in the center. After the event, remove the temporary botanical cuff and set the lantern directly onto an outdoor porch or home entryway.
Idea 4: Fluted Glass Cylinder with Preserved Botanicals
How to Make
The fluted glass cylinder centerpiece with preserved botanicals blends tactile vertical texture with airy, everlasting florals, creating a modern tablescape. This design features a tall, clear glass cylinder with vertical fluted ridges, holding an upright collection of dried bleached ruscus, natural bunny tails, and golden palm spears. The textured glass ridges catch and bend candle glow, casting delicate shadows across table linens while softening the stems inside the vessel. Because the botanicals are completely dried, this centerpiece requires no water, eliminating any danger of cloudy spills during busy wedding dinners. In a residential setting, this arrangement serves as an enduring entryway display, dining table accent, or guest bedroom vanity piece that lasts for years.
Assemble this centerpiece by cleaning an eight-inch tall fluted glass cylinder with glass cleaner, ensuring both the interior and exterior walls remain streak-free. Place a small block of dry floral foam or a heavy metal pin frog in the bottom interior of the vase, securing it with clear floral adhesive tape. Trim your longest stems of bleached Italian ruscus to fourteen inches, inserting them into the rear of the foam to establish an architectural backdrop. Cut three stems of dried golden sun palm spears, inserting them at varying heights in front of the ruscus to add fan-like geometry. Fill the front and sides with clusters of natural ivory bunny tails and bleached broom bloom, angling the fluffy heads outward to conceal the internal foam mechanics completely. Transfer the entire finished vessel directly onto an interior home credenza or living room side table once the reception concludes.
Idea 5: Natural Marble Tray with Pillar Cluster
Setup Method
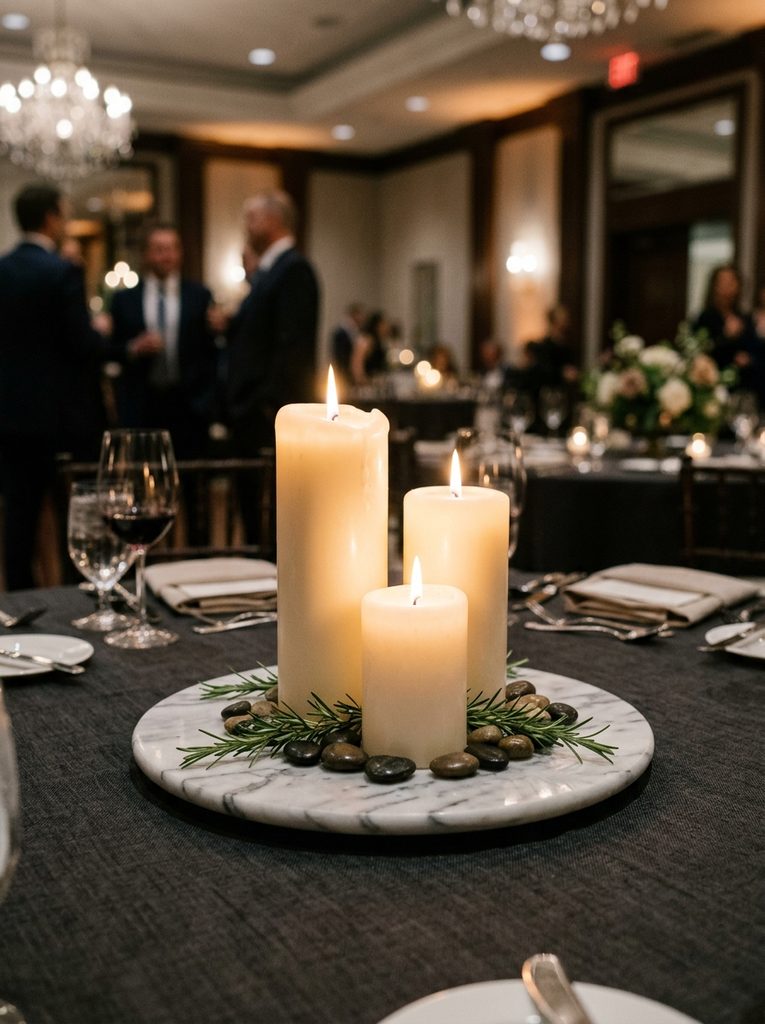
The natural marble tray with a pillar candle cluster delivers understated elegance through heavy, natural stone textures and clean geometric repetition. This design features a solid white Carrara or green travertine marble tray holding three ivory pillar candles of varied heights, accented with scattered loose stones or small brass accents. The cool, polished marble reflects warm flickering candlelight, establishing a luxurious visual anchor that keeps dinnerware grounded. The low, horizontal orientation leaves cross-table sightlines completely open, allowing guests to converse comfortably throughout the meal. When repurposed at home, the stone tray functions as a perfume organizer on a bedroom dresser, a stylish bar tray for decanters, or a functional vanity organizer.
Execute this design by sourcing a ten-inch or twelve-inch round natural marble tray with a raised rim, adhering four protective silicone bumper pads to the underside base. Clean the stone surface thoroughly with a damp cloth and allow it to dry completely before candle placement. Select three ivory wax pillar candles measuring four, six, and eight inches in height, positioning them in an asymmetrical triangle formation on the marble surface. Secure each candle base to the marble using clear double-sided adhesive dots to prevent tipping when tables are bumped by catering staff. For wedding styling, tuck two short sprigs of fresh rosemary or olive leaves between the candle bases for a subtle touch of green. Following the celebration, discard the botanical sprigs and repurpose the heavy stone tray as a functional organizer in your master bathroom or kitchen island.
Idea 6: Glazed Stoneware Pitcher with Olive Branches
Step-by-Step Guide
The glazed stoneware pitcher with fresh olive branches channels Mediterranean countryside warmth through artisanal pottery and rustic foliage. This concept utilizes a heavy ceramic pitcher in warm oatmeal, matte cream, or soft sage, filled with an abundant spray of natural olive branches. The curved handle and organic ceramic silhouette introduce handcrafted domestic charm that softens rigid banquet spaces. The silvery-green undersides of olive leaves catch ambient venue lighting, creating subtle shimmer across the dining area. After the wedding festivities, this ceramic pitcher transitions seamlessly into daily kitchen life, functioning as a working beverage server, utensil crock for wooden spoons, or casual floral vase on dining tables.
To prepare this arrangement, inspect an eight-inch glazed ceramic pitcher to confirm the interior glaze is completely watertight and crack-free. Fill the pitcher two-thirds full with fresh, room-temperature water mixed with a standard packet of commercial cut-flower food. Select four long, sturdy branches of fresh olive foliage, trimming the woody stem ends at a sharp forty-five-degree angle using bypass pruning shears. Strip all leaves from the lower four inches of each stem to ensure clean water submersion and prevent bacterial growth. Insert the two tallest branches into the center of the pitcher, allowing the remaining shorter branches to lean naturally toward the spout and handle to create an asymmetrical, relaxed silhouette. Wipe down the ceramic exterior with a clean cloth before placing it on the reception table, easily refilling the water throughout the event and keeping the pitcher as permanent kitchenware later.
Idea 7: Wooden Dough Bowl Succulent Garden
Execution Process
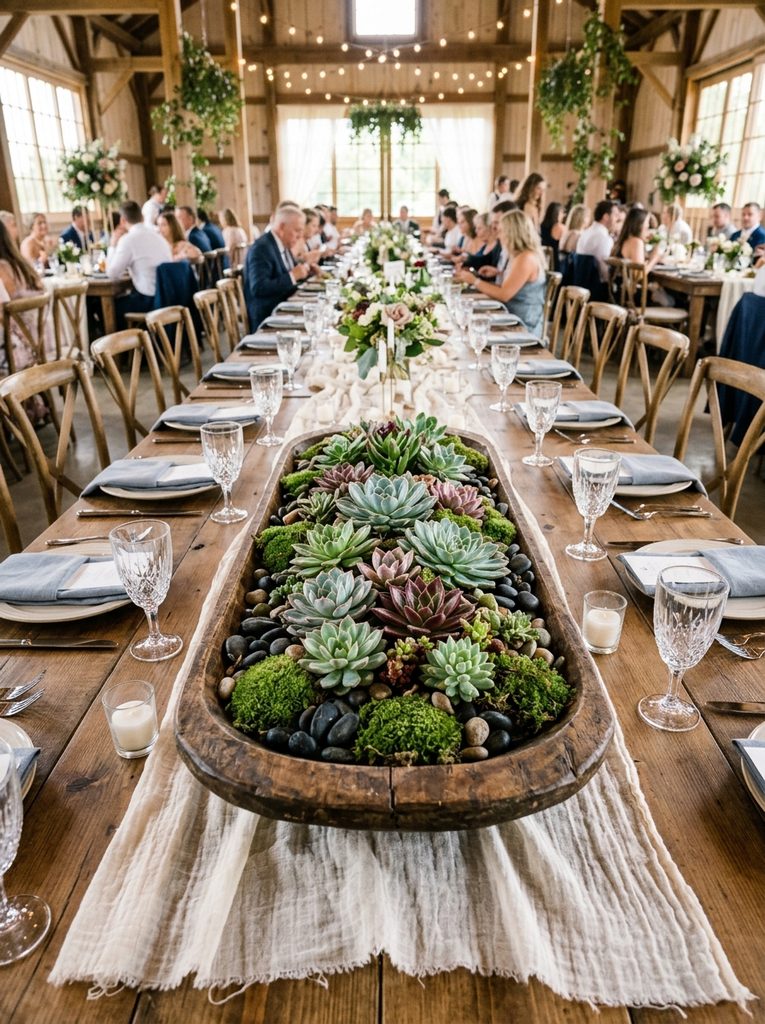
The wooden dough bowl succulent garden brings rustic warmth and rich, varied textures to long banquet tables through a low, linear arrangement of living desert plants. This design showcases a carved paulownia or reclaimed pine trench bowl filled with an assortment of living rosette succulents, dark river pebbles, and velvety sheet moss. The elongated, low-profile footprint makes this centerpiece ideal for long rectangular farm tables, framing the center without obstructing guest sightlines. The warm, weathered timber introduces an earthy texture that complements linen runners and matte stoneware plates. At home, this self-contained living garden serves as a striking centerpiece for dining tables, kitchen islands, or outdoor patio coffee tables.
Start by sourcing an eighteen-inch carved wooden dough bowl, sealing the interior cavity with a clear coat of water-resistant polyurethane or lining it with heavy clear plastic sheeting trimmed flush with the bowl rim. Spread a half-inch layer of horticultural drainage gravel across the base, topping it with a well-draining cactus soil blend. Select five to seven living succulents in varied shapes and colors—including rosettes, trailing burro’s tail, and jade—arranging them in an undulating, natural pattern down the length of the bowl. Pack additional soil firmly around each root ball to stabilize the plants, ensuring the crowns sit level with the bowl edges. Tuck damp green moss and small polished black stones over the exposed soil to create a finished look. After the wedding, position the bowl on a sunny home dining table, watering sparingly once every three weeks.
Idea 8: Ribbed Amber Glass Bud Vase Assortment
How to Make
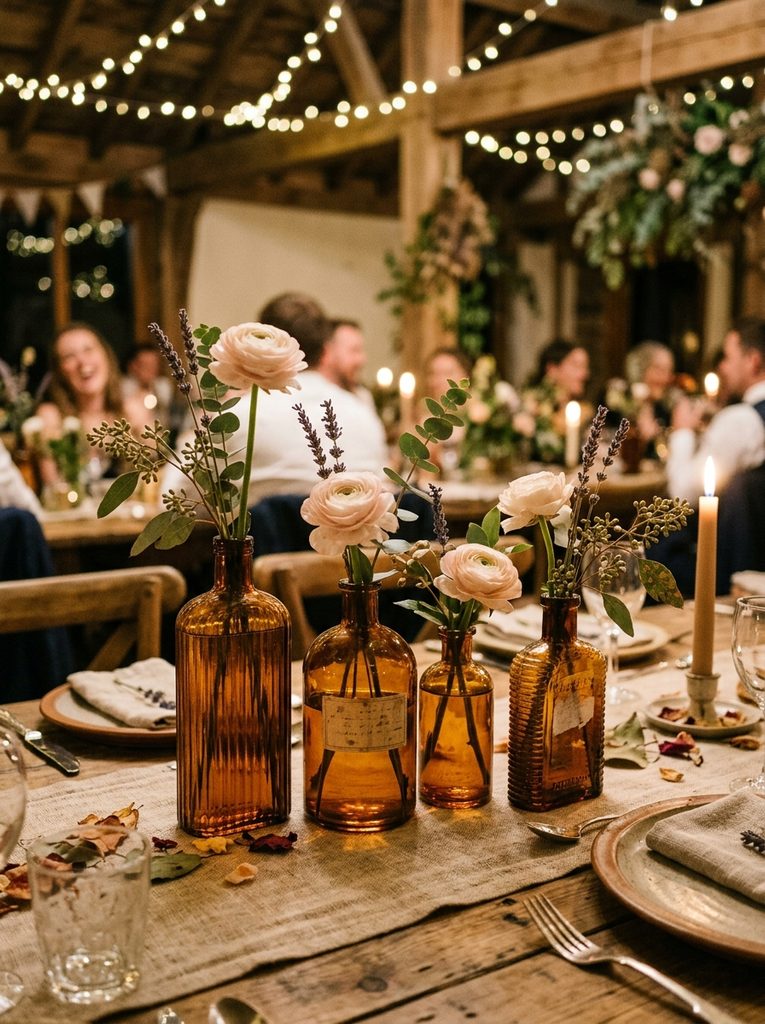
The ribbed amber glass bud vase assortment introduces warm vintage nostalgia and dynamic visual rhythm through scattered clusters of small, textured bottles. This concept uses an eclectic grouping of three to five amber-tinted glass medicine bottles and fluted bud vases, each holding a single delicate flower stem or dried botanical sprig. The warm amber glass bends light, casting a golden hue across table settings while concealing submerged stems. Scattering small vases creates an airy, relaxed tablescape that leaves plenty of room for shared family-style dinner platters. Once the wedding is over, these charming bottles can be divided among friends or displayed along residential window ledges, floating bathroom shelves, and office desks.
To assemble this scattered runner, gather four assorted amber glass bud vases ranging from four to seven inches tall for each guest table. Fill each bottle halfway with clean water, using a slender watering can to keep the exterior glass completely dry. Trim your chosen flower stems—such as open ranunculus, delicate cosmos, or sprigs of dried lavender—so the blooms hover one to three inches above the bottle rims. Place a single focal bloom in the taller bottles, adding small sprigs of textured foliage like seeded eucalyptus to the wider-mouth jars. Arrange the filled bottles in an organic cluster in the center of round tables, or stagger them along a linen runner on banquet tables, interspersing small glass tealight holders between the vases. After the reception, rinse the bottles thoroughly and place them along a sunny kitchen windowsill to propagate houseplant cuttings.
Idea 9: Pedestal Fruit Compote with Preserved Foliage
Setup Method
The pedestal fruit compote centerpiece combines classical still-life elegance with living elements, featuring whole seasonal fruits nestled among preserved greenery. This design utilizes a shallow footed compote made of dark iron, cast stone, or brushed brass, filled with real whole fruits like green pears, pomegranates, and dark figs, framed by trailing preserved eucalyptus. The rich colors of the fresh fruit introduce deep tones that complement fall and winter celebrations, while the elevated compote base lifts the arrangement above flatware. The entire arrangement is food-safe and completely reusable; following the wedding, the fruit can be enjoyed at home while the vessel serves as a luxury fruit bowl on a kitchen island.
Begin setup by selecting a nine-inch footed compote bowl in antique brass or dark cast stone, lining the interior with clean food-grade wax paper. Lay a circular foundation of preserved seeded eucalyptus and salal leaves around the inner rim of the bowl, allowing the leafy tips to spill naturally over the metal edge. Wash and dry whole seasonal fruits—such as small Bosc pears, whole pomegranates, and dark purple figs—buffing their skins with a dry cloth to bring out their natural sheen. Arrange the heaviest fruits, such as pomegranates, in the center of the compote to establish a stable core, nestling the smaller pears and figs around them to build a mounded shape. Tuck small sprigs of fresh rosemary between the fruits to fill gaps and add a light scent. After the reception, transfer the fruit to your home pantry and use the pedestal compote as an everyday kitchen fruit bowl.
Idea 10: Heavy Cast Concrete Planter with Herbs
Step-by-Step Guide
The heavy cast concrete planter with living culinary herbs brings modern industrial architecture and fresh fragrance to wedding reception tables. This concept features a rectangular or cylindrical raw concrete planter holding potted aromatic herbs like rosemary, sweet basil, and silver thyme, topped with clean gravel. The cool gray stone texture provides an appealing contrast against delicate green herb leaves, making it a great fit for modern lofts, minimalist weddings, and outdoor terrace receptions. The herbs emit a subtle, clean scent that enhances the dining environment without competing with the meal. When brought home, these functional planters serve as an indoor kitchen herb garden on sunny counters or patio railings.
Construct this functional herb centerpiece by choosing a ten-inch rectangular raw concrete planter fitted with an internal plastic drainage liner. Place a one-inch layer of coarse pea gravel across the bottom of the liner to ensure healthy root drainage. Remove healthy potted herbs—such as upright Tuscan rosemary, curly parsley, and variegated thyme—from their plastic nursery containers, setting them side by side inside the concrete planter. Fill the surrounding spaces with rich, organic potting soil, pressing down around the plant bases to eliminate large air pockets. Water the soil lightly until damp, wiping away any stray soil from the concrete exterior with a damp sponge. Spread a half-inch layer of crushed white marble chips across the top soil to give the planter a clean, modern finish. Following the wedding, position the planter on a sunny kitchen counter to provide fresh cooking herbs year-round.
Common Beginner Mistakes and How to Avoid Them
Creating reusable DIY wedding centerpieces presents specific design hurdles that differ from standard cut-flower arranging. The most critical mistake beginners make is failing to seal porous containers like terracotta, unglazed stoneware, or wooden dough bowls, resulting in water seepage that damages expensive banquet tablecloths. Always line porous vessels with waterproof plastic liners, saucers, or florist cellos before adding damp soil or water, checking for leaks prior to event day. Another widespread issue is poor scale and balance; building top-heavy arrangements in lightweight containers causes centerpieces to topple when tables are bumped. Prevent accidents by adding heavy drainage gravel or stone ballast to container bases, keeping the center of gravity low and stable. Finally, many decorators choose high-maintenance indoor houseplants that droop under venue air conditioning or dim lighting. Avoid this by selecting hardy, climate-resilient plants such as pothos, ZZ plants, or living succulents, which tolerate varied temperatures and lighting conditions throughout long celebrations without showing signs of stress.
Practical Tips for Better Results
Achieving a polished, store-bought finish with reusable centerpieces relies on meticulous surface cleaning, proper plant preparation, and intentional transport planning. Always clean both the interior and exterior of glassware, ceramic vessels, and brass lanterns with a microfiber cloth and rubbing alcohol before styling; this removes manufacturing residue and fingerprints that become visible under bright table lighting. When designing living plant arrangements, repot the specimens at least one week prior to the wedding day; this gives the roots time to settle, ensures the plants look perky, and allows excess soil dust to wash away before placement on fine linens. Apply small adhesive felt or silicone surface bumpers to the underside of heavy stone, concrete, and ceramic containers to prevent scratching wooden farm tables or delicate tablecloths during setup. If utilizing candles inside lanterns or glass cylinders, choose quality battery-powered LED pillars with automated timers, ensuring consistent illumination throughout the evening without open-flame hazards or wax spills. Finally, pack extra clean gravel, moss, and a microfiber cloth in your setup kit to quickly touch up any arrangements displaced during transit.
Styling, Presentation, or Organization Ideas
A thoughtful presentation enhances the visual beauty of multi-functional centerpieces, whether you are styling an event ballroom or a cozy home living space. Layer diverse lighting elements around your primary reusable vessels: nestle small ribbed votives, delicate tea-light cups, and slender taper candles among your potted plants or stone trays to create glowing highlights and gentle shadows across dining surfaces. Pair permanent containers with textured linens, such as washed Belgian linen, waffle-weave runners, or raw cheesecloth overlays, which ground the solid vessels with tactile warmth. Select dinnerware and flatware finishes that complement your vessel materials: warm brushed brass and antique gold flatware highlight the warm tones of terracotta and amber glass, while polished chrome and modern silverware emphasize the cool, architectural lines of concrete and marble. For an organized, cohesive reception room, alternate centerpiece styles across tables—pairing tall brass lanterns on half the tables with low dough bowl succulent gardens on the others—to create dynamic visual movement across the venue while optimizing rental decor budgets.
Budget or Time Planning
Careful project planning helps you balance your creative goals with realistic material costs and project timelines, ensuring your wedding decor stays on budget. Sourcing durable home decor vessels—such as ceramic pitchers, concrete planters, and glass cloches—from home goods outlets or wholesale decor suppliers allows you to invest your budget into items that will provide long-term functional value in your home rather than being discarded. Living potted plants cost significantly less than cut floral stems and can be purchased weeks in advance, eliminating the last-minute stress, refrigeration needs, and rush delivery fees associated with fresh cut flowers. Structure your preparation into organized, stress-free stages: spend two weeks prior to the wedding sourcing containers, washing vessels, and potting living plants in a comfortable garage or studio space. Assemble all dry components, such as LED candles in lanterns and stone trays with bumpers, packing them into padded storage bins labeled by table number. Reserve the morning of the wedding exclusively for on-site table placement and candle switching, allowing you to complete reception styling in a fraction of the time required for fragile floral setups.
Creative Expansion and Advanced Inspiration
Once you master basic reusable vessel centerpieces, you can explore creative variations that expand the style, scale, and functional life of your decor. Consider incorporating personalized calligraphy elements directly onto permanent containers: use oil-based paint pens to letter table numbers or meaningful quotes onto ceramic pitchers, marble trays, or terracotta pots, creating personalized keepsakes that celebrate your wedding date in your home later. You can also experiment with seasonal transitions by choosing vessels that adapt easily to holiday styling: brass lanterns, glass cloches, and wooden dough bowls can be refreshed with pinecones and holiday greenery in winter, pastel eggs in spring, or mini gourds in autumn. Another engaging approach involves assigning centerpiece vessels as meaningful gifts for wedding party members, family hosts, or vendors, presenting them with a fully established, living home decor accent at the conclusion of the evening. These adaptable design techniques ensure your wedding decor remains functional, beautiful, and treasured long after the final dance of your reception.