Contemporary wedding styling relies heavily on structured spatial dynamics, clean architecture, and balanced visual weight across reception tables. Designing functional, artistic tablescapes requires an intentional blend of structural frames, organic botanical arrangements, and reflective accent lighting. This detailed manual covers ten original, structurally sound geometric wedding centerpiece concepts that incorporate metallic armatures, sculptural woodwork, and faceted glass enclosures into formal dining spaces. You will gain actionable guidance on proportion control, floral mechanics, anchoring media, and material compatibility to produce cohesive tablescapes. Exploring these curated arrangements enables couples, event coordinators, and florists to establish clear visual continuity across diverse floor layouts without blocking guest sightlines across banquet or round table configurations. Understanding how geometric angles interact with natural greenery, candle flame dispersion, and ambient venue lighting allows for deliberate table staging. Each project highlights beginner friendly assembly strategies, practical DIY workflows, and structural modifications suited for various budget tiers. By applying systematic assembly practices, selecting resilient floral varieties, and matching base sizes to reception table profiles, you can construct modern, professional arrangements that retain their structural integrity throughout the duration of the event.
Why This Idea Is Trending or Useful
Geometric centerpieces maintain widespread popularity across wedding styling platforms because they bridge the visual gap between crisp modern design and soft botanical installations. Traditional mound arrangements often require dense masses of expensive blooms, which can drive up decoration costs and crowd dining surfaces. In contrast, geometric frameworks offer structural presence and vertical height using open air space, allowing reception spaces to look filled while using fewer fresh stems. This open architecture maintains clear lines of sight across reception tables, encouraging seamless table conversation among guests without heavy physical obstruction. Furthermore, geometric forms complement a vast spectrum of event motifs, spanning clean Scandinavian minimalism, industrial urban lofts, desert aesthetics, and mid-century modern environments. The modular nature of wire polygons, terrariums, and timber cubes makes them accessible for novice decorators pursuing straightforward DIY projects. These physical vessels are reusable after the wedding day, transitioning effortlessly into functional everyday home decor accents, terrariums, or tabletop organizers.
Materials and Preparation
Thorough planning and systematic preparation form the foundation of stable, visually balanced wedding table centerpieces. Before beginning construction, secure reliable raw materials: welded metal wire prisms, faceted brass lantern enclosures, untreated hardwood timber battens, floral foam cages, bind wire, waterproof floral tape, and micro-hole wire mesh. Essential crafting tools include heavy-duty wire snips, pruning shears, hand saws, industrial hot glue applicators, high-tack floral adhesive, and measuring gauges. Calculate table dimensions and seating layouts in advance to define exact height thresholds, ensuring no centerpiece element intrudes into the primary guest conversation corridor between fourteen and twenty-two inches above the tablecloth. Conditioning your natural botanicals is an essential initial step; trim stem ends at a clean forty-five-degree angle and hydrate stems in room-temperature floral nutrient solution for twelve hours before assembly. When incorporating open candle flame sources, verify venue fire safety parameters, calculate glass chimney clearance dimensions, and anchor all internal pillar foundations using clear mounting putty to prevent shifts during event service.
Idea 1: Floating Rose Gold Icosahedron Cage
Step-by-Step Guide
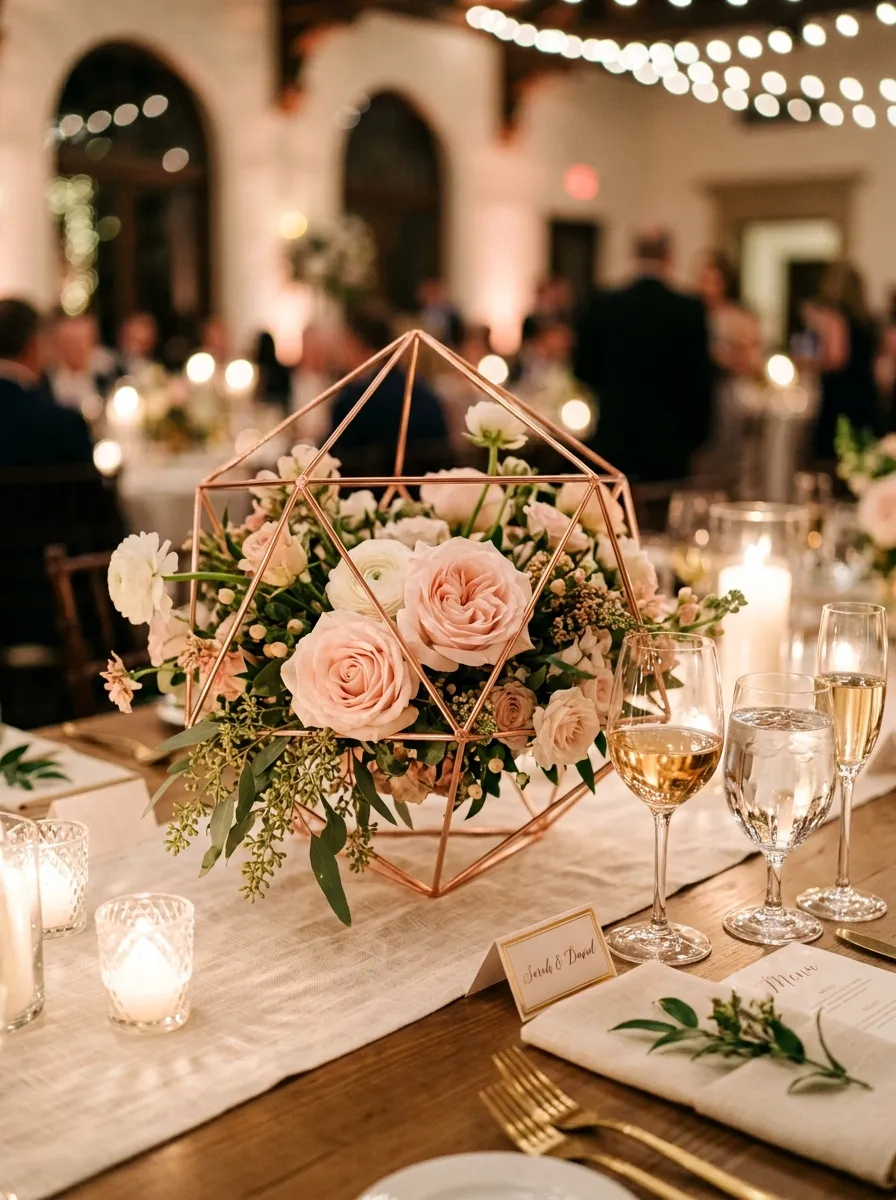
The floating rose gold icosahedron cage brings architectural sophistication to reception tables by suspending delicate garden florals inside a twenty-sided geometric framework. The open-air wire exterior provides a three-dimensional boundary that catches indoor downlighting, casting light geometric shadows across table linen surfaces. Using rose gold wire softens the industrial nature of the form, offering a warm metallic undertone that pairs well with blush garden roses, ranunculus, and silver dollar eucalyptus. This design keeps the flowers clustered tightly at the lower interior core, creating an organic counterpoint to the rigid polygonal outer points. The elevated wire facets guide the viewer’s eye upward without building a solid visual barrier, making it suitable for standard round banquet tables seating eight to ten guests. Because the frame remains mostly open, ambient light moves naturally through the interior, highlighting the velvety petals and variegated green foliage from every seat.
Begin by assembling a twelve-inch welded hollow iron wire icosahedron armature finished in a uniform rose gold metallic powder coating. Cut a three-inch circular puck of high-density wet floral foam, soak it completely in water treated with flower food until submerged, and wrap the foam sides securely in green florist foil to prevent water leakage onto table surfaces. Secure the wrapped foam disc onto a shallow three-inch clear acrylic drainage dish using waterproof bowl tape. Place this base unit flat onto the lower internal apex of the metal icosahedron, locking the dish edges to the wire struts using two thin, discreet zip ties trimmed flush at the base. Insert your greenery first, pushing shortened stems of seeded eucalyptus and olive foliage into the foam perimeter at forty-five-degree angles to conceal the plastic mechanics. Insert five focal blush garden roses and seven white ranunculus stems directly into the top center of the foam, keeping stem lengths between three and four inches so the blooms sit neatly within the lower half of the cage.
Idea 2: Octagonal Prism Terrarium with Floating Botanicals
Execution Process
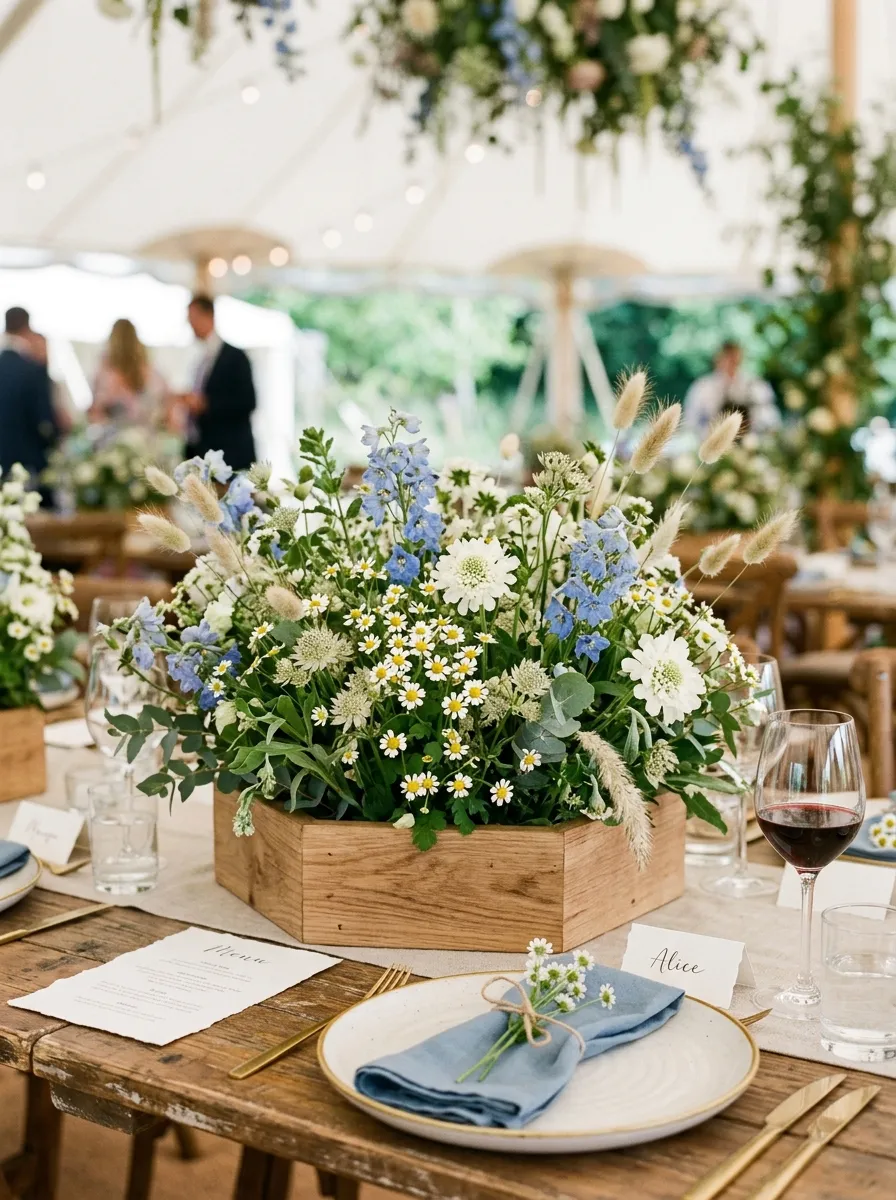
The octagonal prism terrarium offers a polished, vitrine-style presentation that protects delicate floral cuts while showcasing sharp glass seams. Featuring eight clear glass side panels joined by slim antiqued brass soldered joints, this vertical prism functions as a protective micro-environment for sensitive botanical elements. The clear glass structure reflects nearby candle flickers, generating a layered lighting effect that elevates evening dinner services. Rather than filling the vessel with soil or gravel, this modern design treats the interior as an artful botanical display case, balancing negative internal space with a suspended floral spray. Soft cream lisianthus, dynamic clematis tendrils, and trailing asparagus fern stems create an illusion of weightless suspension inside the glass chamber. Its vertical lines make it an effective centerpiece for narrower rectangular farm tables, establishing visual height while keeping a compact surface footprint that leaves ample room for family-style food platters and place settings.
Select an open-topped octagonal glass prism measuring fourteen inches high and six inches in diameter, ensuring all solder lines are cleaned with rubbing alcohol to remove oils. Cut a mini rectangular block of dry floral foam to two inches square, secure it into a specialized mini floral cage, and thoroughly saturate the exposed foam core with water. Fix this miniature cage onto the bottom interior base of the glass chamber using clear, heavy-duty waterproof silicone mounting dots pressed down with firm pressure. Insert dynamic curved stems of ruscus and fine asparagus fern directly into the base foam, angling them upward along the glass seams to define an internal vertical arch. Place three stems of cream lisianthus and two delicate heads of white spray roses at staggered heights within the lower third of the chamber to establish a grounded floral base. Finish the internal base by covering the exposed mechanical cage with preserved gray pillow moss and smoothed beach river stones.
Idea 3: Natural Timber Hexagonal Box with Wildflower Meadow
How to Create
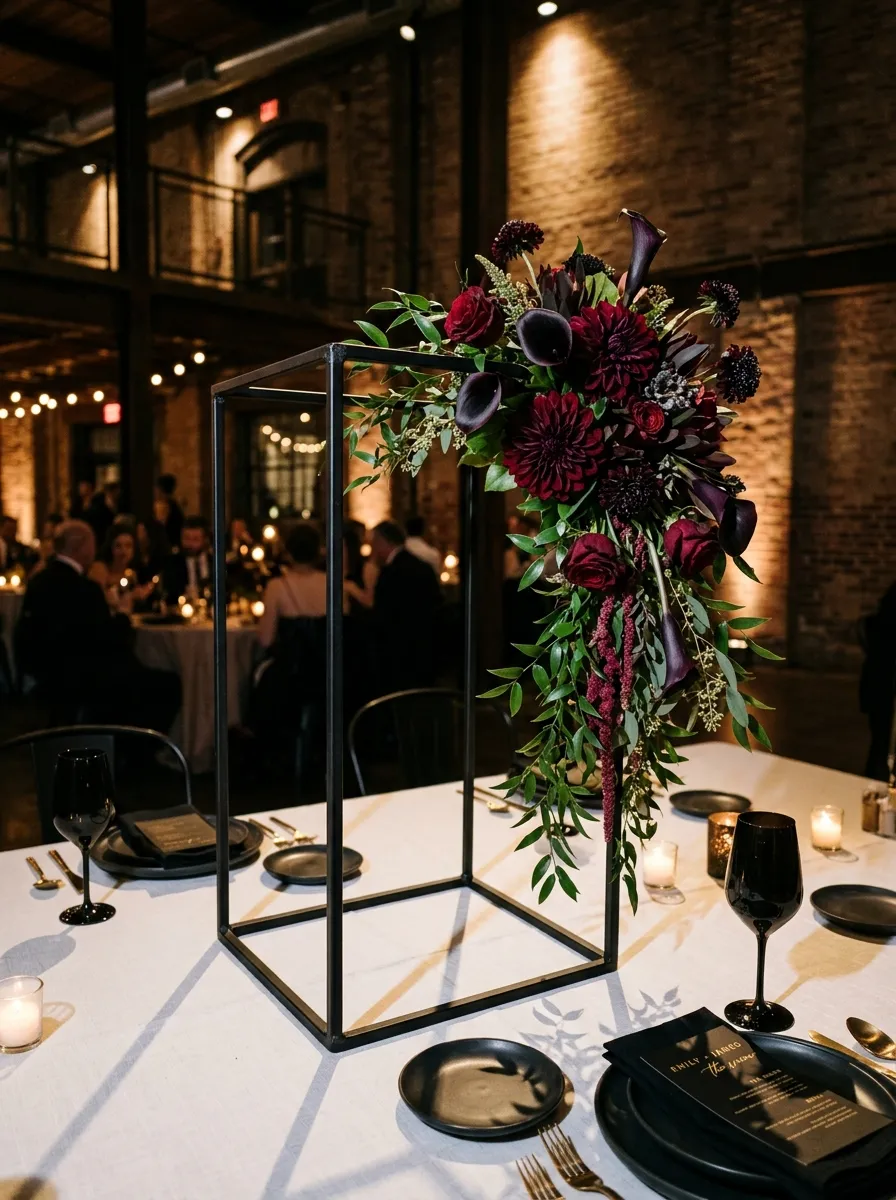
The natural timber hexagonal box centerpiece combines clean, angular woodwork with the relaxed texture of a meadow-style wildflower arrangement. Crafted from planed white oak or blonde pine, the six-sided shallow wooden tray provides an organic anchor that grounds rustic indoor or outdoor wedding tablescapes. Its low-profile structure ensures that conversation across the dining table remains entirely unobstructed, adhering strictly to ergonomic wedding guidelines. The geometric layout provides six distinct outward viewing facets, allowing each guest seated around the table to see a balanced mix of florals and textures. The design pairs the straight lines of the wooden frame with soft garden florals, including blue delphinium florets, chamomile, scabiosa, and feathered ornamental grasses. This combination fits garden receptions, vineyard settings, and barn venues, introducing a crafted, artisanal character that feels both contemporary and warm.
Build a shallow six-sided wooden box measuring ten inches wide from corner to corner and three inches in vertical wall height using half-inch thick planed oak boards joined with interior wood glue and flush pin nails. Seal the interior joint lines with waterproof clear silicone caulk and allow it to cure for twenty-four hours before introducing moisture. Cut a heavy-gauge clear vinyl sheet to size and press it firmly into the wooden container, stapling the perimeter one-half inch below the upper rim to establish a leak-proof liner. Cut a saturated wet floral foam brick to fit within the hexagon, securing a layer of coated poultry wire netting over the top of the foam and tucking the edges beneath the base to provide multi-point stem stabilization. Push upright stems of feathery bunny tail grass and blue delphinium into the foam center to establish a gentle vertical spray twelve inches high. Fill the surrounding areas with low-stemmed chamomile, white scabiosa, and creeping pennycress, distributing blooms outward over the timber rim to disguise hard container edges.
Idea 4: Asymmetrical Matte Black Cuboid Frame Installation
Setup Method
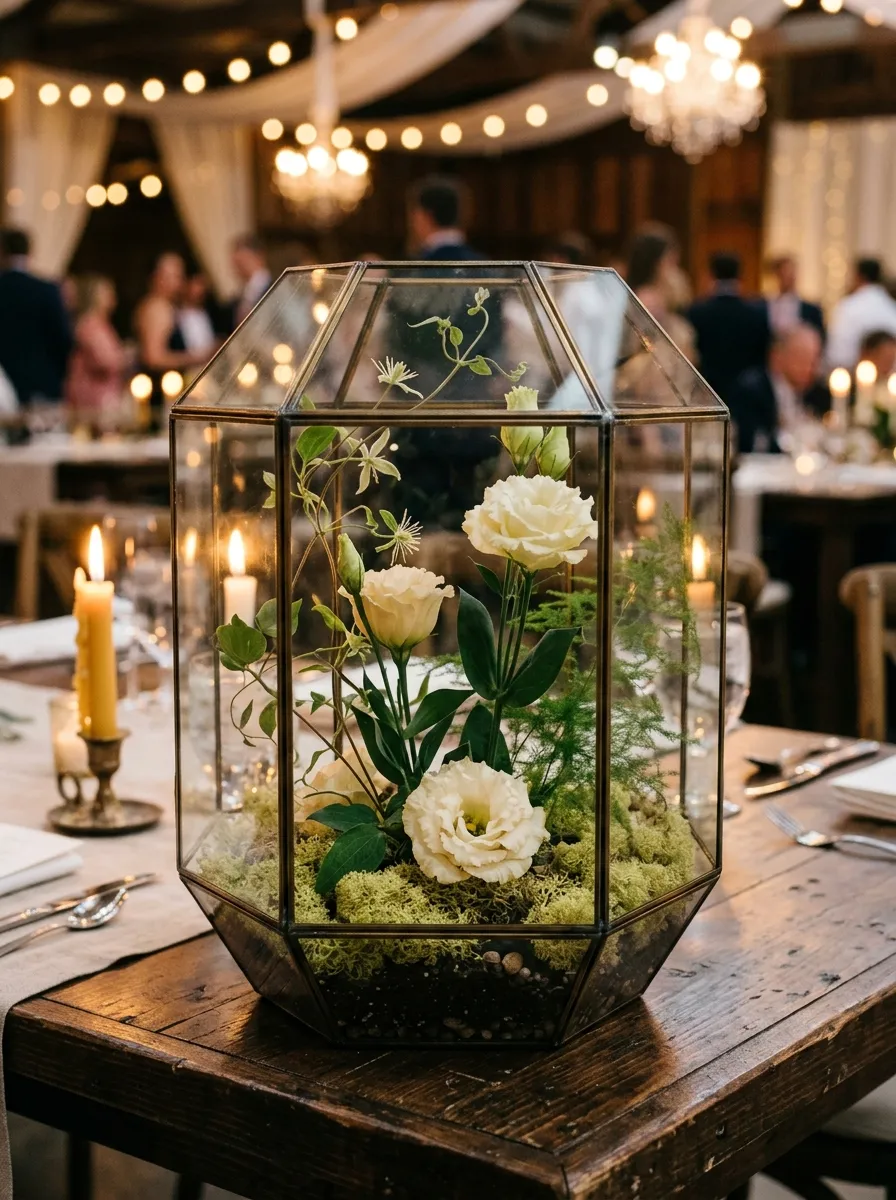
The asymmetrical matte black cuboid centerpiece embraces industrial minimalism by using crisp lines, negative space, and off-center botanical clustering. Constructed from slender square-profile hollow steel rods, the black frame outlines a sharp rectangular box that contrasts with light linen tablecloths. Instead of positioning florals centrally, this approach clusters all botanical mass along one vertical upright and across the top adjacent corner, leaving the remaining frame open. This structural layout provides an engaging focal point that shifts in appearance depending on where guests are seated around the table. The bold black finish pairs cleanly with deep burgundy dahlias, dark calla lilies, and glossy tropical foliage, creating an eye-catching moody palette. The open cuboid design works especially well on extra-long banquet table rows, where repeating multiple frames down the table centerline creates an architectural gallery effect across the venue.
Obtain a fabricated sixteen-inch by eight-inch by eight-inch open rectangular cuboid frame made from quarter-inch square-stock iron tubing coated in flat matte-black enamel. Prepare a small, four-inch double-ended floral cage packed with wet foam, and secure it horizontally along the top right interior corner joint using two black UV-resistant zip ties pulled tight with pliers. Affix a second, identical saturated foam mechanics cage onto the diagonally opposite lower bottom rod to balance physical weight across the framework. Beginning at the top corner, insert cascading Italian ruscus and trailing ivy stems downward along the vertical steel post, securing trailing runners with fine black floral wire. Insert five dark burgundy dahlias, four deep plum calla lilies, and delicate sprays of dark sweet pea blossoms into the top cage, angling blooms outward to produce an organic burst from the metal junction. Replicate this planting logic on the lower base cage with shortened stems to anchor the arrangement, then vacuum loose debris from the table surface.
Idea 5: Layered Mirrored Dodecahedron and Pillar Display
How to Make
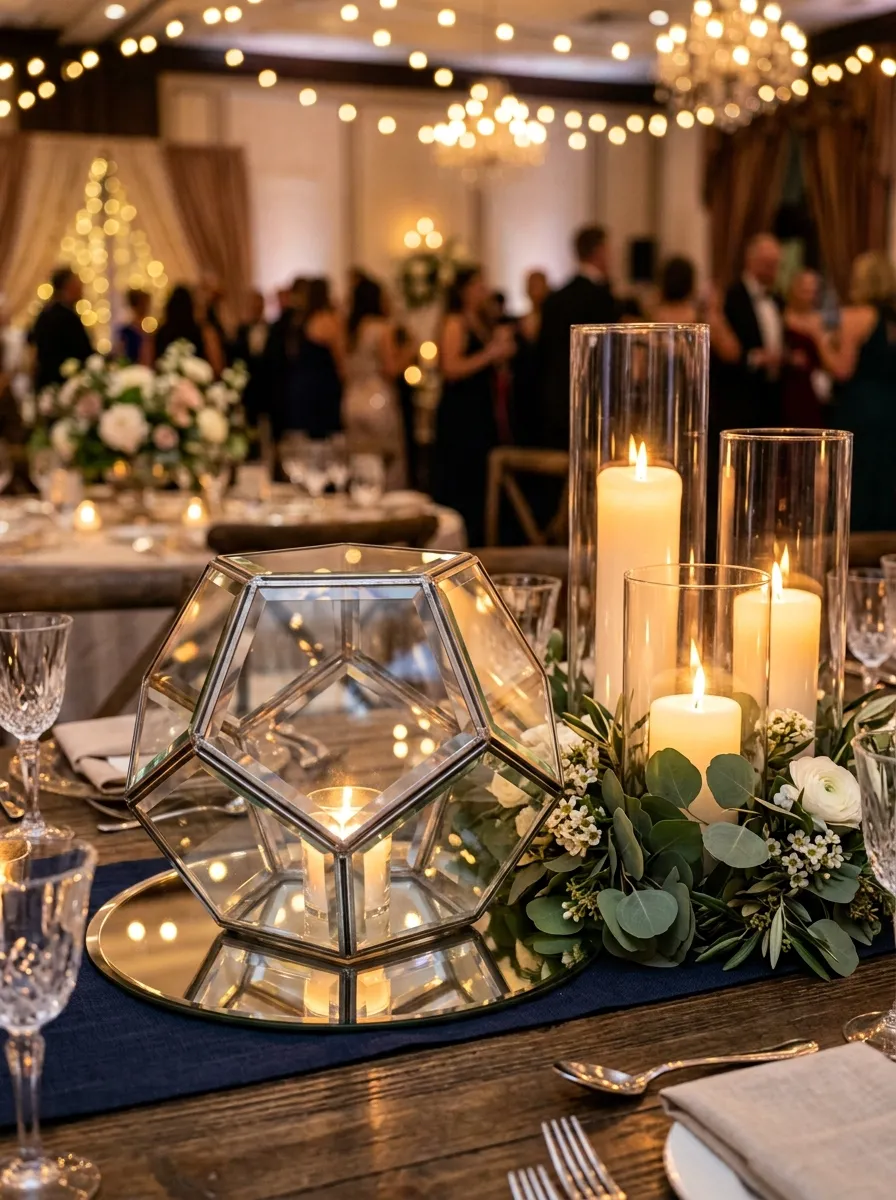
The layered mirrored dodecahedron centerpiece combines twelve-sided geometric shapes with reflective surfaces to produce a dynamic lighting feature. Composed of pentagonal mirrored glass tiles set into a durable metal matrix, the base reflects overhead pin-spotting and ambient candle flickers across the dining table. Surrounding this sculptural polyhedral form with varying heights of clear glass cylinder vases holding real-wax LED candles creates a warm, layered tablescape. The polished surfaces reflect nearby flower petals and glassware, visually expanding the tabletop space. This arrangement serves as an effective low-water alternative to heavy floral displays, making it well suited for hot outdoor climates or multi-day celebrations where cut flowers might wilt. Its low, stable physical footprint makes it resistant to wind gusts on open terraces, while the geometric facets bounce light smoothly throughout the event.
Source an eight-inch diameter open-faced hollow dodecahedron constructed from bevel-edged mirrored glass panels soldered with an aged pewter patina. Place a ten-inch circular beveled mirror runner flat on the center of the reception table surface to act as an expanded reflective tray base. Position the mirrored dodecahedron slightly off-center on the round base plate, tilting the open pentagonal face outward toward the primary table viewing approach. Set three clear borosilicate glass cylinder chimneys measuring six, eight, and ten inches in height closely around the back curve of the geometric dodecahedron. Place a pure white, unscented paraffin pillar candle into each glass cylinder, securing the bottom wax bases with clear adhesive discs to prevent tipping. Weave fresh, hardy silver dollar eucalyptus garlands and white spray aster blooms tightly around the base perimeter of the glass chimneys and dodecahedron footings, concealing the outer edges of the circular mirror runner beneath natural greenery.
Idea 6: Minimalist Brass Triangle Archway Ensemble
Step-by-Step Guide
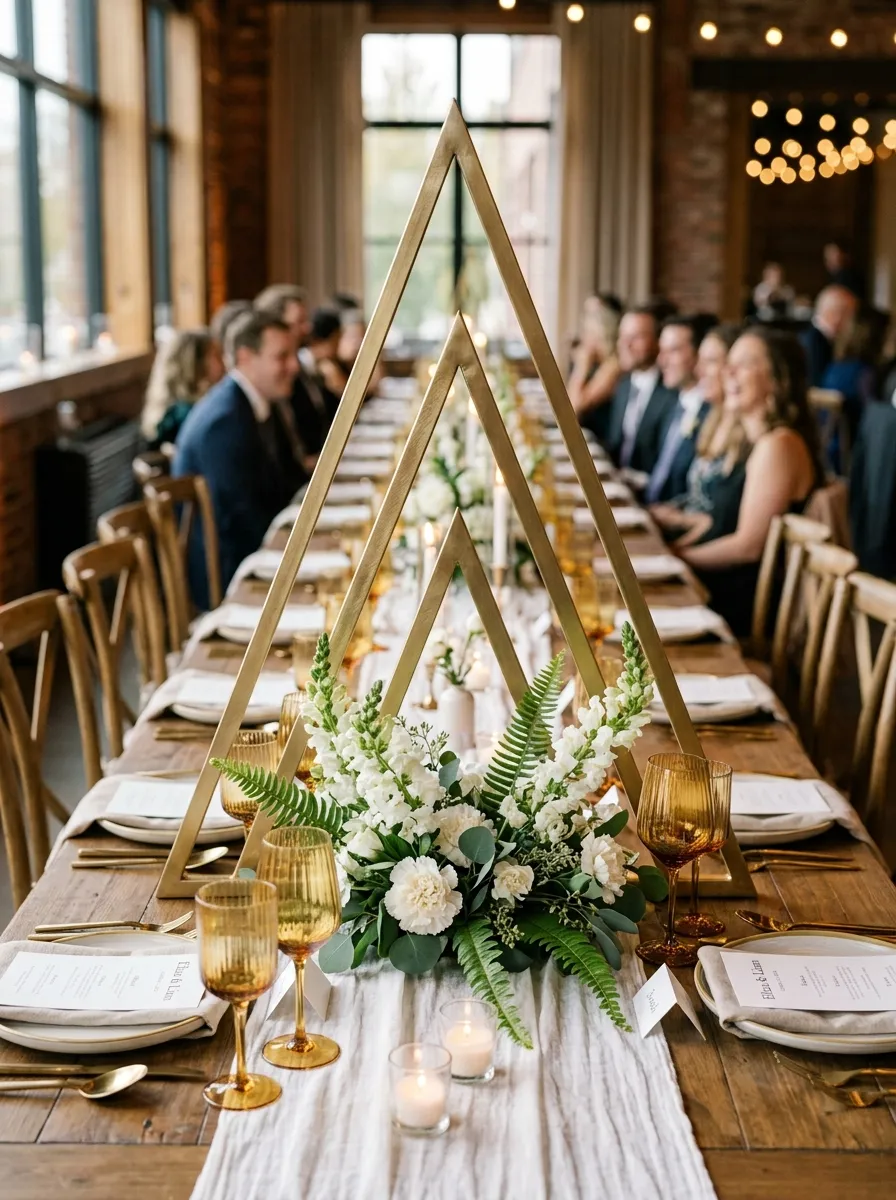
The minimalist brass triangle archway ensemble translates modern architectural backdrops into a functional tabletop scale. Featuring three nested, free-standing equilateral triangles of graduated heights, this centerpiece establishes vertical rhythm along banquet tables without requiring solid, heavy floral backings. The brushed brass tubing provides a warm metallic sheen that complements amber glassware and natural stone chargers. Flowers are gathered exclusively at the converging base vertices of the metallic frames, creating an anchor point that keeps the upper triangular peaks crisp and open. This geometric styling is well suited for modern industrial warehouse weddings, contemporary art museum venues, or outdoor tent receptions. The linear profile makes setting up and breaking down straightforward, as the flat-sided triangular foundations pack efficiently during event transport and setup.
Fabricate three distinct equilateral open triangle forms from half-inch round brass tubing, sizing them at twelve, sixteen, and twenty inches in overall height, with each triangle attached to a four-inch flat brass plate base. Arrange the three triangular components along the center axis of an eight-foot wooden farm table, overlapping the outer base plates slightly to create a cohesive staggered row. Clamp the overlapping brass footings together beneath the table runner line using low-profile C-brackets to ensure the tall vertical frames remain upright if the table is bumped. Secure a six-inch saturated floral saddle cage across the joined base plates using waterproof wire ties. Insert long, arching stems of sword fern and bleached Italian ruscus outward from the base along the table runner axis. Add ten stems of architectural white antirrhinums and ivory carnations into the top of the foam base, directing the blooms to frame the lower interior opening of the triangles while leaving the upper metallic peaks clear.
Idea 7: Sculptural Pyramidal Wire Obelisk with Orchid Cascades

Execution Process
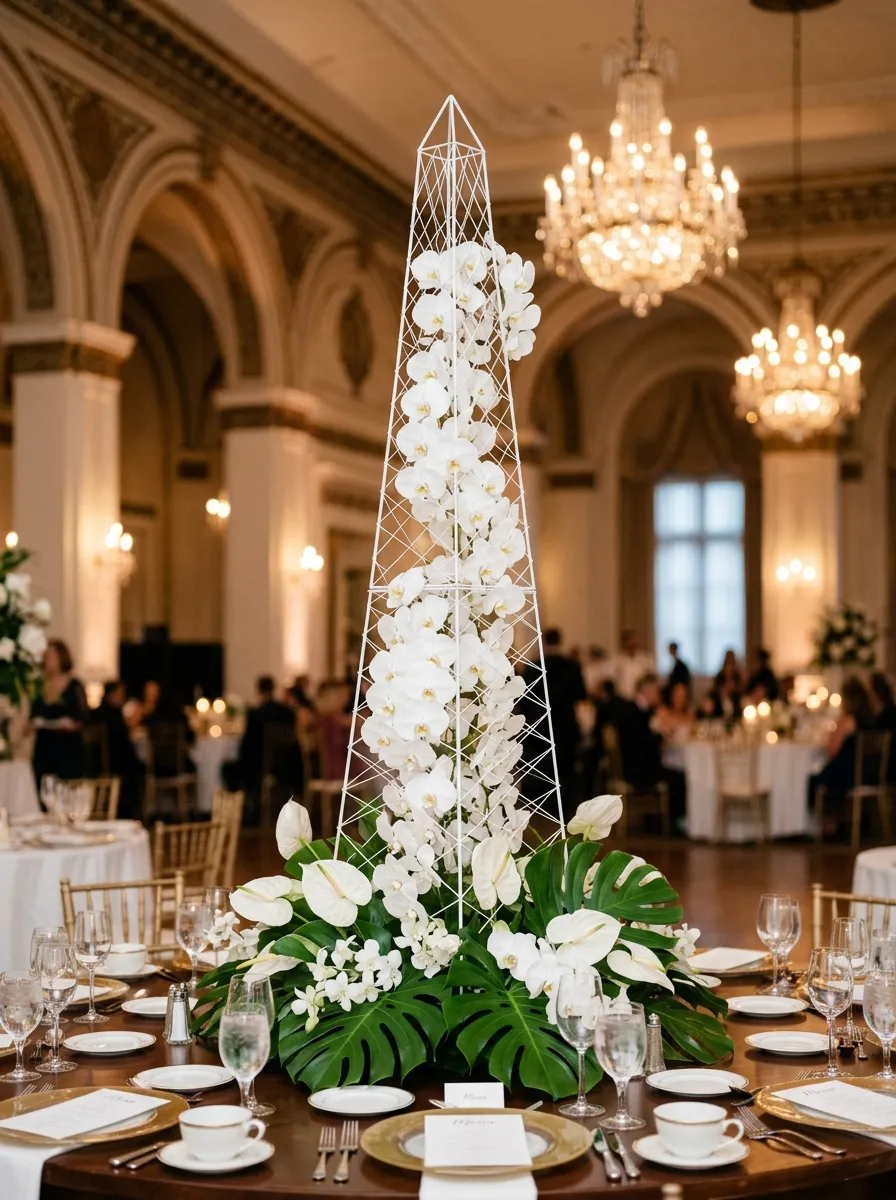
The sculptural pyramidal wire obelisk centerpiece uses strong vertical tapering to draw the eye upward toward high ceiling treatments in large event spaces. Modeled after classic garden obelisks, this four-sided pyramid uses thin painted steel wire cross-bracing that supports natural climbing stems. The steep, converging lines guide the eye upward, making it an effective choice for venues with exposed rafters, high tent canopies, or historic vaulted ceilings. Cascading white phalaenopsis orchids attached along the upper pyramid edges create a graceful botanical drape across the structured metal. The deliberate contrast between the straight industrial wire lines and the curving orchid petals produces a polished, gallery-worthy installation. Because the broad base tapers sharply toward a fine upper point, this design provides tall vertical presence without blocking line of sight across the dining table.
Obtain a prefabricated four-sided open pyramid obelisk measuring twenty-four inches in height with an eight-inch square base, fabricated from three-millimeter wire stock coated in satin white paint. Cut a three-inch block of saturated wet foam, place it inside a water reservoir cup, and use cable ties to bind it to the central obelisk core eight inches below the top point. Wrap individual phalaenopsis orchid stems in water-soaked cotton batting sealed with green stem wrap to keep blooms hydrated during the reception. Insert two cascading arching sprays of white phalaenopsis orchids into the high foam block, weaving the stem curves down through the wire struts so flowers drape across the frame faces. Secure the main orchid stem axes to the white wire posts using clear botanical clips positioned discreetly behind the flower nodes. At the four-sided bottom base, weave a low, dense ring of curled monstera leaves and white anthuriums into a weighted base ring to balance the visual weight of the vertical column.
Idea 8: Faceted Diamond Wire Lantern with Botanical Wreath
Setup Method
The faceted diamond wire lantern centerpiece pairs geometric metal lines with a classic, low-profile botanical base ring. Shaped to resemble a brilliant-cut gemstone, the wide-waisted diamond wire cage sits inside a lush wreath of fresh foliage and seasonal flowers. This layered setup keeps the main flower mass resting securely flat on the table, while the central diamond wire cage rises up to house a glowing ambient light source. Using blackened bronze or charcoal wire frames adds an industrial, modern edge that keeps the traditional floral wreath looking fresh and contemporary. This layout is versatile, providing a stable centerpiece that remains secure against accidental bumps during busy meal services. The open framework ensures that internal candlelight passes outward through the flower stems, projecting warm patterns onto dinner plates and place settings.
Source an open-top faceted wire diamond lantern measuring ten inches wide across its center belt and nine inches high, finished in deep blackened bronze. Position a standard ten-inch plastic floral wreath base ring filled with pre-soaked wet floral foam flat on the tabletop surface. Insert dense sprigs of salal leaves, boxwood clippings, and silver dollar eucalyptus horizontally into the outer and inner rings of the wreath form, creating a ring of foliage that leaves the center open. Insert twenty-two peach spray roses and stems of white waxflower into the top of the foam ring, distributing the floral heads evenly around the circle. Carefully lower the flat bottom base of the faceted wire diamond lantern into the open center well of the saturated flower ring until it rests on the table. Place a six-inch-high clear glass cylinder hurricane holding a battery-operated wax pillar candle inside the wire diamond to establish a protected, wind-resistant light source.
Idea 9: Asymmetrical Triangular Pedestal Stand Installation
How to Create
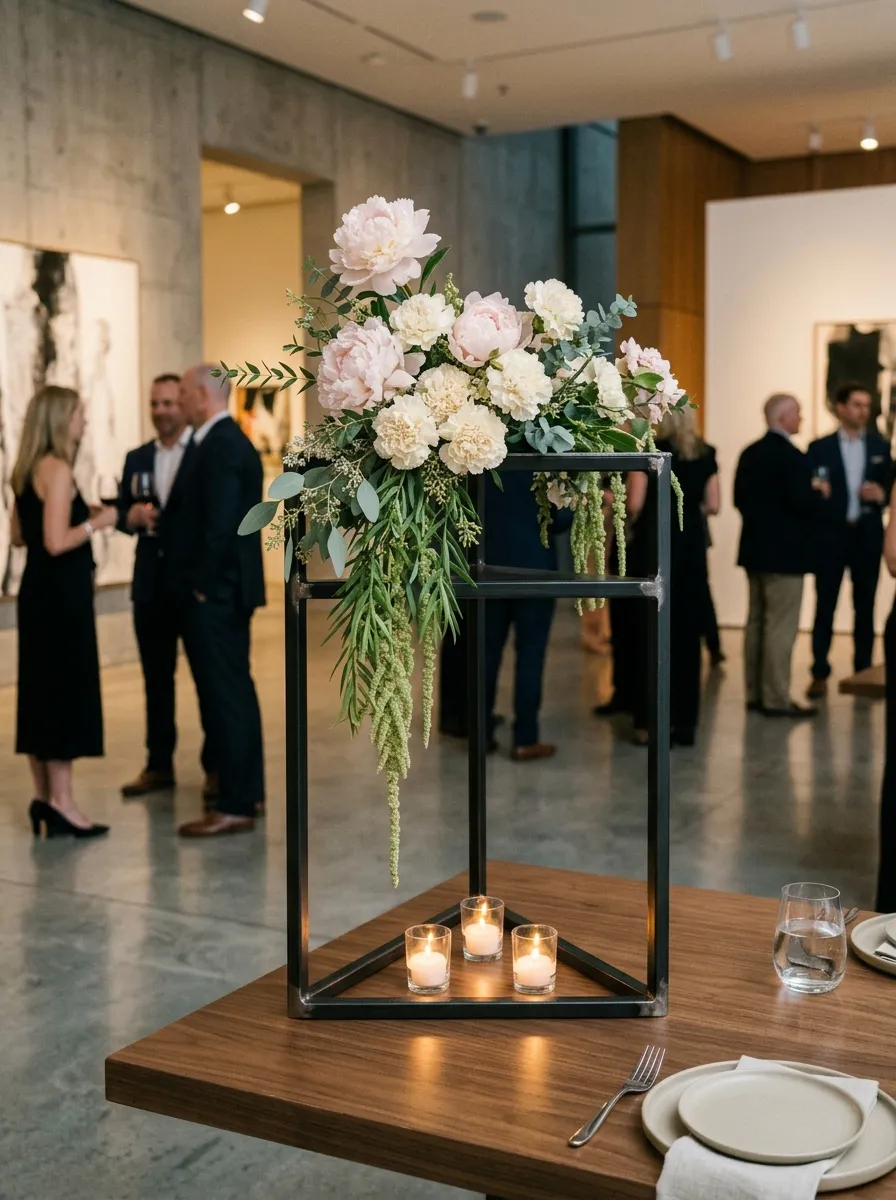
The asymmetrical triangular pedestal centerpiece uses varying step-down elevations to create visual movement across long banquet tablescapes. Featuring an offset triangular base that supports a raised, cantilevered floral platform, this design brings an eye-catching, sculptural presence to reception spaces. Constructed from welded square-profile aluminum tubing with an industrial powder-coat finish, the clean metal geometry contrasts with soft, trailing botanicals. Raising the main floral mass on an elevated platform creates space on the tabletop below for shared serving dishes, place cards, and low votive candles. The asymmetrical layout works particularly well on head tables, king’s tables, and long family-style banquet arrangements, where repeating angled frames can be mirrored down the table line to establish visual flow.
Fabricate an asymmetrical triangular pedestal stand standing twelve inches high, featuring a nine-inch triangular base plate and a matching six-inch offset triangular top platform made from welded steel rod. Secure a six-inch hard plastic shallow saucer to the top triangular platform using industrial-strength double-sided bonding tape. Cut a matching block of wet floral foam to fit the upper saucer, tape it securely across the rim with waterproof tape, and insert structural stems of green weeping podocarpus so they trail downward toward the table surface. Add eight ivory standard carnations, five pale blush peony blooms, and four open stems of white cosmos into the top foam surface, clustering focal flowers tightly over the upper metal plate. Wrap the vertical metal struts with fine smilax vines, using green bullion wire to hold the foliage close to the posts. Finish the installation by grouping three low glass tealight cups on the table surface beneath the raised platform to illuminate the trailing vines from below.
Idea 10: Suspended Rhombus Chandelier and Tabletop Duo
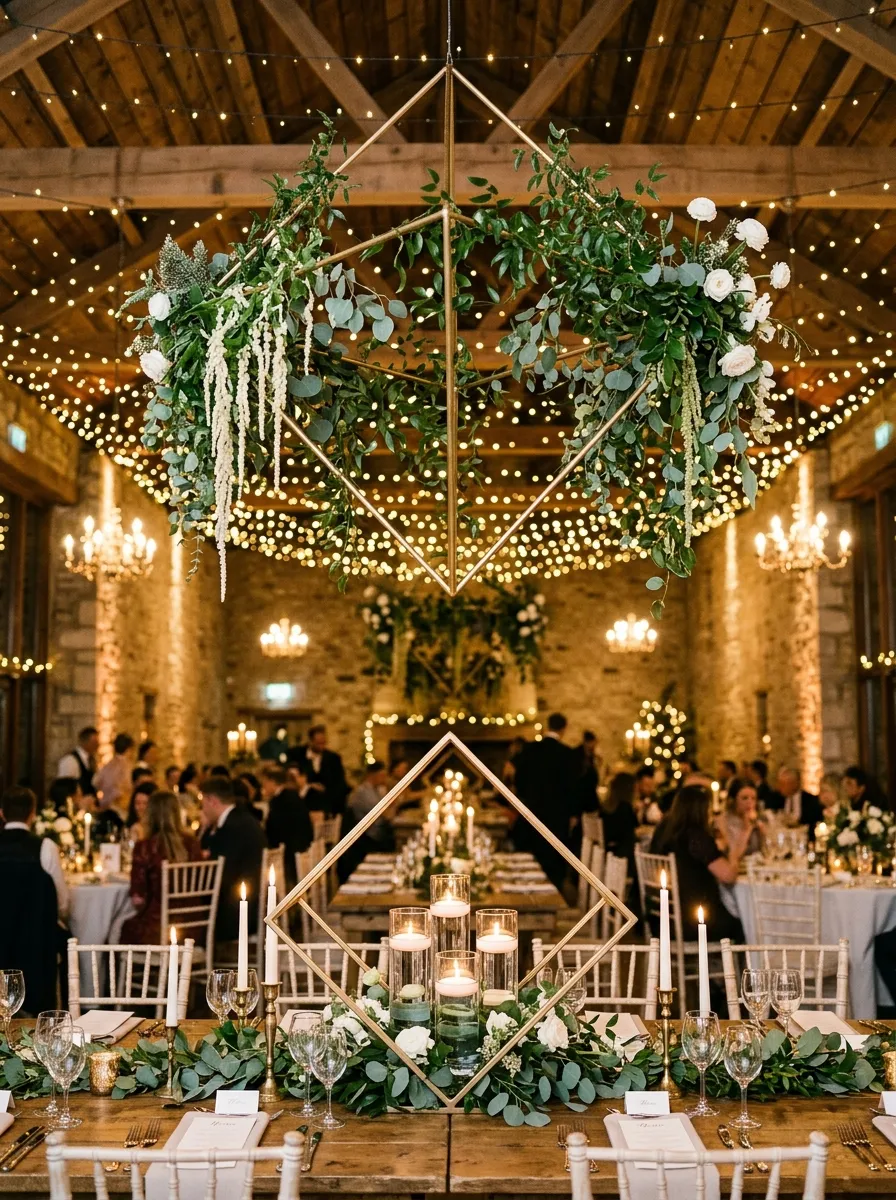
Step-by-Step Guide
The suspended rhombus chandelier and tabletop duo expands centerpiece design into a coordinated, multi-level installation spanning ceiling space and dining tables. This concept pairs a suspended, diamond-profile rhombus wire frame hanging overhead with a matching, smaller geometric prism resting on the table below. The aerial hanging element draws the eye upward to highlight venue ceilings, while the companion base piece maintains continuity on the tabletop without consuming valuable dining space. Using matching metallic finishes and floral elements across both heights unifies the space and creates a cohesive dining setting. This dual-level approach works well in high-ceiling venues, open-sided pavilions, and clear-top marquees, framing the dining space within clean geometric lines without crowding the tabletop with bulky arrangements.
Hang a twenty-four-inch wide hollow steel wire rhombus frame securely from overhead ceiling structural points using load-tested transparent monofilament line, leveling the frame six feet above the table surface. Secure two wet floral foam garland cages along the lower horizontal perimeter rails of the suspended metal frame using locking cable ties. Insert trailing smilax vines, long eucalyptus branches, and white hanging amaranthus into the overhead foam, directing the stems downward to soften the suspended metal edges. Add white delphiniums and pale garden roses to the aerial frame, keeping the flowers hydrated for the duration of the event. On the table surface directly below the suspended frame, position a matching eight-inch tabletop rhombus frame flat on an ivory table runner. Place three clear glass cylinder vases holding floating candles inside the tabletop frame, and surround the base with a light ring of matching eucalyptus leaves to tie the overhead and table-level designs together.
Common Beginner Mistakes and How to Avoid Them
Constructing structural centerpieces requires balancing physical weight, container mechanics, and living botanicals. A common pitfall is miscalculating vessel height and density, which can block lines of sight across the table. When a centerpiece intrudes into the primary eye-level zone between fourteen and twenty-two inches above the tabletop, it disrupts guest conversation. You can prevent this issue by keeping structures very low or elevating the main floral mass on slender frames above twenty-two inches. Another frequent mistake is using unsealed metal frames or bare wood containers without waterproof liners, which risks water leaking onto linens and venue tables. Always line wooden boxes with heavy-gauge vinyl and seal internal seams with silicone before adding wet foam. Beginners also often use lightweight foam that fails to support heavy-stemmed flowers like garden roses and proteas. Choose dense, high-grade floral foam, soak it naturally without forcing it underwater to prevent dry air pockets, and reinforce the mechanics with coated chicken wire to keep stems securely in place throughout the event.
Practical Tips for Better Results
Achieving a clean, professional finish with geometric centerpieces comes down to disciplined structural prep, neat floral mechanics, and careful stem placement. Always construct the structural framework and test lighting elements several weeks before the wedding to verify that all components balance safely on the tables. When designing open wire structures, keep your mechanics discreet: wrap foam blocks in green florists’ foil, use dark zip ties that blend into dark metal, and choose clear mounting dots to hold glass securely. Inserting greenery at an angle along container perimeters establishes a natural foliage collar that hides plastic cages and tape lines without adding bulky flower stems. Choose long-lasting flower varieties like spray roses, carnations, ranunculus, and hardy ruscus, which hold up well out of direct water supplies. Finally, lightly mist finished arrangements with an anti-transpirant floral spray once they are placed on the tables; this seals petal pores, reduces moisture loss in climate-controlled venues, and keeps flowers looking crisp from the first photo to the final send-off.
Styling, Presentation, or Organization Ideas
A well-designed geometric centerpiece relies on thoughtful coordination with surrounding table elements to establish visual balance across the entire reception space. Match the metallic finish of your geometric frames—whether warm brass, brushed copper, matte black, or rose gold—with your place settings, charger plates, and flatware to create a unified design. When styling rectangular farm tables, consider placing geometric centerpieces in repeating lines, alternating between tall open prisms and low floral boxes to add visual rhythm down the table runner. For round banquet tables, ground the central geometric frame on a contrasting textured base, such as a sliced natural marble slab, a dark slate tile, or a rough-woven linen round, to clearly define the centerpiece zone. Soften the straight edges of metal and wood by interweaving delicate, battery-powered micro-fairy lights or pairing the frames with ribbed glass votive holders that scatter warm light across the table. Maintaining consistent spacing between the centerpiece, place settings, and glassware keeps the table feeling organized and easy for guests to navigate throughout dinner service.
Budget or Time Planning
Managing costs and assembly schedules efficiently is essential when producing multiple geometric centerpieces for large wedding receptions. Open wire frames and terrariums are cost-effective choices because their open volume fills visual space using fewer cut flowers, lowering overall botanical expenses. Sourcing geometric vessels in bulk from wholesale decor suppliers rather than buying retail cuts unit costs significantly. You can also repurpose these durable containers after the wedding by selling them to future couples or incorporating them into your home decor. To streamline assembly, set up an assembly-line workflow forty-eight hours before the event: clean glass panels, apply foam mechanics to frames, and cut binding wires in one dedicated prep session. Hydrate and condition all fresh botanicals twenty-four hours in advance so stems are firm and ready to arrange. Assemble the fresh floral elements the day before the wedding, and store completed centerpieces in a cool, dark room between forty-five and fifty-five degrees Fahrenheit to preserve flower freshness before transport and final venue installation.
Creative Expansion and Advanced Inspiration
Once you feel comfortable with foundational geometric centerpiece assembly, you can experiment with creative materials and dynamic lighting installations. Consider combining contrasting design elements, such as pairing sharp, industrial matte-black cubes with delicate, dried botanical varieties like bleached ruscus, preserved bunny tails, and ornamental pampas grass for a modern textured look. You can also incorporate clean architectural details by using fluted glass panels, frosted acrylic dividers, or neon light accents inside open wire frames to add depth and interest. For evening celebrations, explore interactive lighting concepts by mounting miniature battery-operated down-lights inside upper geometric vertices to illuminate suspended blooms from above. Another striking option is designing asymmetric installations where geometric frames link together across several tables, creating an extended sculptural line that runs through the dining space. These creative modifications elevate simple tabletop arrangements into memorable, modern installations that reflect your personal design vision.