Designing memorable wedding reception spaces often relies on the natural elegance, structural depth, and organic vitality of fresh foliage installations. Lush botanicals provide an enduring, refined aesthetic that effortlessly transforms industrial lofts, rustic barns, modern ballrooms, and outdoor dining pavilions without the high costs of imported floral blooms. This comprehensive guide provides ten original reception concepts focusing strictly on botanical arrangements, hanging structures, table runners, and architectural plant accents. Readers will learn the exact step by step methods needed to select hardy foliage varieties, construct stable structural armatures, maintain all-day stem hydration, and safely secure overhead decorative elements. Shifting away from delicate, temperature-sensitive cut flowers toward long-lasting leafy greens ensures that every installation maintains its crisp volume and deep color from daytime arrivals to late-night departures. Understanding foliage anatomy, water-tube integration, and wiring mechanics allows couples and event planners to curate high-end, editorial tablescapes and backdrops with complete confidence. Following these practical methods equips makers of any experience level with the foundational knowledge needed to create stunning, durable event decoration that balances timeless natural beauty with budget-conscious planning.
Why This Idea Is Trending or Useful
The consistent prominence of leafy botanical installations across modern Pinterest inspiration stems from a growing demand for sustainable, cost-effective, and nature-forward event aesthetics. Couples increasingly seek out creative ideas that break away from traditional, tightly packed floral arrangements in favor of wild, textural, and garden-inspired atmospheres. Reception greenery offers exceptional practical value because thick, waxy leaves resist wilting in variable weather conditions, providing dependable durability for both indoor air-conditioned halls and breezy outdoor venues. The earthy, vibrant tones align naturally with trending ideas of quiet luxury and contemporary minimalist style, which emphasize rich textures, negative space, and understated architectural forms. For beginners and DIY enthusiasts embarking on a wedding creative project, working with hardy foliage is an approachable, beginner friendly undertaking that does not require advanced floristry certification. Large boughs of olive branch, Italian ruscus, and silver dollar eucalyptus provide substantial physical coverage quickly, allowing hosts to fill expansive reception venues while maintaining realistic budget ideas. Using fresh, verdant botanicals creates a cohesive, relaxed visual environment that feels sophisticated, intentional, and intimately connected to the natural world.
Materials and Preparation
Assembling long-lasting, gallery-grade greenery installations requires deliberate supply sourcing, dedicated hydration stations, and organized tool management well ahead of event day. Essential botanical materials include hearty varieties such as silver dollar eucalyptus, Italian ruscus, seeded salal, fresh bay laurel, broad-leaf monstera, and leatherleaf fern. Critical construction tools include ergonomic bypass floral shears, waterproof floral tape, heavy-duty paddle wire in twenty-two gauge, self-locking nylon cable ties, water-retaining floral cages, and ceiling attachment hooks. Thorough preparation requires setting up a cool, shaded storage zone equipped with clean five-gallon buckets filled with chilled, conditioned water treated with professional commercial floral preservatives. When foliage arrives forty-eight hours before assembly, prune the bottom two inches of each woody stem at a sharp forty-five-degree angle and submerge the branches immediately for deep hydration. Planning considerations include measuring table lengths, mapping ceiling load-bearing points, and verifying venue installation guidelines regarding ladder usage and fire-safe clearances around lighting fixtures. Storing pre-cut greenery bundles and prepared wire mechanics inside labeled storage crates guarantees smooth organization and rapid deployment during tight wedding setup windows.
Idea 1: Cascading Italian Ruscus Table Runner with Pillar Candle Clusters
Step-by-Step Guide
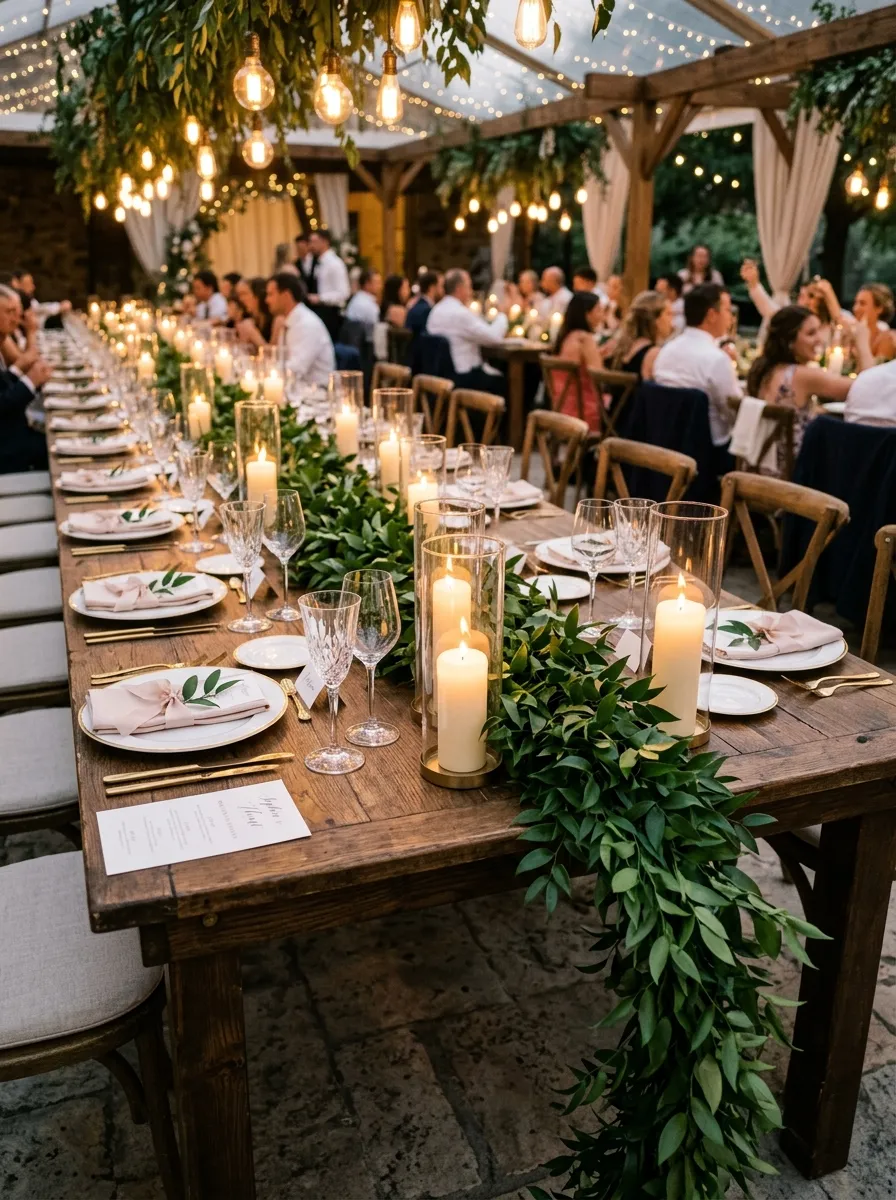
The cascading Italian ruscus table runner establishes an elegant, unbroken botanical spine down long family-style banquet tables without impeding cross-table guest visibility. Italian ruscus features glossy, deep-emerald spear-shaped leaves growing along slender, naturally flexible stems that lay flat against linen or bare wood surfaces. The continuous horizontal arrangement produces a soft, organic line that cascades gently over the table ends, pooling gracefully onto the floor. Interspersing clusters of white wax pillar candles enclosed in clear glass hurricane cylinders introduces vertical structure while protecting flames from indoor drafts. The natural flexibility of ruscus foliage allows the vine-like stems to weave seamlessly around plate settings, wine glasses, and communal serving platters without taking up valuable dining space. This low-profile installation creates a sophisticated woodland atmosphere, softening the stark lines of linear banquet tables while keeping the center of the table neat, functional, and visually balanced throughout dinner service.
To construct this table runner, begin by laying out a clean fabric runner or exposing the natural wood grain down the center axis of your banquet table. Lay three primary long stems of conditioned Italian ruscus end-to-end along the table center, overlapping the stem bases by four inches and binding them securely with fine green paddle wire. Weave secondary stems outward at forty-five-degree angles along the central spine, alternating directions to produce a full, balanced silhouette measuring approximately ten inches in width. At the table edges, let the final branches drape downward, securing them to the underside table edge with removable clear floral tape clips so the ends pool naturally onto the floor. Position clear glass hurricane cylinders of staggered heights in asymmetrical clusters of three along the foliage runner, anchoring the glass bases with clear adhesive putty dots. Insert unscented ivory pillar candles into each glass sleeve, checking that the top rims extend at least three inches above the candle wicks for safety.
Idea 2: Suspended Eucalyptus and Bay Laurel Botanical Chandelier
Execution Process
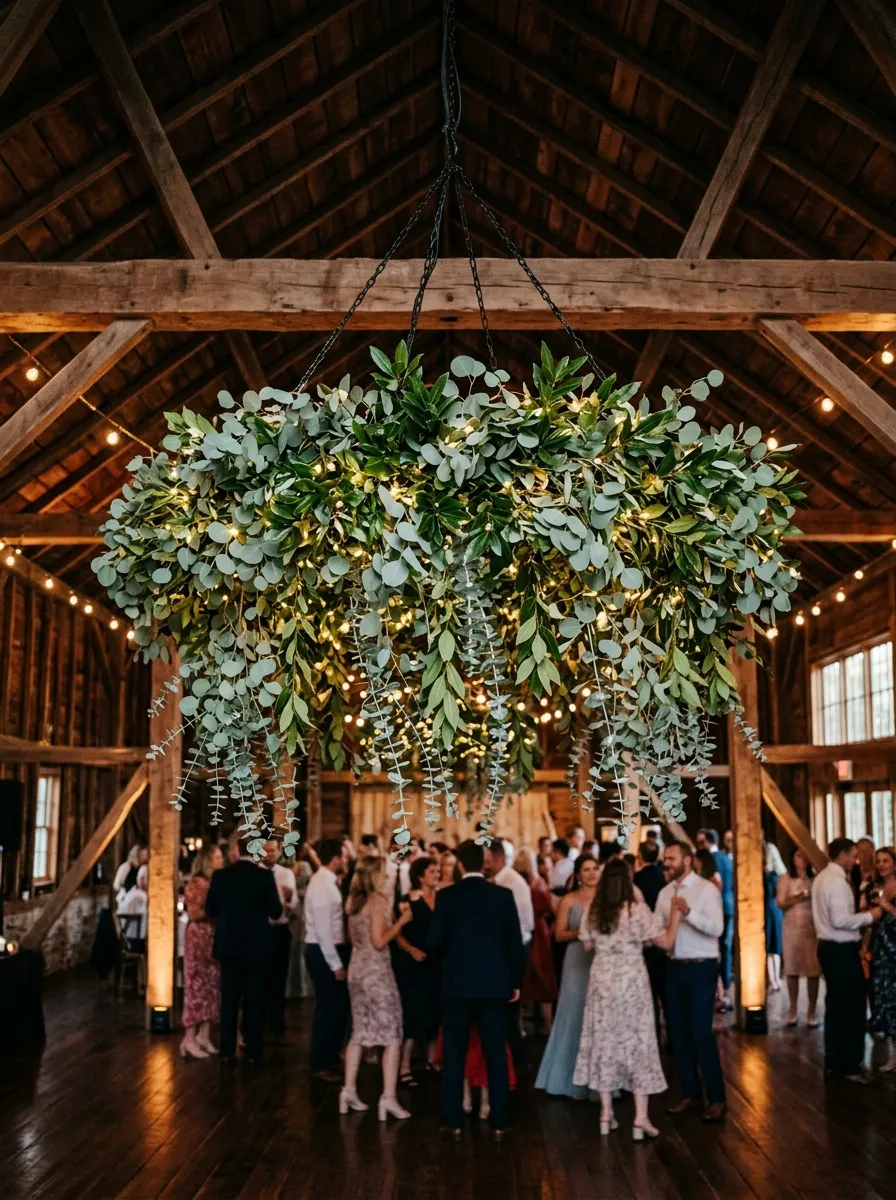
A suspended botanical chandelier draws the eyes upward, filling cavernous ballroom or barn ceilings with an impressive canopy of floating greenery. This elevated design utilizes an open metal or wooden ring armature wrapped densely in contrasting varieties of silver dollar eucalyptus and glossy bay laurel branches. Suspended directly above the dance floor, head table, or entrance lounge, the circular installation introduces soft organic geometry that breaks up vast overhead space. Silver dollar eucalyptus brings rounded, dusty-blue-green leaves, while bay laurel provides dark, structured foliage that releases a subtle, refreshing herbal aroma into the room. Suspending the greenery above the dining tables frees up precious tabletop space, allowing place settings to remain uncluttered while giving guests the feeling of dining under a living forest bower. The balanced suspension system ensures that the piece hangs level, creating a striking focal point that anchors the entire visual layout of the room.
Begin construction by acquiring a lightweight welded steel hoop or repurposed timber wagon wheel measuring thirty-six to forty-eight inches in diameter. Secure three equal lengths of high-tensile steel aircraft cable symmetrically around the hoop perimeter using heavy-duty swaging sleeves, gathering the top ends onto a central heavy-duty carabiner. Wrap the entire ring securely with moistened fresh sphagnum moss or pre-soaked foam garland cages, securing the core with twenty-two-gauge paddle wire. Cut your eucalyptus and bay laurel branches into uniform ten-inch sprigs, stripping the lower two inches of leaves from each stem. Insert the stems firmly into the moss base in a single rotational direction, overlapping each bundle over the preceding stems to completely conceal the wire mechanics. Layer longer, trailing eucalyptus branches along the lower perimeter, allowing them to hang twelve to eighteen inches beneath the ring for a loose, airy drape. Rig the central carabiner securely to an approved overhead ceiling anchor using an adjustable manual chain hoist.
Idea 3: Monochromatic Fern and Asparagus Vine Ceremony Arch Repurposing
How to Create
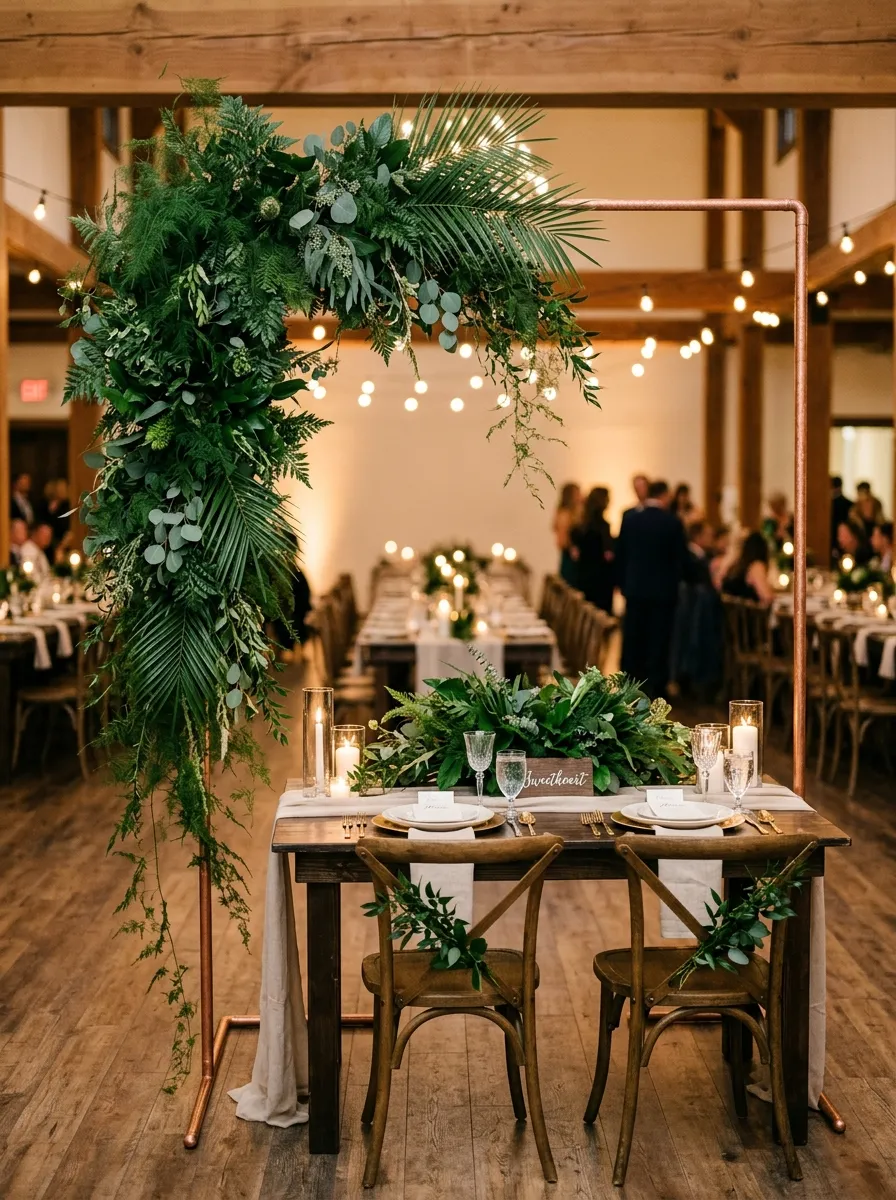
Repurposing the ceremony arch into a lush, sculptural backdrop behind the sweetheart table demonstrates practical modular design and maximizes visual impact across the reception space. This installation relies heavily on the feathery textures of plumosa fern, broad sword fern, and wispy hanging asparagus vines to produce an airy, romantic frame. Ferns provide exceptionally rich negative space, creating a delicate, lace-like appearance that catches ambient uplighting beautifully without feeling heavy or oppressive. By building the greenery asymmetrically along an architectural metal frame, the design feels contemporary and modern rather than stiffly traditional. Repositioning this grand focal structure from the outdoor ceremony to the indoor dinner reception grounds the newlyweds’ seating area, providing a lush botanical backdrop for formal photography, toasts, and speeches. The subtle variation in frond textures creates visual interest within a strictly monochromatic green color scheme.
Begin by setting up an architectural metal arch—such as a clean rectangular or curved circular copper frame—directly behind the designated sweetheart table. Secure two large, pre-soaked floral foam cages containing built-in plastic grids onto the upper left corner and lower right vertical post using heavy-duty nylon zip ties. Cut dark green sword fern fronds to varied lengths between eight and sixteen inches, inserting them around the back and outer perimeters of the cages to establish a broad, flared silhouette. Fill the central core of each cage densely with soft, ruffled plumosa fern stems to completely conceal the plastic cage and mechanics from view. Weave long, delicate strands of asparagus vine throughout the arrangement, allowing the wispy tendrils to trail downward across the metallic frame. Mist the completed installation thoroughly with an anti-transpirant floral hydration spray to lock internal moisture into the fern fronds, ensuring the foliage remains vibrant and crisp all evening.
Idea 4: Overhead Floating Ladder Trellis with Trailing Smilax Vines
Setup Method
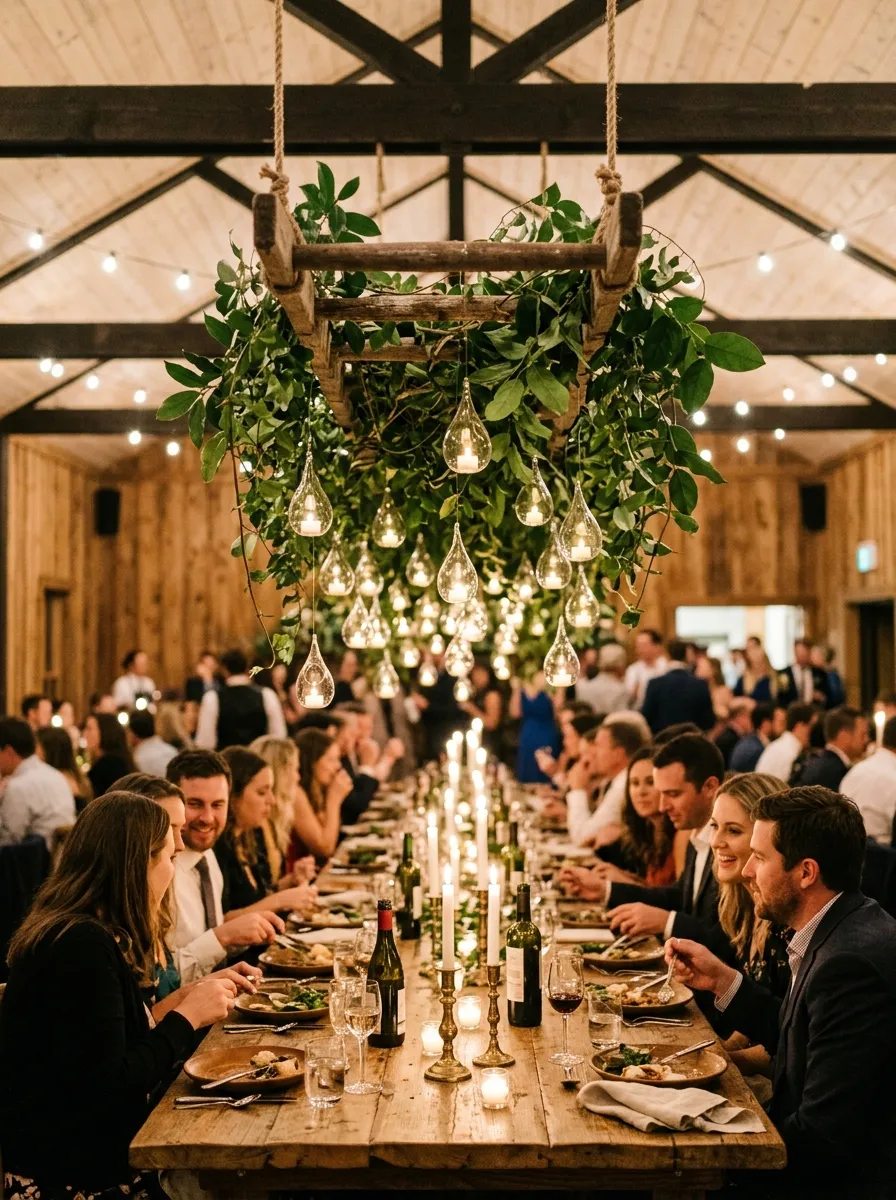
The overhead floating ladder trellis creates an enchanting, rustic canopy by turning a vintage wooden ladder into an architectural hanging garden suspended above long dining tables. The clean horizontal rungs of the ladder provide a sturdy foundation for weaving lush southern smilax vines and broad salal leaves into a cohesive hanging trellis. Smilax vine is prized in event design for its exceptional tensile strength, deep green leaf color, and natural climbing habit, which allows it to wrap gracefully around timber structures. The floating display creates an intimate ceiling height in tall, open venues, transforming large dining halls into cozy, welcoming spaces. Layering hanging glass teardrop orbs filled with soft LED tealights down the length of the ladder introduces magical, starlike points of illumination that shine through the leafy canopy. This suspended design keeps dining tables completely clear for food service while delivering an unforgettable visual statement.
Select a clean, sturdy wooden fruit ladder or painter’s ladder measuring six to eight feet in length, inspecting the timber rungs to ensure structural stability. Attach four heavy-duty forged eye bolts through the four outer corners of the ladder rails, linking each corner to braided steel wire rope using safety-rated carabiners. Hoist the ladder horizontally above your banquet table, securing the cables to overhead structural ceiling beams using certified beam clamps. Weave fresh, long boughs of southern smilax through the ladder rungs, wrapping the flexible stems tightly around the outer timber rails to soften the sharp wood edges. Secure the vine anchor points along the top rungs using discreet, dark green zip ties, trimming the excess plastic ends flush with side cutters. Hang clear blown-glass candle globes from the rungs at varying heights using transparent monofilament line, placing warm-white battery-operated LED tealights inside each orb to finish the installation.
Idea 5: Minimalist Potted Olive Tree Forest with Linen-Wrapped Bases
Step-by-Step Guide
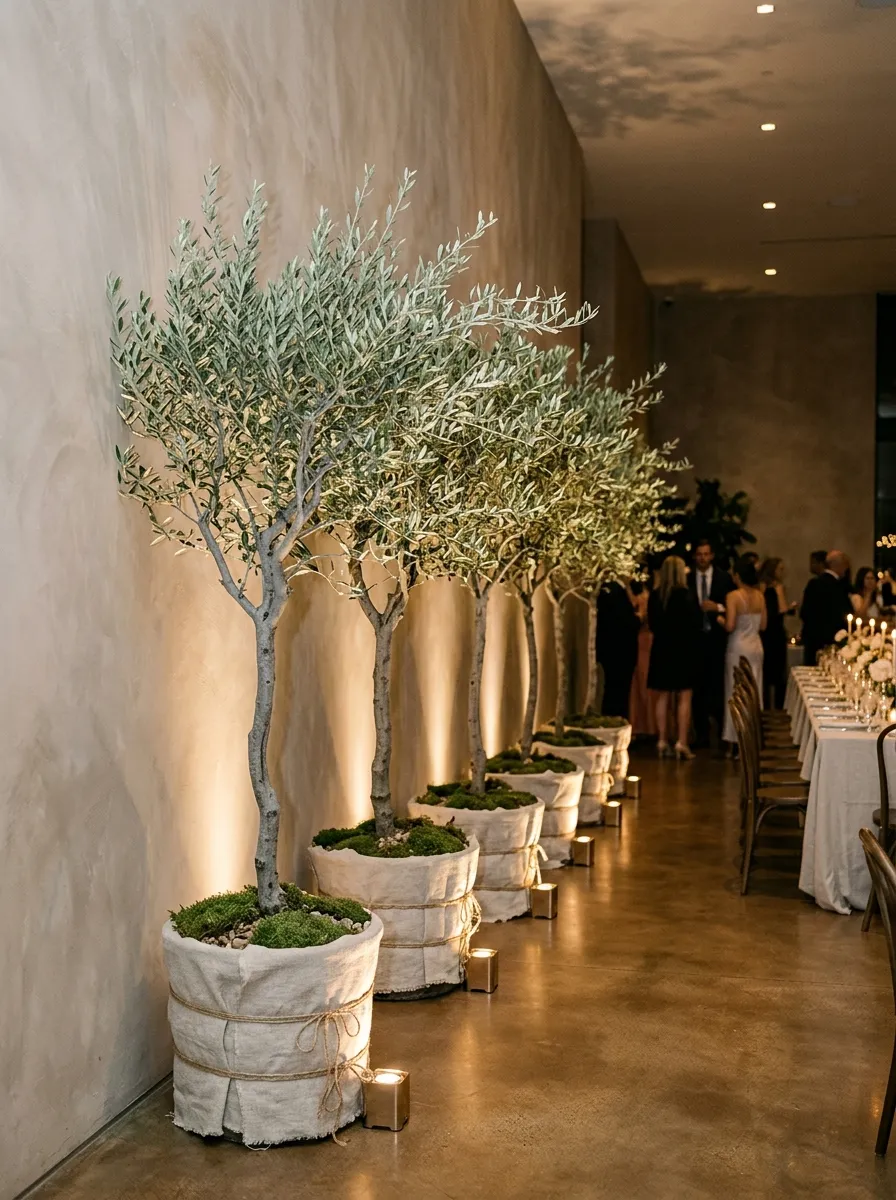
The minimalist potted olive tree forest uses living architectural trees to introduce height, authentic Mediterranean charm, and timeless elegance into reception layouts. Olive trees feature slender, pale gray trunks, silvery-green sage foliage, and sculptural branch structures that harmonize with clean, modern architectural backdrops. Rather than utilizing cut branches that wilt over time, using mature living trees in nursery containers guarantees that the reception decor remains vibrant throughout the entire event. Wrapping the base grower pots in textured natural fabrics like raw linen or burlap conceals the plastic containers while adding an organic, artisanal finish to the floor. Positioning these trees along the perimeter of the dining area, beside the band stage, or at entry portals creates an immersive botanical grove that defines different zones within the venue. This living approach provides sustainable value, as the trees can be gifted, planted in home landscapes, or returned to local plant nurseries after the wedding.
Source six to eight healthy, mature potted olive trees standing between five and seven feet tall, ensuring the branch crowns are pruned into balanced, open shapes. Place each tree into its designated location around the reception venue, prioritizing blank perimeter walls, structural pillars, and empty corners flanking the main bar. Cut large squares of heavy, raw-edge unbleached linen or textured washed canvas measuring approximately forty inches on each side. Center each black plastic nursery container on a fabric square, gathering the textile upward around the sides of the pot to cover the plastic rim completely. Secure the gathered linen around the base of the tree trunk using thick natural jute twine, tying a neat square knot and letting the cut twine ends hang naturally. Top the exposed soil surface inside the pot with a dense, two-inch layer of preserved green sheet moss to complete the clean presentation, and aim warm floor uplights at the branches.
Idea 6: Geometric Wire Spheres Nested with Mixed Woodland Mosses
How to Create
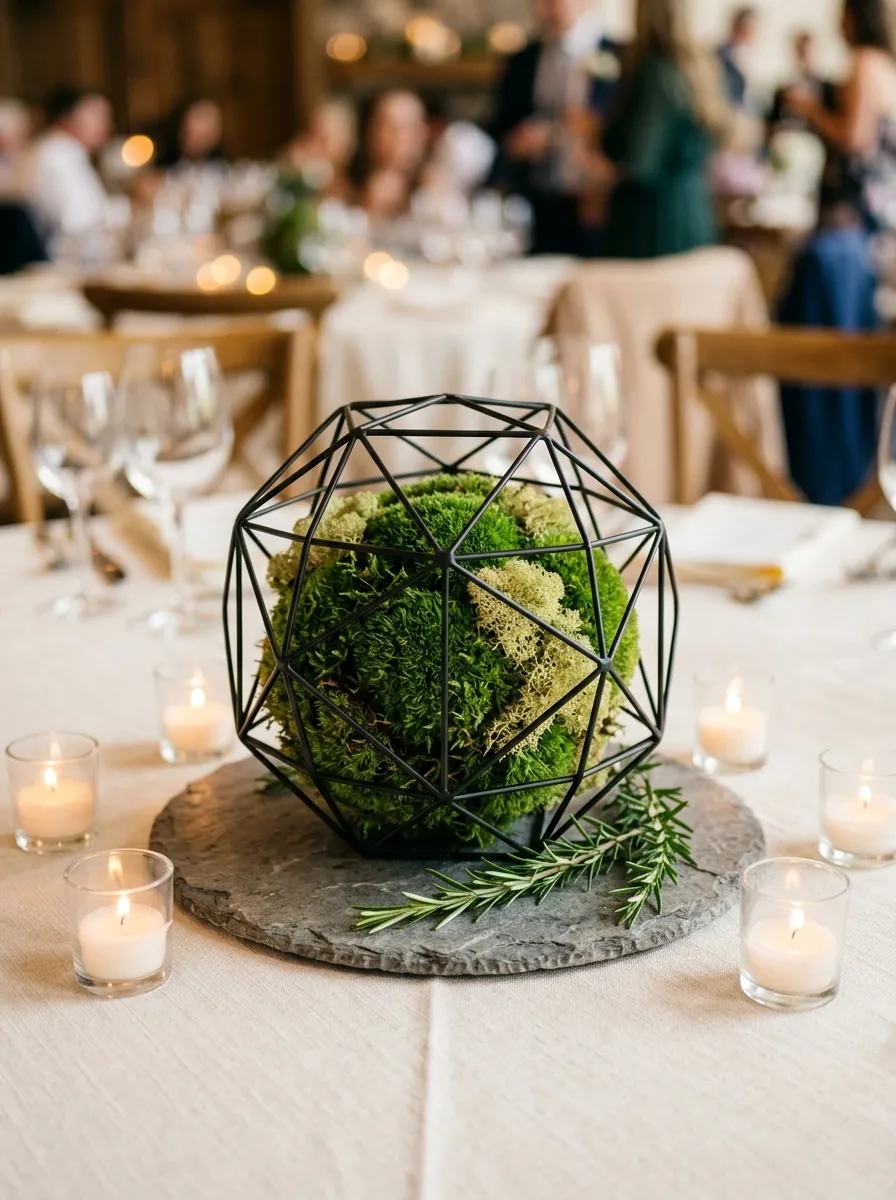
Geometric wire spheres filled with mixed woodland mosses combine modern industrial geometry with the rich, grounded textures of forest floor ecosystems. The design utilizes open iron or brushed brass wire orb armatures containing dense clusters of preserved mood moss, sheet moss, and delicate reindeer lichen. These varied moss types provide subtle variations in color, ranging from deep forest emerald and soft olive to pale minty gray-green, creating an appealing tapestry of natural tones. Because the mosses are preserved, these centerpieces require zero water sources and will not wilt under warm reception lights or outdoor sunshine. The open wire bands allow ambient light to pass through freely, casting clean geometric shadows onto white or neutral tablecloths. This low-profile, spherical centerpiece is ideal for round reception tables, offering tactile interest and modern style while keeping sightlines clear for table conversation.
Acquire hollow decorative geometric wire spheres crafted from matte black or brushed antique brass iron bands, measuring eight to ten inches in diameter. Prepare your moss base by setting out clean portions of preserved emerald sheet moss, rounded pillow mood moss, and chartreuse reindeer lichen. Form a firm core ball of lightweight floral foam or compacted paper wire measuring five inches in diameter to serve as an internal base. Use hot glue or floral pins to adhere the preserved moss varieties across the core, pressing the rounded pillow moss in the center and feathering sheet moss around the edges. Carefully slide the finished moss ball through the widest opening of the geometric wire sphere, nesting it firmly in the bottom center of the metal framework. Position the assembled sphere in the center of your table over a round stone coaster, and tuck two slender sprigs of fresh rosemary into the moss for a subtle fragrance.
Idea 7: Monstera and Palm Frond Wall Grid Backdrop
Execution Process
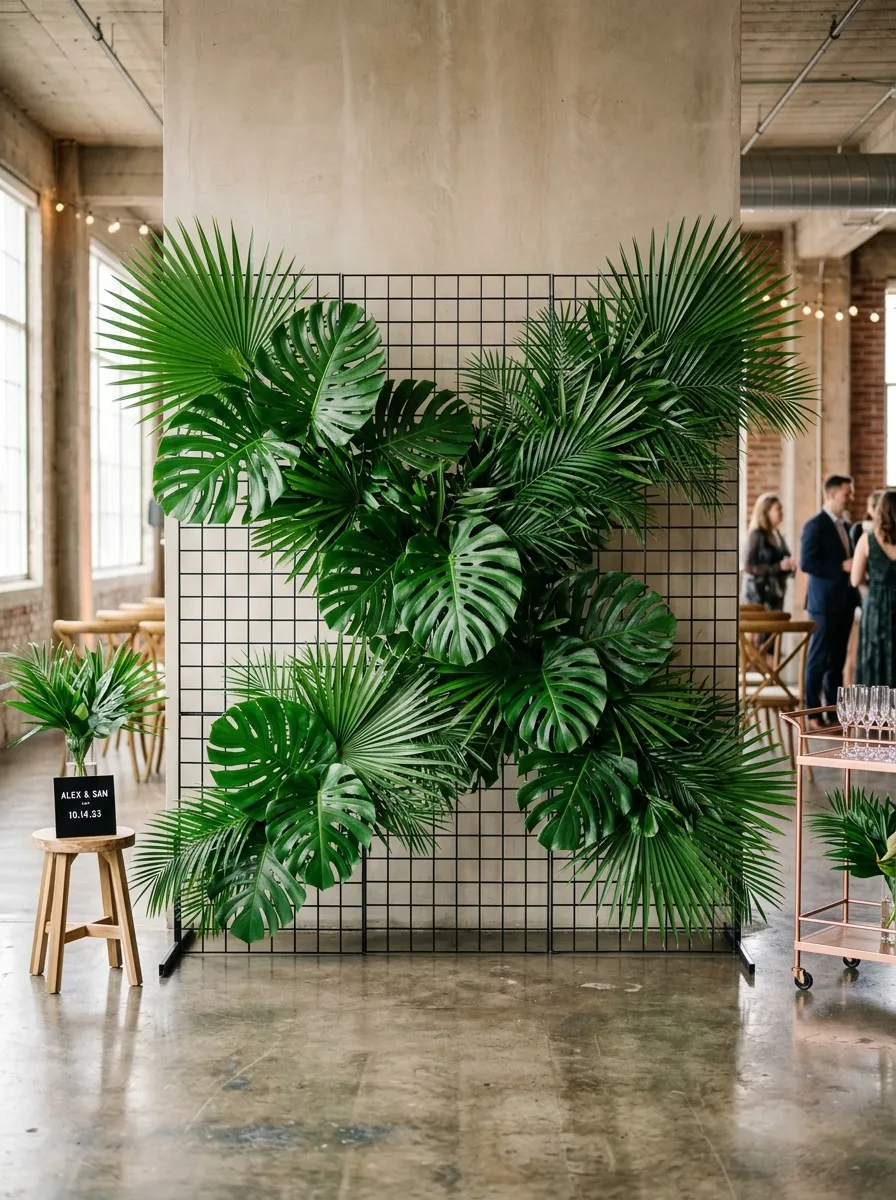
The monstera and palm frond wall grid transforms tropical foliage into a bold, sculptural backdrop featuring sharp architectural silhouettes and deep green tones. This installation uses a contemporary wire mesh panel mounted with an array of broad cut monstera deliciosa leaves, fan palms, and emerald areca fronds. The distinctive natural leaf cuts and wide leaf spans of monstera provide graphic patterns that stand out cleanly against pale neutral walls or exposed urban brick. By arranging the cut tropical foliage in clean, directional clusters across the wire grid, the wall becomes an artistic backdrop perfect for a photo station, escort card display, or bar backdrop. Cut tropical leaves are naturally resilient, featuring thick, waxy coatings that retain internal moisture for days without showing distress. This installation delivers an energetic, modern design that feels bold and fresh while requiring minimal assembly mechanics.
Begin by assembling a freestanding wire mesh wall or mounting a powder-coated wire grid panel measuring six feet wide by seven feet tall securely onto stable support feet. Prepare your cut monstera leaves, areca palm fronds, and fan palm leaves by cutting their thick stems down to four inches in length. Slide each stem into a plastic water tube filled with clean floral preservative water, snapping the flexible rubber cap tightly around the stem to create a leakproof seal. Working from the upper right corner downward in a sweeping diagonal direction, attach the stems of the palm fronds to the wire mesh using green zip ties, creating an expansive fan-like background layer. Layer the large, perforated monstera leaves directly over the palm stems, positioning the wide leaf faces outward to conceal the water tubes and attachment ties. Fill any small gaps between the larger leaves with glossy leatherleaf fern fronds to produce a dense, layered foliage wall with dramatic visual depth.
Idea 8: Suspended Hoop Wreaths with Delicate Asparagus Fern Accents
Step-by-Step Guide
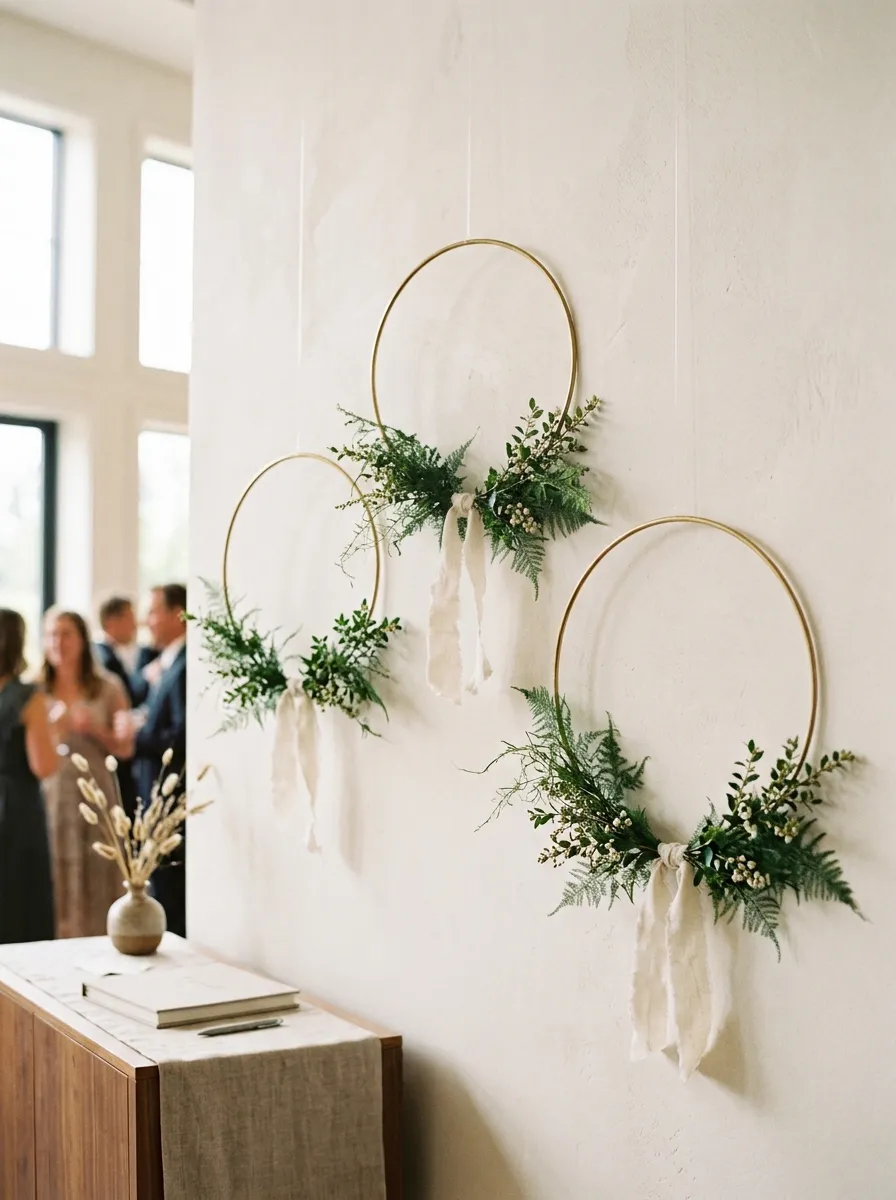
Suspended hoop wreaths with delicate asparagus fern accents introduce an airy, minimalist Scandinavian aesthetic that feels modern, lightweight, and refined. Thin, delicate hoops crafted from natural light bamboo or raw brass tubing serve as the structural framework, floating gracefully on fine monofilament lines. Rather than covering the entire hoop in heavy foliage, the greenery is concentrated exclusively along the bottom third of the ring, creating an asymmetrical crescent that highlights the metal or wood frame. The airy, cloud-like texture of asparagus fern and plumosa vine provides delicate movement, swaying gently with the natural air currents of the room. Hanging several of these minimalist hoops at staggered heights along empty venue walls or behind the head table adds artistic depth without requiring bulky construction armatures. The slender profiles keep the overall installation light and modern, making it an exceptional choice for contemporary minimalist weddings.
Select raw brass craft rings or natural bamboo embroidery hoops measuring eighteen to twenty-four inches in diameter, ensuring the rims are clean and unblemished. Cut a four-inch strip of self-adhesive green floral tape, wrapping it tightly around the bottom right quadrant of the ring to create a non-slip base for the greenery stems. Cut small, five-inch sprigs of fresh plumosa fern, asparagus vine, and miniature myrtle leaves, stripping the lowest leaves from each stem. Bind three sprigs together into a flat fan-shaped bundle using fine floral bind wire, then lash the bundle securely against the taped portion of the hoop. Build a second matching bundle and wire it facing the opposite direction, overlapping the stem ends in the center of the arc to hide the wire mechanics. Conceal the central wire junction by tying a short, clean knot of frayed-edge raw silk ribbon in pale sage or natural ivory. Attach a length of clear fishing line to the top of the ring, suspending the hoop from the ceiling at your desired hanging height.
Idea 9: Wax-Sealed Glass Cloches with Potted Maidenhair Ferns
Setup Method
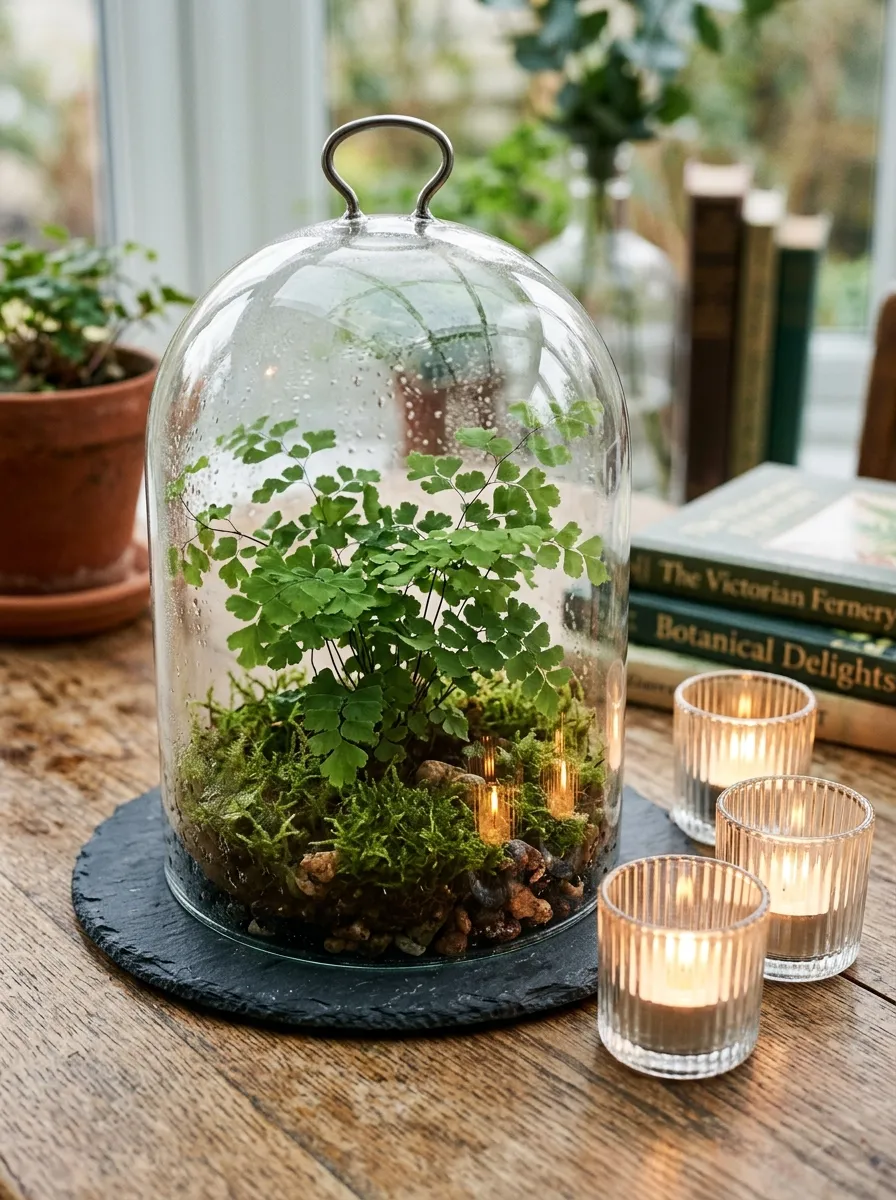
Wax-sealed glass cloches enclosing delicate maidenhair ferns introduce an authentic botanical conservatory charm that protects fragile greenery from drying out during the reception. Maidenhair ferns are celebrated for their thin black stipes and bright green, fan-shaped leaflets, but they normally wilt quickly in open-air environments. Enclosing living miniature potted ferns beneath clear glass bell jars creates a humid micro-terrarium that keeps the delicate fronds fresh, perky, and protected from air conditioning and heating drafts. The curved glass dome magnifies the intricate foliage patterns, catching soft ambient light from surrounding dinner candles. Resting on round slate or turned-wood bases, these enclosed botanical specimens look like scientific museum displays, bringing vintage curiosity and refined sophistication to reception tables. This low-profile tabletop option offers great practical value because the potted ferns remain healthy and can be enjoyed at home long after the wedding festivities have concluded.
Source high-clarity glass bell jars or cloches measuring ten inches in height, paired with fitted circular wooden or slate display bases. Acquire healthy, miniature potted maidenhair ferns growing in three-inch grower pots, checking that the fronds are lush, green, and free of brown tips. Lightly water each fern pot until the soil is damp, taking care not to oversaturate the root ball, and wipe the outside of the plastic pot dry. Place the potted fern directly in the center of the display base, packing fresh green sheet moss around the plastic pot to hide it from view. Place the clean glass cloche over the fern, lowering the dome slowly onto the grooved base to ensure no delicate fronds are pinched between the glass rim and the base. Polish the exterior of the glass dome with an alcohol-misted microfiber cloth to remove all dust, smudges, and fingerprints. Surround the base of the glass cloche with three small ribbed glass votives holding warm soy tealights to illuminate the terrarium from outside.
Idea 10: Layered Galax Leaf and Myrtle Garland with Brass Accents
How to Create
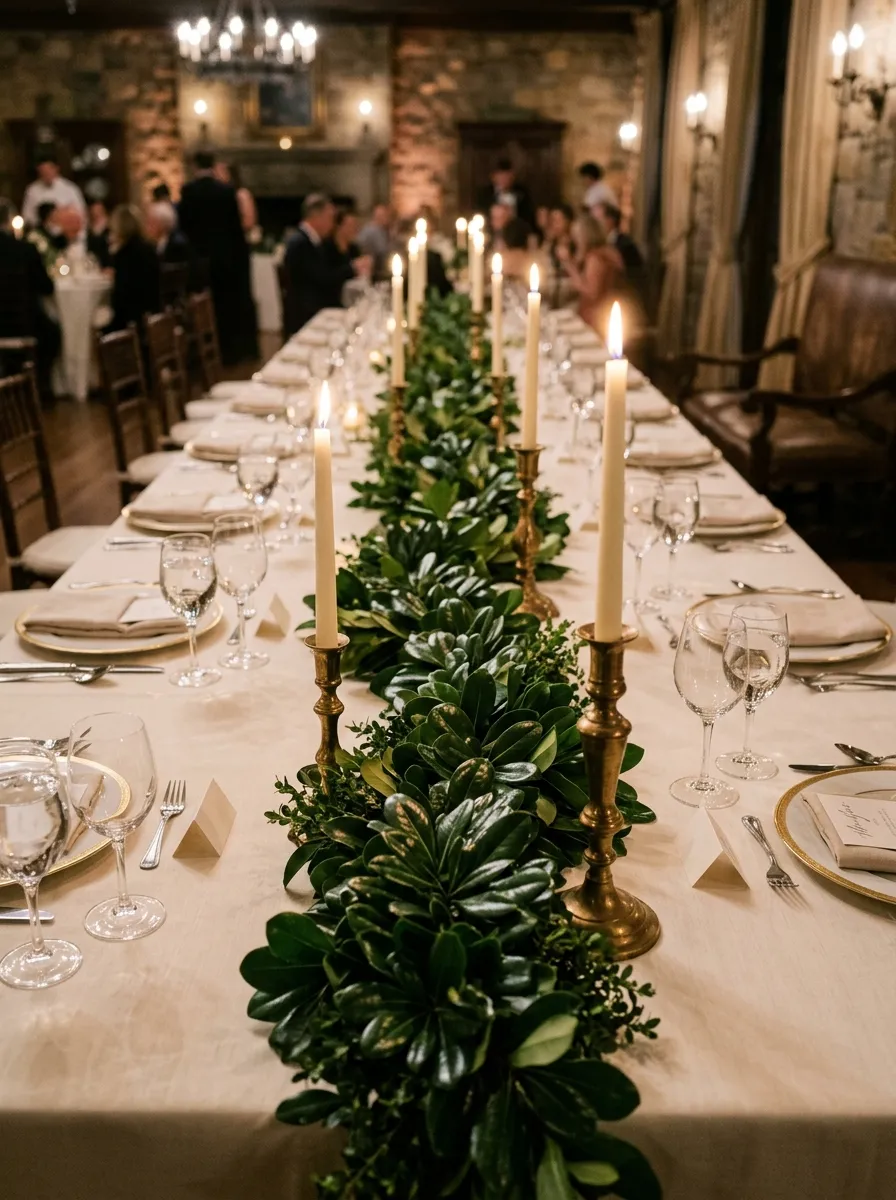
The layered galax leaf and myrtle garland combines glossy circular foliage with delicate herbal greenery, accented with warm vintage brass elements for a luxurious tablescape. Galax leaves feature round, leathery silhouettes with scalloped edges and deep green coloring that holds up exceptionally well out of water. Pairing these bold circular leaves with the fine, fragrant sprigs of baby myrtle creates an appealing textural contrast between broad shapes and fine sprays. The garland is assembled as a continuous rope that twists along the center of the table, curving around vintage brass candlestick holders holding tall taper candles. The warm metallic reflections of the polished brass pop against the deep forest-green leaves, producing an upscale, timeless aesthetic. This design is particularly well-suited for historic estates, libraries, and winter wedding receptions where deep, rich colors are desired.
Prepare the garland by laying out a six-foot length of natural jute twine across your work surface to serve as the central backbone. Gather three stems of fresh baby myrtle and two round galax leaves into a flat, shingled bundle, placing the glossy galax leaves at the front. Lash the stems firmly onto the jute twine using continuous twenty-six-gauge green paddle wire, wrapping the wire twice around the stems without cutting the wire strand. Create a second matching bundle and lay it directly over the stems of the first bundle, positioning it three inches further down the twine to cover the previous wire wraps. Continue this shingling process along the entire length of the twine, finishing the final end with an inverted bundle to create a neat, finished edge. Position the completed garland down the center of your dining table, weaving the flexible rope around vintage solid brass candlesticks fitted with ten-inch dripless taper candles. Check that the foliage rests flat on the table, away from the taper flames.
Common Beginner Mistakes and How to Avoid Them
The most critical mistake beginners make when assembling DIY greenery decor is failing to hydrate woody botanical stems properly prior to assembly. Leaves may appear healthy when unpacked from shipping boxes, but dry stems rapidly transpire internal moisture, leading to curled, brown leaf tips within hours of installation. Prevent this disappointment by cutting all stems at a sharp angle and submerging them in deep, cold water treated with floral preservative for at least twenty-four hours before handling. Another frequent error is using weak attachment mechanics for overhead installations; relying on tape, thin craft wire, or flimsy suction cups leads to structural failures under the weight of fresh foliage. Always utilize load-tested hardware, such as braided aircraft cable, steel carabiners, and industrial nylon zip ties, verifying that ceiling anchor points are structurally sound. Beginners also often build tabletop garlands too wide and tall, crowding out glassware, dinner plates, and bread baskets while obstructing across-the-table conversation. Keep horizontal table runners under ten inches in total width and keep centerpieces below fourteen inches in height to maintain clear sightlines. Finally, avoid installing greenery directly against unshielded open flames, as air drafts can blow leaves into candle wicks, creating a significant fire hazard.
Practical Tips for Better Results
Achieving professional, editorial-quality greenery installations requires disciplined botanical selection, strategic moisture control, and refined finishing techniques. Always prioritize hardy, long-lasting foliage varieties such as Italian ruscus, silver dollar eucalyptus, salal, and bay laurel over delicate, soft-stemmed field greens that wilt quickly without a water source. Coat completed cut-foliage installations, such as arches, table runners, and suspended chandeliers, with a thorough misting of commercial anti-transpirant spray; this clear, non-toxic polymer locks moisture inside the leaves, significantly reducing dehydration under warm reception lighting. When constructing custom garlands, work on elevated folding tables rather than the floor to prevent hand fatigue, keeping your paddle wire under continuous tension to ensure stems do not slip out. Use battery-operated micro-LED fairy lights with warm-white color temperatures (2700 Kelvin) rather than cool-toned lights, ensuring the botanical leaves glow with a warm, inviting hue that flatters skin tones. If your event takes place in an outdoor summer venue, keep all finished arrangements in an air-conditioned room or cool shaded basement until two hours before guest arrival to minimize heat exposure. Finally, incorporate multiple foliage varieties with contrasting leaf scales, pairing broad, glossy leaves like salal with fine, feathery greens like plumosa fern to achieve dimensional visual depth.
Styling, Presentation, or Organization Ideas
Styling wedding reception greenery effectively depends on creating a seamless visual rhythm between tabletop decor, architectural room features, and the surrounding venue. Use sheer, raw-edge runners made from lightweight linen or gauzy cotton cheesecloth beneath dark greenery garlands to provide a high-contrast background that makes intricate leaf shapes pop. For round banquet tables, anchor circular greenery wreaths around low clusters of glass votives or wooden pedestal risers to establish a clear, intentional centerpiece footprint. Coordinate your paper stationery, such as menu cards, table numbers, and place cards, by tucking small botanical sprigs beneath natural twine ties or using wax seals embossed with leaf motifs. When styling large venues with high ceilings, draw the eye upward by suspending foliage chandeliers over the dance floor and wrapping venue structural columns in winding smilax vines. Maintain a unified color palette across all tables by pairing deep forest greens with warm ivory linens, matte black stoneware, or brushed brass flatware to produce an elevated, modern tablescape. Leave at least eight inches of clear space along table edges so dinnerware, wine glasses, and flatware do not crowd the central greenery runner, keeping the overall presentation neat, functional, and organized.
Budget or Time Planning
Creating your own wedding reception greenery decor delivers significant cost savings compared to traditional full-service floral design, while providing broad scheduling flexibility. While floral arrangements often require high-cost blooms, climate-controlled refrigerated transport, and high-stress morning-of assembly, greenery can be sourced in bulk from wholesale growers at a fraction of the price. Maximize your budget by purchasing foliage by the case rather than by individual bunches, prioritizing varieties with high stem volume like salal and silver dollar eucalyptus to cover large areas affordably. Establish a clear production timeline: order your bulk greenery three to four months in advance, scheduling delivery for Wednesday morning for a Saturday wedding to allow ample time for conditioning. Dedicate Thursday afternoon to stem trimming, hydration, and building hanging armatures or mossed hoops. Assemble table runners and garlands on Friday, storing the finished pieces in cool, dark rooms under damp bedsheets to keep them fresh. On Saturday morning, assign a dedicated two-person setup team to transport, place, and secure the finished installations at the venue, leaving ample time for final candle placement and lighting. This structured approach eliminates wedding-day panic, reduces last-minute labor fees, and guarantees that your reception space looks lush, polished, and beautifully organized.
Creative Expansion and Advanced Inspiration
Once you have mastered foundational greenery assembly techniques, you can explore sophisticated creative variations that elevate your botanical decor into immersive, artistic installations. Integrate subtle botanical scents throughout the reception space by weaving fresh culinary herbs, such as broad-leaf sage, aromatic rosemary, and sweet flowering mint, into table garlands and chandeliers. Experiment with dynamic overhead lighting by weaving ultra-fine, dimmable micro-LED wire strands through hanging smilax vines or suspending warm Edison filament bulbs through floating ladder trellises. For a contemporary, high-fashion statement, incorporate unexpected textural elements by lightly dusting the edges of magnolia leaves with matte copper floral spray or interspersing deep burgundy smokebush foliage among green eucalyptus stems. You can also explore living botanical favors by incorporating small potted ferns, succulent cuttings, or miniature herb pots into place settings, inviting guests to take home a piece of the wedding decor at the end of the evening. Crafters interested in architectural design can build freestanding verdant room dividers using wire mesh screens covered in broad monstera and palm fronds to define lounge areas or conceal venue service doors. These creative variations push the boundaries of standard event styling, transforming simple foliage into captivating, memorable art that leaves a lasting impression on every guest.