Tall wedding centerpieces represent one of the most transformative elements in modern event styling, commanding attention across high-end visual boards and reception spaces. This comprehensive tutorial guides couples, event planners, and DIY enthusiasts through constructing stable, elevated reception arrangements without the exorbitant costs associated with full-service floral design. A frequent challenge in reception room planning is balancing dramatic height with functional guest comfort; arrangements that sit directly at eye level often obstruct seated cross-table conversations and make banquet rooms feel crowded. Elevated centerpieces solve this dilemma by lifting heavy floral masses and decorative structures above thirty inches, creating an open line of sight across table linens while drawing the eye upward toward cathedral ceilings and architectural beams. Throughout this guide, you will learn practical construction techniques, structural mechanics, water source engineering, and floral distribution methods across various elevated vessel types. From slender metallic stands to organic branch installations, mastering these creative ideas enables you to transform standard banquet venues into immersive environments. Whether planning an intimate gathering or a large ballroom celebration, these actionable designs provide clear blueprints for stunning handmade table decor that balances structural safety with unforgettable design.
Why This Idea Is Trending or Useful
Elevated centerpieces have surged across contemporary wedding inspiration platforms because they maximize visual impact while addressing venue scale and functionality. Modern reception spaces, such as industrial lofts, glass greenhouses, and historic ballrooms, often possess vast vertical clearance that swallows compact, low-profile centerpieces. Tall structures fill this expansive vertical volume, turning vast dining rooms into warm, curated environments with layered visual texture. From a practical perspective, elevating the focal decor frees up substantial table surface area, leaving plenty of room for formal place settings, glassware, family-style platters, and ambient candlelight. For beginners taking on a DIY creative project, modern modular frames, fluted trumpet vases, and pre-welded pedestals eliminate the need for specialized construction trades or advanced engineering skills. This accessibility allows hosts to achieve a high-end aesthetic on realistic budget limits by blending hearty foliage with strategic focal blooms. The ability to assemble these structures in advance and transport them securely ensures that couples can execute grand wedding themes with confidence, creating memorable atmospheres that look striking in photography and enhance the dining experience for every guest.
Materials and Preparation
Constructing stable tall centerpieces requires careful selection of structural hardware, hydration mechanics, fresh botanical elements, and methodical workspace planning before purchasing botanicals. Essential hardware includes weighted riser stands, trumpet vases, clear acrylic columns, florists wire, heavy-duty cable ties, waterproof floral tape, floral foam bricks, and secured plastic designer dishes. The botanical palette should combine durable structural foliage—such as silver dollar eucalyptus, Italian ruscus, and salal—with sturdy focal blooms like standard roses, hydrangeas, lisianthus, and carnations that withstand room temperatures. Preparation begins by setting up a dedicated staging area equipped with folding tables, five-gallon hydration buckets, sharp floral shears, and drop cloths. Thorough planning also entails assessing venue layout variables, including banquet table dimensions, doorway clearances, and the proximity of heating or air conditioning vents that might dehydrate delicate petals. Conditioning your cut stems forty-eight hours in advance through angular recutting and treatment with commercial floral nutrient solution ensures rigid stem turgidity, preventing wilting during elevated display and allowing your arrangements to remain vibrant throughout the entire celebration.
Idea 1: Slender Matte Gold Column Floral Riser
Step-by-Step Guide
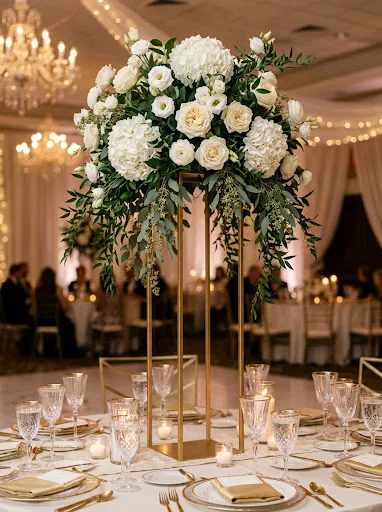
The slender matte gold column floral riser relies on an open four-sided rectangular pedestal to loft a lush, cascading floral arrangement above the dining space. This open-frame architecture prevents visual blockage, allowing seated guests to maintain clear eye contact through the thin metallic corner posts while a dense floral canopy rests securely above head height. The contrast between rigid geometric metal and organic, spilling botanicals creates a timeless balance suited for modern classic and black-tie ballroom weddings. Choosing a brushed brass or matte gold finish introduces understated warmth to the table without producing harsh glare under venue spotlights. The flat top plate of the riser acts as an anchor platform for floral foam bowls, keeping the mechanics hidden beneath draping greenery. This design delivers maximum vertical impact while using an easy project framework that simplifies setup and takedown.
To build this centerpiece, assemble a forty-inch open metal pedestal stand, tightening all corner hex screws firmly to ensure the frame does not wobble. Affix a deep plastic designer bowl to the top metal plate using waterproof floral clay or heavy-duty mounting tape. Secure a thoroughly soaked block of high-density floral foam inside the bowl using crisscrossed strips of half-inch green floral tape. Begin building the botanical foundation by inserting long stems of weeping Italian ruscus and spiral eucalyptus around the lower rim of the foam, angling them downward to drape along the metal legs. Next, establish height and width by inserting intermediate branches of lemon leaf horizontally and vertically. Populate the core of the arrangement with large white hydrangeas to provide dense volume and conceal the foam mechanics. Finally, distribute long-stemmed ivory roses and white lisianthus at varied outward depths, mist the arrangement with anti-transpirant finishing spray, and inspect all four sides for balanced visual coverage.
Idea 2: Dramatic Curly Willow Branch Tree
Execution Process
The dramatic curly willow branch tree creates a natural architectural canopy inspired by woodland forest settings, utilizing tall, twisting hardwood branches to achieve impressive height without the expense of massive floral stem counts. The natural curves of willow stems introduce organic movement and linear texture, catching soft uplighting and drawing attention toward venue ceilings. This structure works exceptionally well in rustic barns, vineyard estates, and tented outdoor pavilions where organic textures harmonize with surrounding landscapes. Because hardwood branches do not require water hydration once set, the installation remains remarkably stable throughout the day and can be constructed days before the wedding. Adding suspended glass orbs holding flickering tea lights creates an enchanting glow that filters downward across dining linens, establishing a cozy, romantic atmosphere as twilight arrives.
Begin by selecting an eight-inch wide, weighted ceramic or heavy composite cylinder vase that provides a solid, tip-resistant base. Prepare six to eight tall curly willow branch stems measuring between four and five feet in length, binding the thick bottom base stems tightly together using zip ties. Anchor the bound branch base into the bottom of the container using fast-setting floral plaster or dense floral gravel to give the vase sufficient counterweight against accidental table bumps. Once the branch structure is rigid, insert a dense collar of fresh salal and seeded eucalyptus around the vase opening to mask the foundational anchor mechanics. Using clear monofilament line, suspend six to eight round glass globes containing battery-operated LED tea lights from sturdy branch forks at varying heights, ensuring each knot is double-secured. Complete the arrangement by wiring small clusters of fresh white spray roses and dendrobium orchids along the lower branches for a delicate floral accent.
Idea 3: Elevated Crystal Candelabra with Floral Ring
How to Create
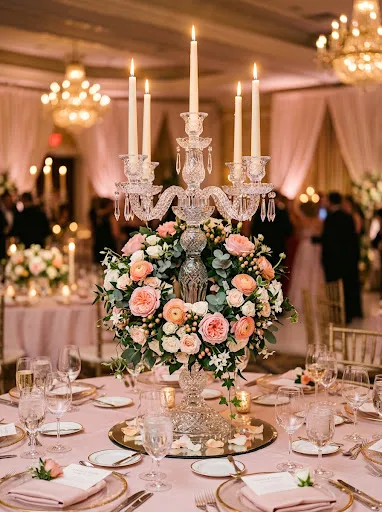
The elevated crystal candelabra with a floral ring merges Old World European elegance with modern floral engineering, pairing sparkling multifaceted glassware with lush, fragrant fresh blossoms. This design features a multi-arm glass candelabra measuring between thirty and thirty-six inches in height, crowned with tall taper candles that cast a warm, ambient glow across the table setting. A self-contained donut-shaped floral foam wreath rests securely around the central stem or upper candle branch junctions, allowing florals to cascade around the glass elements without obstructing the candlelight. The reflective surfaces of cut crystal bounce candlelight across table settings, producing an opulent aesthetic ideal for formal ballroom receptions. This method protects the delicate candle stems from excessive heat while ensuring that every flower stem has direct access to dedicated water reservoirs throughout the evening.
Select a sturdy, broad-based glass or crystal candelabra featuring five raised candle cups and a stable center post. Take a pre-formed eight-inch open-center floral foam wreath ring, submerge it fully in water until completely saturated, and blot the plastic bottom dry. Fit the wreath ring carefully over the upper center branch of the candelabra, securing it to the glass arms using clear cable ties trimmed flush at the back. Insert short, flexible sprigs of variegated pittosporum and silver dollar eucalyptus around the inner and outer circumferences of the foam ring to hide the green mechanics. Insert reflexed blush garden roses, ranunculus, and champagne carnations into the top and side planes of the foam ring, keeping stem lengths between three and five inches to maintain a compact, rounded halo. Finally, insert smokeless, dripless paraffin or LED wax tapers into the candle cups, ensuring each candle stands straight before lighting prior to guest arrival.
Idea 4: Clear Acrylic Column with Suspended Blooms
Setup Method
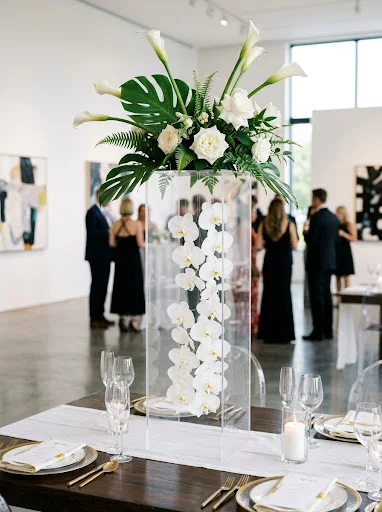
The clear acrylic column with suspended blooms offers an ultra-modern, floating aesthetic that suits contemporary art galleries, modern lofts, and minimalist urban venues. By utilizing a transparent four-sided Lucite pillar, the structural support virtually disappears under venue lighting, giving the illusion that the lush floral arrangement is floating mid-air above the dining table. This clean design highlights transparency and uncluttered lines, complementing sleek acrylic ghost chairs and modern monochrome paper goods. Inside the hollow column, crafters can leave the space empty for an open look, or string vertical lines of individual flower heads to add internal interest. The sturdy acrylic base provides excellent balance, while the flat top plate easily supports a wide foam dish packed with modern, graphic botanicals.
Unbox a clear forty-inch acrylic pedestal riser and clean all static dust and fingerprints from the exterior and interior surfaces using an anti-static microfiber cloth and plastic cleaner. If adding internal suspended blooms, suspend individual white carnations or orchids along three lines of clear fishing wire using small knots beneath each calyx, securing the top ends to the interior roof of the pillar with clear adhesive dots. Affix a low-profile white designer tray to the top surface of the column using double-sided mounting foam. Secure water-soaked floral foam within the tray, carving the top corners into a soft bevel to expand the insertion surface area. Build an architectural, low-profile dome using flat monstera leaves, folded aspidistra, and white calla lilies inserted at sharp, graphic angles. Finish the display by adding clusters of white reflexed standard roses and cascading amaranthus, ensuring no water drips down the outer acrylic walls during assembly.
Idea 5: Cascading Trumpet Vase Hydrangea Dome
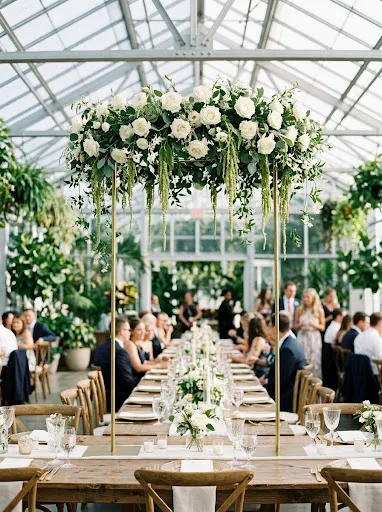
Step-by-Step Guide
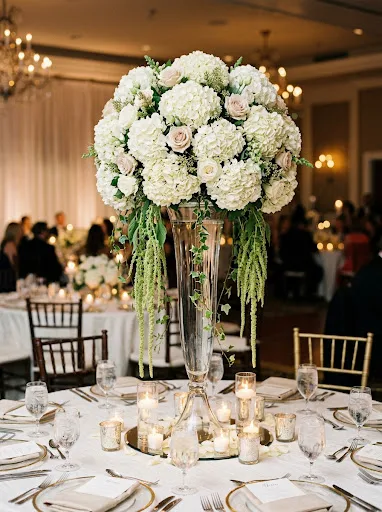
The cascading trumpet vase hydrangea dome provides an iconic, high-impact silhouette characterized by a slender fluted glass neck that flares into a wide upper mouth. This classic shape concentrates water in a vertical glass tube while supporting a large, rounded crown of blooms that spills outward and downward toward the table. Hydrangeas serve as the structural workhorse for this design, their voluminous heads creating an instant sphere of petals that easily supports secondary focal stems. Clear trumpet vases allow venue lighting to pass through the lower half of the tablescape, maintaining an airy feeling even in densely seated reception spaces. The addition of long trailing amaranthus, hanging pepperberry, or cascading orchids adds graceful vertical flow that links the high floral mass to the table runner below.
Source a thirty-two-inch clear glass trumpet vase with a heavy, solid glass foot that prevents tipping. Place an eight-inch plastic container securely into the flared mouth of the vase, lining the contact point with clear waterproof florist tape to lock the cup in place. Fill the inner container with pre-soaked floral foam, securing it with crossed strips of waterproof tape anchored to the container lip. Insert four to six large white or pale blue hydrangeas at thirty-degree angles around the rim and one directly upright in the center, forming a full spherical framework. Weave long trails of bleached or green hanging amaranthus between the lower hydrangeas, letting the tassels drape down the exterior glass neck. Fill the remaining spaces between the hydrangea petals with long-stemmed quicksand roses, white snapdragons, and touches of plumosa fern, checking that the arrangement appears balanced and symmetrical from every angle.
Idea 6: Industrial Edison Bulb and Flora Arch Riser
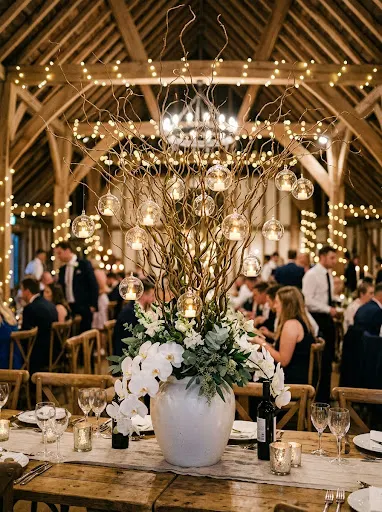
Execution Process
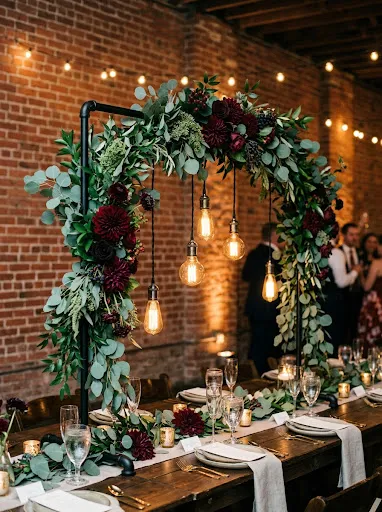
The industrial Edison bulb and floral arch riser blends vintage lighting with lush botanical textures, catering to industrial-chic and romantic warehouse wedding themes. This concept uses an overhead curved metal conduit arch that spans across a rectangular wooden banquet table, holding exposed filament Edison bulbs alongside trailing greenery. The warm, amber glow emitted by vintage bulbs creates a cozy, intimate canopy over the communal dining space, while the elevated arch keeps the table surface clear for place settings and shared platters. By combining rugged hardware elements with soft garden roses and feathery foliage, this design balances hard and soft textures. The overhead arch framing invites guests into an intimate setting, making cavernous venue spaces feel tailored and welcoming.
Assemble a matte black metal table-clamping arch frame, tightening the dual screw clamps securely to the opposite ends of a solid wood farm table. Wrap the upper horizontal crossbar with protective foam pipe insulation to create an anchor surface for floral attachments. Weave a commercial-grade, low-voltage vintage Edison light string along the top bar, securing the wiring every eight inches with black zip ties and letting bulbs dangle at varied lengths. Next, secure pre-soaked, cage-backed floral foam blocks along the top bar using heavy-duty zip ties pulled tight. Insert hardy greenery—such as silver dollar eucalyptus, Italian ruscus, and broad salal—deeply into the foam cages to fully conceal the insulation and wiring. Blend in clusters of mauve garden roses, burgundy dahlias, and spray carnations along the length of the arch, ensuring all blooms are hydrated and positioning foliage safely away from the warm glass of the vintage light bulbs.
Idea 7: Reclaimed Wood Beam Pedestal Arrangement
How to Create
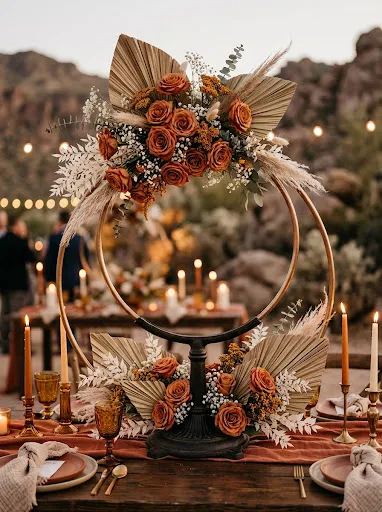
The reclaimed wood beam pedestal arrangement brings warm, organic farmhouse charm to elevated reception decor through weathered timber posts topped with garden-style florals. Rather than using sleek metal or polished glass, this centerpiece features an authentic square-cut salvaged timber column with natural wood grain, saw marks, and time-worn character. The solid wood structure grounds rustic barn weddings and outdoor tented receptions, complementing burlap, linen, or raw silk table runners. The top surface supports a loose, garden-style compote bowl filled with textured, asymmetrical flowers that feel freshly gathered from a countryside estate. This contrast between weathered wood and soft garden blooms adds rich tactile dimension, proving that rustic decor can be elevated and refined through thoughtful proportions.
Source a thirty-four-inch length of hollowed or solid reclaimed barn beam measuring six by six inches square, ensuring both ends are cut flat and level. Fasten an eight-inch square plywood plate to the bottom of the beam using countersunk wood screws, and attach felt pads underneath to protect table surfaces from scratches. Secure a green plastic design bowl to the top of the timber using two-inch pan-head screws driven through the inside center of the bowl into the wood. Place a soaked brick of floral foam inside the container, beveling the top edges with a knife, and secure it with floral tape. Build a loose garden silhouette by inserting trailing olive branches, jasmine vine, and seeded eucalyptus around the bowl rim. Add focal garden roses, open peonies, buttercup ranunculus, and delphinium stems at varied depths, creating a relaxed, organic shape that spills over the wooden beam below.
Idea 8: Double-Tiered Metallic Hoop Centerpiece
Setup Method
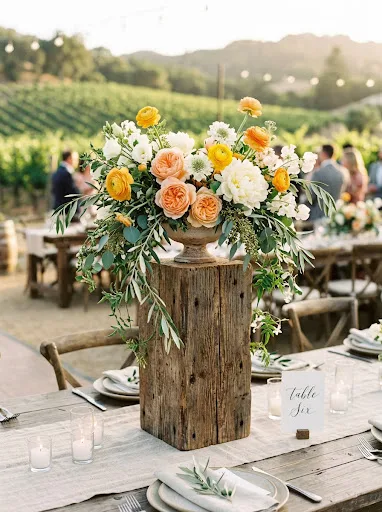
The double-tiered metallic hoop centerpiece features two intersecting circular rings attached to a weighted base, framing elevated florals within a striking modern silhouette. This design uses circular geometry to create visual interest from every angle around the table, contrasting with traditional rectangular and triangular floral shapes. The interior space of the metal rings frames the reception room, while the lower base and upper junction points hold clustered blooms. Metallic hoop designs fit modern boho weddings, desert celebrations, and contemporary loft events, pairing well with velvet linens and modern paper goods. The open circular design keeps the center of the table feeling light and airy, while providing plenty of anchor points for creative floral placements.
Assemble a thirty-six-inch dual metal hoop frame onto its heavy cast-iron base, ensuring all alignment nuts are tightened with a small wrench. Position a pre-soaked, plastic-backed floral foam cage at the top intersection of the hoops, locking it in place with four-inch zip ties around the metal tubing. Secure a second, smaller foam cage at the lower base to create a visually balanced double-tier design. Begin greening the upper cage with cascading asparagus fern, bunny tails, and preserved baby’s breath to establish an airy, textured halo. Insert focal terracotta garden roses, dried palm spears, bleached ruscus, and quicksand roses into the top cluster, angling them outward along the curve of the metal ring. Mirror this color palette in the lower base cage with shorter stems, keeping the central opening clear so guests can see through the circular frame across the table.
Idea 9: Sleek Elevated Flute with Ostrich Plumes
Step-by-Step Guide
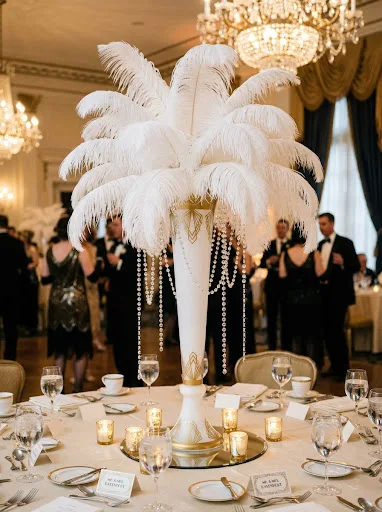
The sleek elevated flute with ostrich plumes captures the vintage glamour of the Art Deco era, trading traditional fresh flowers for luxurious, sweeping white feathers that sway gently with the room’s air currents. This design uses an elongated, slender glass flute vase rising into an explosion of full, soft ostrich feathers, creating instant drama that evokes 1920s supper clubs and upscale metropolitan celebrations. Because ostrich feathers are naturally lightweight, they do not require heavy water containers, making them easy to transport and quick to set up on wedding mornings. The soft movement of the feathers catches ambient lighting, adding delicate, dynamic texture to classic ballroom spaces. This approach provides an enduring design that remains pristine regardless of reception room temperatures, humidity, or long multi-day celebrations.
Select a thirty-inch white or clear glass flute vase with an extra-wide, weighted foot to ensure total balance on the table. Insert a specialized high-density dry floral foam bouquet holder or foam disc into the flared mouth of the vase, securing it firmly around the rim with clear anchor tape. Select twenty to twenty-five grade-A white or ivory ostrich wing plumes measuring between twenty-two and twenty-six inches in length. Begin inserting the thick quills into the lower tier of the foam holder at a downward forty-five-degree angle, working around the perimeter to create a soft, cascading base layer. Insert the next tier of plumes at a thirty-degree angle, overlapping the feathers to conceal the inner foam mechanics. Finish by inserting the straightest plumes vertically into the top of the foam, creating a rounded, fountain-like dome. Add hanging crystal strands or a subtle collar of battery-operated fairy lights around the vase neck for an extra touch of sparkle.
Idea 10: Suspended Botanical Ring on Slender Supports
Execution Process
The suspended botanical ring on slender supports utilizes a circular wreath suspended horizontally on twin slim metal poles, creating an elevated halo of greenery that floats over the center of the table. Unlike traditional spherical centerpieces that rest on a single point, this horizontal ring distributes flowers across a wide horizontal plane, providing balanced visual coverage down the length of long banquet tables. Seated guests enjoy completely unobstructed views through the slender twin uprights, while looking up into a lush canopy of foliage and dangling flowers. This design complements modern greenhouse weddings, romantic garden ceremonies, and minimalist industrial spaces where architectural lines meet natural elements. The suspended halo can also frame dangling votive globes or hanging blossoms, adding delicate movement to the dining space.
Assemble a custom centerpiece stand featuring a heavy rectangular steel base plate and two vertical metal rods rising forty inches, topped with a flat circular support ring. Take an eighteen-inch open floral foam ring, soak it in water treated with floral preservative, and secure it horizontally onto the upper metal ring using green cable ties spaced every four inches. Begin covering the underside and edges of the ring with broad salal, gunnii eucalyptus, and leatherleaf fern to conceal the plastic mechanics from guests seated below. Insert cascading stems of white dendrobium orchids, hanging amaranthus, and trailing jasmine vine along the inner and outer circumferences so they drape down toward the table. Fill the upper surface of the ring with white garden roses, pale carnations, and lisianthus to create a lush, full botanical wreath. Inspect the structure from a seated perspective to confirm that all foam and mechanics are hidden from below.
Common Beginner Mistakes and How to Avoid Them
A frequent mistake beginners make when creating elevated centerpieces is failing to account for structural ballast, resulting in top-heavy arrangements that risk tipping when tables are bumped. Elevated arrangements carry significant physical leverage; therefore, the base must always be sufficiently weighted to anchor the height and water-saturated foam above. Prevent tipping by using heavy cast-iron bases, pouring fast-setting plaster into hollow containers, or securing vessels to tables using clear museum putty. Another common error is inserting floral foam without adequate structural support or tape, causing wet foam bricks to crumble and collapse under the weight of thick woody stems. Always use plastic-backed designer dishes and secure your foam with high-tensile waterproof floral tape wrapped in complete revolutions around the container. Beginners also tend to place arrangements right at seated eye level, which frustrates guests by blocking conversations across the table. Keep your elevated designs either below fourteen inches or above thirty inches from the table surface to maintain clear sightlines. Finally, never transport tall centerpieces fully assembled; build the floral elements in modular, detachable bowls that can be quickly mounted onto the tall stands once you arrive at the venue.
Practical Tips for Better Results
To achieve clean, professional-looking results with tall DIY centerpieces, mastering hydration techniques and structural floral layering will elevate your finished arrangements. When working with floral foam, allow the bricks to float freely in a deep tub of water and sink naturally; forcing them down traps dry air pockets inside the foam that will dehydrate flower stems later. Cut every flower stem at a sharp forty-five-degree angle using clean, sharp floral shears rather than household scissors, which crush delicate water capillaries and impede hydration. When inserting stems into elevated foam, push each stem at least two inches deep to ensure it stays anchored against gravity and temperature shifts. Use high-volume, cost-effective flowers like standard hydrangeas, carnations, and football mums as your structural base; their broad heads fill space efficiently, allowing you to use fewer expensive focal blooms like garden roses and orchids. Always finish your completed arrangements with a thorough coating of commercial anti-transpirant spray over the petals and foliage; this locks in internal moisture, protects against dry venue air conditioning, and keeps your centerpieces looking fresh from the morning setup through the last dance of the evening.
Styling, Presentation, or Organization Ideas
Presenting your tall centerpieces thoughtfully across the reception room enhances the overall dining atmosphere and ties your wedding theme together. To create dynamic visual rhythm across large spaces, alternate table designs by placing tall elevated arrangements on half the tables and lower, compote-style bowls on the remaining tables; this alternating pattern adds depth to the room and keeps the space from feeling overwhelmed by too much height. Surround the base of each tall stand with low-profile decor, such as groupings of ribbed glass votives, pillar candles in glass hurricane cylinders, and delicate loose greenery trails that echo the botanicals in the canopy above. When styling long rectangular banquet tables, use two or three slender column risers spaced evenly down the table center, connected by a flowing chiffon runner and delicate taper candles. Coordinate the metal finish of your floral risers with your place settings—matching brass stands with gold-rimmed chargers and flatware, or pairing clear acrylic columns with modern silver accents. At the end of the evening, have small floral transport boxes and shears ready so guests can easily take home the detachable floral bowls as favors without needing the tall rental hardware.
Budget or Time Planning
Creating tall wedding centerpieces on a practical budget requires strategic planning, bulk floral purchasing, and disciplined time management across the wedding week. Renting or purchasing modular metal stands and acrylic risers in bulk online is significantly cheaper than buying them through full-service florists, and the hardware can be resold on wedding marketplace groups after the event to recover most of your investment. Allocate roughly sixty percent of your floral budget to hearty, inexpensive greenery varieties like salal, ruscus, and eucalyptus, which provide substantial volume and allow you to buy fewer expensive focal flowers. Organize your workflow systematically across the week: receive and hydrate bulk flowers three days before the wedding, assemble dry branch and hardware structures two days prior, and insert fresh flowers into the soaked foam dishes the day before the event. Store completed floral bowls in a cool, dark room or air-conditioned space away from direct sunlight and ripening fruit. On the morning of the wedding, delegate the setup to a trusted day-of coordinator or friend: transport the floral bowls flat in shallow plastic bins, set up the stands on the tables, and simply secure the finished arrangements onto the top plates with mounting tape in minutes.
Creative Expansion and Advanced Inspiration
Once you feel comfortable with foundational elevated floral mechanics, you can explore creative variations to tailor these designs to unique venue themes and seasons. For fall and winter weddings, weave rich seasonal textures into your tall arrangements, such as hanging burgundy amaranthus, dark berries, copper-tinted magnolia leaves, and dried pampas grass plumes that add warmth and tactile movement. You can also incorporate illuminated elements, such as winding battery-operated micro fairy lights through aerial foliage or suspending glass globes with LED tea lights from overhead branch structures to create a magical, glowing canopy. For modern minimalist aesthetics, design asymmetrical arrangements on your stands, clustering bold, graphic flowers like anthuriums, calla lilies, and monstera leaves on one side of a metal frame while leaving the rest of the structure open and architectural. If your venue features high ceilings and sturdy overhead beams, consider building hanging installations suspended directly from ceiling points using steel aircraft cables, creating floating floral clouds that free up table surfaces entirely. These advanced techniques expand your styling capabilities, allowing you to transform basic reception venues into immersive, tailored environments that showcase your personal design vision.